[Step-by-Step] How to Overlay Images in Photoshop
You'd have known that in the photography term, overlays are a texture or image that is added to the photos through an editing application. Photoshop remains one of the most efficient ways to learn how to overlay images in Photoshop effortlessly.
If you're a photographer you'd like to use the overlays to add the texture and multiple other things to the photos. This implies that adding the extra layer to the images while editing the photos has become simple.
Dig into this guide to opt for the Photoshop overlay images.
Part 1. How to Overlay Images in Photoshop?
Before learning how to overlay an image in Photoshop, you'll need to understand one thing: using Adobe Photoshop could be difficult for newcomers. With Photoshop, one thing is certain, which is that it doesn't affect the quality of the images, so if you've got the prior knowledge of using Adobe Photoshop, you can aim for this beautiful tool.
Here's the step by step guide to know how to overlay an image in Photoshop.
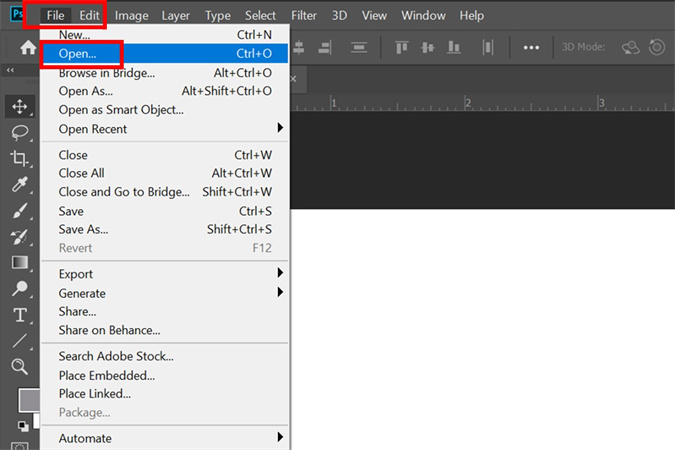
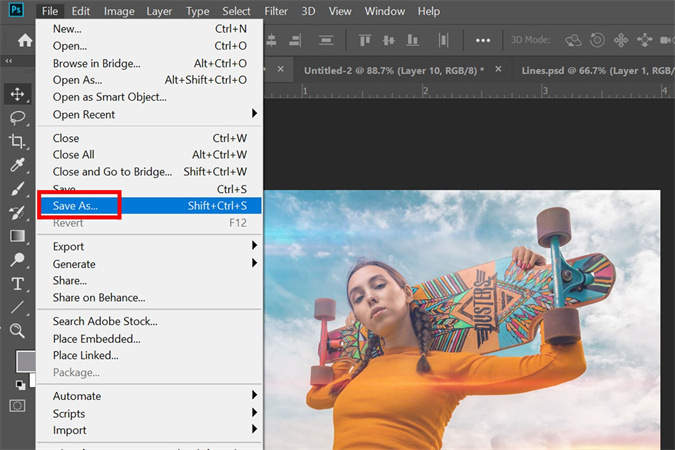
Step 1.To start with, you'll need to install Adobe Photoshop on the computer and start the software afterward. To launch the image you'd like to overlay, you'll need to press the File button before hitting the ''Open'' icon.

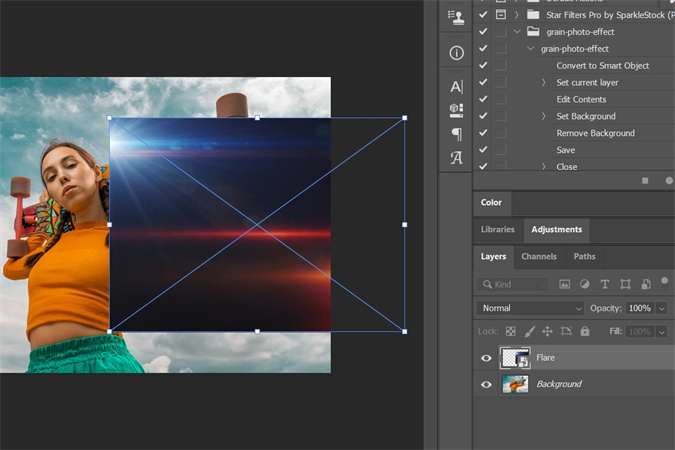
Step 2.In this phase, you'll need to open the second photo, and one of the easiest ways to put the things in order is to push the second image from the folder on the top of the base image.

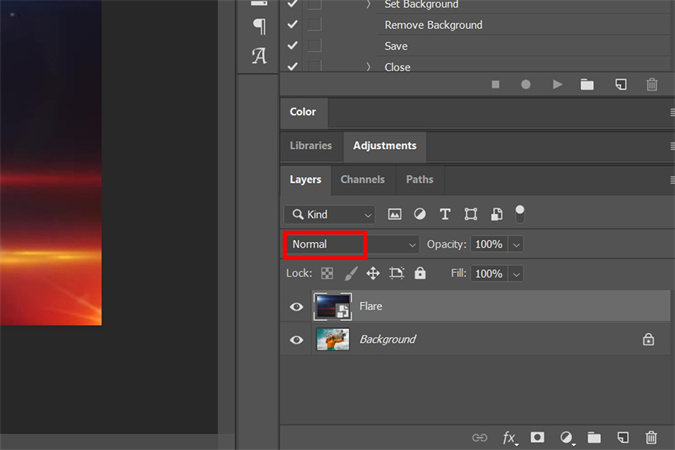
Step 3.Press on the Blending Mode from the drop-down menu. Before choosing the Blending Mode, you must customize the placement or size to fit the base image. Select the Blending Mode that works for the image. You can use the Screen mode for this purpose.

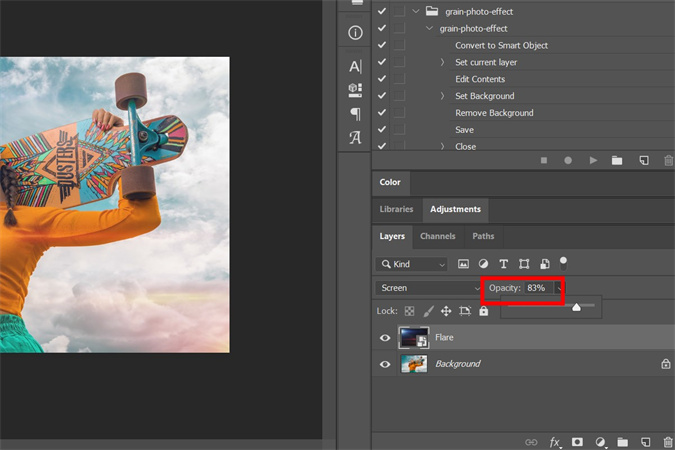
Step 4.Select the Opacity of the second image in the upper right corner of the layers panel shown on the photo below. You can achieve the desired look by adjusting the slider appropriately.

Step 5.Merge the base image and the second photos and right press on the layer of the second image before hitting the Merge Down button. If you aren't satisfied with the outcome of this process, you can perform the same operations again to get the desired results. Adobe Photoshop also enables you to perform editing operations from scratch to get what you've been searching for.
Once you've reviewed the outcome of the images and are satisfied with the overlaying of the images, you can finally download the photos to the computer. To do it, you'll need to press the File button before hitting the Save icon.
Adobe Photoshop can take time, depending on the internet, to download and edit the images. Still, you won't see Adobe Photoshop messing up with the quality of the images in this process.
Part 2. How to Change Photo Background with HitPaw FotorPea
After going for the Photoshop overlay images, if you're searching for the user-friendly tool to change the image background, HitPaw FotorPea could come in handy. With a simple user interface and AI power technology, HitPaw FotorPea automatically lets you rip apart the previous photo background.
Apart from allowing you to eliminate the photo background, HitPaw FotorPea also allows you to add substantial background colors, and the ability to enhance the photo quality is surely icing on the cake.
Features- Lets you change the background of the overlaid images
- Doesn't mess up with the image quality
- It allows you to eliminate the noise and blur from the images
- Upscale and enlarge the photos without quality loss
- Doesn't put the watermark on the images
- Available for Mac and Windows and Mac
- Lets you to produce multiple images simultaneously
Here's the detailed guide below to help you learn how to change the photo background through HitPaw FotorPea.
Step 1.
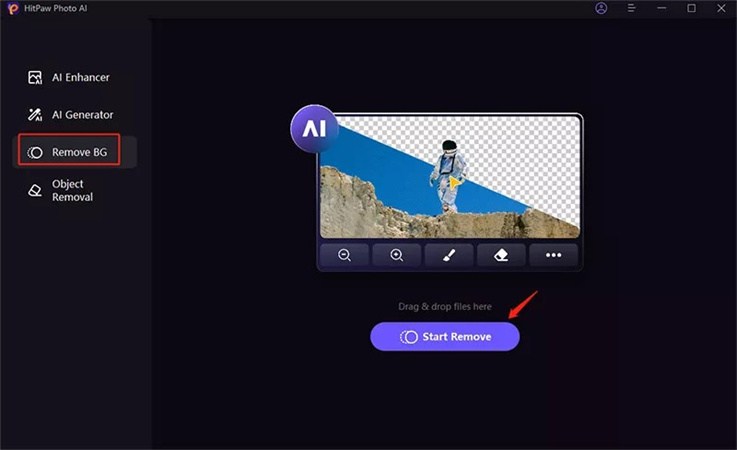
Visit the official webpage of the HitPaw FotorPea and install the software afterwards. Start the program and click on the Remove BG button. Next, you'll need to import the photo you'd like to customize the photo's background.
Step 2.
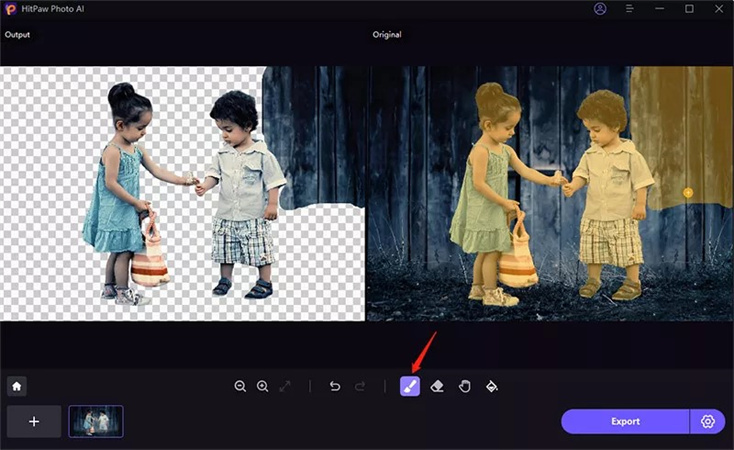
Once you've imported the image into the interface of the HitPaw FotorPea, this tool recognizes the image automatically. Now, you can see two images, with one image having its background removed and the other photo with the original background image.
Step 3.
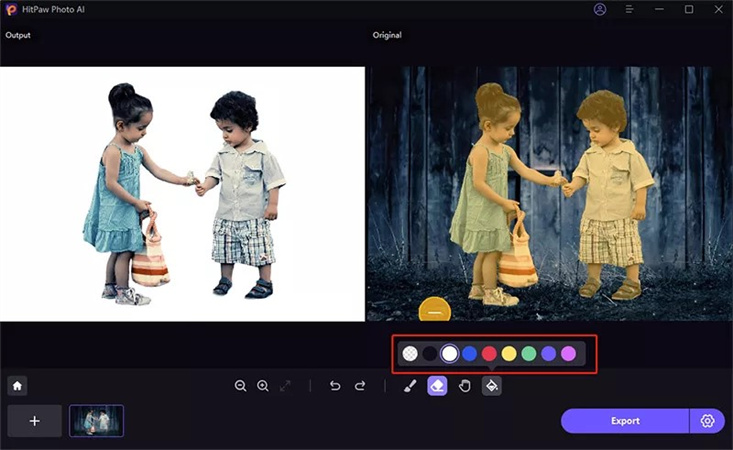
You can select the part of the image you'd like to keep by using the brush and selecting your brush size.
Step 4.
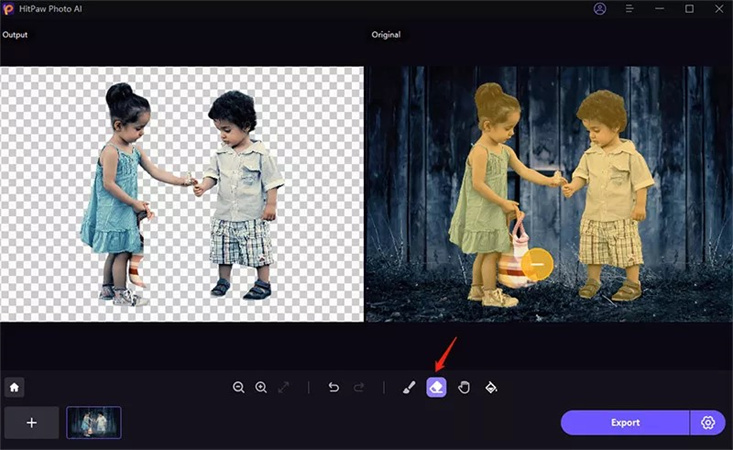
Opting for the Erase brush is an appropriate way to choose the part of the photo you'd like to rip apart from thereon.
Step 5.
After ripping apart the photo background, you can add unique colors to the images.
Step 6.
Click on the Preview button to assess the changes made to the photos. Once you're happy with the overall results of the images, you'll need to press the Export button to get the photo downloaded on the computer.
Tips: Steps to enhance images
Step 1.
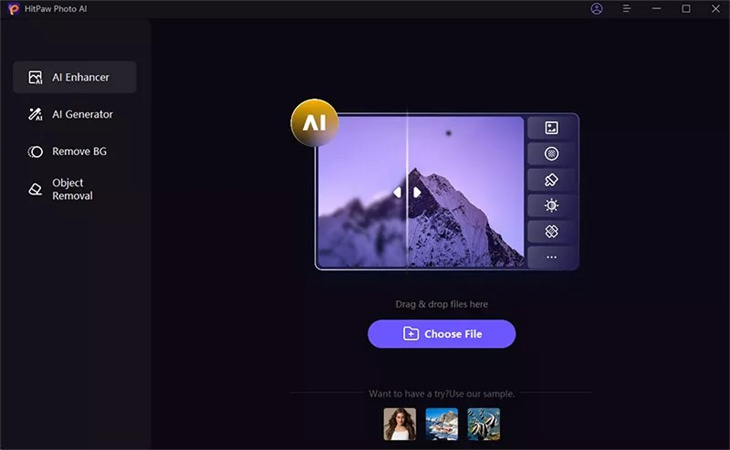
Start the HitPaw FotorPea on the PC and click the AI Enhancer button afterwards. Tap the Choose Files button to import the photo you'd like to improve the quality.
Step 2.
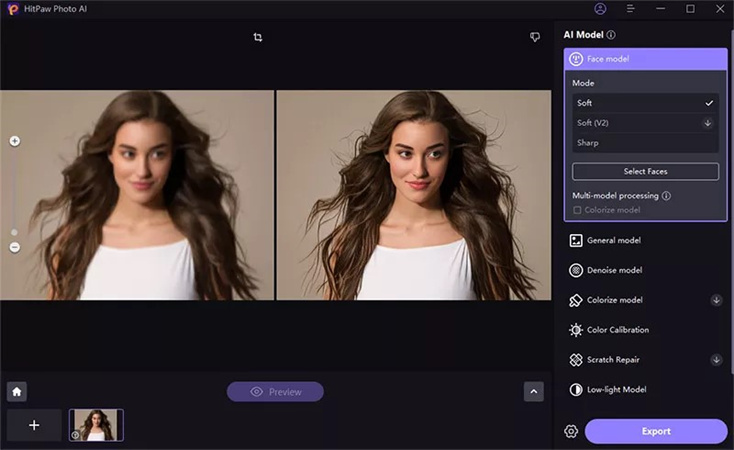
HitPaw FotorPea empowers you to select from the 7 outstanding AI models, including the Face Model, Denoise model, General model, color calibration model, low light model, scratch model, etc.
Step 3.
After applying the preferred AI model, you'll need to tap on the Preview button to review the changes. Click on the Export button to download the enhanced image on the computer.
Part 3. FAQs of Photoshop Overlay Images
Q1. What is it called when you combine two pictures into one?
A1. When you make a composite photograph by gluing, cutting, overlapping, and rearranging two or more images into a new photo, it is called a Photomontage. Sometimes, the resulting composite photo you photographed appears in such a way that indicates that the final image appears as a seamless physical print.
Q2. How do you blend backgrounds in Photoshop?
A2. If you intend to blend 2 images in Photoshop, you don't need to put in extra effort to get the job done. To do it, you'll need to start the images in Adobe Photoshop before adding the layer mark to the top of the image. Select the Gradient tool with the black to white gradient before dragging the gradient tool where you'd like to mix the images.
In Summary
This post reveals the step-by-step guide to learning how to overlay images in Photoshop. Using Adobe Photoshop to overlay the images has a lot of benefits, as it doesn't mess up the quality of images while performing several editing operations on the images.
Apart from allowing you to go for the Photoshop overlay images, we've also listed the HitPaw FotorPea as the most recommended way to change photo background. This way you can apply the mesmerizing colors to the images and apart from customizing the image background, HitPaw FotorPea also enables you to enhance the photos quality offering the 7 outstanding AI models.







 HitPaw Edimakor
 HitPaw Watermark Remover
  HitPaw VikPea (Video Enhancer)


Share this article:
Select the product rating:
Joshua Hill
Editor-in-Chief
I have been working as a freelancer for more than five years. It always impresses me when I find new things and the latest knowledge. I think life is boundless but I know no bounds.
View all ArticlesLeave a Comment
Create your review for HitPaw articles