[Step-by-step] How to Feather Edges in GIMP
While softening the edges of the images, you'll need to look for software that doesn't tinker with the quality of the images. Unfortunately, various tools present in the market don't provide you with the quality you must have been looking for while feathering the edges.
Fortunately, you've got the luxury of using the GIMP to soften the edges of the images and make them look exciting. If you want to know more about feather edges GIMP, creep into this step by step guide to learn how to feather edges in GIMP.
Part 1. How to Feather Edges in GIMP
GIMP is easily one of the best photo editing tools, and opting for the GIMP feather edges is simpler than you think. Besides offering a simple user interface, GIMP ensures that the image's original resolution isn't lost.
Although GIMP could take extra time while performing the photo editing operations, looking at the GIMP feather edges is still worthwhile.
Here's the step by step to use the GIMP feather edges of the layer.
Step 1
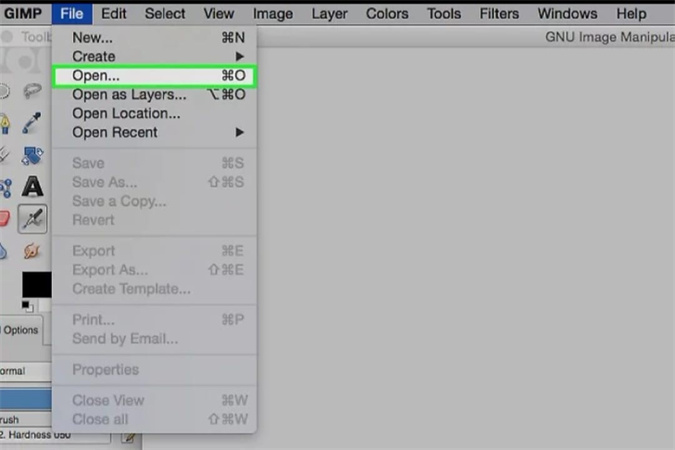
To begin with, you'll need to visit the official website of the GIMP and download the software from there. After installing the software, you must press the File button and hit the Open icon to upload the photo you want to feather. After importing the photo into the timeline of the GIMP, you can then proceed ahead.

Step 2
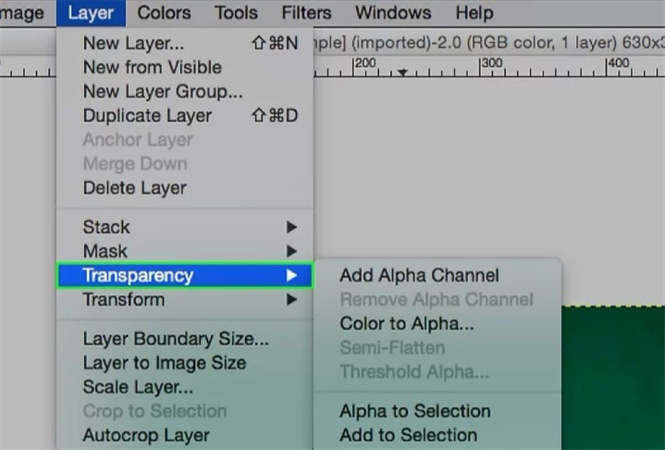
Click on the Layer button and select the Transparency button. Next, you must select the ''Add Alpha Channel'' to begin the proceedings. You can add the alpha channels to make the images look transparent.

Step 3
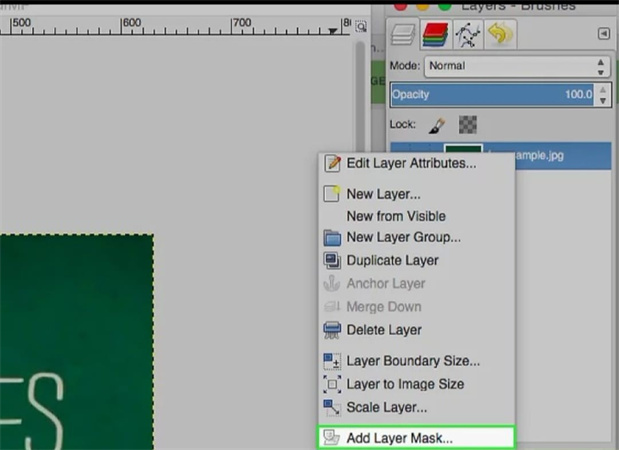
After visiting the layers toolbox, you'll need to click on the image after hovering over the photo. Next, you'll need to press the ''Add Layer Mask'' button. Now, you can add the layer mask, and in this situation, you'll need to ensure that the white opacity has been selected.

Step 4
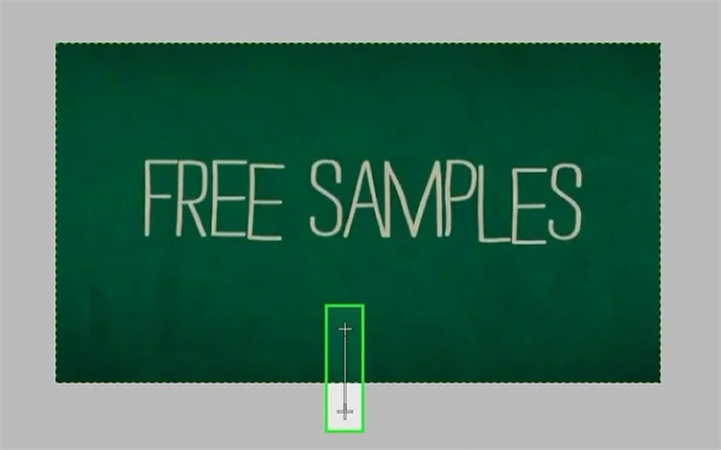
To feather the edge, you must choose the ''Blend Tool'' after visiting the toolbox. Next, you'll need to select the area from which you'd like to remove the edges. If you don't like the initial changes and would love to undo all the operations, you'll need to press the ''Ctrl+z'' icon to get the job done.
The feather of edges operation you've performed will accompany the page's length. Press and hold the Ctrl button to automatically make the line stick to selected angles, making a brilliant horizontal and vertical line.

Step 5
Click the File button and choose Export to save the edited file in the folder you'd love to keep it in. This way, you'll be able to feather edges GIMP to soften the image's edges, making it look worth watching and mesmerizing.

Part 2. The Best Alternative to Enhance Photos with HitPaw FotorPea
Looking at the feather edges GIMP is fine, but if you intend to make the photos look extraordinary, you must aim at the HitPaw FotorPea.
It is a commendable photo quality enhancer that allows you to explore the 6 AI models to take the quality of the images to the next.
While editing the parameters of the images, HitPaw FotorPea doesn't compromise the quality of the images, and importing the photos in various image formats is possible.
Features- It allows you to upscale the image resolution automatically.
- You can make the images look less blurry.
- Allows you to eliminate the noise from the images
- It doesn't cause image quality loss.
- You can upscale and enlarge images automatically.
- Perfect image quality enhancer for both Mac and Windows
- HitPaw FotorPea enables you to colorize the black and white images in no time.
- It allows you to upscale the images to 4K or 8K.
- It allows you to restore the old images, making them look flawless.
- HitPaw FotorPea enables you to resize the images, making them stunningly.
- You can process multiple images simultaneously as HitPaw FotorPea supports batch processing.
Here's the step by step guide to learn how to enhance the image quality through HitPaw FotorPea.
Step 1:Get straight into the HitPaw FotorPea's official web page and download the software afterward. Next, you'll need to start the program after installing it on the computer.
Click on the ''Choose Files'' button to upload the image you'd like to improve the quality. You can import various image formats, including TIFF, JPG, JPEG, PNG, etc. Since HitPaw FotorPea supports batch processing, you can import multiple images into the timeline of the HitPaw FotorPea.
Step 2:In this phase, you'll need to select the appropriate AI model as HitPaw FotorPea blesses you with 6 commendable AI models, including the color calibration, Colorize, Denoise, General, face, and Scratch Repair models. Regardless of whether you're struggling with old images or blurred images, selecting the appropriate AI model will assist you in fixing the shortcomings your image might be dealing with.

Step 3:Once the preferred AI model is applied to the HitPaw FotorPea, you must press the Preview button to review the changes. After ensuring that the quality of the images has improved impressively, you'll need to click on the Export button to download the images. This way, you can save the photos in the preferred location on the computer.

Part 3. FAQs of Gimp Feather Edges
Q1. How do I soften edges in gimp?
A1.
Using the feather edges in GIMP is effortless, as you'll only need to follow a couple of simple steps to soften edges in GIMP. You must start the GIMP program and upload the photo into its timeline. Next, you must add an alpha channel before adding a layer mask.
After performing these two operations, you can feather the edge by selecting the area you'd like to remove using the Blend tool. That's all you've had to learn how to soften edges in GIMP.
Q2. How do I feather one side of an image in gimp?
A2. Blend Tool will surely be handy if you want to feather one side of your photo in the GIMP. For instance, you'll only need to add an alpha channel and mask layer before selecting the Blend Tool. After using the Blend Tool, you can choose the one particular image you'd like to feather in GIMP. The blend tool is wonderful and doesn't take much time before highlighting the edges you want to eliminate.
Final Words
You can use the feather edges GIMP without prior knowledge courtesy of this inspirational guide. We have listed the detailed guide above to help you learn how to feather edges in GIMP.
The options we've listed in this guide could be hectic for newcomers; thus, looking at the HitPaw FotorPea to improve the image quality is more recommended.
It is a flawless image quality enhancer that empowers you to rely upon the 6 sensational AI models to make the photos look stunningly and memorable. The best thing about the HitPaw FotorPea is that it doesn't compromise the quality of the Images, making it one of the best photo quality enhancers.


 HitPaw VikPea (Video Enhancer)
 HitPaw Edimakor
Share this article:
Select the product rating:
Daniel Walker
Editor-in-Chief
This post was written by Editor Daniel Walker whose passion lies in bridging the gap between cutting-edge technology and everyday creativity. The content he created inspires audience to embrace digital tools confidently.
View all ArticlesLeave a Comment
Create your review for HitPaw articles