[Step-by-step] How to Smooth Edges in Photoshop
While cutting a fruit, person, or another object on your object, you'd have noticed the jagged edges. These edges aren't appropriate for the project and make the images look irrelevant and ugly. With the rough edges, your image will be unattractive and sloppy. Hence, you can look at the Photoshop smooth edges to make the edges smoother and relevant.
Dive into this post to learn how to smooth edges in Photoshop without spending much time.
Part 1. What is Smooth Edge?
Have you ever cut a fruit, animal, or person in a photo and pasted that subject into a different background? If yes, you'd have experienced the pixelated and jagged edges on the cutout, especially in the hair, feet, or hands' area.
Smoothing the edges will assist you in fixing the pixelated and jagged edges, making them look relevant and flawless. Smooth edges look relevant, and refining the edges can help you get the desired results.
Part 2. How to Smooth Edges in Photoshop?
The smooth edges in Photoshop feature will surely make the images look exciting and breathtaking. Adobe Photoshop is a brilliant photo editor with all the credentials to make irrelevant images look exciting and eye catching.
There are various ways to do smooth edges in Photoshop, and we will use ''The Select And Mask Workspace'' and '' the Channel'' methods to help you learn how to use smooth edges in Photoshop.
Smooth edges in Photoshop through ''The Select the Mask Workspace''
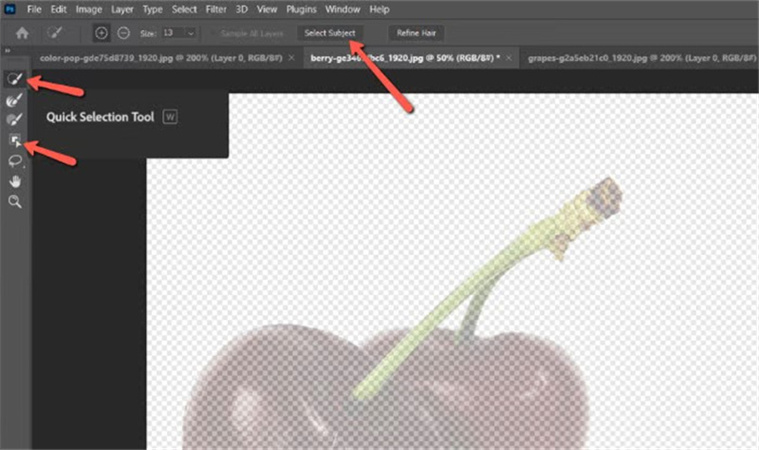
1.Install Adobe Photoshop and launch it afterward. Next, import the photo and tap the Select and Mask or Select Subject button in the Options bar. If you cannot use these two options, you must ensure you have the Lesso or Quick Selection tool active. Select subject allows you to make the selection automatically depending upon the best guess of Photoshop.
Opting for the Select and Mask means quickly taking you into the ''Select and Mask workspace''. The image disappears upon entering into the ''Select and Mask'' icon. You may see the solid color on the checkered transparency's top side. You can make the images appear by bringing down the transparency a tad.
2.In this phase, you'll need to choose the selection tools in your workspace. You can also talk on the Select Subject to make a selection.

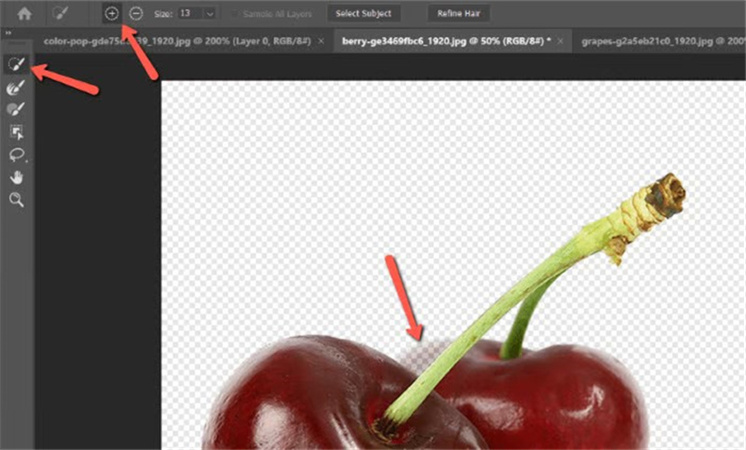
3.If the selection isn't made appropriately, you can make more adjustments with your selection tools. You can drag and click around the areas of the image you'd like to fix there.

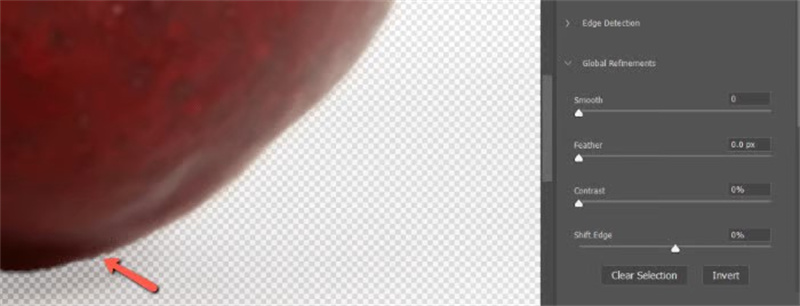
4.After zooming the selection, you can see the jagged edges out there. You can use the slider to smooth out these edges. You may consider changing the view on your screen's right side to make the selection's edges appear easily. We are selecting the black-and-white mode to see how it pans out.

5.Increase the smooth slider icon to up to 7, and you'll notice that edges start softening up a bit. You can also add the feathering in the black and white view, which will turn gray. After bringing up the contrast, you'll see everything moving towards black or white, creating a defined edge.


How to soften edges in Photoshop through Channel?
You can also use the Channel method of Adobe Photoshop to opt for the smooth edges Photoshop.
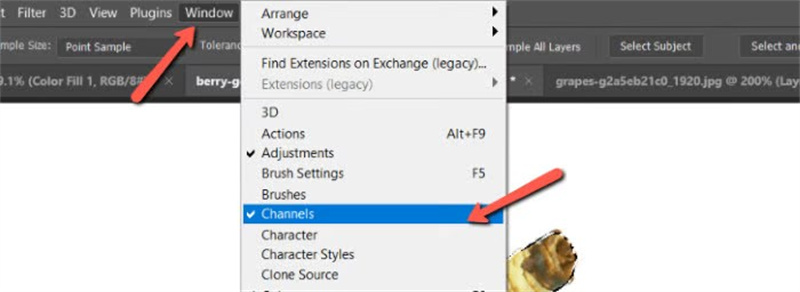
1.Select the Channels button on the Layers tab's right side.

2.If you can't see the Channels there, navigate to the Window icon before selecting the ''Channels'' button. A checkmark next to your word Channels gives a clue about the activation of the panel.

3.You can now mask off the selection by pressing the layer mask icon.

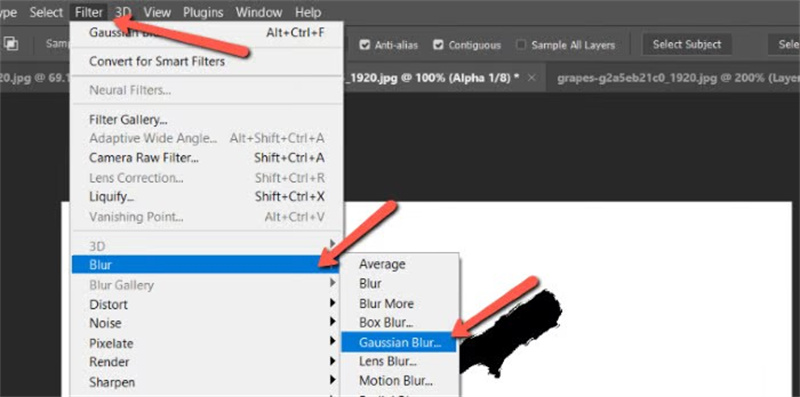
4.Click on the layer mask, which pops up, and then navigate to the Filter button. Select the Gaussian Blur after hovering over the Blur.

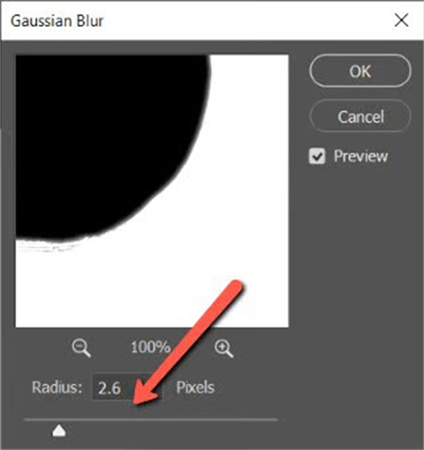
5.In this phase, you'll need to bring up the Radius Slider until the edges on the image get smothered along with the selection's edges. Tap on the ''OK'' button if you're satisfied with the results.

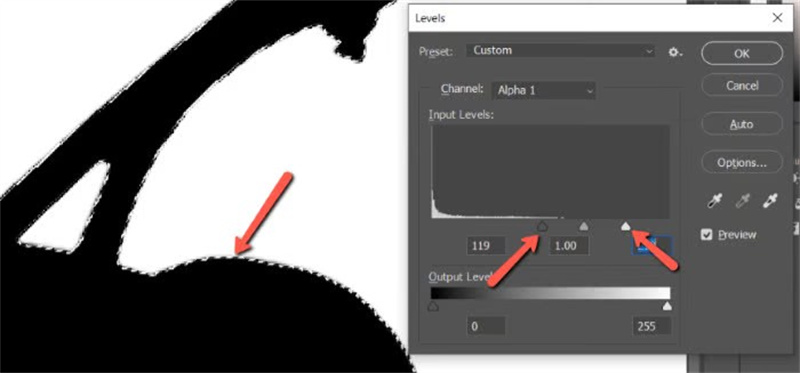
6.Open the levels by pressing the Ctrl+L or command+ K with the layer mask still being selected. You can now bring the sliders to the center side to increase the contrast in the photo. Tap on the OK button when you are happy with the changes.

Part 3. The Best Alternative to Enhance Photos with HitPaw FotorPea
HitPaw FotorPea could be the best alternative to any tool to enhance the quality of the images. With the 6 outstanding AI models and AI power features, HitPaw FotorPea allows you to upscale the images without sweat.
The best thing about the HitPaw FotorPea is that it performs all the photo editing operations automatically and doesn't compromise the quality of the images while enhancing their quality.
Features- Maintains the original quality of the photos
- Enlarge the images appropriately.
- Remove the Blur from the images.
- Allows you to upscale or enhance the images automatically
- Supports batch processing
- Colorize the black and white images
- Available for Mac and Windows
Here's how to upscale the image quality through HitPaw FotorPea
Step 1:Launch the HitPaw FotorPea after installing it, and then click on the Choose File button to upload the photo you'd like to upload.

Step 2:Select the preferred AI model you'd like to apply to the image, as you've got the 6 eye catching options to choose from.

Step 3:Click the Preview button and press the Export icon to download the images.

Part 4. FAQs of Photoshop Smooth Edges
Q1. How do you refine edges in Photoshop?
A1. Refining the edges in Adobe Photoshop is quite simple, as all you need to do is launch Adobe Photoshop and import the photo into the tool's timeline. Next, you'll need to choose the selection tool and select the area of the image you'd like to refine. Next, you'll need to access the Refine Tool settings to manage the edges that got refined.
Q2. What is the shortcut for smooth edges in Photoshop?
A2. If you don't want to spend extra time smoothing the edges in Adobe Photoshop and would love to go for the smooth edges Photoshop Shortcut, you can press the Ctrl+Alt+R on the Windows. If you're a Mac user, press the cmd+ Option+ R to begin smoothing the Adobe Photoshop edges.
Final Words
If you're struggling with the jagged or pixelated image's edges, looking at the smooth edge, Photoshop will assist you in eliminating all your issues. We have listed a couple of breathtaking methods in Adobe Photoshop that allow you to learn how to smooth edges in Photoshop.
However, using Adobe Photoshop could be difficult for newcomers, so opting for the HitPaw FotorPea is the most recommended way to upscale the image. Regardless of which type of issue your photo is struggling with, HitPaw FotorPea will dismantle every shortcoming.







 HitPaw Univd (Video Converter)
  HitPaw Watermark Remover
  HitPaw VikPea (Video Enhancer)
![[Step-by-step] Two Ways to Achieve Low Light Image Enhancement](https://images.hitpaw.com/topics/covers/low-light-image-enhancement-cover.jpg?w=347&h=450)

Share this article:
Select the product rating:
Daniel Walker
Editor-in-Chief
This post was written by Editor Daniel Walker whose passion lies in bridging the gap between cutting-edge technology and everyday creativity. The content he created inspires audience to embrace digital tools confidently.
View all ArticlesLeave a Comment
Create your review for HitPaw articles