5 Ways to Compress a Video on Mac to Reduce Size without Losing Quality
It’s a great experience to make and watch ultra-high definition (UHD) videos. They are, however, the most difficult to handle files because each UHD 4K movie demands a large amount of bandwidth to stream and a large amount of disc storage space. Because of their large file size, these videos are difficult to share on the web or transmit to mobile devices.
Video compression is required in such cases. To ensure that the quality of video files is not compromised, how to compress a video on Mac is a crucial subject that must be grasped and used appropriately. The procedure shrinks file sizes, allowing you to quickly share movies via email, upload them to the web, or transfer them to a PC, Mac, SD card, USB flash drive, iPhone, Android phone, or other devices.
Part 1. What Are the Factors That Affect A Video Size and Quality?
When you start watching a video, the first thing you notice is the quality of the video. People like to watch a video that is optimum in size and has amazing video quality. The size and quality of a video depending on various factors that are given below.
Duration of the Video
We may almost certainly assume that longer videos have greater file sizes. This is due to the fact that the video file contains more information.
Video Bitrate
The bitrate of a video file during playing is measured in bits per second. Bitrate control is an important aspect of compression since it controls how smoothly a video will stream. The better the quality, the higher the bitrate. As a result, lowering the bitrate reduces the file size of your films.
Video Codec
Compression relies on codecs for its heart and soul. The data that makes up the video is encoded and decoded using the video codec. In a nutshell, it compresses and decompresses video files so that they may be played properly. The bitrate of the video is determined by the video codec, which is a significant element in the file size of the video.
Frame Rate
A video is made of many images that are adjusted and played consecutively to make them a video. The number of frames played in one second is the frame rate of the video. Frame rate affects the quality of the video in some ways.
Video Resolution
In a video, the resolution is basically the pixel count of the video, which is directly proportional to the quality of a video. The higher the resolution of the video, the more are the pixels used and it will make better the quality of the video.
Part 2. The Lossless Way to Reduce Video Size on Mac
You can adjust video size with the help of a video converter software. HitPaw Video Converter for Mac lets users customize video quality, and adjust encoder, resolution, bitrate, etc. It is not only a video converter but a video compressor. It can smartly compress a video on Mac to a desired file size and quality level. Easy to use and supports batch compressing videos.
HitPaw Video Converter can also compress images. Batch compress image at the optimal quality. Import your photos in different formats and reduce the filesize easily.
Look at some features of HitPaw Video Converter for Mac:
- Compress video size on Mac without losing quality
- Can freely adjust video size as your need
- Compatible with latest macOS system
- Convert video/audio to and from 1000+ formats
- 120X faster conversion speed and lossless quality
- Download videos from streaming sites and custom the downloaded video/audio
Follow the given steps to learn how to reduce video size on Mac using HitPaw Video Converter for Mac.
Step 01 Open the HitPaw Video Converter on your Mac after installation, click on the ‘Toolbox’ to open 'Video/Image Compressor'.

Step 02 Add the videos that you want to compress and you can import videos in batch. You can also rename your video by hitting the pen icon.
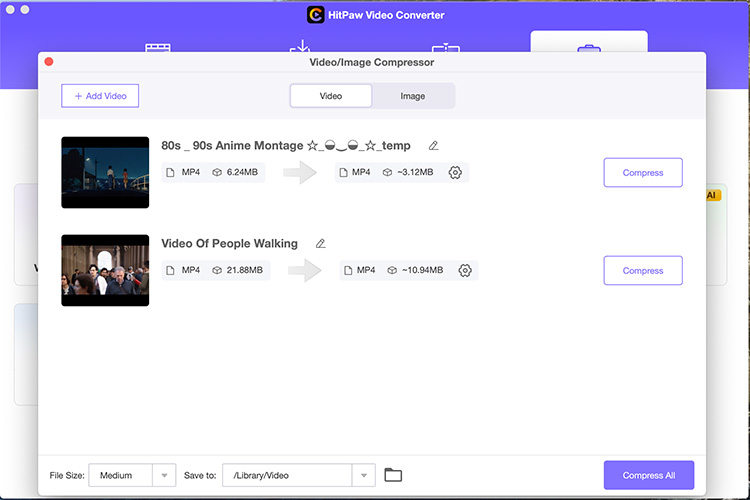
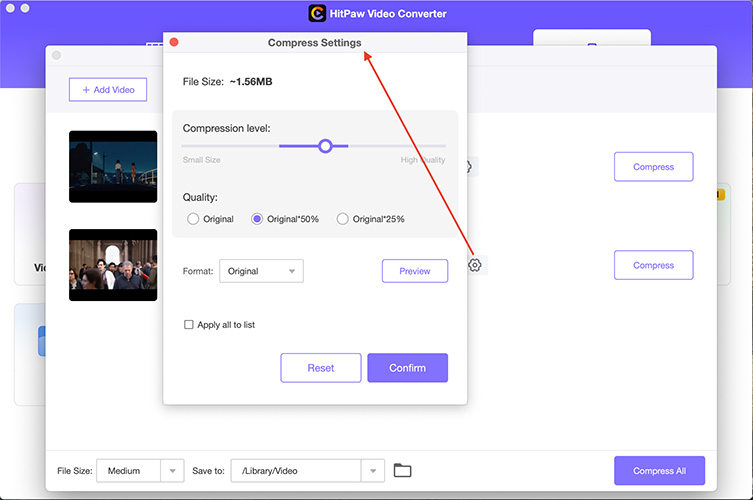
Step 03 You can select the quality and compression level for the video files by clickling on the gear icon. Next you can preview the effect. If you are satisfied with the effect then you need to save setting through hitting the "Comfirm".
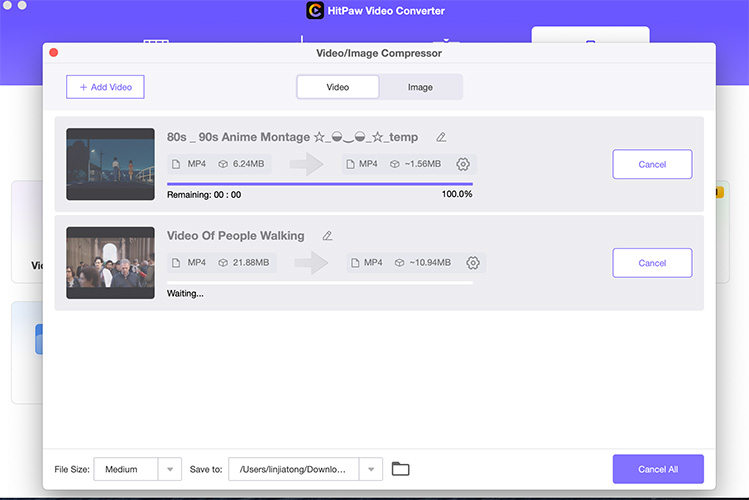
Step 04 Finally tap on the ''Compress'' icon to start compressing the video on Macyou've uploaded. HitPaw will not lose the quality of your videos.
Part 3. How to Compress Videos on Mac with iMovie
The iMovie program is one of the most widely used tools for compressing videos on Mac. It comes with macOS by default, but if you don’t have it, you may get it from the Mac App Store.
You can follow the steps below to learn how to compress a mov file on Mac.
-
1
On your Mac computer, open iMovie.
-
2
Now, on the next window thus opened, click on the ‘Create New’ and then on ‘Movie’.
-
3
From the menu tab, click on the File menu, and then on Import and choose the video file that you want to compress.
-
4
After selecting the video, it will appear on the main window, and now you have to drag that file to the timeline window.
-
5
Now Gain click on the ‘File’ menu, then on ‘Share’ and lastly on the ‘File’ option.
-
6
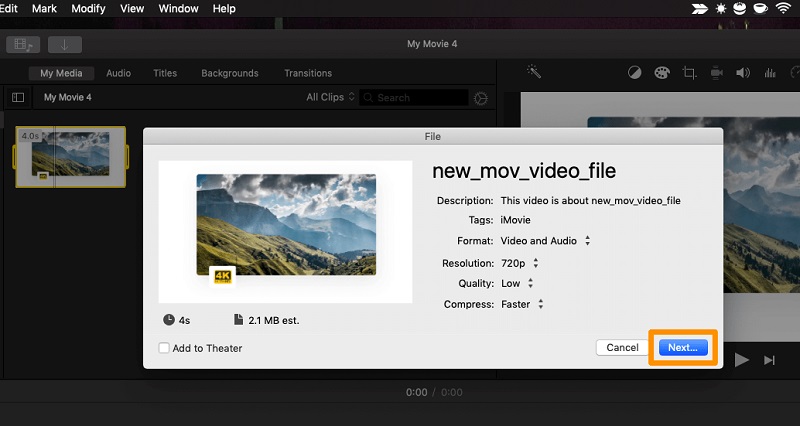
Click on the ‘Export Setting’ and adjust the resolution and quality will the size of the video file, you can also set the Compress Dropdown to ‘Faster’, and then hit the ‘Next’.
-

-
7
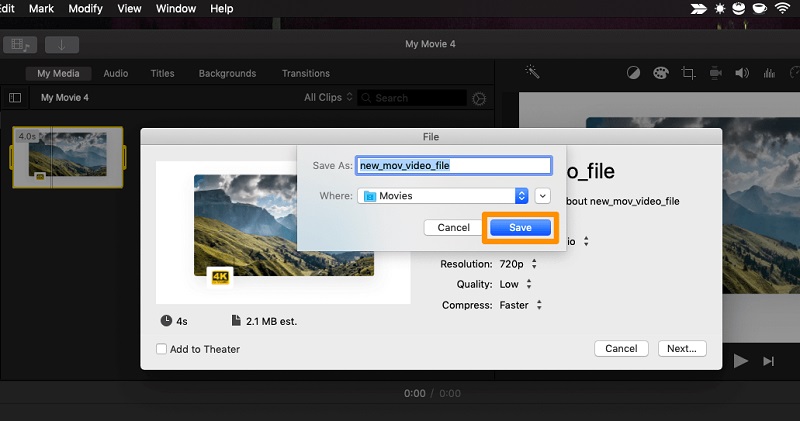
Give a preferred name to your video and select the destination location of the video. Then click on the ‘Save’ button.
-

Part 4. How to Make a Video File Smaller on Mac with QuickTime Player
QuickTime Player is a popular player on PC and Mac. Because QuickTime’s primary function is to playback videos, many people overlook the fact that it also has some great editing features. It can compress video on Mac easily and effortlessly.
You can follow the below-given steps to get to know how to reduce QuickTime file size.
-
1
Open QuickTime Video Player on your Mac.
-
2
Open the video that you need to compress, by clicking on the ‘File’ menu and then click on ‘Open File’.
-
3
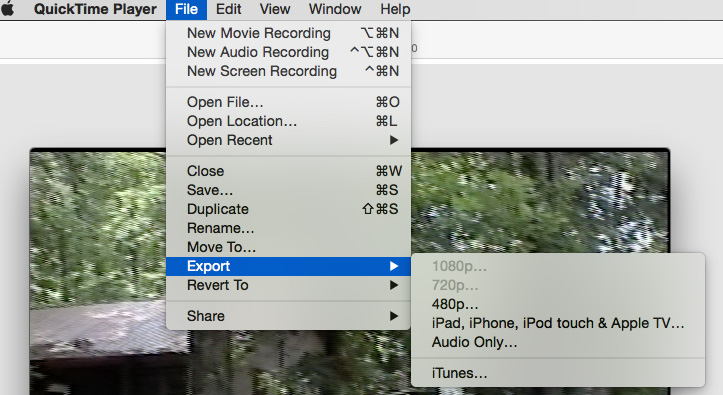
Now, on the next window, click on ‘File’ and then on ‘Export’.
-
4
From the list of multiple video resolutions, choose the lowest resolution for your video.
-
5
Now, you can name your video and give it a preferred location where you want to save it.
-

Part 5. How to Compress MOV File in Mac Finder
Mac Finder is a wonderful choice if you want a quick, uncomplicated, and straightforward way to compress your video files. This built-in Mac application is mostly used to access many Mac programs, but it can also perform a variety of other tasks, like video compression.
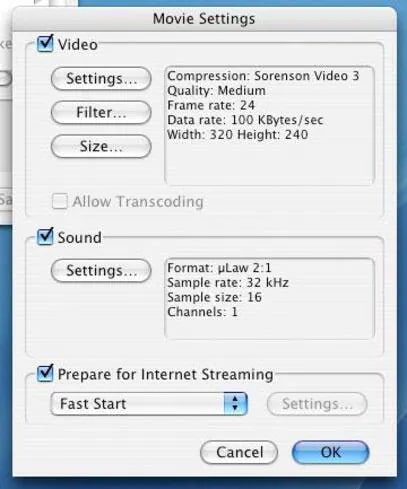
To reduce the video size, use Mac Finder to alter the bit rate, frame rate, resolution, codec, and quality. Mac Finder is a video compression technology that enables video personalization as well as other features. It's worth noting that only MOV files can be converted and compressed using Mac Finder.
The below given steps can help you with video compression on Mac using Mac Finder.
-
1
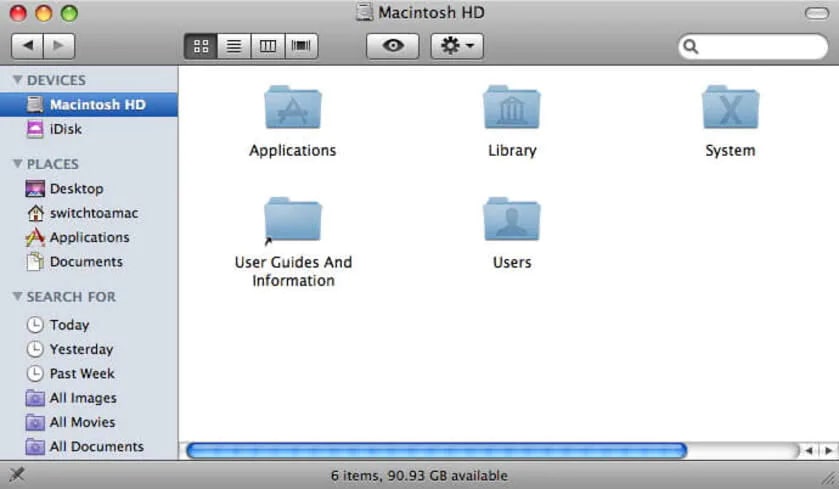
On your Mac computer, open the Mac Finder.
-
2
Now, you should select the files that you need to compress using Mac Finder.
-

-
3
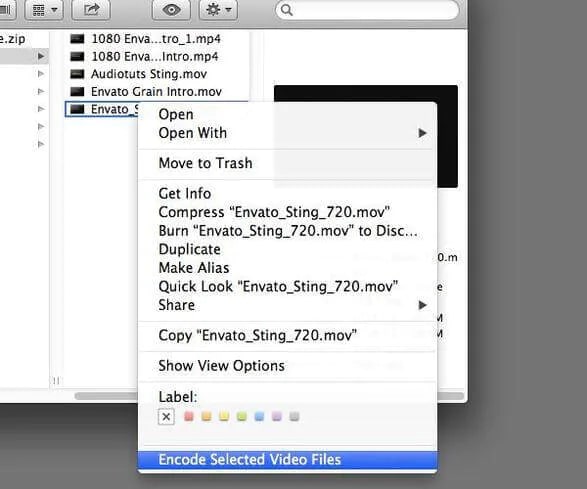
Open the menu option by tapping on the Control and clicking on the right side of the mouse at the same time. From the list thus opened, select ‘Encode selected video file’.
-

-
4
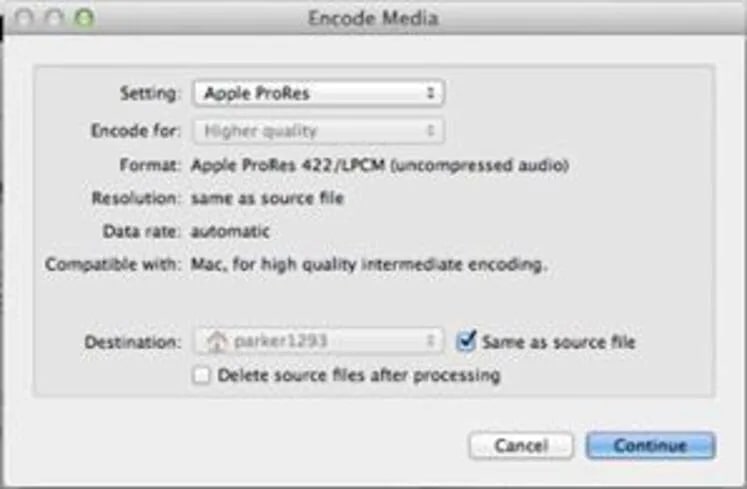
Here, you can change the output setting of the video that you need to compress. Once selected the options, you can click the ‘Continue’ button to start compressing the video.
-

-
5
At last, click on the ‘Ok’ button to start the process to compress a video file.
-

Part 6. Online Free Video Compressor for Mac
There are also online video compressors that are available for Mac users to compress your video to a reduced size without losing quality. Most of these tools serve the same purpose with easy operations and simple features.
HitPaw Online Video Compressor is one of those online video compressor tools that can make a video smaller on Mac, PC, iPhone or Android in a click. This free online video compressor supports to compress video within 20MB for free. To compress a video that is larger than 20MB, it is suggested to use the desktop version.
To compress a video size online, please visit the online video compressor, and click Choose File to upload your video.
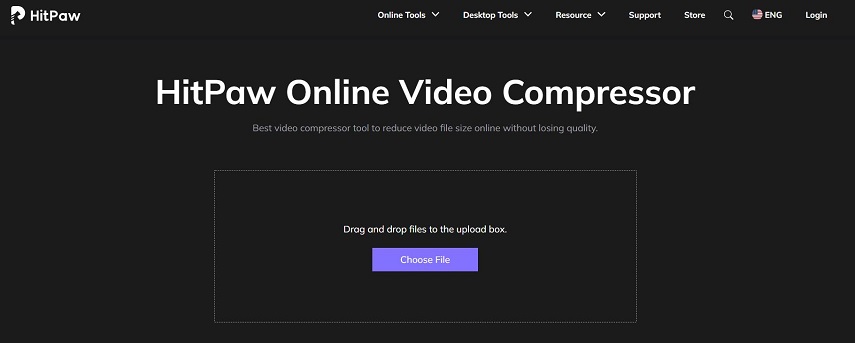
When the file is uploaded successfully, you can adjust the quality, frame rate and resolution for this video.
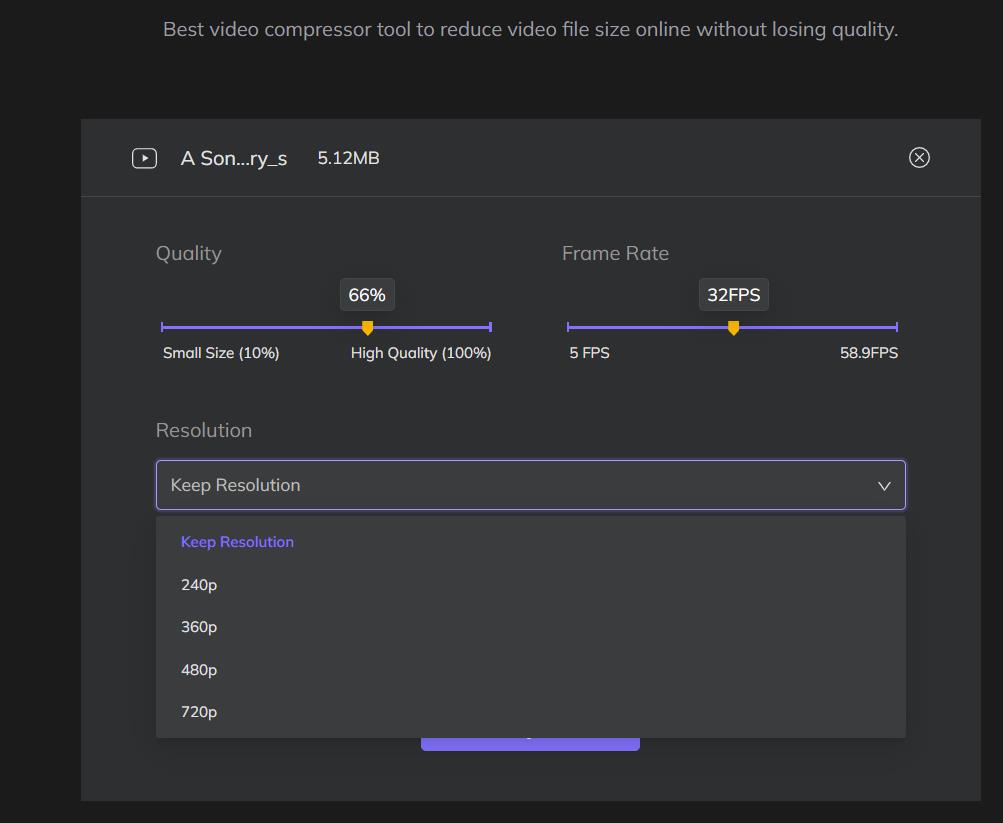
Click the Compress button to start compressing video files on Mac.
The Bottom Line
Here, in this article, we have discussed several ways on how to compress a video on Mac to reduce video size. The most quick and lossless choice is HitPaw. If you require higher quality and want to save time, I will recommend you to use professional video compressor software HitPaw Video Converter for Mac.



 HitPaw Video Converter
  HitPaw Screen Recorder

Share this article:
Select the product rating:
Joshua Hill
Editor-in-Chief
I have been working as a freelancer for more than five years. It always impresses me when I find new things and the latest knowledge. I think life is boundless but I know no bounds.
View all ArticlesLeave a Comment
Create your review for HitPaw articles