6 Ways on How to Record Audio on Mac (2024)
Recording audio on your computer has many benefits and purposes in practical life. From preserving memories to creating professional content, you can use this utility for many reasons. It helps you record lectures, voice messages, and important meetings to save them for future use. In this article, we will be exploring how to record audio on Mac using the right techniques.
Part 1. How to Record Audio on Mac Fast & Easy
Recording audio on your MacBook is easy with handy editing tools like HitPaw Edimakor. It stands as a versatile tool that lets you create and edit videos with precision. This tool provides a vast array of audio and video editing features which helps in creating exceptional content. Using this incredible tool, you can swiftly trim the audio as required and turn your audio file into subtitles using the Speech-to-Text feature.
Another amazing feature of this tool is its AI noise reduction, which can make your audio sound clean and crisp. Whether you want to record audio for a lecture or generate a voiceover for your video, use Edimakor's audio recorder for high-quality results.
With HitPaw Edimakor, you can conveniently record sound with professional-grade quality. Here are the steps on how to capture audio on a Mac:
Step 1. Access the HitPaw Tool and Create a Video
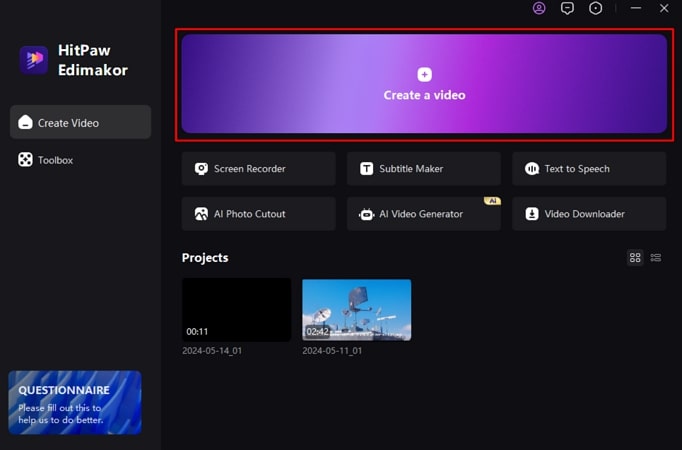
To start with the audio recording, launch the HitPaw Edimakor tool on your Mac and click on Create a video to proceed to the editing window.
Step 2. Start Your Audio Recording
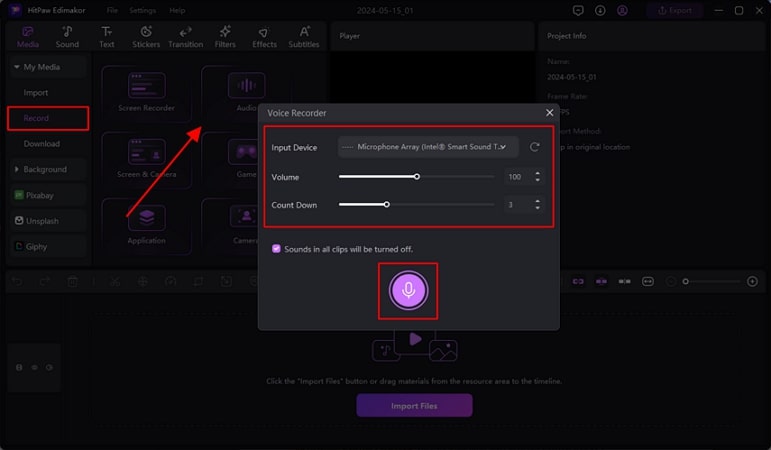
Head to the Record option available on the left panel below the Import section. Opt for Audio, which opens the Voice Recorder windows. Click on the Microphone to start the recording. You can adjust the Count Down and Volume by dragging the respective sliders. You can also choose the input devices if multiple microphones are attached to your MacBook.
Step 3. Stop and Edit Your Audio
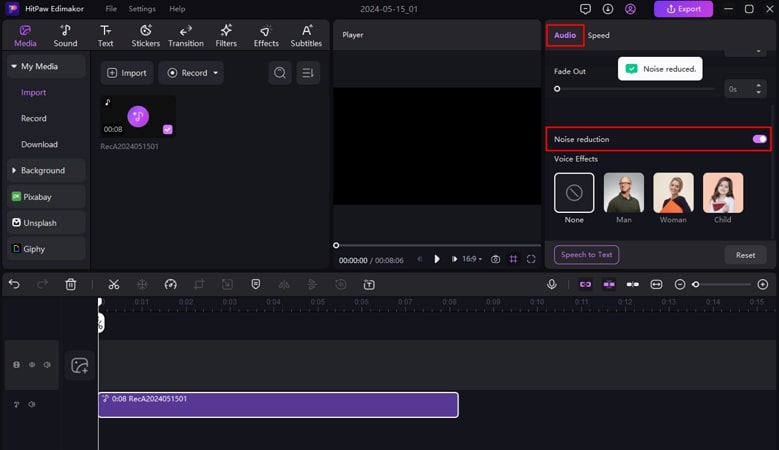
Once you have completed the recording, hit the Red button to stop. Now, your audio will be automatically imported into Edimakor's editing timeline. With the motive of enhancing the audio, if there is any noise in the background, toggle the Noise Reduction feature available from the Audio panel.
Step 4. Fine-tune and Export Your Project
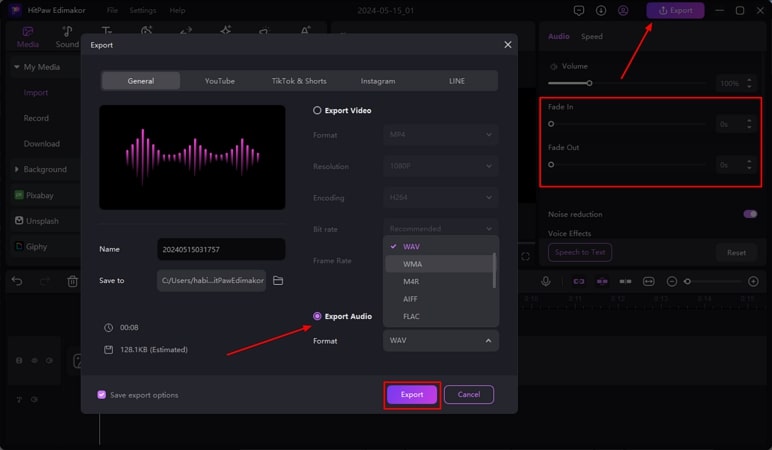
You can add transition effects like Fade In and Fade Out by dragging the sliders to further enhance the sound quality. Once all your editing is completed, press the Export button on the top right corner. Select the file format WAV from the drop-down list and add other configurations like file name and destination. Finally, lead into the Export button to save your audio file on your computer.
Part 2. Other 5 Ways to Record Audio on Mac You Can Try
As discussed above, HitPaw Edimakor is one of the decent options that provides a comprehensive solution for recording audio on a MacBook. Here are a few other ways to explain how to record audio on a MacBook:
1. HitPaw Screen Recorder
To record audio with ease and convenience, HitPaw provides a dedicated tool for recording audio with the screen. This comprehensive tool records the screen with audio and lets you edit the audio file to enhance the sound quality.
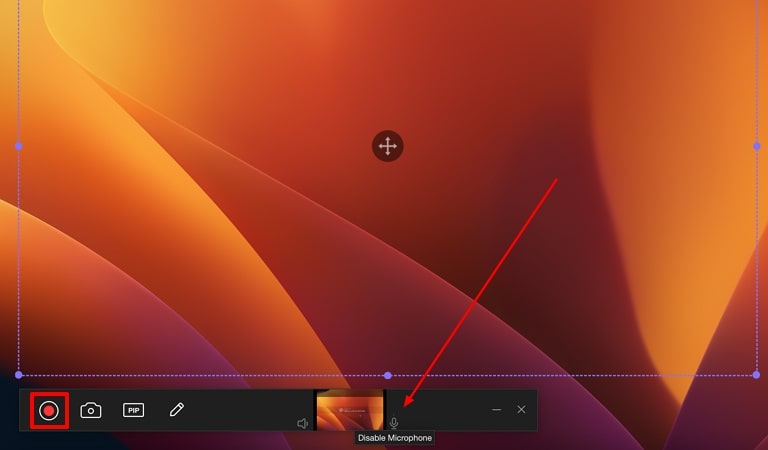
Step 1. Select the Record Screen option after launching HitPaw Screen Recorder and granting it access. Continue to select the area that is to be recorded to lead further. As you find yourselves on the next screen, discover if the Microphone icon shows disabled or enabled status. Once confirmed, click the Red button to start recording your screen with audio.
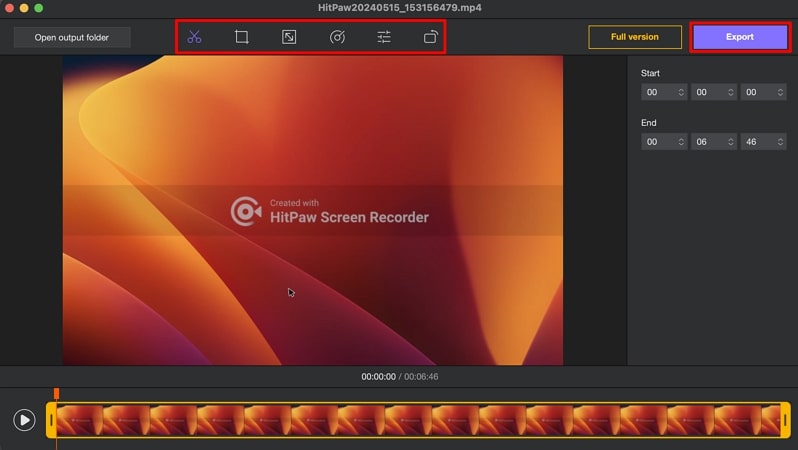
Step 2. Once you have completed the recording, click the Red button again to stop capturing. You will be redirected to the preview of your recorded window, where you can edit the video with the available options on the top toolbar. Next, save your video by clicking the Export button.
Pros
- HitPaw Screen Recorder lets you record the system audio and audio from your Mac's microphone.
- You can trim, crop, and adjust the recorded file across its quick editing interface.
Con
- This tool lacks the feature of scheduled recording.
2. Audacity
This is an open-source audio editing tool that lets you record and edit audio efficiently. This tool is perfect for recording voiceovers and podcasts:
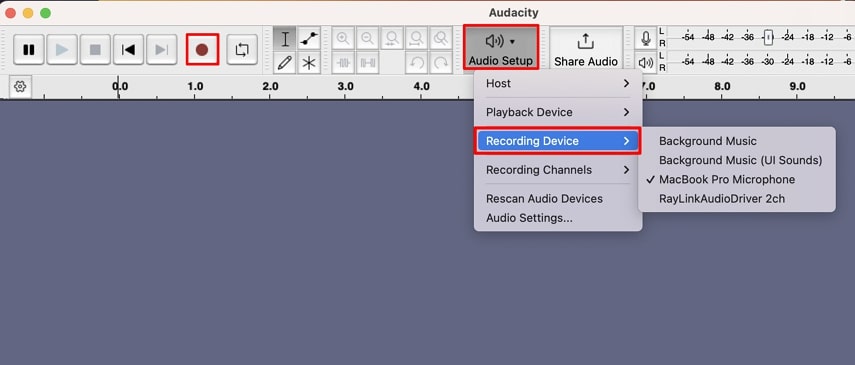
Step 1. Launch the Audacity tool on your Mac device, and from the toolbar at the top, select your desired Recording Device option under Audio Setup. Now click the Red button on the toolbar to start recording.
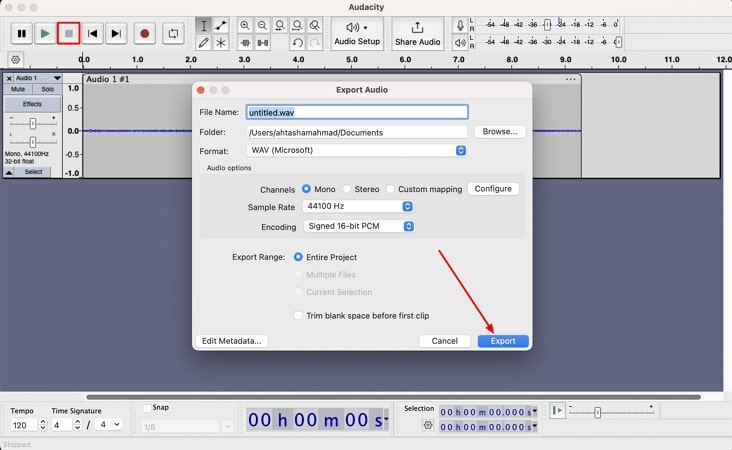
Step 2. When the recording is completed, hit the Stop button to stop the capturing. Now, you can edit and save the audio by inputting configurations like file name, destination, and format by clicking the Export button.
Pros
- This platform extracts your video's audio and can save it in MP4 format.
Con
- The tool does not let you preview sound effects in real-time.
3. QuickTime Player
Apple's QuickTime Player is a preferred choice for many Mac users when the question of how to record audio on a Mac arises. This is a multimedia utility offering a variety of features along with audio recording.
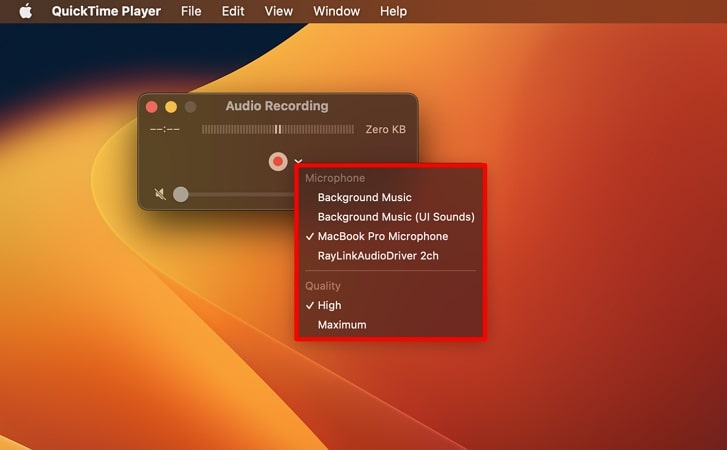
Step 1. Open the tool interface, click the File tab on the toolbar, and select New Audio Recording. From the drop-down menu, choose the options like Microphone and Quality. Click the Red record button to set up recording across QuickTime Player.
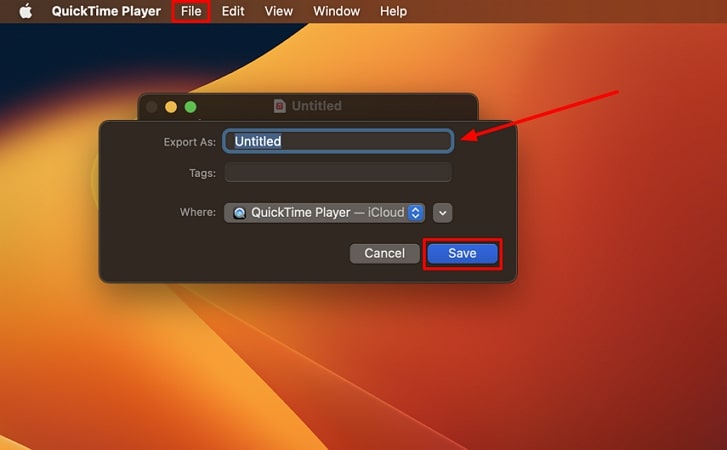
Step 2. Press the Stop button once your desired recording is completed. When selecting the Save option from the File tab, input the name and click the Save button to export the file to your Mac.
Pros
- Along with audio recording, this tool also allows screen recording with various options.
- It also provides basic editing tools like flip, rotate, trim, etc.
Con
- This tool lacks advanced features like audio mixing, multi-camera editing, etc.
4. Voice Memos
Voice Memos is a built-in voice recorder for Mac, perfect for beginners and users who do not have editing experience. You can also perform some basic editing with the tool's integrated features.
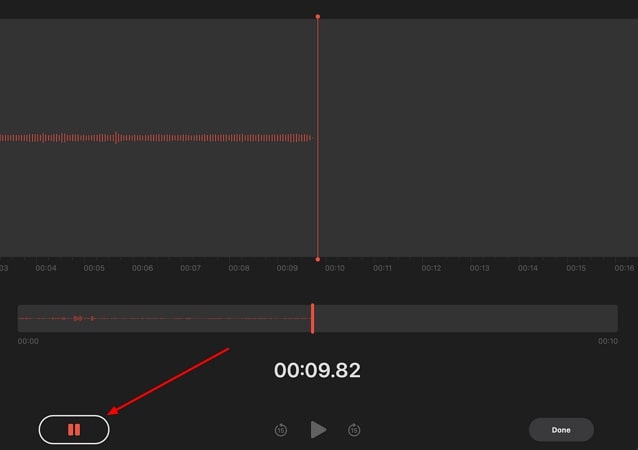
Step 1. Click the Round Red button on the Voice Memo tool, and your recording will begin instantly. You can take a break by pressing the Pause button and then Resume to continue recording.
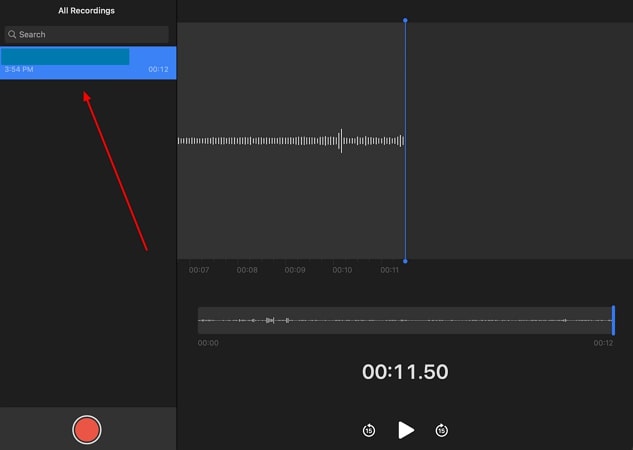
Step 2. Click the Done button once you have finished the recording. Your recorded file will appear on the interface's left panel.
Pros
- You can save the audio file locally on iCloud and on a Mac.
- The recording time offered by this tool is unlimited.
Con
- Restricted recorder as compared to other competitors in the market.
5. GarageBand
Another Apple software that lets you generate good audio files is the GarageBand. You can play, edit, share, and record audio effortlessly with an intuitive design.
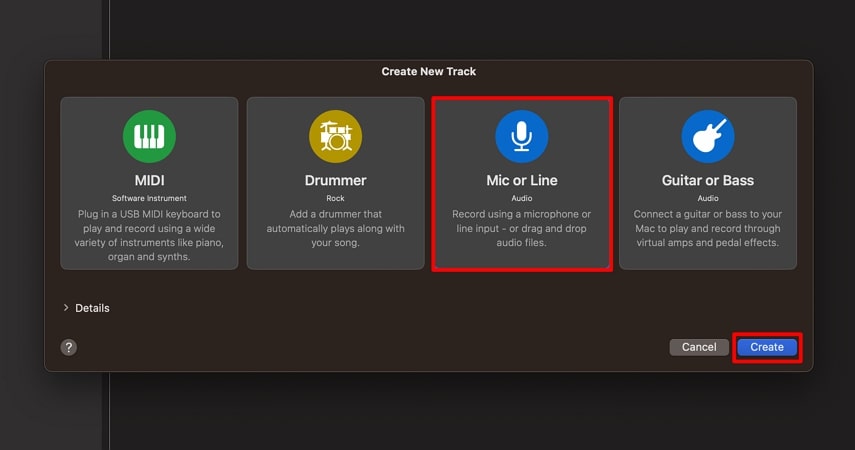
Step 1. After opening the GarageBand Mac application, create an Empty Project, select Mic or Line to record audio using a microphone, and click Create.
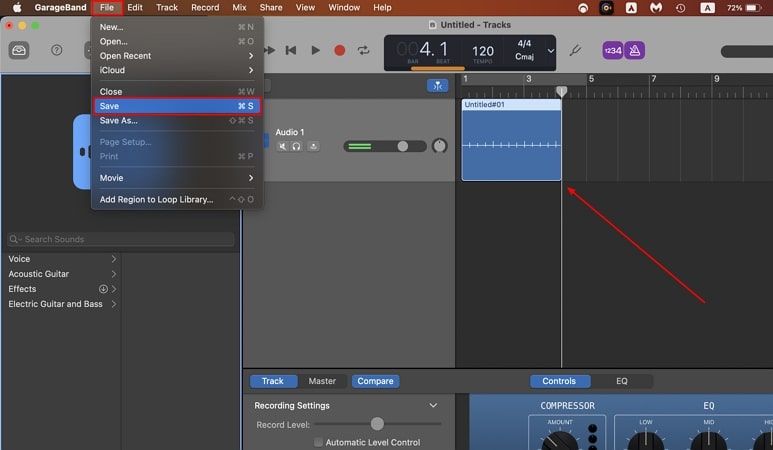
Step 2. In the next window, click Record and speak in the microphone to start the audio recording. Once done, click the Stop button. You can listen to your recorded audio by clicking the Go to Beginning button and then Play. Furthermore, lead to the File tab and select Save to save the audio project on Mac.
Pros
- You can connect different instruments to your device and produce music with this tool.
- It provides various professional audio editing features like Echo, Reverb, and Noise Gate to enhance your audio's sound quality.
Con
- Beginners may find it difficult to navigate through the tool.
Part 4. FAQs on How to Record Audio on Mac
Q1. What app is used to record audio on a Mac?
A1. You can utilize various online, offline, and built-in tools on Mac to record audio, but HitPaw Edimakor could be a decent choice for recording endeavors.
Q2. Does QuickTime Player record screen audio?
A2. Yes, QuickTime Player provides you with the option of screen recording with audio. You can enable it by clicking the Microphone during the screen recording setting.
Q3. How to record internal audio on a Mac?
A3. Mac does not have a built-in sound recorder system. You can record the audio by installing apps and tools like HitPaw Edimakor to conveniently record and edit audio and videos.
Conclusion
Whether you want to save a lecture or a meeting, recording them for later use is a sane choice. Many tools are available for the MacBook that let you record audio and video. In this guide, we discussed how to capture audio on Mac using various tools. However, HitPaw Edimakor is the right choice if you want to record video and audio together or separately.


 HitPaw Univd (Video Converter)
  HitPaw Screen Recorder
 HitPaw VikPea (Video Enhancer)


Share this article:
Select the product rating:
Daniel Walker
Editor-in-Chief
My passion lies in bridging the gap between cutting-edge technology and everyday creativity. With years of hands-on experience, I create content that not only informs but inspires our audience to embrace digital tools confidently.
View all ArticlesLeave a Comment
Create your review for HitPaw articles