How to Create a Fillable Form in Word: Full Tutorial
Fillable forms are used to streamline the collection of information, making the process convenient for users and efficient for information collectors. These forms can be integrated with various kinds of interactive fields such as text boxes, tick boxes, and drop-down lists.
Several online and offline platforms enable users to create their personalized fillable forms, but people often struggle to determine the best one. MS Word stands out among those programs, and this article will explore in detail on how to make a fillable form in Word.
Part 1. How to Create a Fillable Form in Word: Detailed Guide
MS Word is widely used to create fillable forms because it provides various formatting options and a wide range of customizable form fields. You can also choose to protect your form from unwanted editing by limiting editing to specified fields. The process discussed below explains how to create a fillable form in Word:
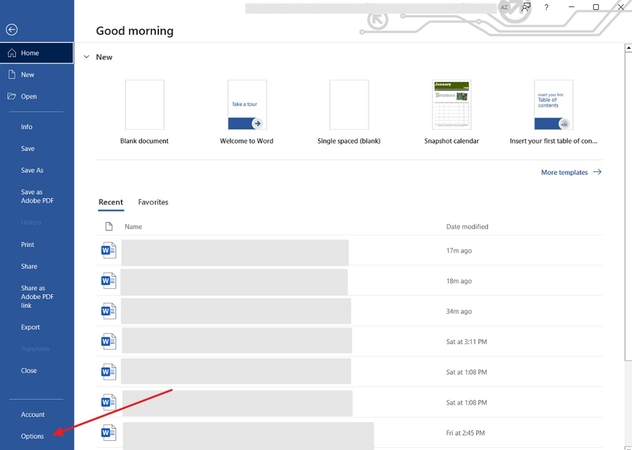
Step 1. Run the Word program on your PC and head to “Options” after clicking on the “File” tab at the top left corner.
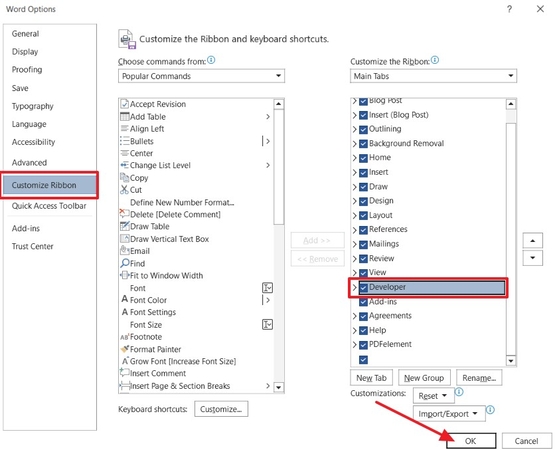
Step 2. In the “Options” window, press the “Customize Ribbon” button, check the box next to the “Developer” option, and hit “OK.”
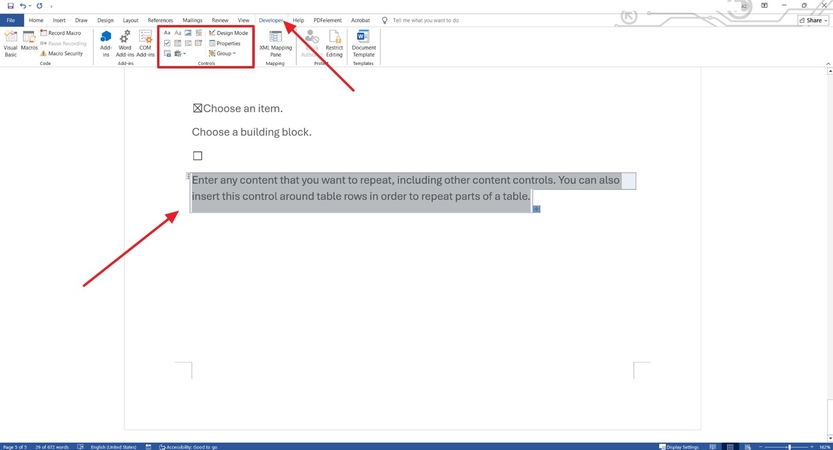
Step 3. Access the “Developer” tab from the top toolbar and insert text boxes or any desired fields in the form to finalize your fillable Word form.
Part 2. How to Make a Word Document Fillable: Types of Form Controls
After learning how to create a fillable document in Word, let’s move on to discuss various types of content control options for a fillable document. The “Developer” tab in Word provides access to a comprehensive controls group, allowing users to insert desired form fields. The list mentioned below explores several fillable form controls offered by MS Word:

1. Plain Text: This control is used to collect short and straightforward answers that can be provided in a single line. It keeps the text simple and does not support any type of formatting in response.
2. Rich Text: It is typically used when you are expecting longer answers in the form of paragraphs. Users can choose to bold, underline, or format their text as desired in their response.
3. Drop-Down List: People commonly use this content control option to conduct voting surveys. The list displays several preset options, allowing users to select any of them.
4. Combo Box: This option is similar to the drop-down list, but it offers additional functionality. When enabled, it features a separate text box in addition to the provided list, allowing for a written response.
5. Check Box: Learning how to create a form in Word provides this fillable field generally to collect “Yes” or “No” answers from your audience. A check box is placed in front of the given options, and users can choose to check individual boxes or leave them empty.
6. Date Picker: This content field is used to streamline the process of deciding dates and timings of important events. It provides a virtual calendar that can be ticked for a specific date to record user entry.
7. Picture: Word’s picture content control is an ideal option for companies wanting to collect visual data of their candidates. You can easily add your documents and other required images in the fillable fields.
Part 3. How Do You Make a Word Document Fillable: Restricting Editing
Learning how to make a Word Doc fillable is one part of the job that is completed after restricting unwanted editing to secure your form. Its formatting and functionality can be altered if users start editing outside of the specified fields or open it in older versions of the program.
You can consider formatting your fillable form as a PDF for increased protection and compatibility with advanced tools. So, protect your fillable Word forms by following the stepwise process discussed below:
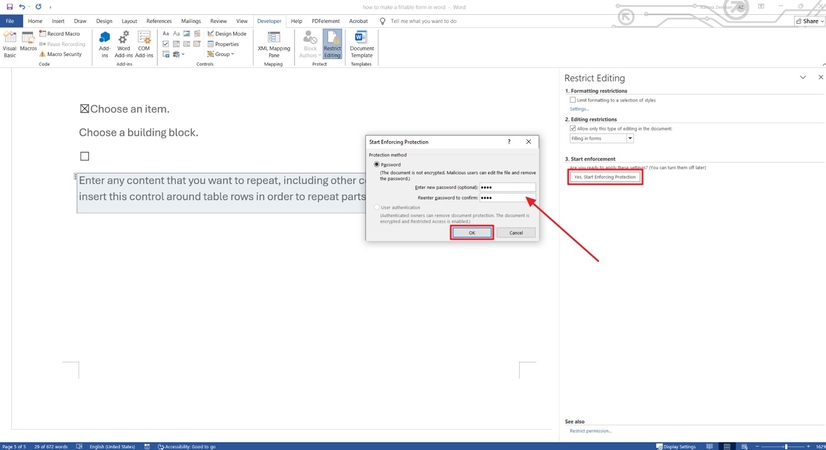
Step 1. Upon finalizing the inserted fields, click the “Restrict Editing” button in the “Developer” tab. In the newly appeared side window, check the box given below “Editing Restrictions” and choose “Filling In Forms” from the drop-down menu.
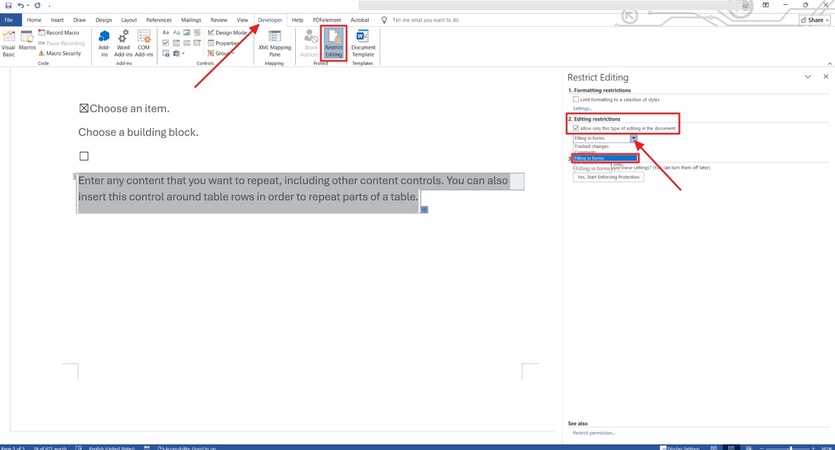
Step 2. Hit the “Yes, Start Enforcing Protection” button below and set your password to stop unauthorized persons from removing protection. Finally, press “OK” to apply editing restrictions to your fillable form.
Part 4. Create Fillable Word Forms with Crisp Visuals-HitPaw FotorPea
We often extract data from existing PDFs when creating fillable Word forms. However, PDFs usually contain image-based data that can be blurry and pose difficulties in extraction. As you know how to create a Word fillable form, move a step ahead to improve your PDF data extraction with HitPaw FotorPea. This tool helps sharpen your text and enhances its resolution for efficient extraction and use in fillable forms.
Key Features
1. Fixes lighting issues and improves the brightness of the darker textual images.
2. Allows users to optimize sharpness and adjust contrast in their provided pictures.
3. Reduces blur and removes grains and other unwanted artifacts from low-quality images.
4. Offers multiple levels to enhance resolution and quality of provided images up to a maximum of 8X.
5. Provides color calibration for enhancing under-exposed images to improve readability.
Guide to Improve PDF Image for Fillable Forms with FotorPea
Now is the time to start enhancing your PDF images for better text extraction after learning how to make a fillable form on Word:
Step 1. Start The Program to Enhance Your PDF ImagesStart by launching HitPaw FotorPea on your system and click on the “+Enhance Photos Now” button provided in the top purple section of the home screen.

Step 2. Select The Appropriate Upload Option for Importing Pictures
Bring your cursor to the bottom “+ Add” button and expand its list to select the “Upload From Phone” option.

Step 3. Import Low Quality Images by Scanning Its QR Code
Use your phone to scan the provided QR code to import your desired PDF images to FotorPea.

Step 4. Select The Text Improvement Model for Provided Text
Upon successful import, toggle FotorPea’s “Text Model” from the right side list of given models and hit the “Preview” button to start improving the imported pictures.

Step 5. Preview Text Enhancement Results and Save in Your System
As the tool concludes its enhancement process, compare improved results with the original and save them by pressing the “Export Images” button at the bottom right corner.

Part 5. FAQs on How to Make a Word Doc Fillable
Q1. How do you create fillable forms in Word on Mac?
A1. Learning how to make a Word document fillable on Mac is almost identical to the process discussed for Windows. Minor differences might occur in the naming of labels, such as “Options” is designated as “Preferences” in Mac.
Q2. How to create a fillable PDF in Word?
A2. Your fillable Word form will lose functionality if you simply convert it to PDF. Specify the required details in Word before saving it as a PDF, use Adobe Acrobat’s “Prepare Form” tool to prepare your PDF as a fillable document.
Q3. Why won’t my form fields work in Word Online?
A3. Word Online is designed for basic text editing and may not support advanced fillable form controls. Consider using Word’s desktop program if you want to use features like Rich Text and Date Picker in your forms.
Conclusion
In summary, learning how to make a fillable form in Word helps collect and organize useful information. People often extract PDF data to incorporate into their form’s drop-down lists, check boxes, and other interactive fields. However, low-resolution PDF images may hinder the process of data extraction. Use HitPaw FotorPea’s Text Enhancement features to improve the quality of your PDF’s data for smooth extraction.


 HitPaw Univd (Video Converter)
 HitPaw VoicePea
  HitPaw VikPea (Video Enhancer)


Share this article:
Select the product rating:
Daniel Walker
Editor-in-Chief
This post was written by Editor Daniel Walker whose passion lies in bridging the gap between cutting-edge technology and everyday creativity. The content he created inspires the audience to embrace digital tools confidently.
View all ArticlesLeave a Comment
Create your review for HitPaw articles