How to Make 2x2 Picture in Word: A Complete Guide
A 2x2 picture is a common requirement for passports and ID cards, but creating one isn’t always straightforward. Thankfully, both online editors and mobile apps make the process easier. In this article, we’ll show you how to create 2x2 photo using Microsoft Word’s built-in features, and introduce a powerful AI tool that offers an even faster, smarter solution.
Part 1. Dimensions and Official Rules for 2x2 Picture
While 2x2 pictures are used for visas, passports, or government identification documents, the given dimensions are followed strictly for obtaining them:
| Measurement Type | Specification |
|---|---|
| Size in inches | 2 x 2 Inches |
| Size in millimeters | 51x51 mm |
| Size in centimeters | 5.1x5.1 cm |
| Digital Dimensions | 600 x 600 pixels (at 300 DPI) |
| Head height | 1inch to 1 ⅜ inches (25 to 35 mm) |
| Eye Position | 1 ⅛ to 1 ⅜ inches (28 to 35 mm) from the bottom edge |
| Aspect Ratio | 1:1 (Square) |
| File Format | JPEG |
| File Size | ≤ 240 KB (for digital submissions) |
Major Official Rules Regarding 2x2 Photos
Before delving into how to make a photo 2x2, the shot that you take must follow the given official rules:
1. The photo should have a plain white or off-white background.
2. The face should be kept straight, giving a full view straight to the camera.
3. The subject should be maintaining a neutral expression on face with open eyes.
4. No uniforms or clothes blending with the background are allowed to be worn in a 2x2 photo.
5. Headwear hiding the hairline or head are forbidden except for those worn for religious purposes.
6. Eyeglasses are not allowed in passport photos except for rare cases where the applicant cannot remove them for medical reasons.
Part 2. How to Make 2x2 Picture in Word: A Detailed Guide
Having gone through the significant rules and requirements, you can use Word for creating a 2x2 photo by using the “Picture” feature within the “Insert” tab. By using its Crop feature, the aspect ratio and appearance of the picture are adjusted to get a square image. Following the given steps, learn how to make a 2x2 picture in Word using its Size adjustment feature:
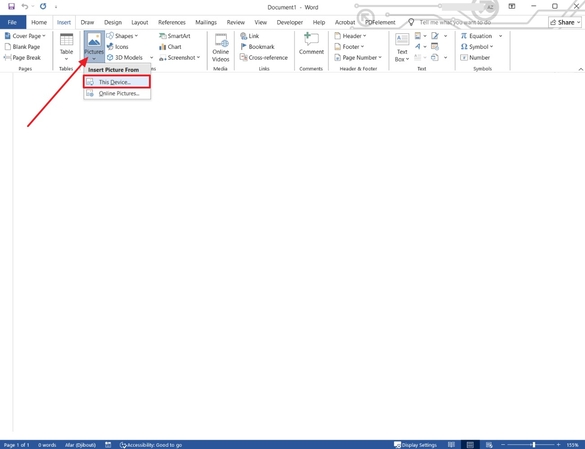
Step 1. Entering Microsoft Word, open a new document and go to the “Insert” tab and select the “Pictures” option. Choosing the “This Device” option from the pop-up menu, import the relevant picture into the Word document.
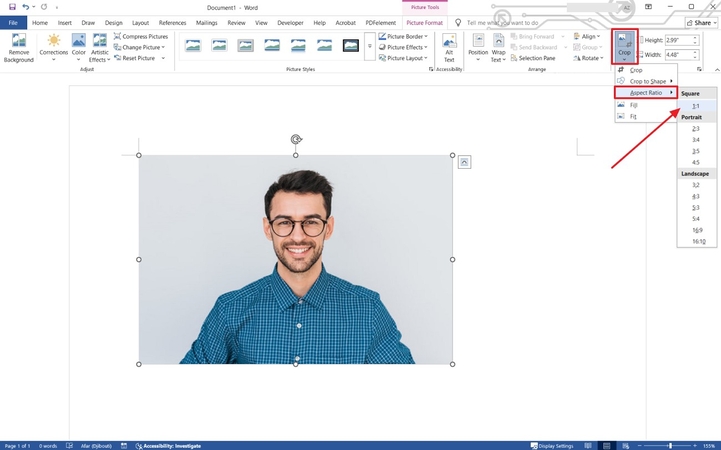
Step 2. Select the “Crop” tab from the right, expand the “Aspect Ratio” menu, and in the “Square” section, set it to 1:1. To adjust the cropped image, manually drag the borders of the picture.
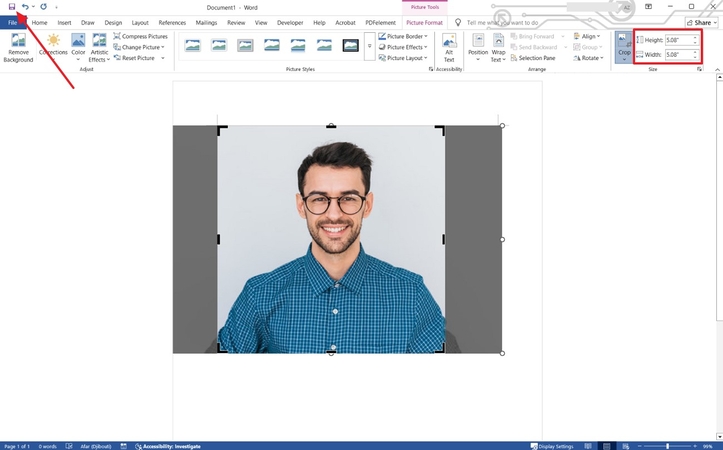
Step 3. After that, go to the “Width” and “Height” options at the right, set them to 5.08 x 5.08 cm each, and save the image through the “Save” icon.
Part 3. How to Resize a Picture in Word Without Losing Its Quality?
Sometimes resizing a picture can result in a significant loss of quality, but by accessing the Microsoft Word “Advanced” settings, you can resolve this issue. To learn how to resize the picture without quality loss, adhere to the given steps and know how to activate the compression settings:
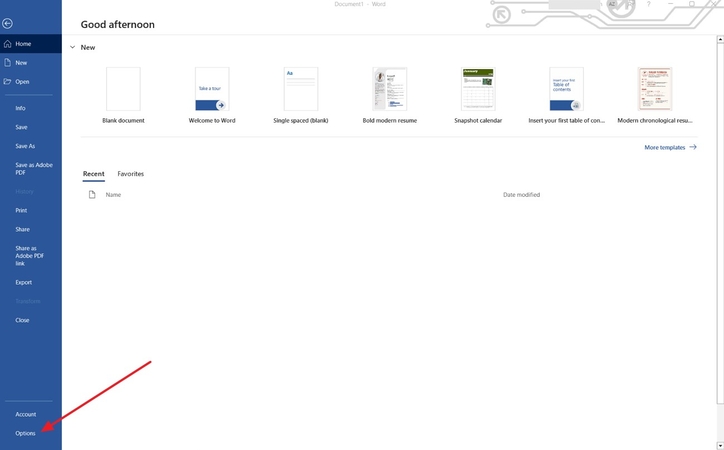
Step 1. Once you have imported your picture to Word, click on “File” from the top-left corner and from the side panel select the “Options “button.
Step 2. Within the “Word Options” window, choose “Advanced” and scroll down to the “Image Size and Quality” option. In this section, tick the box for “Do Not Compress Images in File.”
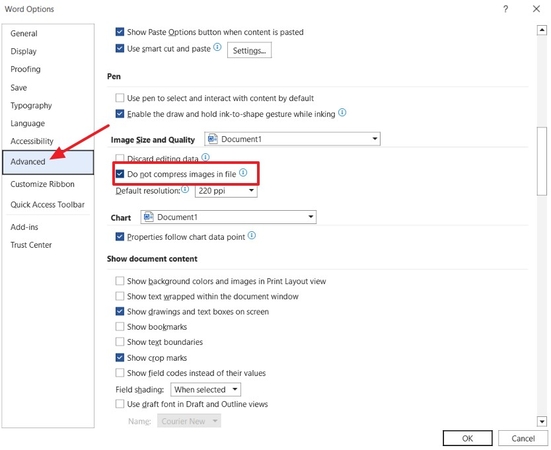
Note: After turning on the given settings, you can follow the above-described steps to convert your picture size. Manually drag the borders of the photo to adjust its size for convenience.
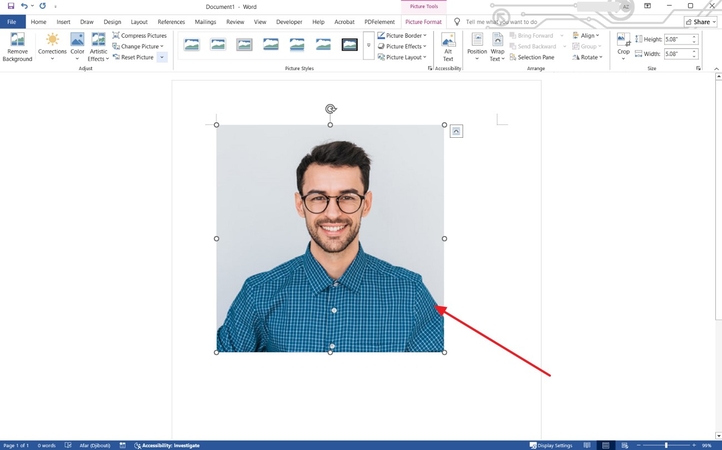
Part 4. How to Edit 2x2 Picture in Word: Changing the Background
Apart from quality issues, the problem of an unsuitable background can be solved by a specialized feature of Word with its intelligent auto-detection and removal of background. To find out how to edit 2x2 picture in Word for background removal with an option to select areas to remove and to keep manually, follow the given steps:
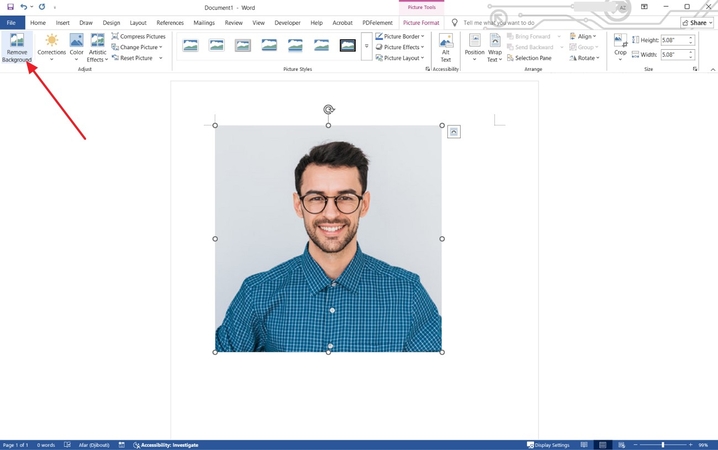
Step 1. After inserting the picture in the Word document, choose the “Remove Background” option in the top-left corner. The background in the picture will automatically be detected by the AI algorithms.
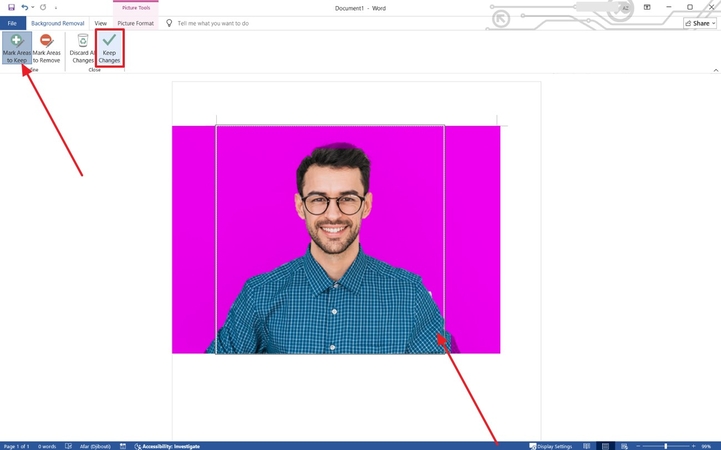
Step 2. If the background selected is not precise, choose one of “Mark Areas to Keep” or “Mark Areas to Remove” options to correct it. Afterwards, you will select “Keep Changes” to complete the removal process.
Part 5. Easy Steps to Make a 2x2 Photo Using HitPaw FotorPea
Creating a perfectly sized 2x2 photo can be frustrating—especially when dealing with unclear image quality, improper backgrounds, or complicated editing tools. HitPaw FotorPea simplifies the process with AI-powered features that let you resize, enhance, and clean up your photo in just a few clicks. Here's how to create a polished, professional 2x2 image in minutes.
Key Features
1. Background Removal:Instantly erase messy or non-compliant backgrounds—perfect for passport or visa photo requirements.
2. Object Removal: Easily delete unwanted items or distractions to keep your photo clean and professional.
3. Photo Enhancement: Sharpen blurry images, adjust lighting, and bring out facial details—ideal for meeting strict 2x2 photo clarity standards.
4. Photo Repair: Restore damaged, pixelated, or low-quality photos with AI-powered repair, making even old images usable for official documents.
A Detailed Guide on How to Create 2x2 Photo Using HitPaw FotorPea
By following the steps below, you will find out how to create a 2x2 picture using HitPaw FotorPea:
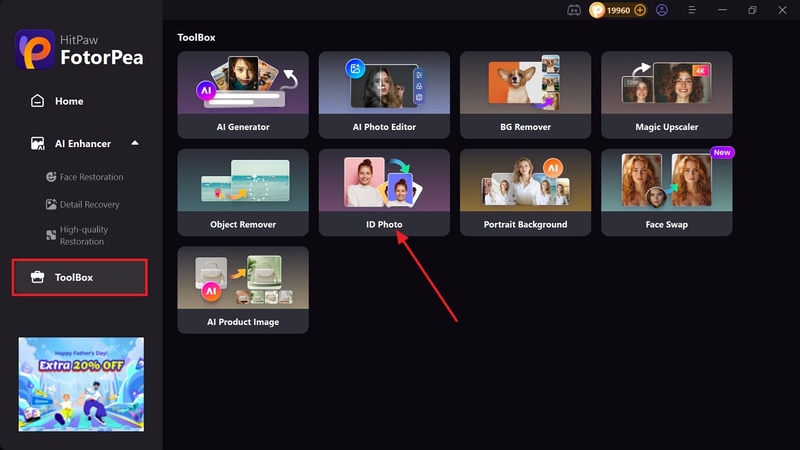
Step 1. Fetch the Tool and Import your PictureIn the first step, you will go to the “ToolBox” on the main page and select “ID Photos” to import your picture.
Step 2. Select Picture Background and Size
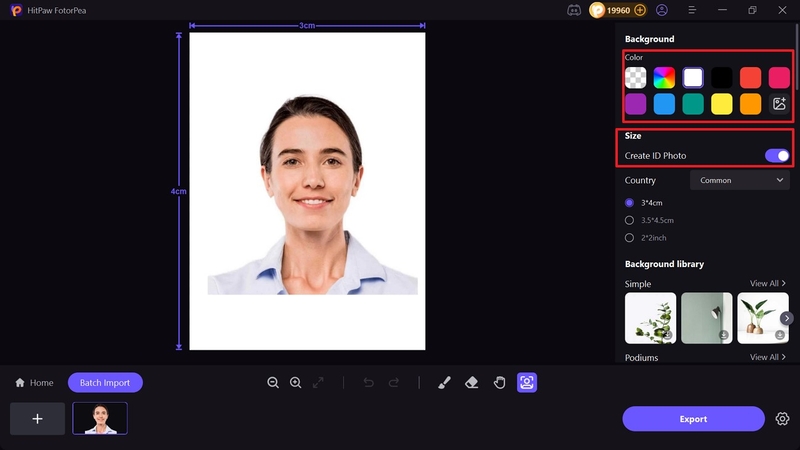
The AI algorithms will automatically detect and remove the background of the picture. In the “Background” feature, change the background as required and enable the “Size” feature to select “2*2 inch” size.
Step 3. Preview and Export the Picture
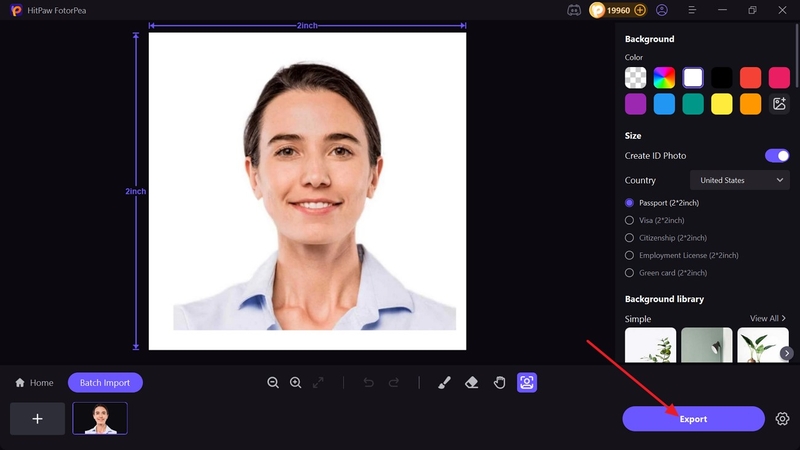
After finalizing the background color and the size, click “Export” to save the final image to your device.
Part 6. FAQs on How to Create a 2x2 Picture in Word
Q1. How to make a 2x2 picture in Canva using simple steps?
A1. Creating a 2x2 picture with Canva requires making a custom design of size 2x2 inches, and the photo is uploaded in that frame. The picture will resize automatically to fit the canvas, while you can adjust it as well to get a perfect 2x2 photo.
Q2. What are the official requirements for a 2x2 passport photo?
A2. The official guidelines for a 2x2 passport photo regarding its parameters include a clear front face shot, 1:1 aspect ratio, and 25 to 35 mm head height. They also include ensuring a neutral facial expression and certain wardrobe restrictions.
Q3. What is needed background work for an official 2x2 ID photo?
A3. Background for the 2x2 ID photo must be ensured to be either white or off-white in color by the official guidelines. It must be clear with no texture, shadows or patterns to ensure clarity of the image.
Conclusion
To sum up, we've covered how to create and edit 2x2 photos using Microsoft Word’s built-in features. For a faster and more refined experience, we recommend HitPaw FotorPea, an AI-powered tool that makes producing high-quality images simple and stress-free.


 HitPaw Edimakor
 HitPaw VikPea (Video Enhancer)
 HitPaw Univd (Video Converter)
 ![[Online &PC] Top 7 Brat Generators You Must Try](https://images.hitpaw.com/topics/photo-enhancer-tips/brat-generator-cover.jpg)



Share this article:
Select the product rating:
Daniel Walker
Editor-in-Chief
This post was written by Editor Daniel Walker whose passion lies in bridging the gap between cutting-edge technology and everyday creativity. The content he created inspires the audience to embrace digital tools confidently.
View all ArticlesLeave a Comment
Create your review for HitPaw articles