OBS Best Settings for Recording and Streaming in 2024[Beginner Guide]
OBS (Open Broadcaster Service) is one of the best video recording software with a large number of users around the world. If you are an OBS user, or if you are just about to try OBS to record video, you should not miss this article as it tells you the best OBS recording settings.
Part 1. Best OBS Recording Settings
OBS allows users to adjust the settings in the software so that people can get the best of out it. In most cases, people would like to search and tweak the OBS settings every now and then so as to make the recordings as professional as possible. Now, without any further ado, we will teach you the best OBS recording settings.
1. Best Recording Settings for OBS
Note: to adjust the OBS settings, we suggest you to download and install the OBS software in your computer first, so that we can walk you through step by step.
Step 1: Now launch OBS software, and go to Settings. Then we will see through all kinds of the settings one by one.
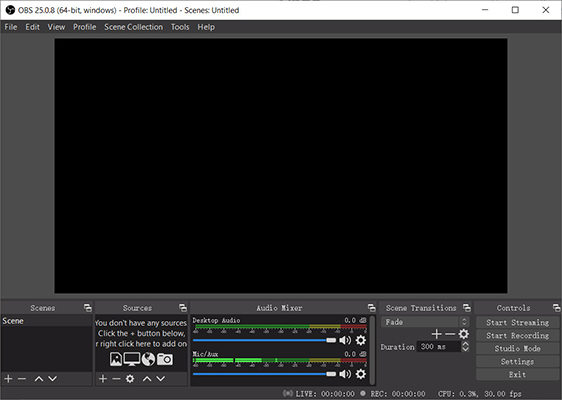
Step 2: Click General tab on the left, and you will be able to see all the general setting options. Select the language and theme as you wish. Then scroll down to check the box next to Enable under System Tray.
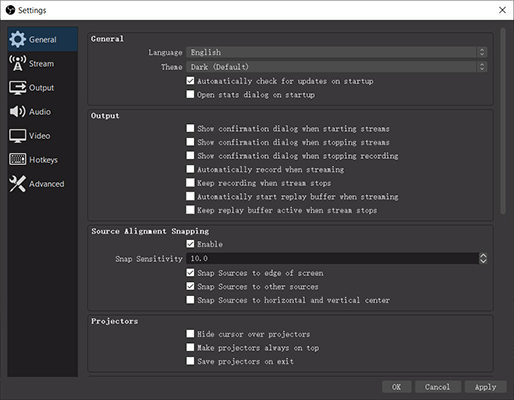
Step 3: Click Output on the left, and you can adjust the recording output settings. Choose advanced for Output Mode, and go to Recording > Recording Path > Browse to choose your preferable path to save all your recordings.
You can also choose Recording Format among these options: flv, mkv, mov, mp4, ts, and m3u8.
To choose Recording Quality, there are 4 options:
- 1.Same as stream: the video quality is what the stream is, and the file size is usually acceptable.
- 2.High quality, medium file size: the recording video is good to watch despite of what the stream quality is, while the file size is medium large.
- 3.Indistinguishably quality, large file size: the video will be clear and accurate while the file size is large. You can choose this one if you want to record game playing or video playing.
- 4.Lossless quality, tremendously large file size: this will create video without quality loss but it is an extremely large file size. You should check your disk space if you want to choose this option.
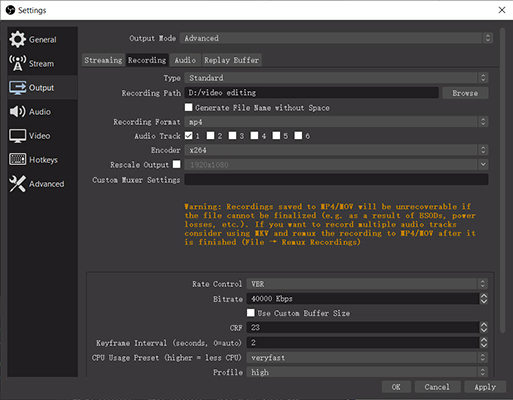
Step 4: Click Audio tab on the left to configure audio settings.
Leave Sample Rate and Channels as default aka 44.1KHz and Stereo. If you have more than one desktop, be sure to choose the right desktop audio device for your recording, and disable the one that you don’t use for recording. If you are using microphone while recording, choose the Mic/Auxiliary Audio device, too, or you should leave it as it is.
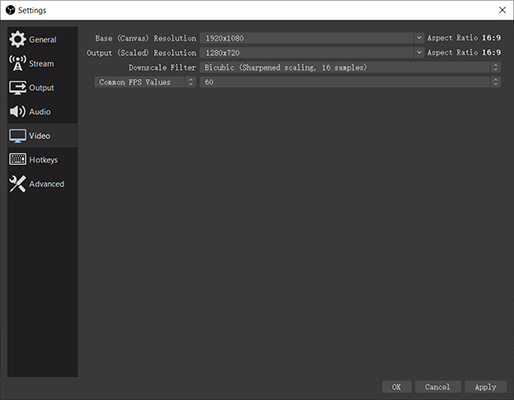
Step 5: Video settings: for Base (Canvas) Resolution you should choose the correct resolution for your monitor; Output (Scaled) Resolution allows you to downscale the recording resolution, and you can choose whatever you like from the drop-down menu.
For Common FPS Values, choose 60 if you want to have a high quality video. However, if you are using an old computer without good hardware, then you should choose 30.
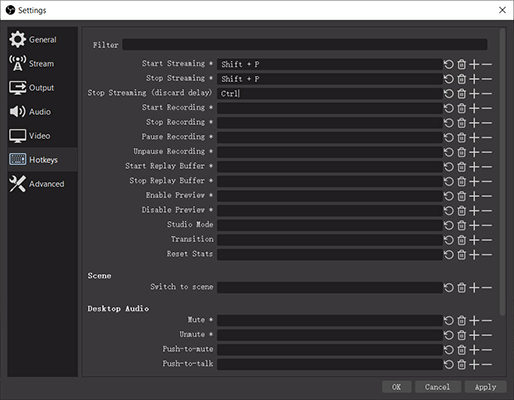
Step 6: When it comes to HotKeys, it is the hotkeys you would like to set up according to yourself.
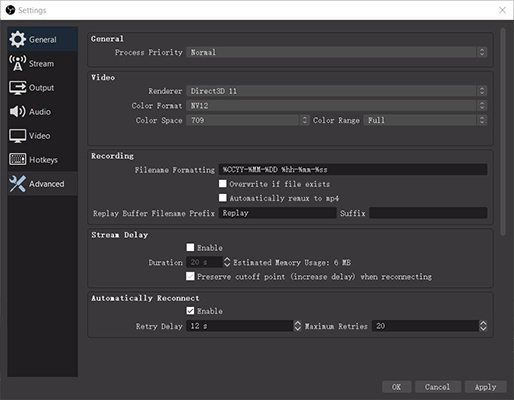
Step 7: Click Advanced, set Color Space to 709 and Color Range to Full.
So there you have it; the best OBS settings for recording. And those settings are for common usages. If you want to know the settings for specific case, such as for YouTube, then more on to the next.
2. OBS Recording Settings for YouTube
In addition, if you are a YouTuber or if you want to record videos for YouTube, consider the settings below to make sure to get the best YouTube videos.
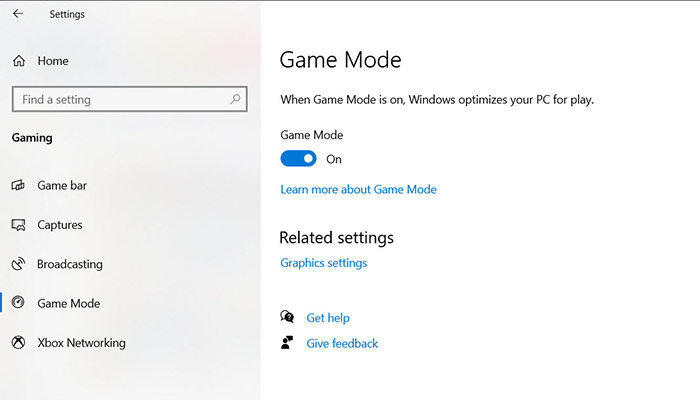
Note: if you want to playing games while recording, you may want to turn on Game Mode in your Windows computer. Just open Settings > Gaming > Game Mode > Turn on Game Mode. This will optimize your PC while playing games and recording videos.
1. Launch OBS in your computer, and click Settings.

2. Click the Output tab, and choose Advanced for Output Mode.

3. Click Recording, and choose the Standard Type. Click Browse to choose the recording path where you want to save your recording for YouTube videos.
4. Click the drop-down menu next to Recording Format, and choose MP4 for most YouTube videos.

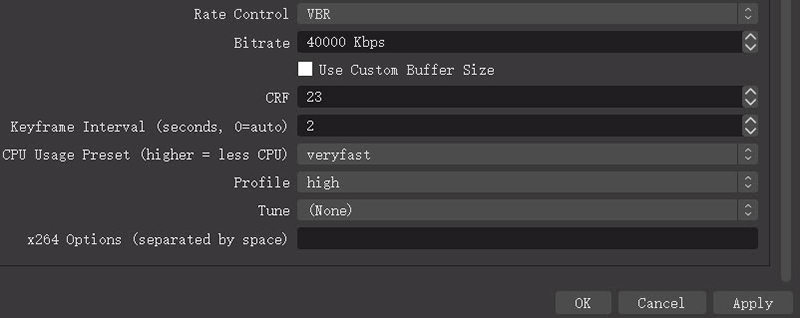
5. For Encoder settings, choose your dedicated graphics card to adjust its settings. If you don’t have one, choose x264.

6. Scroll down and set Rate Control to VBR, Bitrate to 40000 - 60000, Keyframe Interval to 2 seconds, and Profile to High. Then click Apply to save.
7. Click Audio on the left. Choose where your sound goes to from computer for Desktop Audio device, and set the Mic/Auxiliary Audio device to the microphone that you are using while recording. Then click Apply to save your changes.

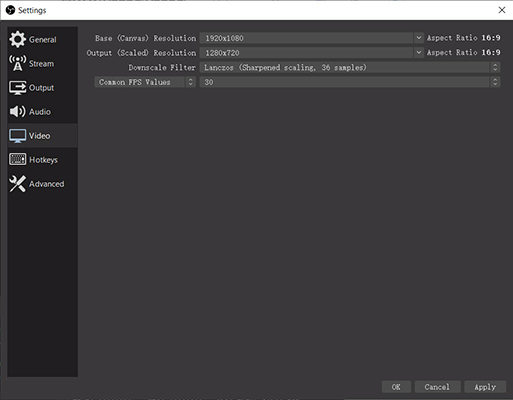
8. Click the Video tab on the left. Set Base (Canvas) Resolution to your monitor resolution. Set Output (Scaled) Resolution to the one that you want to downscale your recording. For instance, if you want to record video in 1920*1080, then your video would be 1080P. Set Downscale Filter to Lanczos (Sharpened scaling, 36 samples). Set Common FPS Values to 60 (or 30 if your computer is lagging).
So if you want to record a video by choosing Downscale resolution to 1920*1080, then it should be OBS settings for recording 1080P 60FPS.
9. Click Advanced, set Color Space to 709 and Color Range to Full.

Hopefully this will help when you want to better understanding OBS settings for YouTube videos.
Part 2. Best Alternative to OBS Recording - Edimakor
To excel in the editing game for producing high-quality videos, HitPaw Edimakor is the perfect solution as it provides a plethora of editing features like AI auto subtitle, color grading, speed ramping, AI script generator, and many more. HitPaw Edimakor’s screen recording feature can be a versatile alternative offering efficiency and straightforwardness for screen recording and editing tasks.
With its many basic and advanced AI video editing features, Edimakor provides an effortless experience for users to record videos without complicated settings and configurations. For people looking for the best OBS recording settings, this tool serves as an incredible and simple solution offering intuitive features for capturing professional-quality screen recordings.
Here is a walk-through of the steps to screen record and edit videos with HitPaw Edimakor's screen recording and video editing feature:
Step 1: Launch the HitPaw Edimakor Application
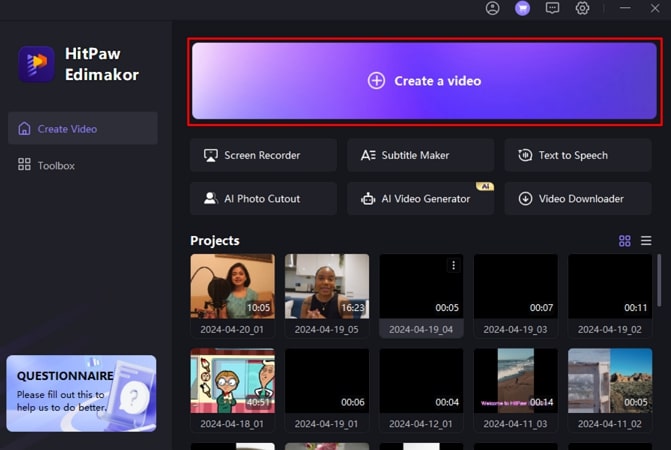
To start with the screen recording process, launch the Edimakor software, and the tool's interface will appear. Click the Create a video button, and you will be directed to the project window.
Step 2: Start With the Screen Recording Process
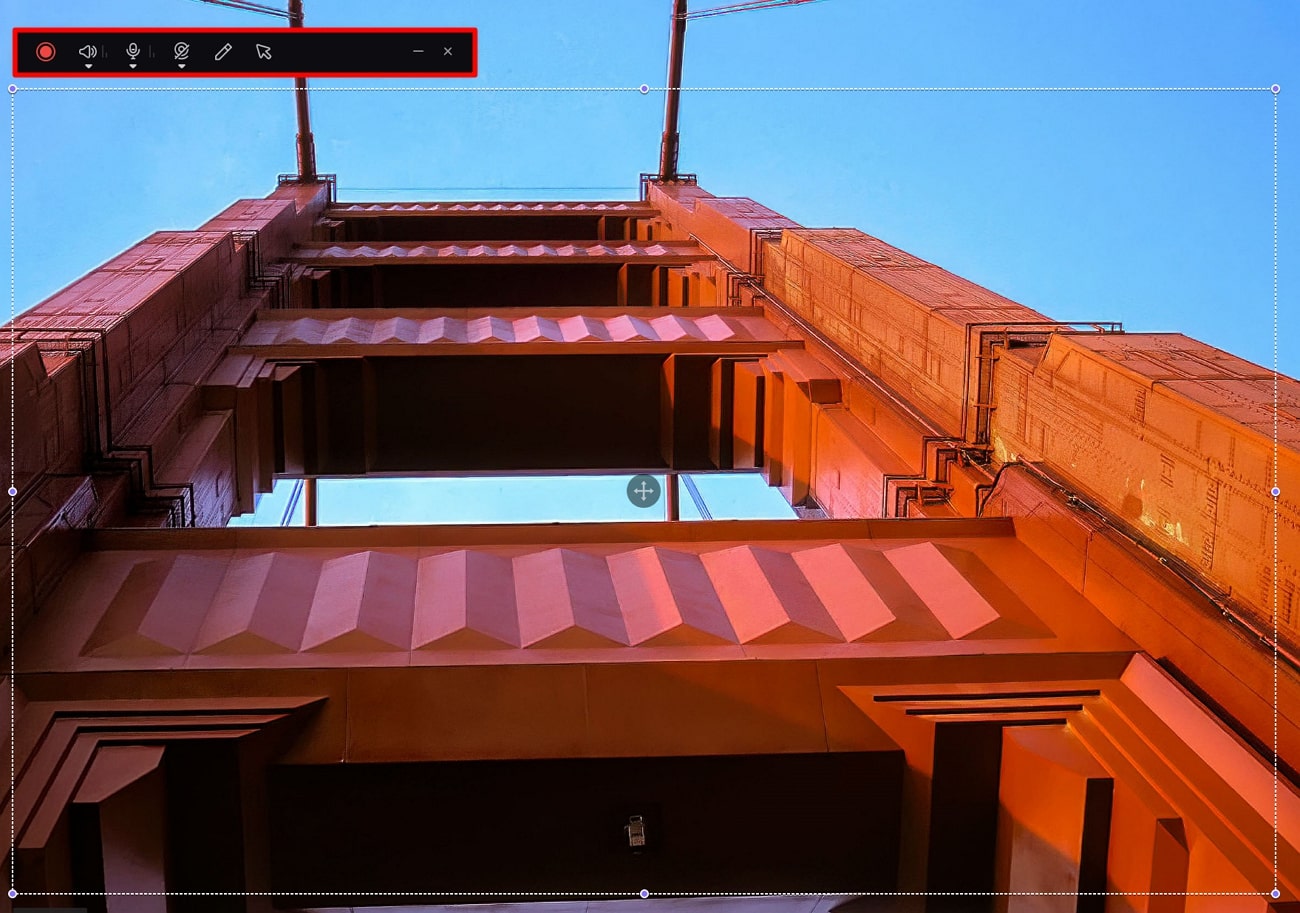
From the Project Window, click the Screen Record button on the left corner and select the respective option, from where you will be redirected to your desktop screen. Now drag the cursor to select the specific area of your screen, or simply hit the Space Bar to capture your entire screen. As the bar appears on the top of the selected screen, set the recording parameters such as device sound, microphone, and camera settings. Click the Red Button available on the toolbar to start the screen recording process.
Step 3: Stop the Recording Session
Once the recording is complete, you can stop by clicking the same Red button again. You can now access your recorded video directly from the Edimakor timeline and preview window.
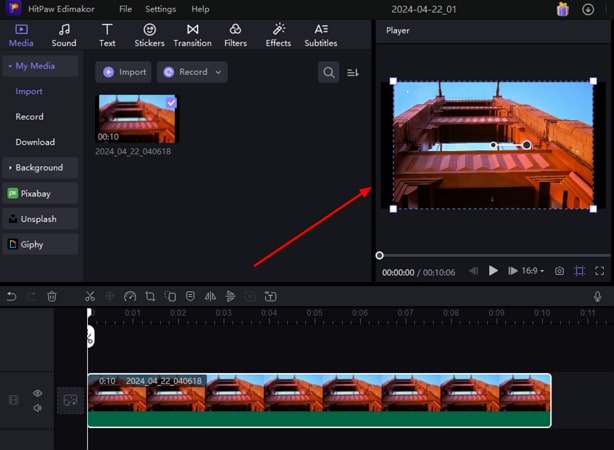
Step 4: Edit the Recording as Required
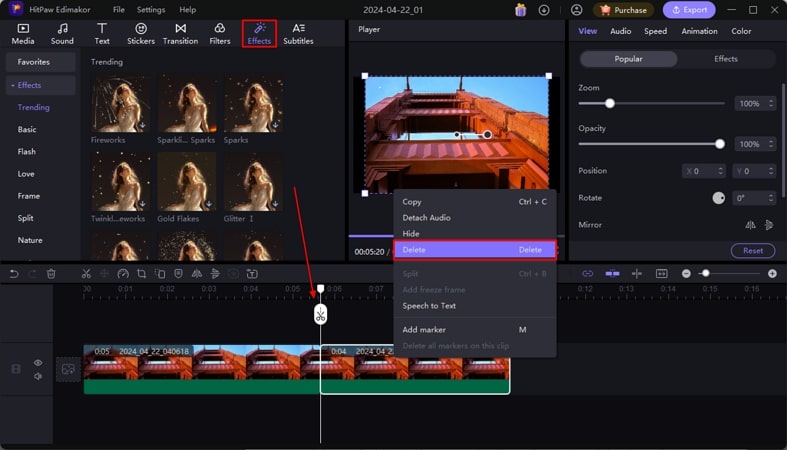
To trim the video, drag the playhead across the timeline, use the Split button, and select the unwanted part to hit the Delete button to remove it. Add different visual effects to your video by clicking the Effects icon on the toolbar and dragging it through the timeline.
Step 5: Export the Recorded and Edited Video
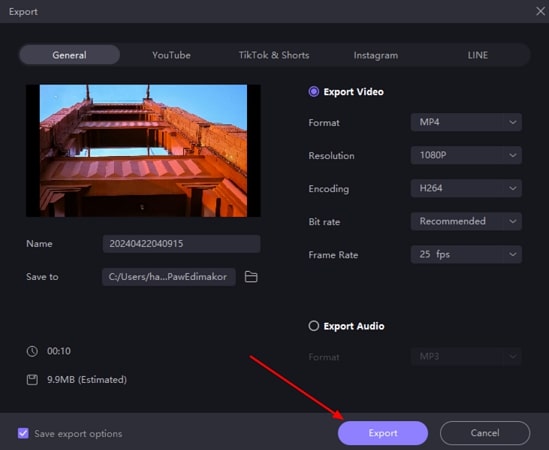
After completing the editing, save your video by clicking the Export option in the right corner. The tool will prompt you for the name, format, destination, and resolution of your file, input the settings, and hit the Export button to save your video.
Part 3. OBS Best Settings For Live Streaming
OBS (Open Broadcast Software) offers plenty of customizable options like YouTube Live Streaming, Recording, and audio adjustments for content creators to amplify their audience reach. Mastering in OBS recording settings can drastically enhance your recording and streaming experience. If you are struggling with the configurations of this tool, here is the detailed guide for OBS's best settings for recording:
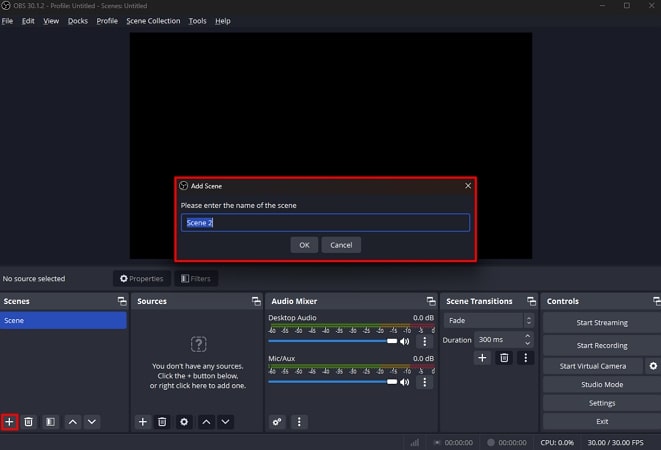
Step 1: After successfully downloading and installing it on your computer, launch OBS for live streaming. To create a new OBS scene, click the + button under the Scenes bar and give your scene a name.
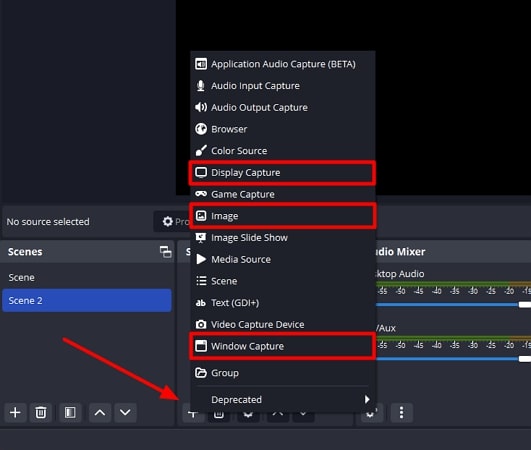
Step 2: Click the “+” icon in the Sources bar next to the Scenes panel and select your desired settings. To capture the entire screen for your streaming, select Display Capture. You can include any image by clicking the Image option. To live stream a specific window, choose Window Capture, and the window will be shown in the preview window of OBS.
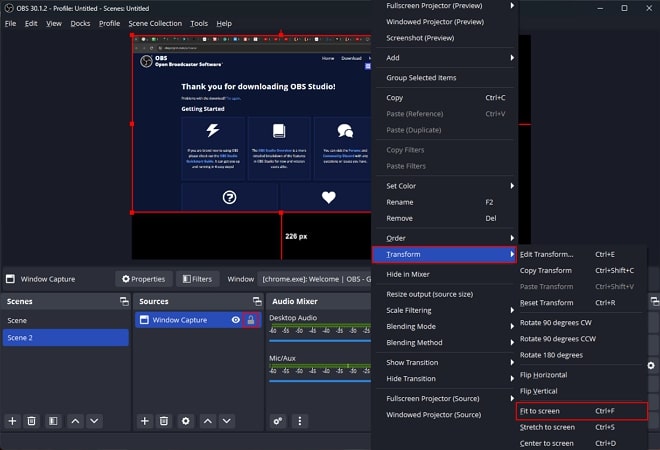
Step 3: Adjust the screen according to the preview window by dragging the corners or right-clicking and opting for Fit To Screen in the Transform option. Now lock all your Scenes from the small Lock icon in front of the Sources bar.
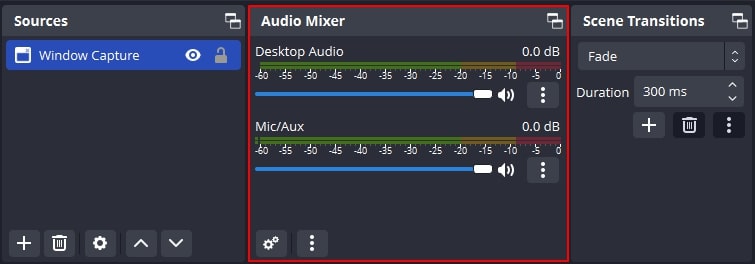
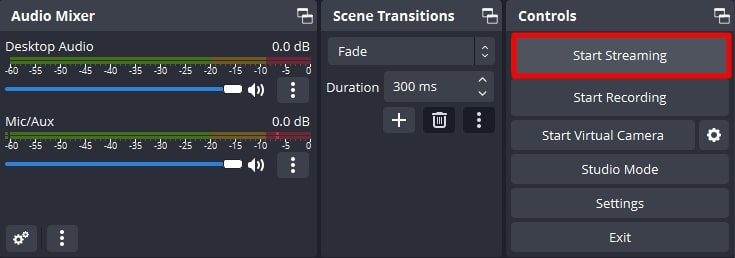
Step 4: Configure the audio settings from the Audio Mixer panel next to the Sources panel. Adjust the Desktop Audio and Mic sliders to set the voice across your live streaming.
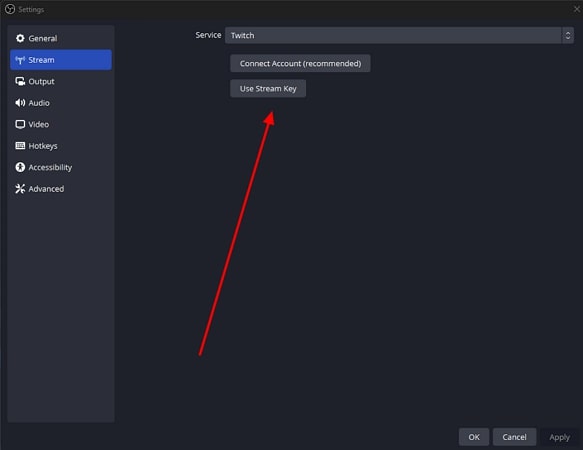
Step 5: Now, from the Controls panel on the bottom right corner, select Start Streaming. Input your streaming platform, connect an account, and add your connection key using the Use Stream Key button.
Step 6: Adjust your Audio and Video bitrates from the Settings window. Finally, go to Controls and hit Start Streaming to stream live with OBS.
Part 4. Essential Tips for Perfecting Your OBS Recording Settings
Though the best OBS recording settings depend on your specific needs, here are some tips that can help you fine-tune your OBS recordings:
1. Adjust the Quality of Your Recordings: To balance the quality of your recordings, ensure that video resolution is finely configured. To record the live stream, the resolution of your screen works perfectly fine, but you can adjust the resolution of your recorded live stream to 720p or 1080p.
2. Utilize Advanced Audio Filters: OBS provides advanced audio quality filters to improve the audio quality of your recordings. You can experiment with filters like noise reduction and compression to enhance the audio and make your recordings sound professional.
3. Optimize the Frame Per Second: To ensure a smoother motion of your screen recordings, especially for sports and gaming recordings, the FPS should be at least 60. A lower FPS, like 30 or 20, might result in choppier screen recordings, resulting in poor-quality videos.
4. Video Coloring: To bring out the best colors for your screen recordings on OBS, you can choose a Full or Partial color range. The partial color range increases the compatibility of your recording on different devices, whereas the full-color range lets you capture more accurate and vibrant visuals.
Part 5. Bonus Tip: OBS Alternative - HitPaw Screen Recorder Recommended
If you find OBS is difficult to use, then you should look for an alternate to replace the OBS Studio. In those regards, HitPaw Screen Recorder proves to be the perfect alternate tool to OBS. With HitPaw Screen Recorder, you can record your screen with ease!
For instance, if you're looking to record the screen, HitPaw Screen Recorder provides a fascinating environment to get your work done. Moreover, HitPaw Screen Recorder is useful and effective at streaming video on various platforms. Then it also holds the ability to record that stream at high-resolution quality.
Key features of HitPaw Screen Recorder:
- Simultaneously Stream Videos: It lets you stream both pre-recorded and live videos simultaneously to over 30+ platforms, such as YouTube, Facebook, Twitch, etc.
- Same Time Streaming and Recording: It can act as both a live streaming tool and a screen recorder at the same time.
- Advanced Operation Studio: Its advanced operation studio lets you add window, screen, game, texts, webcam, and many more at the same time.
- User-Friendly: It offers a click-based, intuitive interface that is easy to use for most users.
- Customize Recording Area: It can record full screen or customized portions as per the user's request.
- Secure: It offers a 256-bit SSL certificate guarantee.
Follow the below steps to learn how to use HitPaw Screen Recorder for live streaming
The first step is to go to the official site of HitPaw, then download and install the HitPaw Screen Recorder software.
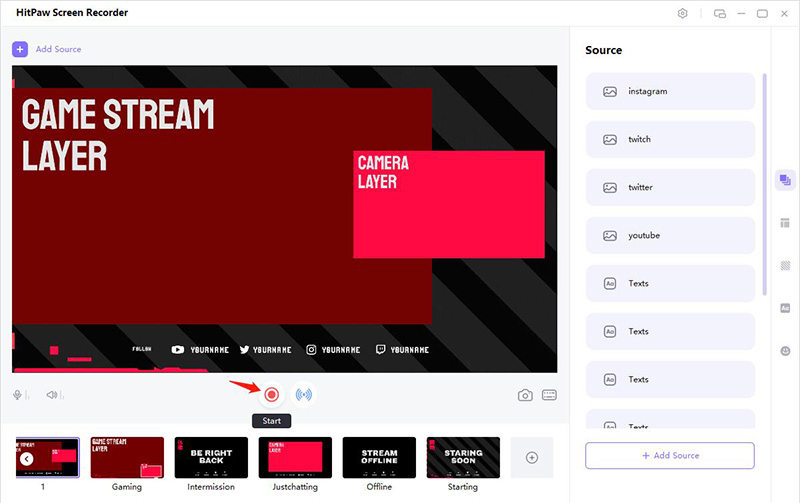
Next up, you'll need to start the program and choose the Live Streaming option from the option you'll find there.
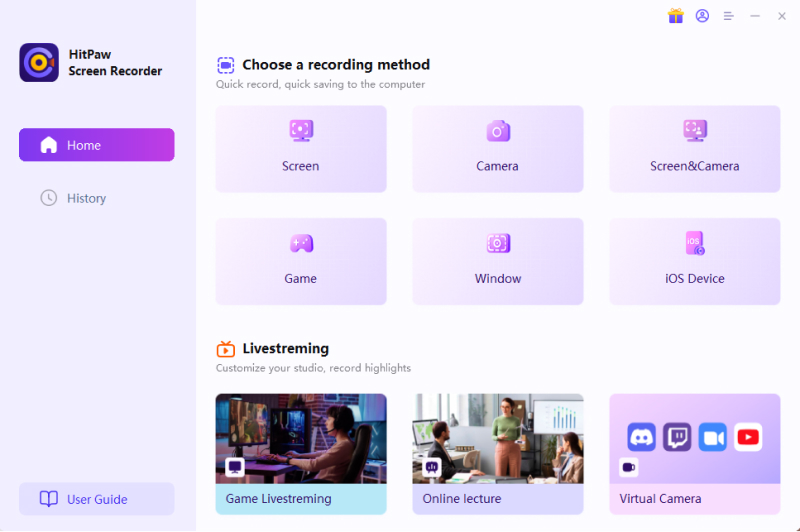
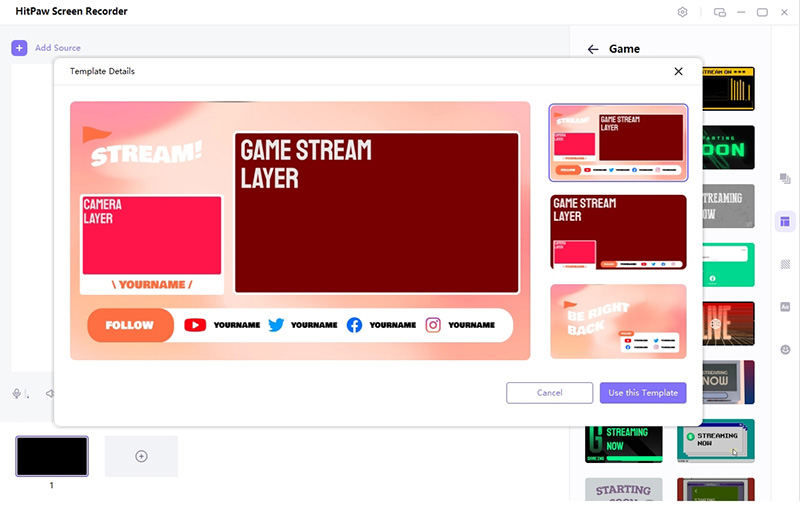
Choose a template and add sources.
After selecting the ''Live Streaming'' icon, you can select the befitting templates for your stream. Moreover, you can also select the color of your templates and add text or stickers if needed.
Later, you'll need to select your webcam after hitting the'' Add Source'' icon. Now, you'll be able to see a webcam running on your screen. We support adding Game, Screen, Window, Webcam, iOS device, image and texts to your live stream.
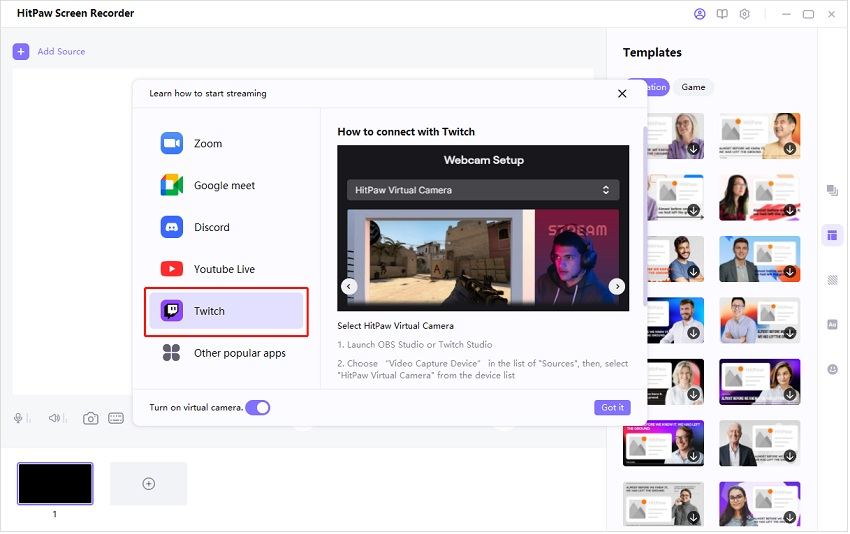
Present in live stream or video call and start live stream.
Now, you'll be able to select the platform you'd like to stream your video into. You can select Twitch from there. Launch OBS Studio or Twitch Studio. Choose “Video Capture Device” in the list of “Sources”, then, select “HitPaw Virtual Camera” from the device list.
Start recording and live stream simultaneously.
Now you can stream on Twitch on PC. Your only task is to start recording the Twitch live streaming by hitting the'' Record'' icon in this phase. HitPaw Screen Recorder enables you to record and stream the video simultaneously.
After you finish the recording, you'll need to hit ''Stop'' to pause the recording. Later, you'll need to assess the recorded stream and download it to your favorite destination.
Part 6. FAQs about OBS Recording Settings
Q1. What is the best recording format for OBS?
A1. To configure OBS settings for recording, you should adjust General settings, Output settings, Audio settings, Video settings, and Advanced settings. If you want to get more details for each settings, you check this article and you will know.
Q2. What should my OBS settings be?
A2. As a matter of fact, there is no settings that your OBS should be. OBS allows you to customize your program so that you can make full use of it. Before changing OBS settings, you should learn that setting carefully and understand it. If you don’t know it at all, then follow the steps in this article to make changes.
Q3. How do I make OBS record smoother?
A3. To make your OBS record smoother, you should have a computer with high performance, so that the program won’t be lagging or freezing while recording. And also, you can adjust your settings to lower figures to make it smoother.
Q4. What are the best OBS settings for recording without big files?
A4. The best OBS recording settings without big files simply require the configuration of the Output FPS rate to 30. This will let you record the screen without creating a large file.
Conclusion
Whether recording educational lectures, gameplay videos, or live streaming, utilizing HitPaw Edimakor can streamline this process with great efficiency. With many generic video editing tools, Edimakor provides you with an intuitive interface to record screens, especially for people who want to avoid complicated OBS recording settings.


 HitPaw Univd (Video Converter)
  HitPaw Screen Recorder
 HitPaw VikPea (Video Enhancer)


Share this article:
Select the product rating:
Daniel Walker
Editor-in-Chief
This post was written by Editor Daniel Walker whose passion lies in bridging the gap between cutting-edge technology and everyday creativity. The content he created inspires audience to embrace digital tools confidently.
View all ArticlesLeave a Comment
Create your review for HitPaw articles