How to Crop a Video on Mac: Steps Guide for Beginners
Video cropping is an essential skill for everyone these days. Whether you're looking to crop out an ex from your Thanksgiving family video, or get rid of the pesky selfie stick from a vlog, knowing how to crop a video can save the day. Frankly, there's no dearth of tools with video cropping feature. However, they vary in complexity, ease of use, quality of output, and many other factors. This detailed guide teaches you how to crop a video on Mac without any prior skills whatsoever. Even if this is your first time editing a video, these step-by-step instructions should help you crop your video like a pro. So, let's get started.
Method 1: How to Crop a Video on Mac with iMovie
The trusty iMovie can perfectly crop videos on Mac. Since it's developed by Apple, it offers a familiar, intuitive interface that feels like home for Mac users. It's remarkably easy to use, too. The clean interface and drag-to-adjust tools make it a breeze for Mac users to crop videos using iMovie. However, as with many free tools, iMovie only offers basic features with limited to no customizations. That's not a problem for casual users though. For basic video cropping needs, iMovie works just fine.
How to Crop a Video in iMovie
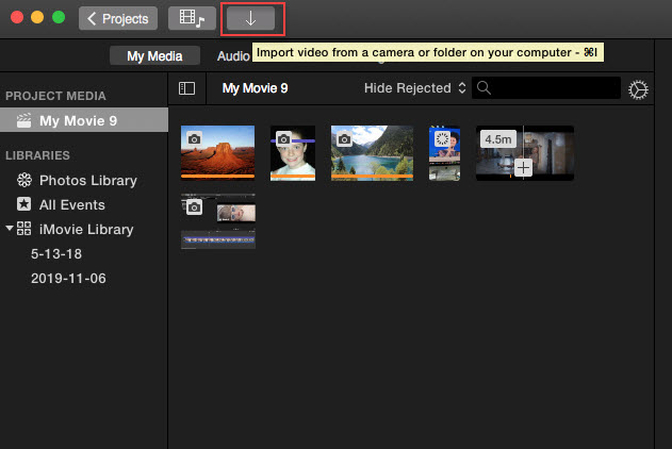
Step 1:Launch iMovie on your Mac >> Click the '+' icon in Projects to create a new one, or open an existing project >> Load the video from its folder.

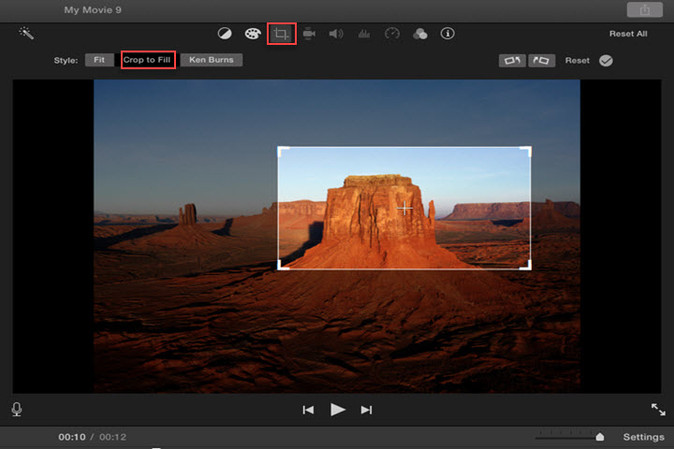
Step 2:Click on the 'Crop' icon at the top >> Choose 'Crop to Fill' >> An adjustable frame (typically in 16:9 aspect ratio) appears on the screen. Drag its corners to adjust the cropping area >> Check the box next to the 'Reset' button at the top right.

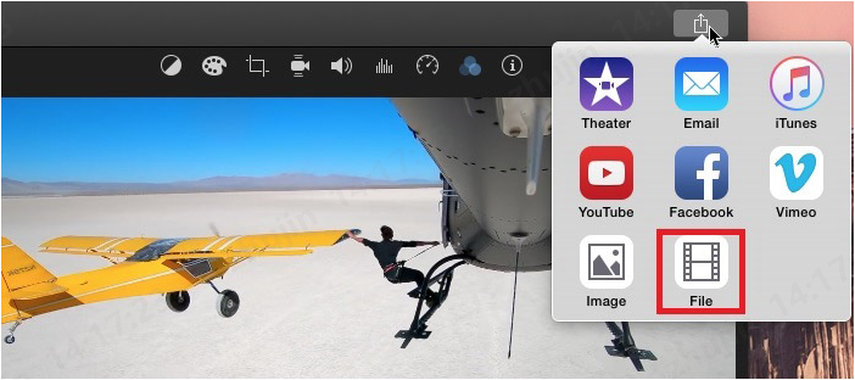
Step 3:Click on the 'Output' icon at the top right >> Choose 'File' to save the video.

Pros
- Beginner-friendly
- Free
- Preinstalled on macOS. No installation needed
- Works flawlessly at basic cropping functions
- Real-time preview of cropping
Cons
- Cropping locked to 16:9 aspect ratio
- Lacks everything but basic features
- Precision cropping unavailable
Method 2: The Best Way to Crop a Video on Mac
Working with presintalled apps on Apple like QuickTime and iMovie has its limitations, but HitPaw Univd for Mac shatters them. Univd offers a freeform cropping tool to crop videos in any aspect ratio you prefer. With granular control and advanced video editing features, Univd elevates the video cropping experience for Mac users. That's why Univd has become the top choice for professional-quality content creation.

HitPaw Univd - All-in-one Video Solutions for Win & Mac
Secure Verified. 254,145 people have downloaded it.
- Freeform Crop: Drag the cropping area to whatever aspect ratio and size you like.
- Preset Aspect Ratios: Need a quick crop? Use preset aspect ratios for a quick cropping job.
- Auto-reframe: AI-powered auto-reframe ensures you never miss the action on the video.
- Beginner-friendly: Univd is so easy to use that anyone can crop videos with it, even beginners.
- Smart Cropping: Use AI to smart crop video frames without manually doing everything.
Secure Verified. 254,145 people have downloaded it.
How to Crop an MP4 on Mac with HitPaw Univd
- Step 1: Activate Crop Feature
- Step 2: Crop Video on Mac
- Step 3: Export Cropped Video
Launch HitPaw Univd >> Go to the "Editor" module >> Select "Crop & Rotate" feature. Drag videos into the tool or click 'Add Files' to import them into HitPaw Univd >> Click the "Crop" icon below an imported video.

Use the rectangle cropping tool to select the areas to be retained after cropping. You can also use preset sizes on the right to select cropping areas.
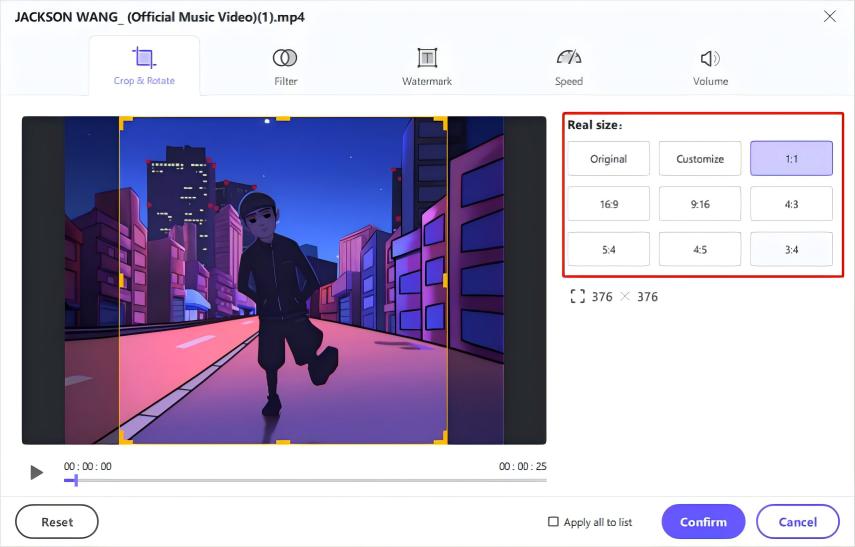
Preview the video by clicking the 'Play' button at the bottom. When you're satisfied, click 'Confirm.' Selecting 'Apply all to list' applies the cropping dimensions to all videos in your imported list.
After cropping, return to the main window >> Click 'Export' or 'Export All'.
Method 3: Crop a Video on Mac with Built-in Photos App
The preinstalled Photos app on Mac is a capable cropping tool, even for videos. It even features other basic features like trimming, which casual users find quite useful. Although it's not a full-fledged video editing tool, it has enough basic features to meet the needs of odd video editing jobs. For instance, its cropping feature is more flexible and useful than the one on iMovie, a dedicated video tool. That's a surprising feature decision from Apple, but if you need a quick crop, Photos may be a better option than iMovie.
How to Crop a Video on Mac with Photos App
- Step 1: Open Video
- Step 2: Crop Video on Mac in Photos App
- Step 3: Save Cropped Video
Launch Photos app >> Drag video into the app >> Double-click on the imported video >> Hit 'Edit' at the top right corner.
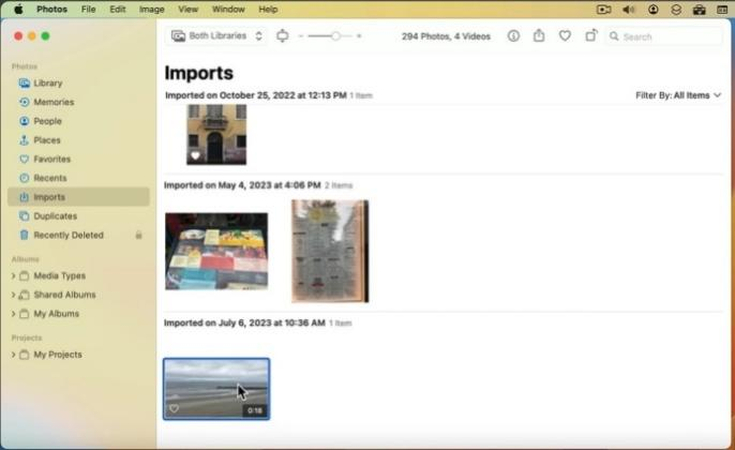
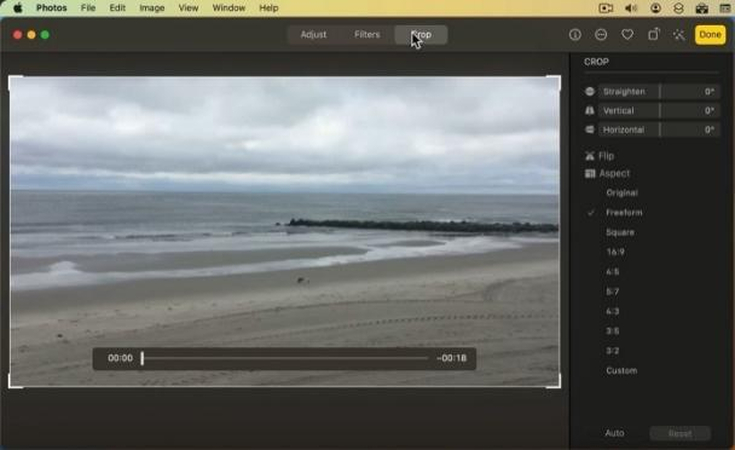
Choose 'Crop' from the Toolbar at the top >> Drag the freeform crop box to custom aspect ratio and size, or use the presets on the right pane.
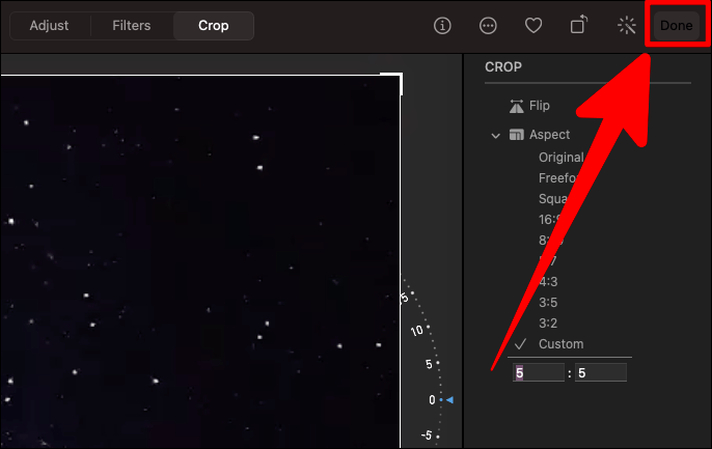
Click 'Done' when finished to save the video to the desktop.
Pros
- Free
- Preinstalled on Macs. No installation required
- Freeform cropping tool
- Original file is preserved while you create cropped versions
- Presets for social media
Cons
- Lacks advanced features
- Lacks precision cropping
- Limited export settings
Method 4: How to Crop a Video in Mac with Final Cut Pro X
It appears there's no dearth of cropping tools on Mac. Final Cut Pro X is another powerful tool with a cropping function baked into it. It's easy to use and fast. It has all the basic and advanced video editing features a professional user would need. Although the process of cropping videos with Final Cut Pro X is easy, it's a bit convoluted. So, you must follow the instructions carefully.
How to Crop a Video in Mac with Final Cut Pro X
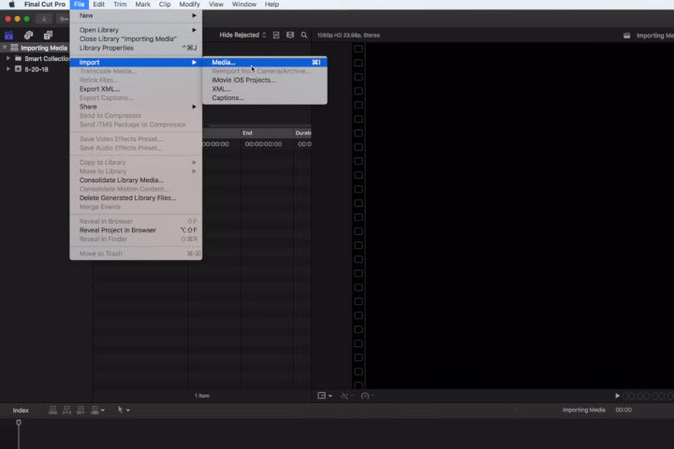
Step 1:Launch Final Cut Pro X on your Mac >> Click 'New Project' >> Go to 'File' >> Choose 'Import' >> Select 'Media' to import the video.

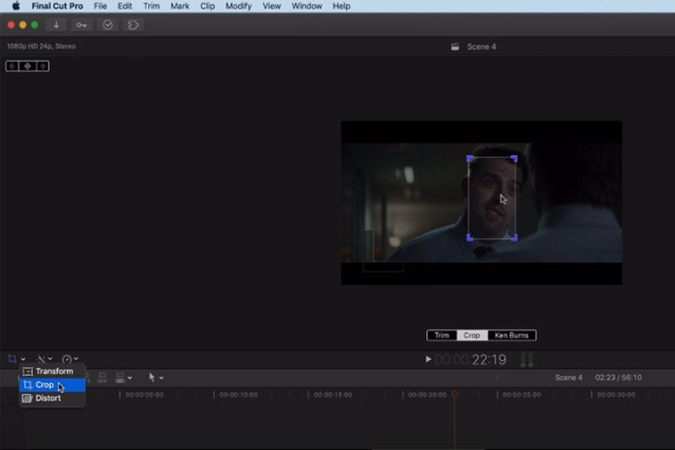
Step 2:Drag the video to timeline at the bottom of the window >> Choose 'Crop' from the menu in the left bottom corner >> Select 'Crop' out of Trim, Crop, and Ken Burns on the right >> Drag the newly appeared crop box's edges to choose the crop area.

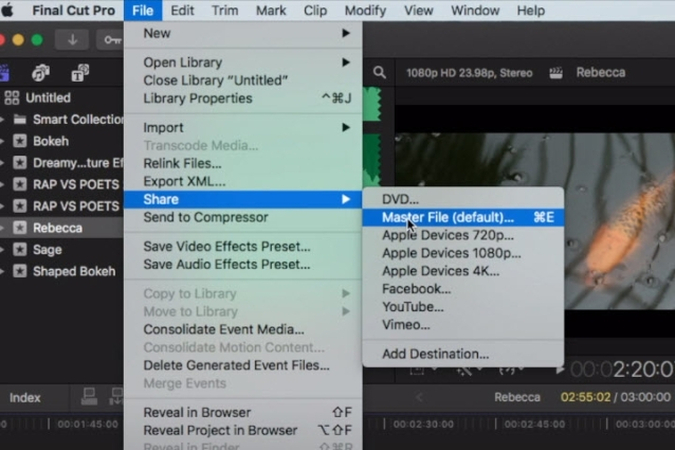
Step 3:Go to 'File' >> Select 'Share' >> Hit 'Master File' >> Select destination and other export settings >> Hit 'Export.'

Pros
- Precision cropping
- Advanced cropping features
- Cutting-edge editing features
- Efficient workflow
Cons
- Steep learning curve
- Expensive
FAQs on Cropping a Video on Mac
Q1. What is the Ken Burns effect in iMovie and Final Cut Pro X?
A1. It's a special cropping feature, wherein the user selects and start and end frame of a clip, and the tool pans and zooms between the two frames, creating a dynamic zoom effect.
Q2. Which app should I use for professional cropping?
A2. For Mac, HitPaw Univd and Final Cut Pro X are the best options for professional cropping.
Q3. Can I crop videos to fit social media platforms?
A3. HitPaw Univd has built-in preset aspect ratios for various social media platforms. You can use the presets the crop the videos for any social media platform.
Q4. How to crop a video in QuickTime?
A4.
QuickTime Player (macOS) allows basic video cropping, but with limited control compared to professional editors. QuickTime Player cannot directly crop video dimensions (remove black bars/resize frames). The "Trim" function only cuts video length, not the frame itself. Here's how to do it:
Conclusion
Cropping a video on a Mac is a straightforward process that anyone can master with the right steps. Whether you need to remove distractions, focus on a subject, or adjust the frame for social media, this guide provides clear instructions to help you achieve professional-looking results. Choose HitPaw Univd to make your task easier. Its advanced AI features streamline cropping by letting AI do everything from freeform cropping to auto-reframing, so that you can kick back and enjoy the time you save. Check HitPaw Univd today!




 HitPaw VoicePea
  HitPaw VikPea (Video Enhancer)
 HitPaw FotorPea


Share this article:
Select the product rating:
Daniel Walker
Editor-in-Chief
This post was written by Editor Daniel Walker whose passion lies in bridging the gap between cutting-edge technology and everyday creativity. The content he created inspires the audience to embrace digital tools confidently.
View all ArticlesLeave a Comment
Create your review for HitPaw articles