Top 4 Ways to Convert HEIC to JPG on Mac
High-Efficiency Image File Format (HEIC) is a relatively new format, adopted only in 2017 by Apple, with the release of iOS in 2017. Although it is a relatively new format and will take some time to become more highly popular, it is still used to a limited extent. However, with its use comes the issue of converting HEIC to JPG, a much more popular format.
The good news is that multiple tools available today to help you do that. This article discusses how you can easily convert HEIC to JPG on Mac without much hassle.
Part 1. Best Way to Convert HEIC to JPEG on Mac without Preview in 120X
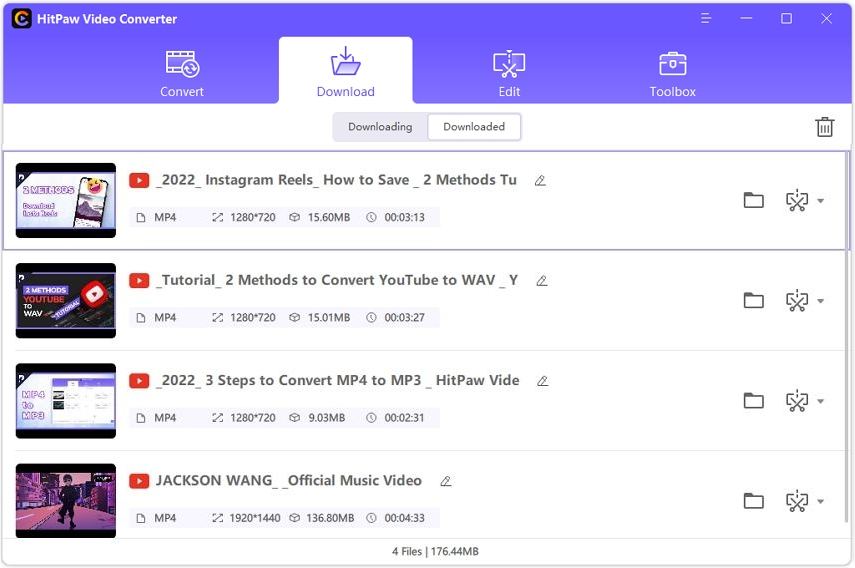
If you're looking for an excellent HEIC to JPG converter that brings everything you need in one package, HitPaw Video Converter for Mac should be number one on your list. Its bulk image converter feature provides you with a bunch of features that are hard to find in any other converter.
Using its professional HEIC to JPG converter can batch convert HEIC to JPG on Mac with super-fast speed. What is more, it uses the most advanced technology to preserve the original quality during the phtoo conversion process.
Features of HitPaw Image Converter
- It converts your images completely free, with no format or quality limitations.
- No ads or watermarks provide a clean experience.
- It is a true one-stop media solution for everyone as it converts images, audio, videos, and Apple music files to 1000+ formats.
- Support up to 8k is also available, which is rare in video converters.
- You don't need to be a professional to use HitPaw. It has a simple interface and guides you throughout the conversion process.
Simple Steps to Convert Your HEIC To JPG On Mac
-
Step 1.Download and install the HitPaw Video Converter.
-
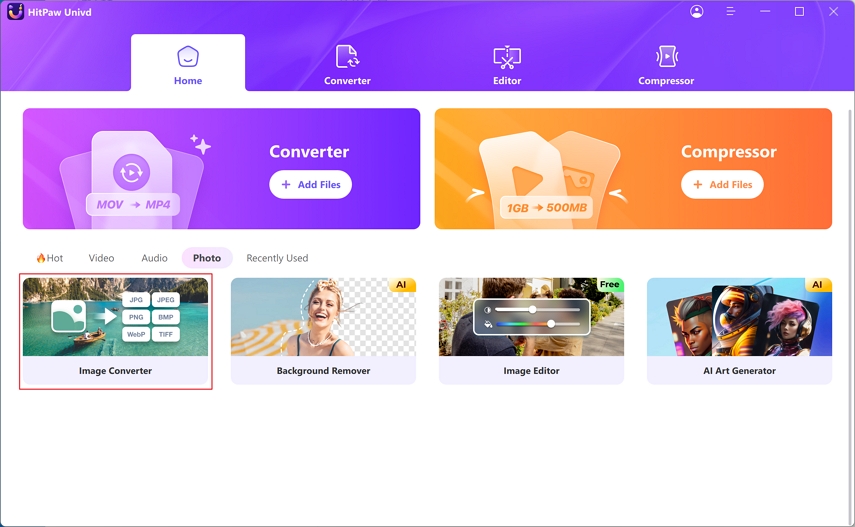
Step 2.Just turn to the Toolbox menu, and choose the image converter function.

-
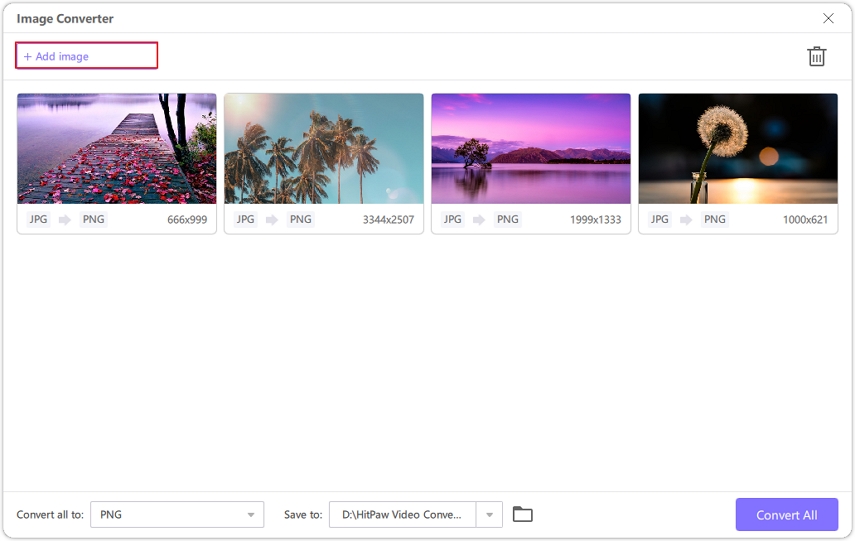
Step 3.Import the HEIC image you need to convert to JPG by clicking Add images

-
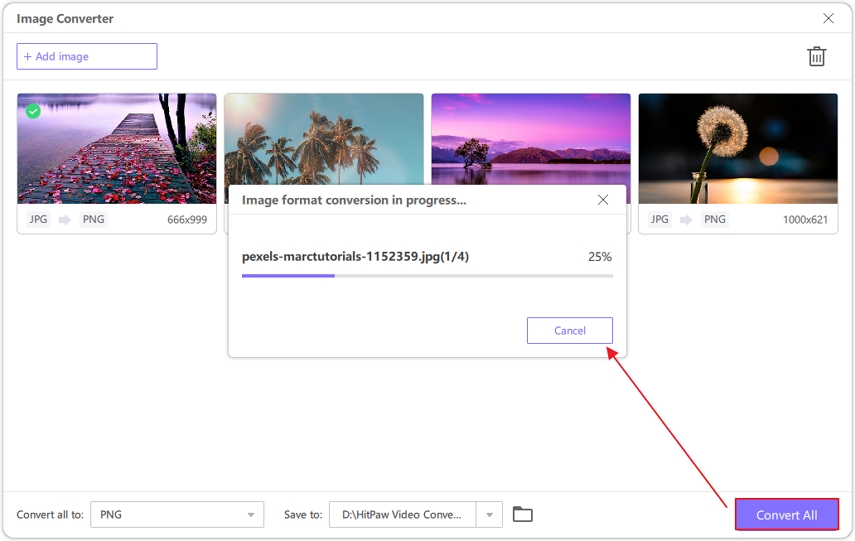
Step 4.Select the JPG format and destination folder, then click Convert all to start the convert procession. You can also cancel to convert the image whenever you want.

Part 2. How to Convert HEIC to JPG on MacOS Monterey 12 with Finder
If you're not working in the Apple ecosystem, converting HEIC to a more popular file format like JPG becomes necessary. Thankfully, macOS Monterey 12 can convert HEIC to JPG mac directly from Finder.
You don't even need to use the Preview to do so. Instead, you have to hit "Convert Image," and your file is converted immediately. And if you want to convert multiple photos, batch conversion is also available.
Simple Steps to Convert HEIC to JPG on MacOS Monterey 12 with Finder
-
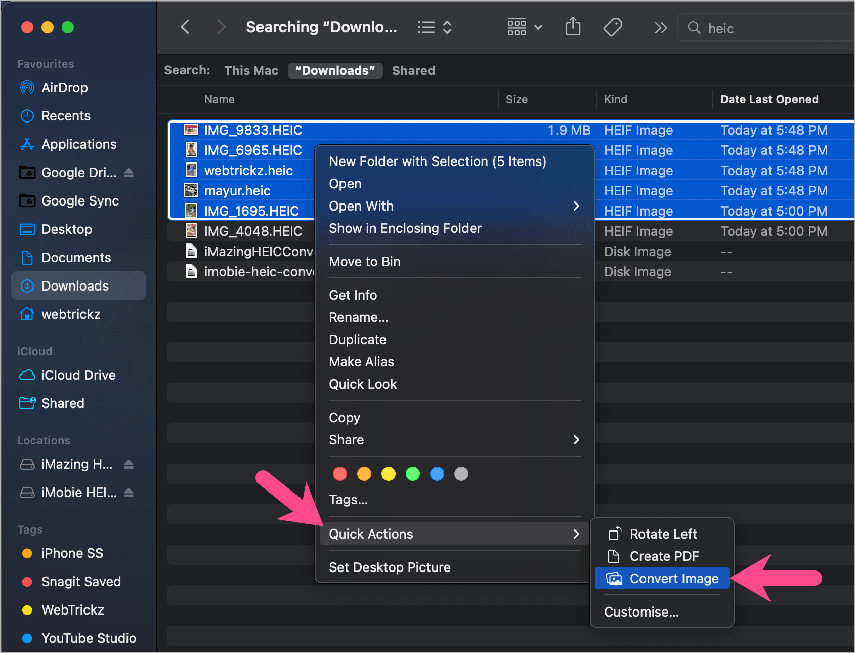
Step 1.Go to Finder or Desktop and right-click on the HEIC image you want to convert. You can also select multiple HEIC images for batch conversion.
-
Step 2.Now go to Quick Actions and hit Convert Image. Select JPEG as your output format.

-
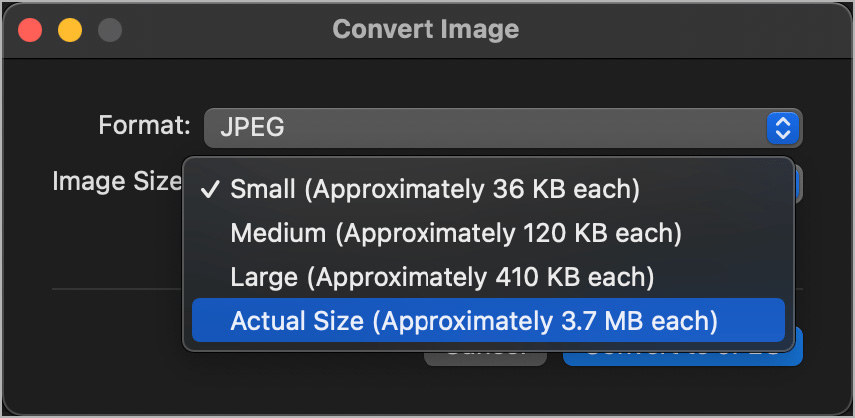
Step 3.In the Image Size section, always select Actual Size to export it in original quality.

-
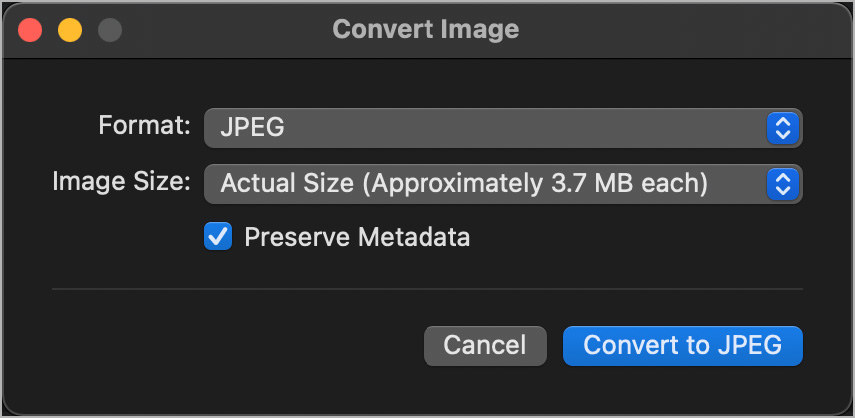
Step 4.If you want to retain the EXIF Metadata, keep 'Preserve Metadata’.
-
Step 5.Hit Convert to JPEG and you're done. Your images will be saved in some folder.

Part 3. Convert HEIC to JPG with Preview on Mac
Storing images in HEIC is great for saving space. However, working with it can be a troublesome experience. In such a scenario, you can convert HEIC to JPG on Mac using Preview.
It has multiple handy features that help you achieve high-quality conversion; supporting multiple file formats ensures that every user can easily convert their files. Secondly, it offers decent speeds without any loss in quality.
Simple Steps to Convert HEIC to JPG Effortlessly
-
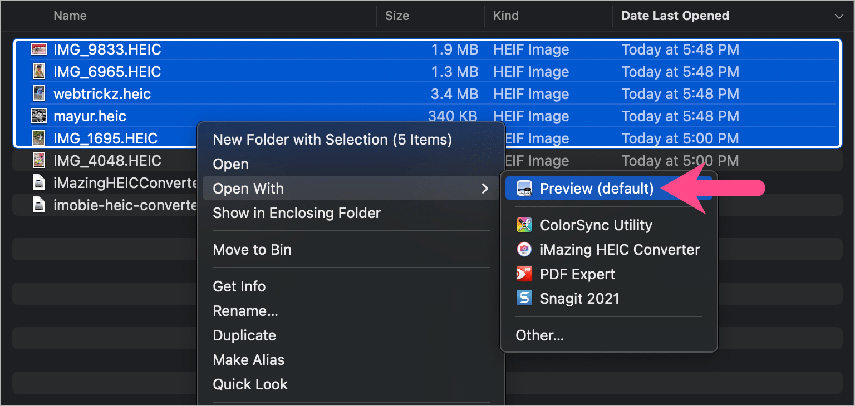
Step 1.If Preview isn't your default HEIC viewer, control-click your photo and Open with Preview.

-
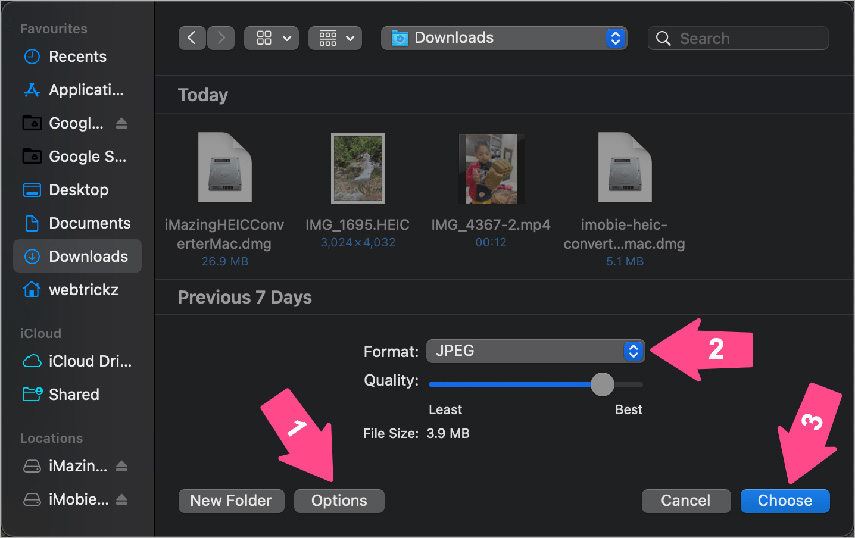
Step 2.Open the File menu and select Export.
-
Step 3.In the drop-down menu, select JPG as your output format and adjust the quality under the Quality slider.

-
Step 4.Select a folder and save your file to it.
Part 4. How to Convert HEIC to JPG with Automator on Mac
Automator is another macOS app that you can easily convert HEIC to JPEG mac. It reduces mutual labor, such as moving folders, renaming files, etc. In addition, Automator adds a right-click option for you so that you can repeat the conversion anytime you desire in the future without launching Automator.
Simple Steps to Convert HEIC to JPG using Automator
-
Step 1.Click New Document after opening Automator.
-
Step 2.Hit Quick and then hit Choose.

-
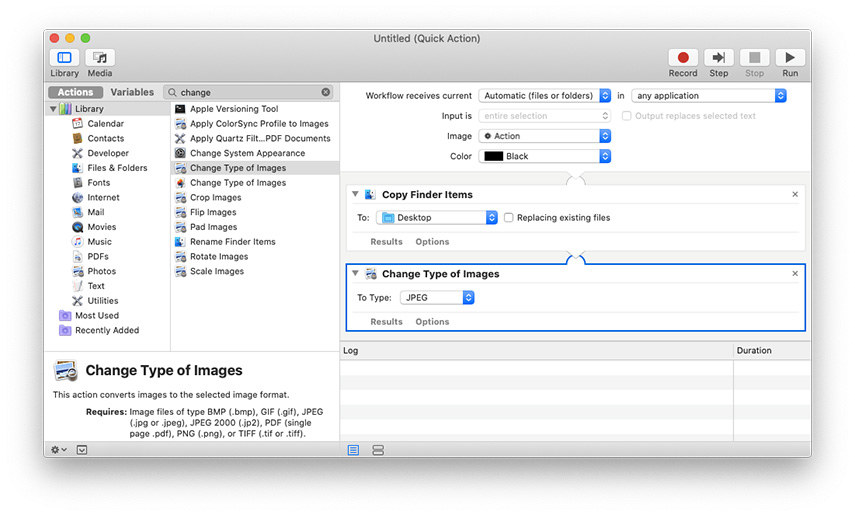
Step 3.Include the Copy Finder Items section by double-clicking it. Then choose the folder where you want to save your converted images.
-
Step 4.Now hit Change Type of Images and double-click it to select JPG in the drop-down menu.
-
Step 5.Now hit File → Save and name your Quick Action to avoid launching Automator every time you want to convert HEIC to JPG.

Part 5. FAQs of Converting HEIC to JPG on Mac
We’ve explained in detail the different methods to how you can convert HEIC to JPG. But still, there may be some questions popping up in your mind. So, here are some frequently asked questions which can make your conversion process easy and comfortable.
Q1. What is HEIC, and why do you need to convert it to JPG?
A1. HEIC stands for High-Efficiency Image File, a format introduced by Apple in 2017. It hasn't been adopted widely yet, which limits its functionality. Therefore, while working on HEIC images, you usually need to convert them to a much more popular format JPEG.
Q2. Is HEIC better than JPG?
A2. HEIC is superior to JPG because it compresses the image to a smaller file size without compromising its quality. However, the issue is its limited support across decides. Although more developers have started adopting it, it is still far from being as popular as JPG or other formats.
Q3. How to set your iPhone to stop taking HEIC photos?
A3. If you don't want to deal with HEIC images and want to change the format in which your iPhone takes photos, you can do it. Open Settings, tap Camera to reveal the available Formats, and select the most compatible format.
Part 6. Conclusion
We hope this detailed guide has helped you learn all the essential aspects of converting HEIC files to JPG. Although multiple converters are available, as discussed in the article, HitPaw Video Converter for Mac earns the top spot. Thanks to its incredible set of features and simple UI, there is no other converter that competes with it.



 HitPaw VikPea
 HitPaw Watermark Remover


Share this article:
Select the product rating:
Joshua Hill
Editor-in-Chief
I have been working as a freelancer for more than five years. It always impresses me when I find new things and the latest knowledge. I think life is boundless but I know no bounds.
View all ArticlesLeave a Comment
Create your review for HitPaw articles