Step-by-Step Guide to Exporting MP4 from Premiere Pro
Many video editors find themselves facing technical roadblocks when trying to export videos to MP4 in Adobe Premiere Pro. From confusing settings to videos that won't play on phones or social platforms, the struggle is real. This guide walks you through the entire MP4 export process, offers solutions to common problems, and introduces an efficient tool to streamline your workflow.
Part 1. How to Export MP4 from Premiere Pro
Exporting videos correctly ensures smooth playback on any device or platform. Follow these steps to export MP4 from Premiere Pro efficiently:
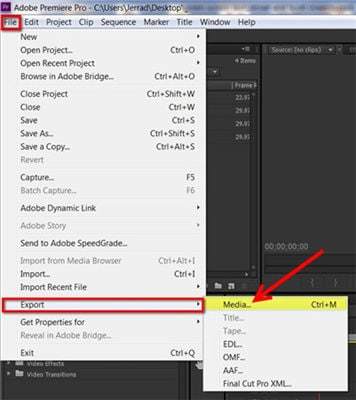
Step 1: Open the Export Settings Window
Click on File > Export > Media to open the export settings panel. This is where you can define your format, codec, resolution, and other output parameters.
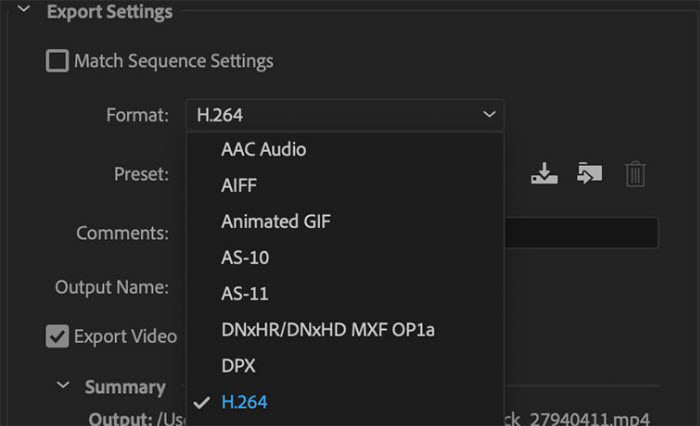
Step 2: Choose Format as H.264
MP4 isn't listed directly; instead, select H.264 from the Format dropdown. H.264 is the codec that encodes videos in the MP4 container.
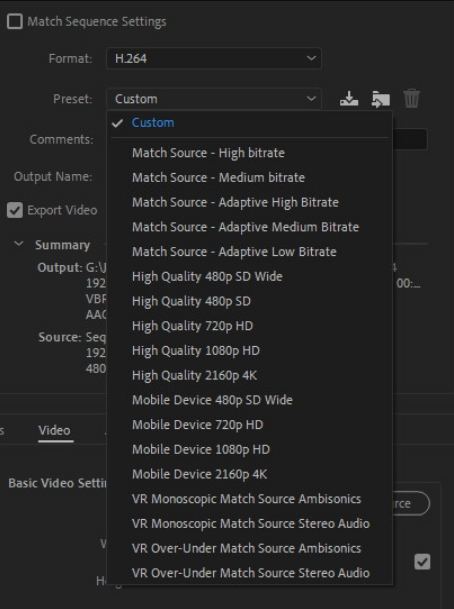
Step 3: Select the Right Preset
Choose a preset that matches your video goals:
- Resolution: Match source (e.g., 1920x1080). For 4K, select 3840x2160.
- YouTube 1080p Full HD: Best for web uploads
- Match Source - High Bitrate: Maintains source resolution and good quality
- Mobile 720p/1080p: For fast playback on phones
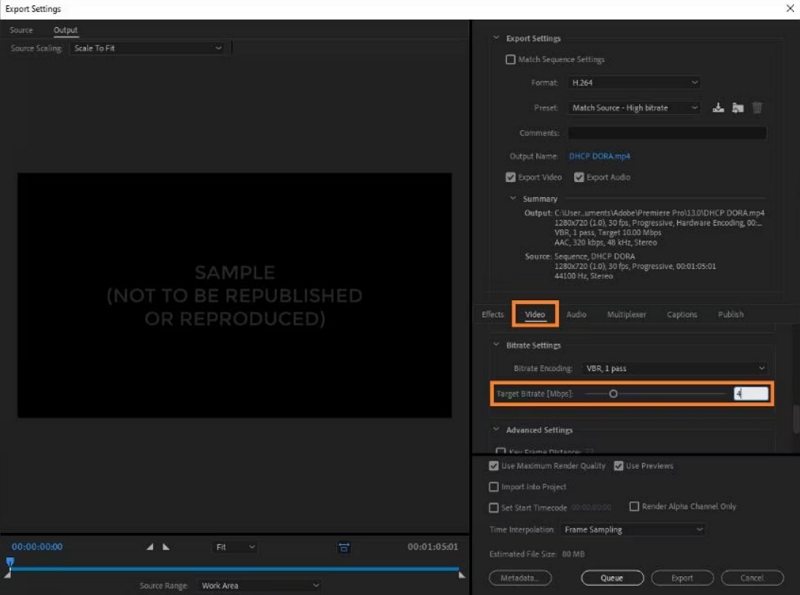
Step 4: Adjust Bitrate Settings
Lower bitrates reduce file size but may degrade quality. Match your target platform (YouTube, Instagram, etc.). In the Video tab:
- Bitrate Encoding: Use VBR, 2 pass for better quality
- Target Bitrate: 8-12 Mbps for 1080p; 35-45 Mbps for 4K
Step 5: Set Output Name and Location
Click on the blue file name to choose where to save your exported MP4 file and give it a meaningful name.
Step 6: Hit Export or Queue
Choose Export for direct rendering or Queue to export via Adobe Media Encoder
Common Problems When Exporting to MP4 in Premiere
| Issue | Solution |
|---|---|
| H.264 missing | Install Adobe Media Encoder or restart Premiere |
| Large file size | Lower bitrate to 10 Mbps or enable VBR 1-pass |
| Can't play on phone | Set Level to *4.0* and Profile to Baseline |
| Export crash | Clear media cache (Edit > Preferences > Media Cache) |
Part 2: Best Alternative to Convert Premiere Pro Video to MP4
If Premiere Pro's export fails or results in incompatible formats, HitPaw Univd is your all-in-one solution. It is a powerful multimedia toolkit designed to simplify and enhance your video workflow.
Why Choose HitPaw Univd
- Convert videos exported from Premiere to over 1000+ formats (MP4, MOV, HEVC, WebM, AVI, etc.)
- Pre-process non-Premiere-friendly formats before editing (e.g., convert FLV/WebM to MP4/MOV)
- Batch convert multiple files with high-speed processing
- Built-in editing tools: trim, crop, add watermark, adjust volume
- AI features: video enhancer, noise remover, speech to text, etc.
How to Convert Premiere Pro Video with HitPaw Univd
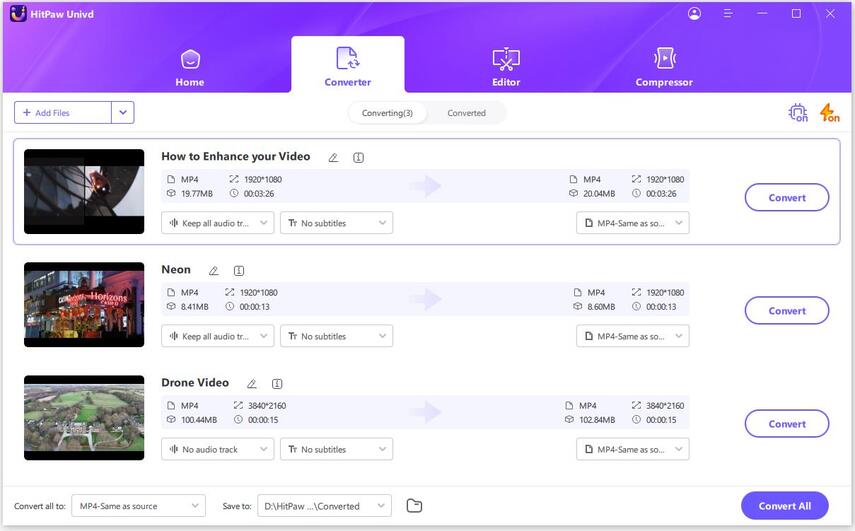
Step 1.Launch HitPaw Univd on computer, and switch to the Converter menu. Click Add Files > Add Video to import your video(s).


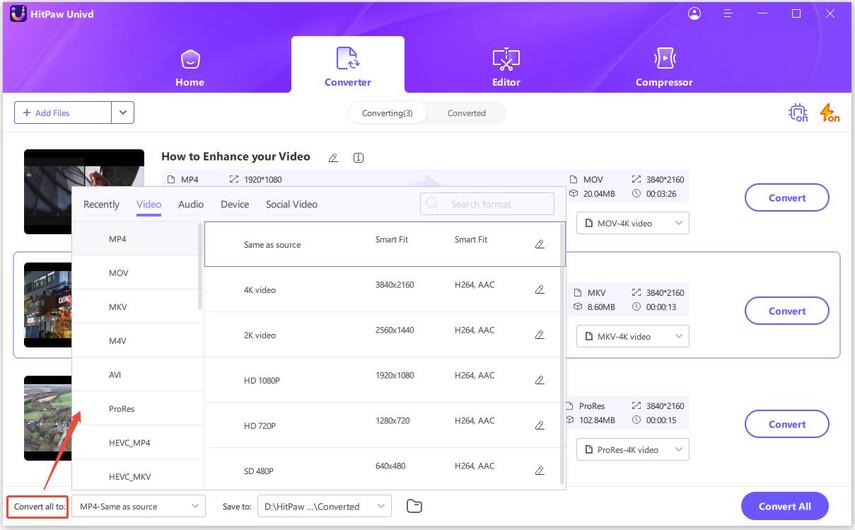
Step 2.Click "Convert All" in the lower left corner to select an output format for all imported files. You can choose MP4 in 4K, 2K or 1080p.

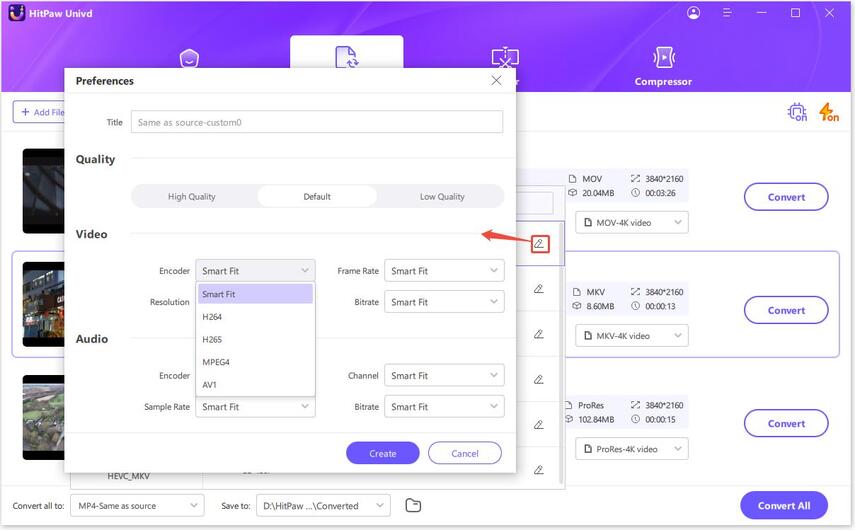
Click the edit icon to edit the video quality, codec, frame rate, etc.

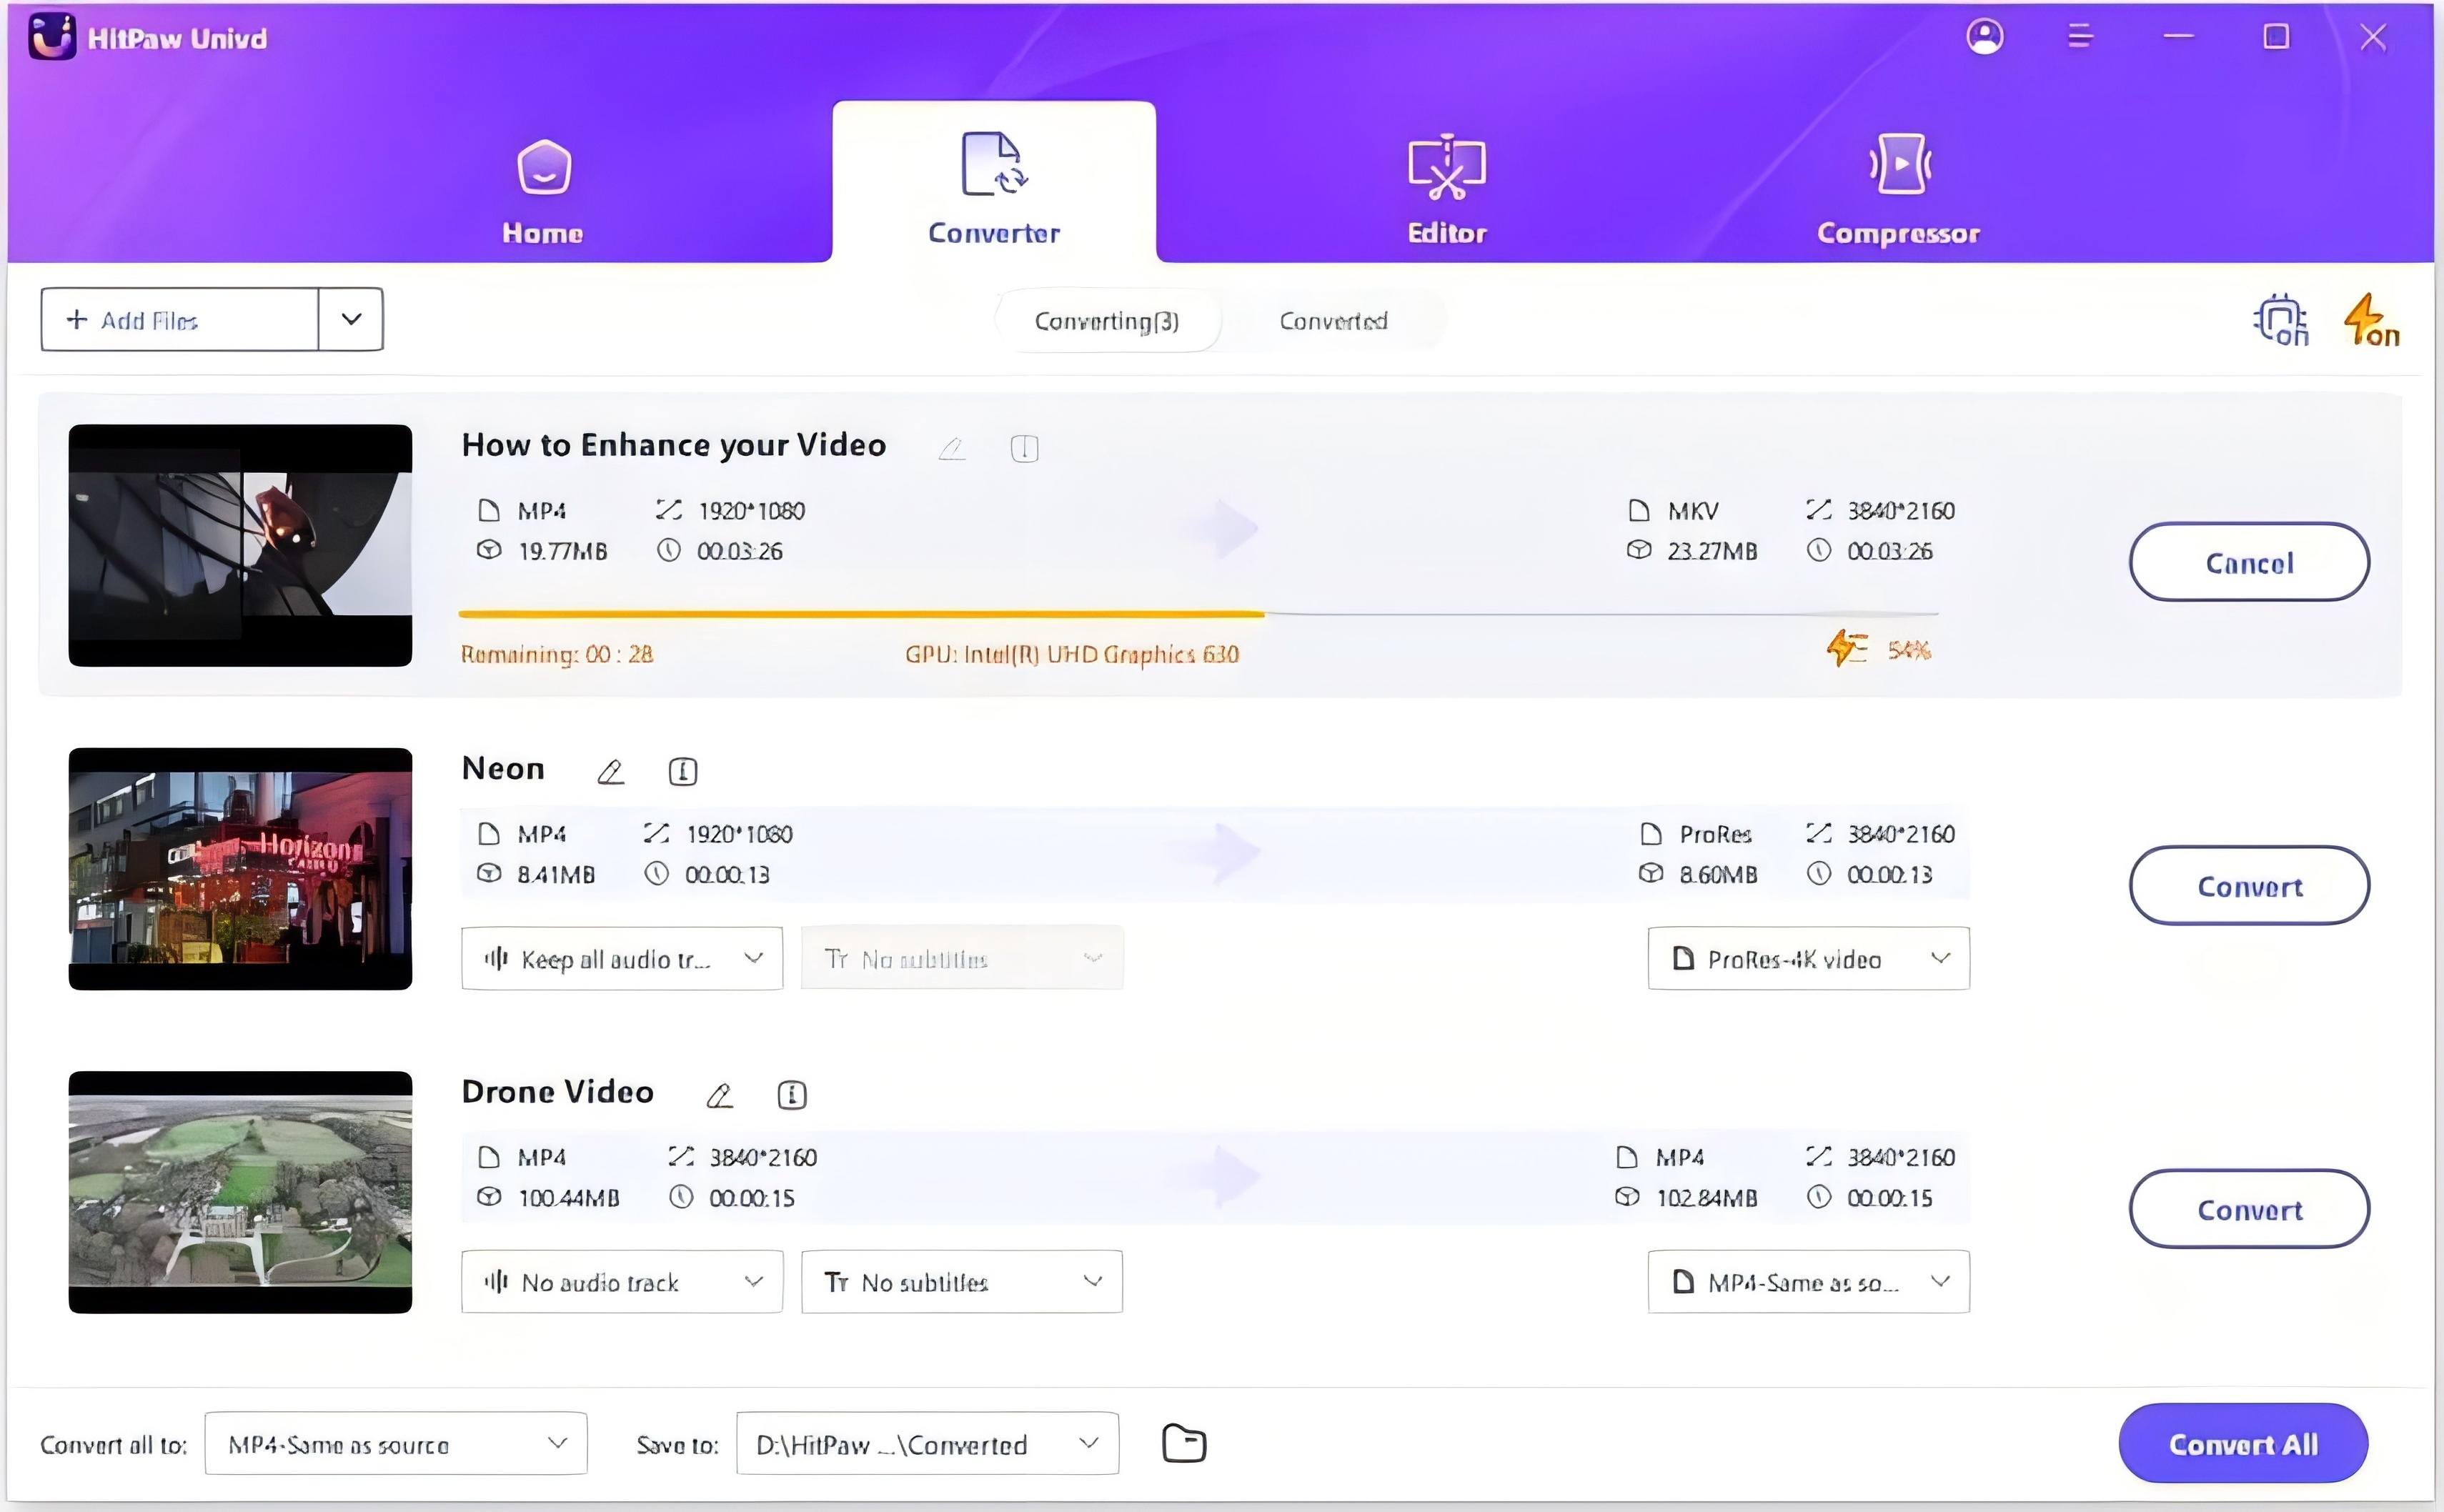
Step 3.Click Convert All to start processing files in batch. This program utilizes full GPU acceleration to speed up conversion speed up to 120x faster.

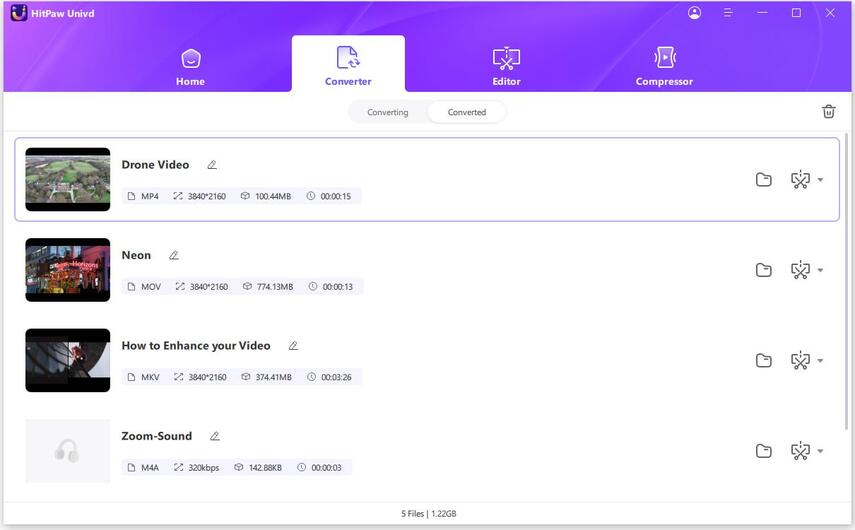
Step 4.After conversion, you can access to the converted MP4 files by switching to the Converted tab.

Part 3: FAQs
Q1. How do I export high quality MP4 in Premiere Pro?
A1. Use H.264 format, choose "High Bitrate" or "YouTube 1080p HD" presets, and manually set target bitrate to 12-20 Mbps for better clarity.
Q2. Why is MP4 not available in Premiere Pro?
A2. MP4 is encoded via H.264. If H.264 isn't listed, try changing the sequence settings or updating Premiere Pro.
Q3. How to export 4K MP4 from Premiere Pro?
A3. Select H.264, set resolution to 3840x2160 manually, and increase bitrate to 35-45 Mbps for good quality 4K exports.
Conclusion
Exporting MP4 from Premiere Pro is essential for creating shareable, playable content across devices. On the meanwhile, when compatibility issues arise, HitPaw Univd helps eliminate format errors, accelerate workflows, and enhance quality via AI. Whether preparing footage for Premiere or optimizing exports from Premiere, it's the ultimate sidekick for editors.



 HitPaw VoicePea
  HitPaw VikPea (Video Enhancer)
 HitPaw FotorPea

Share this article:
Select the product rating:
Daniel Walker
Editor-in-Chief
This post was written by Editor Daniel Walker whose passion lies in bridging the gap between cutting-edge technology and everyday creativity. The content he created inspires the audience to embrace digital tools confidently.
View all ArticlesLeave a Comment
Create your review for HitPaw articles