Resize Images on Mac: Native Apps vs Advanced Tools
Resizing an image on Mac can be necessary for various reasons-whether you're preparing pictures for a website, compressing them for faster email sharing, or adjusting dimensions for a presentation. While macOS offers built-in tools like Preview for basic edits, batch processing and advanced features require specialized solutions. This guide covers native methods, free apps, online tools, and professional software to handle single or bulk image resizing efficiently.
Part 1. Batch Resize and Edit Images on Mac
If you're dealing with multiple images or want to do more than just resize-like converting images to a different format, adding watermarks, cropping, or rotating-using a full-featured tool is your best option.
That's where HitPaw Univd for Mac becomes a top recommendation for Mac users. It is an all-in-one program that contains over 30 multi-media tools for video, audio and photos.
Key Features of HitPaw Univd on Mac
- Image Compressor: Easily resize images by adjusting dimensions and compressing them without significant quality loss.
- Image Converter: Convert images between formats like JPG, PNG, BMP, TIFF, and WebP-individually or in batches.
- Image Editor: Edit images by cropping, rotating, and adding text/watermarks, and adjusting brightness/contrast/saturation/hue.
- Multiple Formats: Supports almost all image formats including JPG, PNG, RAW, HEIC, TIFF, etc.
- Batch and Fast: Batch compress/convert/edit hundreds of files at the same time with full GPU acceleration.
The Steps to Reduce Image Size Using HitPaw UniVD on Mac:
Step 1.Download and install HitPaw Univd on your Mac. Launch the program, and switch to the Compressor menu.

Step 2.Click Add Image to import your photos. Instead, you can drag and drop your images to the program.
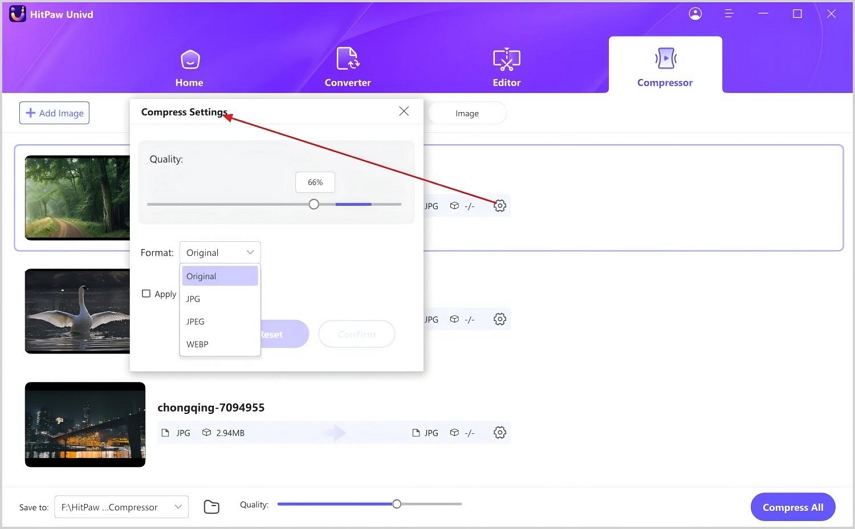
Step 3.Click on the gear icon and select an appropriate compression quality and level. After selecting the compression level, tap on the "Apply all to list" icon. Tap on the "Confirm" option to save the settings.

To batch resize images, you can adjust the compression ratio at the bottom. Drag the slider on the Quality to adjust the image size.

Step 4.Finally, click the Compress All to start compressing the images.

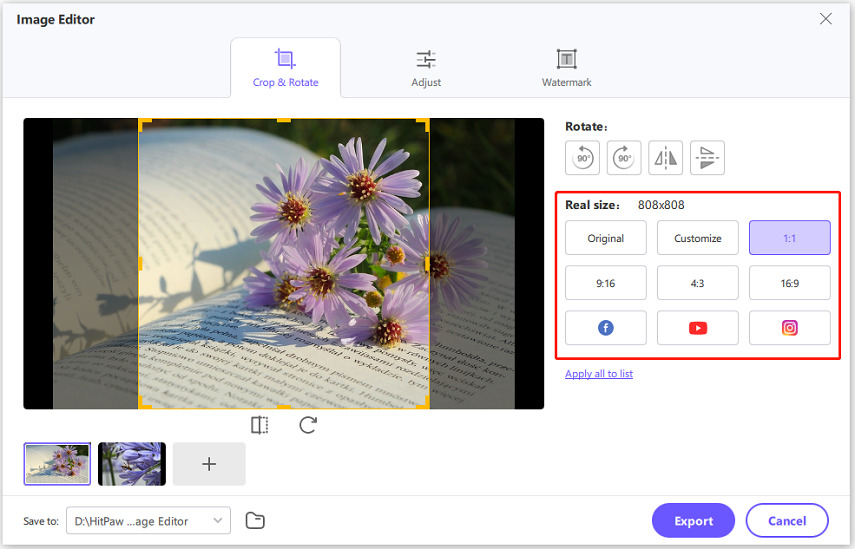
If you'd like to crop images, please go to the Home interface, and find Image Editor feature from the Photo tab.

Import your photos to crop. The program offers several fixed scales as well as supports customizing ratio.

Pros:
- Batch processing saves time
- Compresses images without quality loss
- Advanced tools such as image converter and image editor.
- Fast and user-friendly interface
Cons:
- Requires software installation
Part 2. Free Mac Apps to Resize an Image on Mac
Even without third-party software, macOS includes several built-in tools that allow image resizing for free.
1. Resize an Image Using Mac's Built-in Preview App
The preview app on the Mac PC is a highly underrated tool as it can help you edit your photos immensely. Hence, if you intend to resize image on Mac, the Preview app might come in handy. Here's how to resize an image on Mac.
How to Resize a Single Image
- Open your image by double-clicking it (it opens in Preview by default).
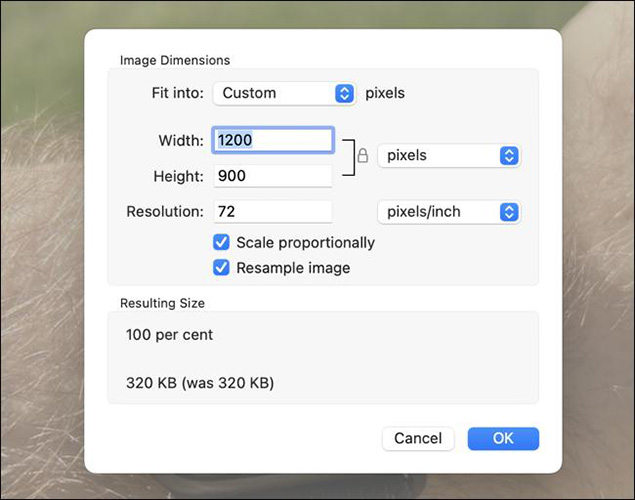
- Click Tools > Adjust Size from the top menu.
- In the pop-up window, input new dimensions in Width and Height.
- Check "Scale proportionally" to maintain aspect ratio.
- Click OK, then go to File > Save to export the resized image.
How to Resize Multiple Images:
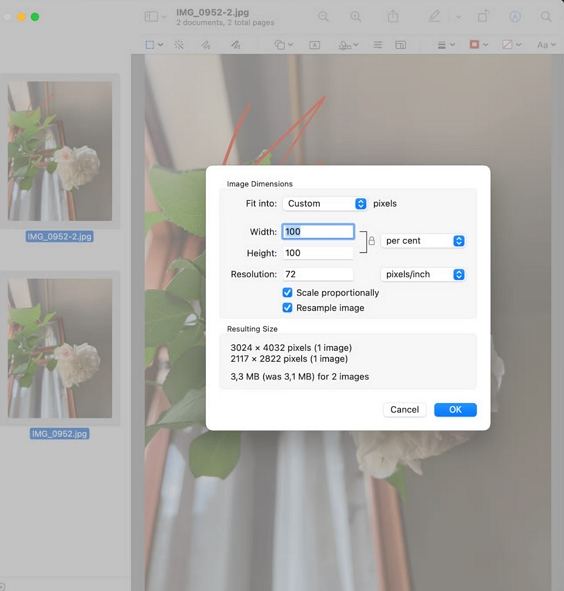
- Select all images you want to resize, then right-click and choose Open With > Preview.
- In the Preview sidebar, press Command + A to select all.
- Go to Tools > Adjust Size.
- Set desired width/height, then click OK.
- Use File > Save All or Export Selected Images to save the resized batch.
Pros:
- Pre-installed on all Macs
- Simple and intuitive
- Supports batch resizing
Cons:
- No advanced editing options
- Doesn't compress file size effectively
- Can't convert image format
2. Change the Size of an Image Using Pages on Mac
Another way to resize images on Mac is through Pages. It is a straightforward method to resize an image on Mac. Here is how to resize image on Mac.
Step 1.Select the image in the Pages document and choose the "Arrange" icon.

Step 2.Navigate to the Size icon.

Step 3.Enter the new value in the Height or Width.

Step 4.If Constrain proportions have been checked off, you must tinker with the value of Height or Width to change the image's dimensions.

Step 5.You can also resize the photo with the trackpad or mouse until it fulfills your requirements.
Step 6.After selecting the image, you must move the mouse cursor to the white boxes on the corners or sides. You can turn a single arrow cursor to a double-sided arrow.

Step 7.When you see a double-sided arrow, you'll need to tap and drag the photo's edge to make it smaller or larger. If you checked off the Constrain proportions, your image would be resized automatically.
Pros:
- Good for document layout
- No additional tools required
- Resize visually
Cons:
- Not meant for actual image export
- No way to compress or change format
- Manual and less precise
3. Resize Images to a Set Size With Automator
If you run a blog, converting the images to a specific height or width is common. Automator is a brilliant tool that empowers you to resize photos to the desired size. Here's how to resize an image on a Mac via Automator.
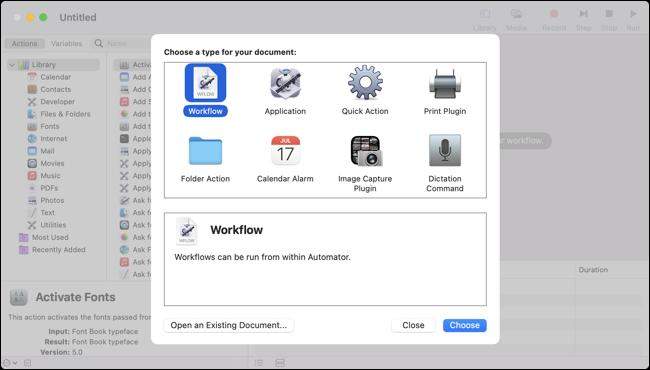
Step 1.Select "Quick Action" after launching the Automator.

Step 2.After navigating the workflow area, alter the " Work Receives Current" icon to the "Image files" icon. Proceed ahead by specifying the Finder as your application.

Step 3.Select an icon you want to associate with your action after hitting the "Image" icon. Next, you'll need to colorize your color accordingly.
Step 4.After visiting the "Finder" group, drag the "Get Specified Finder Items" to the workflow menu.

Step 5.Import the "Scale Images" to the workflow after hitting the "Photos" group. Next, you might have to specify the size either by percentage or by Pixel. If selecting the pixels, remember that that will apply to either axis. Next, save the Quick Action after hitting the " Command+S" icon.
Step 6.Right-click on your image file in the Finder icon to use the action. Next, select" Quick Actions" before selecting your generated workflow.

Pros:
- Great for repetitive tasks
- Fully automated
- Resizes multiple images at once
Cons:
- Not beginner-friendly
- Limited visual feedback
- No format conversion or compression
Part 3. Resize Images on Mac with Online Tools
Online image resizers are a convenient choice for quick, one-time edits without installing software. They allow you to upload an image, set new dimensions, and download the result in just a few steps. This method is ideal for users who want fast results from any device. However, online tools often have limits on file size, lack batch processing, and may pose privacy concerns since your images are handled on external servers. Despite these drawbacks, they remain useful for simple resizing tasks on the go.
Popular online tools include ResizePixel, ILoveIMG, Pixlr, and Image Resizer. Let's take ResizePixel as an example:
How to Resize an Image Using ResizePixel
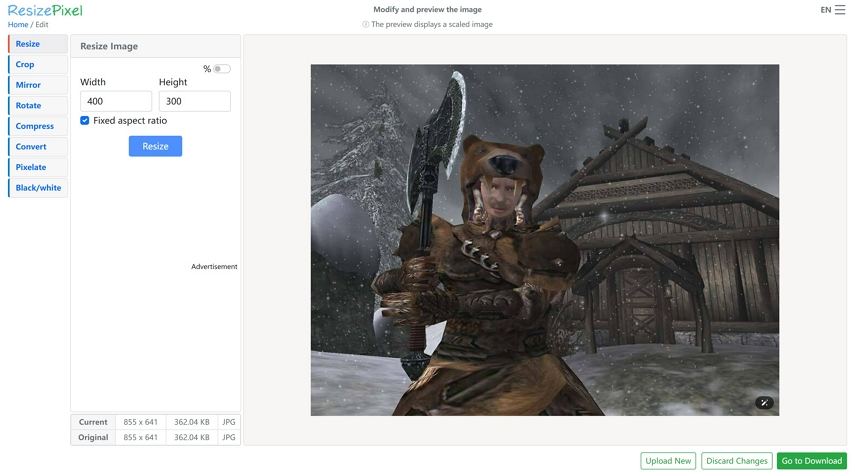
- Go to the websiteof resizepixel.
- Click "Upload Image" and choose the file from your Mac.
- Enter the desired width and height.
- Click "Resize" and wait for the image to process.
- Click "Download" to save the resized image.
Part 4. Which Method Should I Use to Resize Images on Mac?
| Scenario | Recommended Tool |
|---|---|
| Resize a single image quickly | Preview app |
| Resize images inside a document | Pages |
| Automate batch resizing | Automator |
| Resize, compress, and edit in one place | HitPaw Univd |
| Quick resize online without install | ResizePixel or ILoveIMG |
Choose the one that fits your current needs-but if you're dealing with multiple files or want quality & speed, HitPaw Univd is the best all-around solution.
Conclusion
Resizing images on a Mac can be as simple or advanced as you need it to be. Whether you're using the built-in Preview app for one-time edits, Automator for batch resizing, or looking for a powerful all-in-one solution like HitPaw Univd, there's a perfect tool for your workflow. For the best balance of efficiency, quality, and features-especially if you need batch processing, compression, and editing-HitPaw Univd is a top choice for Mac users.








 HitPaw VoicePea
  HitPaw VikPea (Video Enhancer)
 HitPaw FotorPea


Share this article:
Select the product rating:
Daniel Walker
Editor-in-Chief
This post was written by Editor Daniel Walker whose passion lies in bridging the gap between cutting-edge technology and everyday creativity. The content he created inspires the audience to embrace digital tools confidently.
View all ArticlesLeave a Comment
Create your review for HitPaw articles