How to Make a 2x2 Picture: Step-by-Step Guide
Having 2x2 pictures always ready is necessary, as it is a standard size for every official documentation. Regardless of whether you are applying for a job or a visa, please verify that your photo is the right size and format so it doesn't get rejected.
However, most people still wonder how to make a 2x2 picture so this article will cover it for you. In this guide, you will get to know efficient apps to create 2x2 pictures, along with their step-by-step guide.
Part 1. Why Is a 2x2 Picture Required? & Official Rules
Before knowing how to make a 2x2 photo, let’s have a brief look at common scenarios where 2x2 pictures are required:
1. Most countries, including Canada, accept 2x2 photos for passports, ensuring that the background is white and the head is facing straight to the camera naturally.
2. When applying for a student visa or a tourist visa, consultants demand 2x2 pictures with an image resolution of at least 300 dpi and shot within the last 6 months.
3. ID cards and employee badges typically require 2x2 pictures, with proper framing and size, as it will be helpful in face recognition during security check-ins.
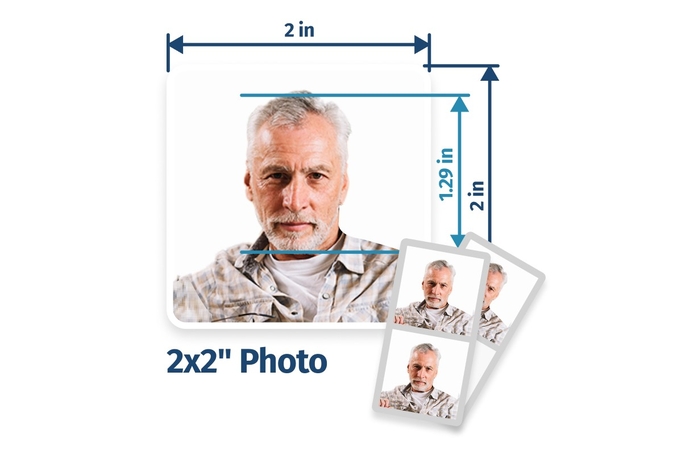
Official Rules for Taking a 2x2 Photo
While learning how to make a 2x2 picture, remember that there are specific rules while creating, which are discussed below:
1. One should submit an official picture which isn't older than 6 months.
2. Always wear casual clothing that reflects your regular appearance, and avoid uniforms.
3. One must maintain a natural facial expression with both eyes open and a light smile.
4. Make sure the picture is in color with a sharp focus on the face in proper lighting.
5. Ensure that the photo background is off-white without having any texture, with the primary focus on the face.
Part 2. How to Make a 2x2 Photo on a PC?
If you are wondering how to make a photo 2x2, here's a breakdown of the most efficient apps to create your official photos.
1. HitPaw FotorPea
When applying for an international scholarship, submitting a compliant and high-quality 2x2 ID photo is essential. With HitPaw FotorPea, creating a professional photo that meets international standards is both simple and efficient.
The software’s built-in “Country” option allows you to instantly select the correct photo dimensions for different national requirements. Moreover, HitPaw FotorPea enhances image clarity, adjusts lighting and background, and ensures your photo is ready for digital submission — all without the need for a professional studio.
Key Features
1. By using its "Background" option, this tool lets you select the desired background color to make your 2x2 photo look professional.
2. One can erase any unwanted character from their picture by using the “Eraser” tool for a cleaner 2x2 image.
3. To save time, the “Batch import” system allows users to edit more than one 2x2 picture at a time.
4. This tool lets you remove every little detail of your picture by using its “Brush” tool to make your 2x2 picture professionally appealing.
5. After generating a 2x2 photo, this tool allows you to use the “AI Photo Editor” from settings to further upscale your photo.
Guide to Using the ID Photo Function in FotorPea
You might want to know how to make a 2-by-2 picture using HitPaw FotorPea, so here is a comprehensive guidebook for you:
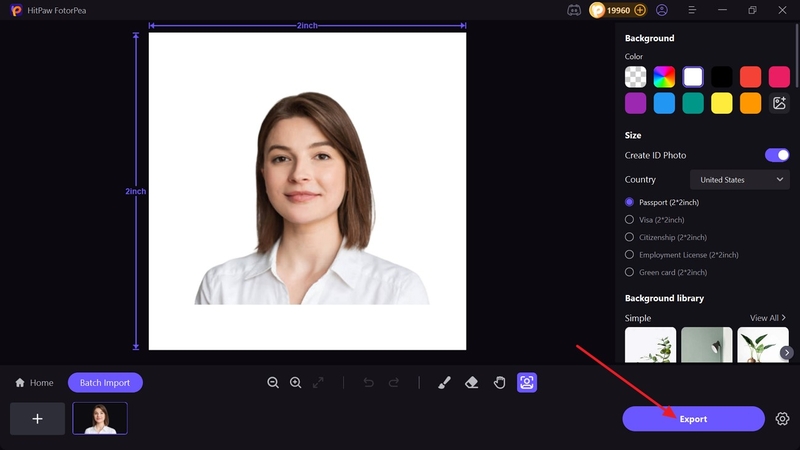
Step 1. Select the ID Photo Tool to Insert the PhotoAfter accessing HitPaw FotorPea, select the “ID Photo” tool from the “Tool” tab option and tap the “+” icon to insert or drag and drop the required photo.
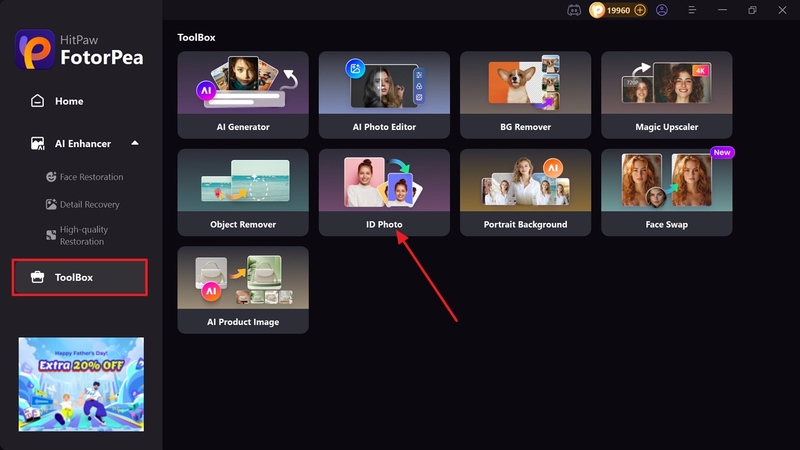
Step 2. Adjust Desired Image Settings
Once the image is imported, the background will automatically be removed. Now, you can tap the “Brush” or “Erase” icon located at the bottom of the interface to further remove area.
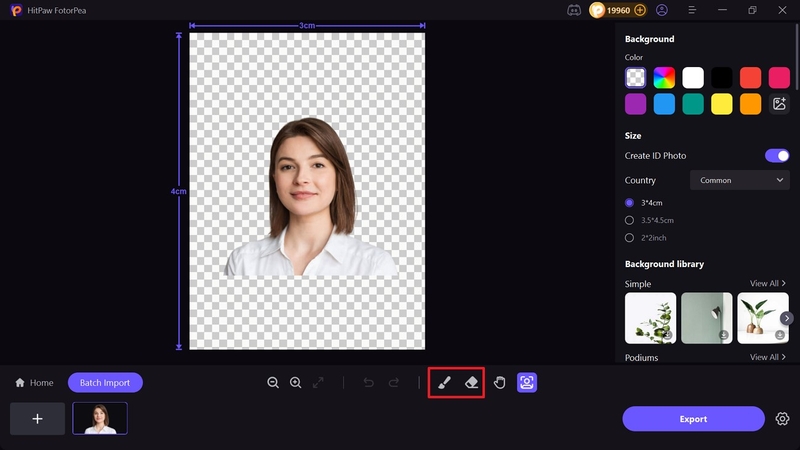
Step 3. Choose the 2x2 Size and Country Format
After this select the required white background color from “Background” section, enable the “Create ID Photo” and lastly select desired country format.
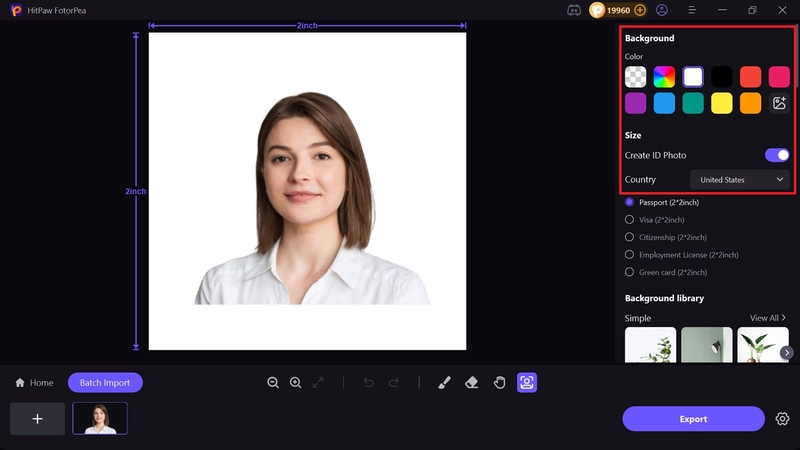
Step 4. Preview and Render the Enhanced Photo
As you have previewed the outcome, select the “Export” button to save it on your device.
2. How To Make 2x2 Picture in Microsoft Word
Key Features
1. Allows manual cropping and resizing adjustments by using Format Picture settings.
2. To know how to create a 2x2 picture in Word, one can choose between “Square, Portrait, and Landscape.”
Comprehensive Steps to Resize an Image to 2x2 in MS Word
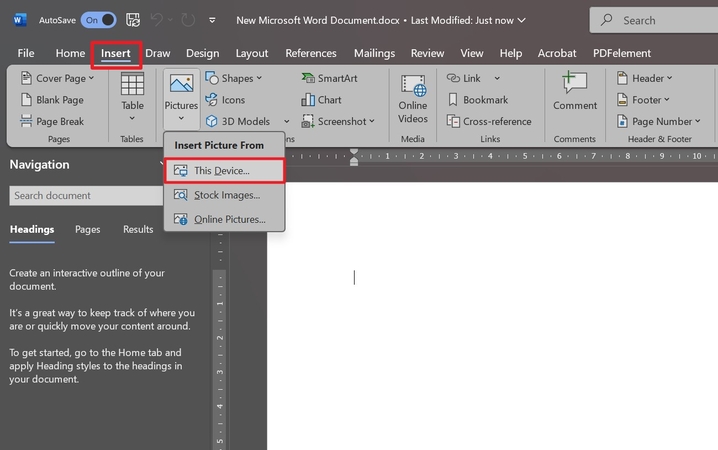
Step 1. Start by creating a new Word document and select the "Insert" tab, followed by choosing the "Pictures" option and tapping on "This Device." After this, import the desired image from the desired folder.
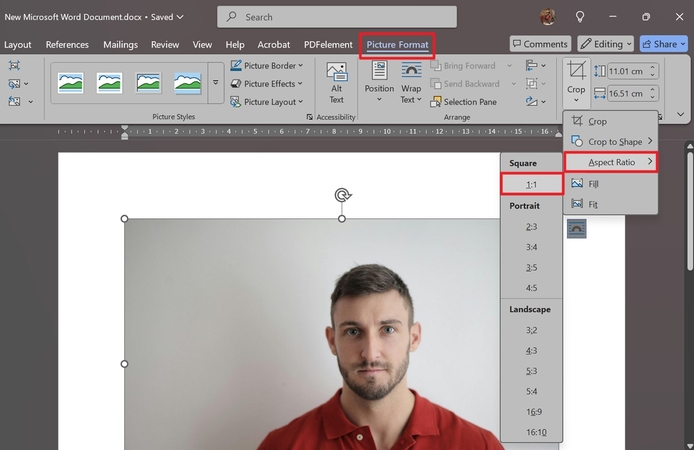
Step 2. Upon the photo being imported, the "Picture Format" setting opens. Now adjust the aspect ratio manually to 1:1.
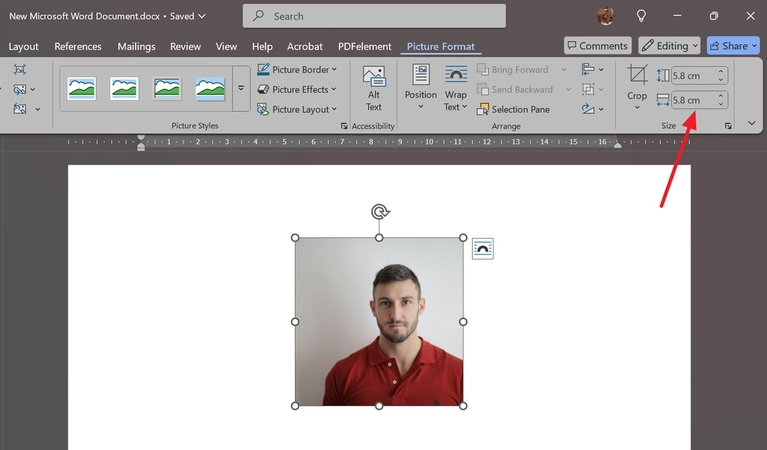
Step 3. Adjust the “Height” and “Width” to 5.08 x 5.08 cm within the “Crop” option to get the image resized.
3. Adobe Photoshop
Key Features
1. Change image dimensions and resolutions with the “Image Size” settings option.
2. While knowing how to create a 2x2 picture, you can change its resolution along with its height and width.
A Beginner-Friendly Tutorial to Make a 2x2 Photo with Adobe Photoshop
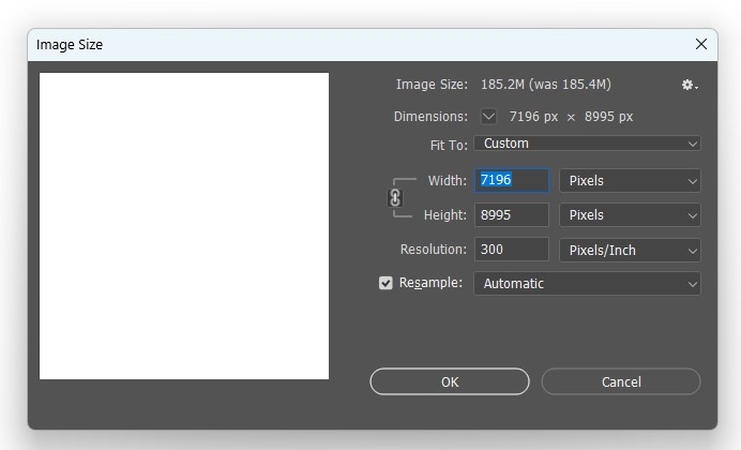
Step 1. After choosing the desired image you want to resize, tap on the “Image” tab, followed by the “Image Size” button in the drop-down options.

Step 2. From this dialogue box, adjust your "Width" and "Height" to specifically "5.08x5.08." Select the “Automatic” option from the "Resample" button and hit "OK."
Part 3. How to Resize a Picture to 2x2 Online for Easy Conversion
While learning how to create a 2x2 picture, know that besides software, there are also web-based tools available, which are discussed below:
1. Canva
Key Features
1. Choose the required width and height within its “Custom Size” section.
2. Allows you to share the link directly without saving it to your device.
Detailed Guide to Creating a 2x2 Passport-Size Image in Microsoft Word
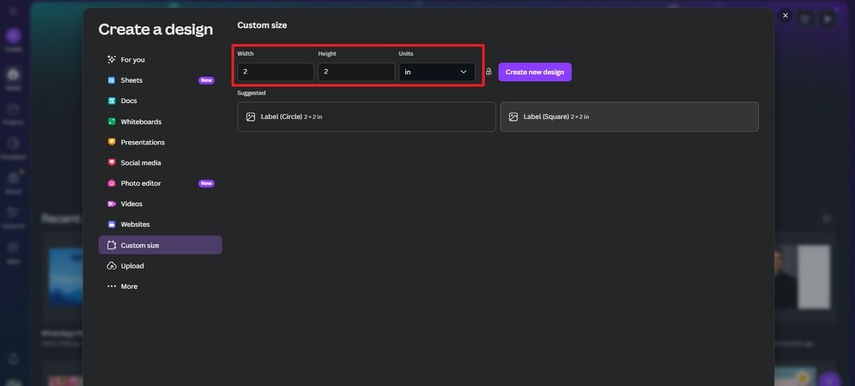
Step 1. Locate the “Custom Size” tab to adjust the “Width” and “Height” to “2x2” inches and hit the “Create New Design” button.
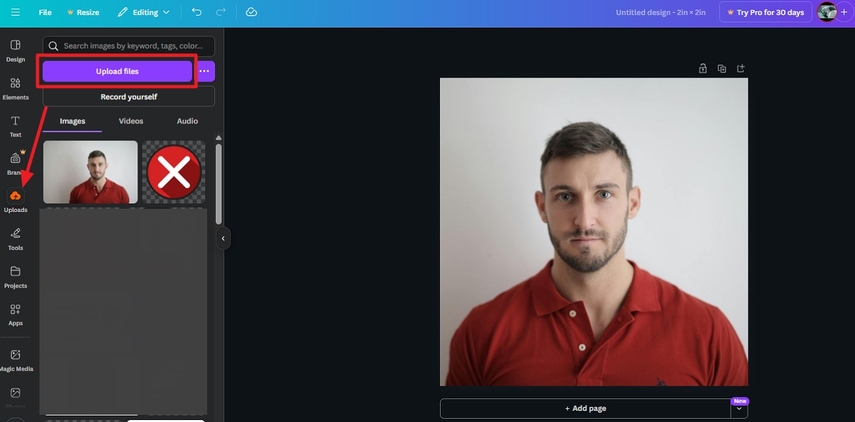
Step 2. As a blank canvas appears, tap the "Upload" icon, followed by the "Upload Files" button to import the desired photo. Optionally, select different tools, such as "Text" and “Branding," from the given options in the left toolbar and make desired edits.
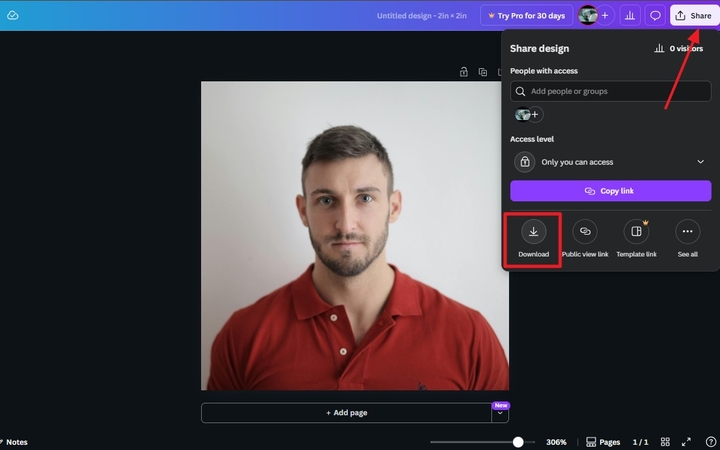
Step 3. Finally, tap the “Share” button and select the “Download” icon to get it saved on the device.
2.Adobe Express
Key Features
1. One can adjust the desired “Aspect Ratio” for a particular social media platform.
2. While learning how to make a photo 2x2, it allows you to compare the photo with its “Quality Compare” option.
Comprehensive Stepwise Guide to Create 2x2 Passport-Size Image
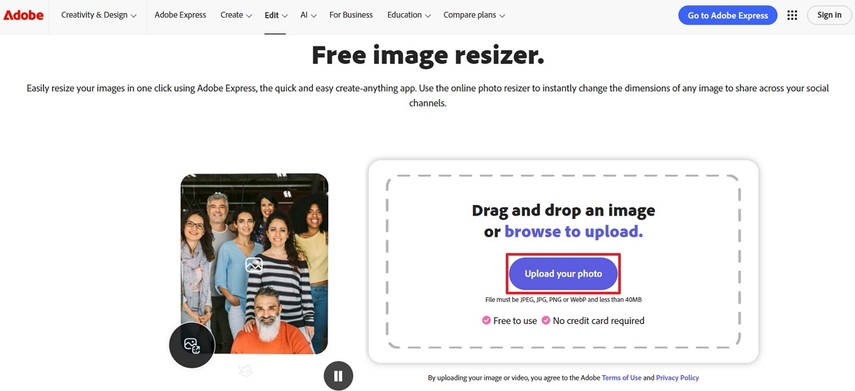
Step 1. Tap the “Upload your Photo” button to get the image imported from your device.
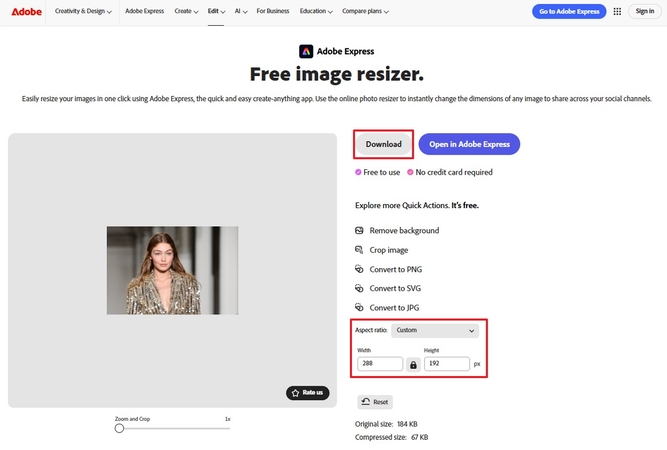
Step 2. Choose the required custom “Aspect Ratio” and select the “Height” and “Width” to “192x288” and tap the “Download” button to save the outcome.
3. Pi7 Image Resizer
Key Features
1. Allows you to resize images in different formats, like JPEG, PNG, and WEBP.
2. One can also compress the image by using its “Compress Image Also” feature.
Comprehensive Tutorial to Generate a 2x2 Professional Image
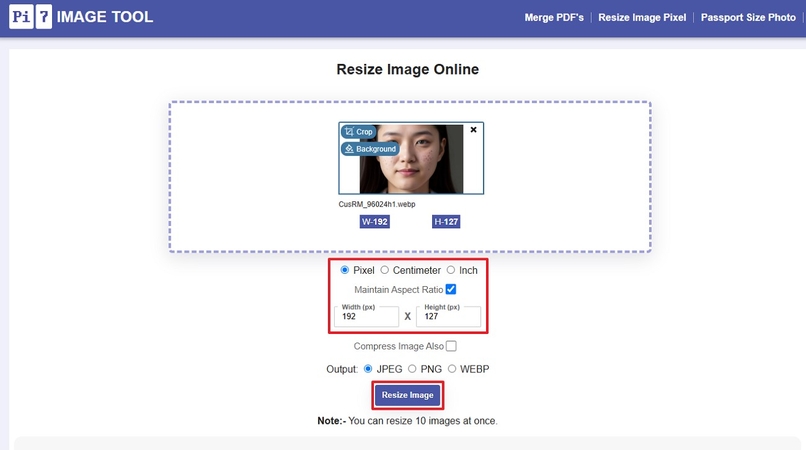
Step 1. Tap on the “Select Image” button to get the picture imported, select the unit of length to pixels, and adjust the “Height” and “Width” to “192x127”. Choose the “JPEG” output format from the “Resize Image” button.
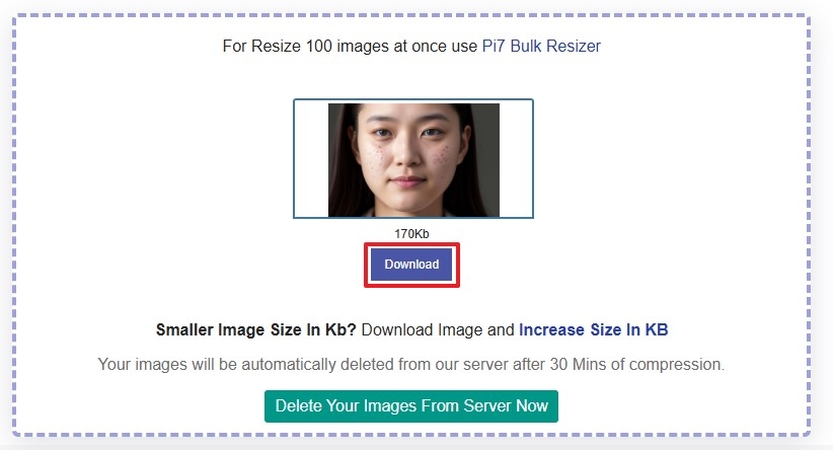
Step 2. Finally, when the image is resized, click on the “Download” button to secure your image for later use.
Part 4. How to Make a 2x2 Picture on a Phone: Android & iOS?
Besides the online tool, if you want to know how to make a 2x2 picture on the phone, the following are some user-friendly apps:
1. Passport Photo
Key Features
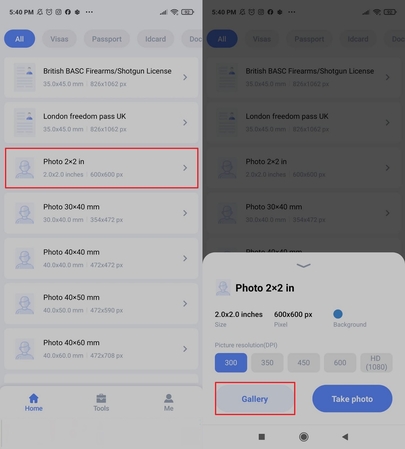
1. Offers plenty of picture formats like “London Freedom Pass UK” and “Photo 2x2 in”.
2. One can upscale the generated 2x2 picture before saving it to the device.
Tutorial to Create a 2x2 Picture with a Passport Picture
Step 1. As you enter the home page, select the “Photo 2x2 inch” option, then import the desired photo by picking the “Gallery” option.
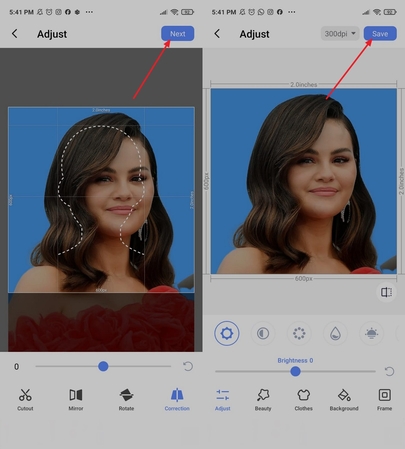
Step 2. Adjust your picture accordingly to the given frame and tap the "Next" button. After the image is generated, further upscale it by using the provided tools and selecting the "Save" button to get it saved.
2. ID Photo Application (Android | iOS)
Key Features
1. Allows you to re-edit the photos from already completed ID photos.
2. After generating your photo, you can copy the image without saving it.
Expert Guide to Create 2x2 Photos with ID Photo Application
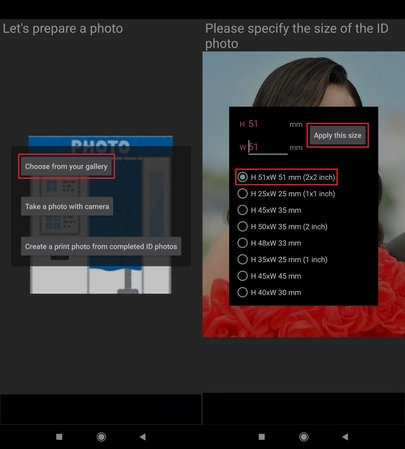
Step 1. After launching the app, tap on “Choose from your Gallery” to get the photo imported, then select the height and width to “51x51mm (2x2 inches)”. Now select the “Apply the Size” option to start generating the photo.
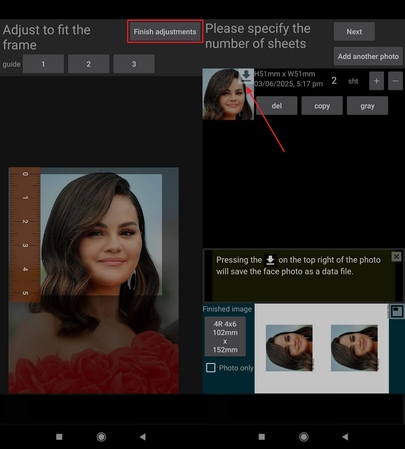
Step 2. Now adjust the picture in the desired frame to choose from the given options like "1,2and 3" and hit "Finish Adjustments." In this interface, tap on the "Download" icon to render the desired photo.
Conclusion
In summary,this article highlights why 2×2 photos are essential and introduces top tools across web, mobile, and PC, complete with a clear step-by-step workflow. For best results, try HitPaw FotorPea—an AI-powered editor—that instantly upscales, deblurs, denoises, removes backgrounds, and more. Download HitPaw FotorPea to elevate your 2×2 photo creation effortlessly!


 HitPaw Edimakor
 HitPaw VikPea (Video Enhancer)
 HitPaw Univd (Video Converter)

Share this article:
Select the product rating:
Daniel Walker
Editor-in-Chief
This post was written by Editor Daniel Walker whose passion lies in bridging the gap between cutting-edge technology and everyday creativity. The content he created inspires the audience to embrace digital tools confidently.
View all ArticlesLeave a Comment
Create your review for HitPaw articles