How to Fix the Moto G Photo Noise Problem Effectively
Are you a Moto G user, and your photos are suddenly looking more of a grainy mess than a masterpiece? The Moto G photo noise problem is a common frustration for its users who just want to capture the best moment without battling fuzz. It's more of a disappointment, especially when your phone is capable of so much more.
You bought Moto G for its value, but that doesn’t mean you have to settle for second-rate photos. To take charge of your camera quality, go through the article for common causes and address them for better shots. Let your Moto G live up to its potential, through the best approach for removing noise with dedicated tool.
Part 1. What Are the Common Moto G Photo Quality Problems and Their Causes?
Before the solution, let's first understand what's really going wrong behind the lens and how Moto G camera noise issues creep in:

1. Inconsistent Photo Quality: Many users report that it may perform well in ideal lighting but struggle when the condition changes, portraying lack of sharpness. This variation often stems from the camera’s limited ability to adapt to different environments.
2. Blurriness: Photos often become blurry when you try to capture them in motion or low light. It can be a result of slow shutter speed, which increases the chances of motion blur.
3. Poor Color Accuracy: Whenever your photos appear washed out or too warm/cool, your phone is likely dealing with poor color accuracy. This generally occurs when the camera struggles to interpret lightning and white balance correctly.
4. Aggressive Noise Reduction: To combat the Moto G's photo quality problem, its software sometimes applies overly aggressive noise reduction. Although it might remove some grain, it often comes with lost details and smeared textures.
Part 2. How to Address Moto G Low Light Camera Noise for Better Night Shots
If you’re a victim of Moto G low-light camera noise issue, walk through this section to overcome it for better night shots:

1. With built-in night mode, you can bring more detail in shadows and create brighter photos even in dim settings.
2. Shaky hands at times ruin a night shot; try resting your phone on a solid surface or use a tripod to keep it steady.
3. When you manually adjust the exposure, it can help you avoid overly dark or overly bright night shots.
4. On certain occasions, using third-party apps can often provide more control over settings, ISO, and shutter speed.
Part 3. What to Do When Your Moto G Camera Produces Grainy Photos
When your photos consistently look like they’ve been sprinkled with grain, it's an alarming moment. The following section reveals trusted Moto G camera noise fixes for more transparent images:
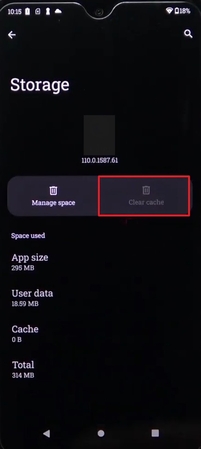
1. Clear Cache
A simple cache buildup in your camera app can cause performance hiccups, which might include grain in photos. This clearance of the cache refreshes the app and can help eliminate bugs that interfere with image processing. To do so, explore the given instructions and give your camera a quick refresh for amazing shots:
Instructions. For clearing cache, first access the “Settings” for your Moto G phone and press the “App” option from the menu. After this, scroll down and tap on the “See All Apps” option to access all the apps on your Moto G. Hit the “Camera” app and navigate to the “Storage and Cache” option available in the app. Later, simply press the “Clear Cache” button to remove all the cluttered caches in camera.
2. Safe Mode
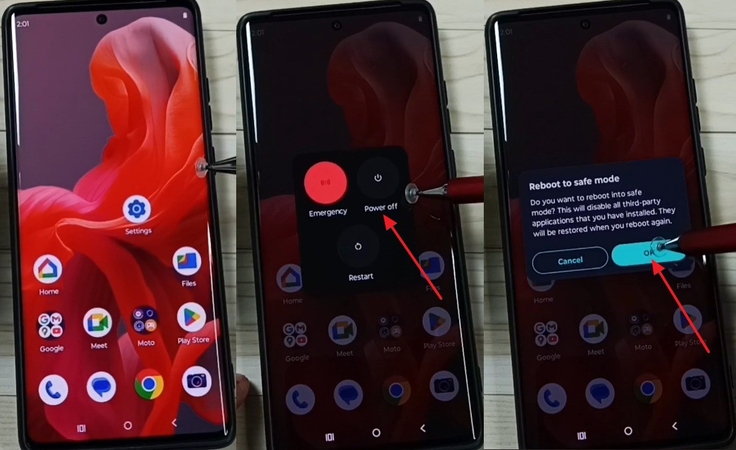
In general, various third-party apps can conflict with your camera and cause unexpected noise or poor quality. Booting your Moto G into Safe Mode can disable all the temporary third-party apps that are interfering. For Moto G low-light camera noise issue, follow the instructions and examine if keeping your phone in safe mode is needed:
Instructions. To begin, press the “Power” and “Volume Up” buttons together on your Moto G phone. In the pop-up window, hold the “Power Off” button for a few seconds and release to reveal another window. Now, hit the “OK” button from the “Reboot to Safe Mode” window appearing on your screen.
3. Lower ISO
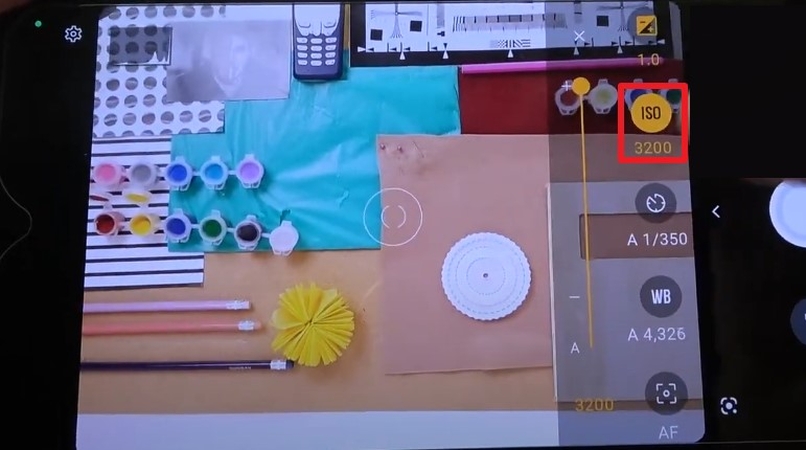
The ISO level in your phone controls your camera's sensitivity to light, and higher it is, the more likely you’ll get noise. When users manually reduce the ISO in their camera settings, they can minimize grain but need to compensate with better lighting. The given instructions explain how to address Moto G camera troubleshooting by lowering ISO:
Instructions. Initiate the process by accessing the “Camera” app on your Moto G phone. Press the “Three Lines” icon in the right corner and select the “Promote” option from the “Photo” section. After this, choose the “ISO” option from the toolkit at right and lower its level through the slider.
4. Proper Lighting
Just moving closer to a light source or repositioning your subject can dramatically reduce noise from your pictures. Natural light is always your best companion, but when shooting indoors, incorporate warm, diffused lighting to keep images bright. For Moto G camera noise fix, you need to have good lighting because it can make or break your quality.
Part 4. The Best Approach to Apply a Moto G Camera Noise Fix: HitPaw FotorPea
When you’re done battling blurry, grainy photos and want a quick, no-hassle solution, remember HitPaw FotorPea as your companion. It's one of the most used Moto G camera noise reduction apps because of Denoise Model. The updated Denoise Model now offers 2 new modes, which are Creative and Realistic Denoise modes. Here, the Creative one delivers a detailed, sharpened outcome that is full of texture.
Conversely, the Realistic mode works by removing extreme noise while retaining original image texture. For precise analysis, you can zoom in and out of your image when previewing the generated outcome. For more crystal memories, it provides an Upscale Model that smooth out the entire picture. When exporting, users can access additional settings that include specifying export DPI and format.
Key Features
1. Sharpen Model: The Sharpen model for HitPaw FotorPea now provides 3 different modes, namely, Repair Lens Blur, Repair Motion Blur, and Repair Compression Blur.
2. Face Model: In the portraits or profile pictures, you can use Face Model, which works specifically for sharpening faces.
3. Low-Light Model: To brighten photos that are taken in a dark environment, the low-light model naturally adds lightning.
Tutorial to Remove Grain from Moto G Photos
The fix for Moto G camera grainy photos is surprisingly simple and requires following the stepwise tutorial for HitPaw FotorPea:
Step 1. Integrate the Program and Enable Enhance Photos NowFor removing grains, commence the program on your device and press the “Enhance Photos Now” button from the main page.

Step 2. Add Your Moto G Grainy Photo
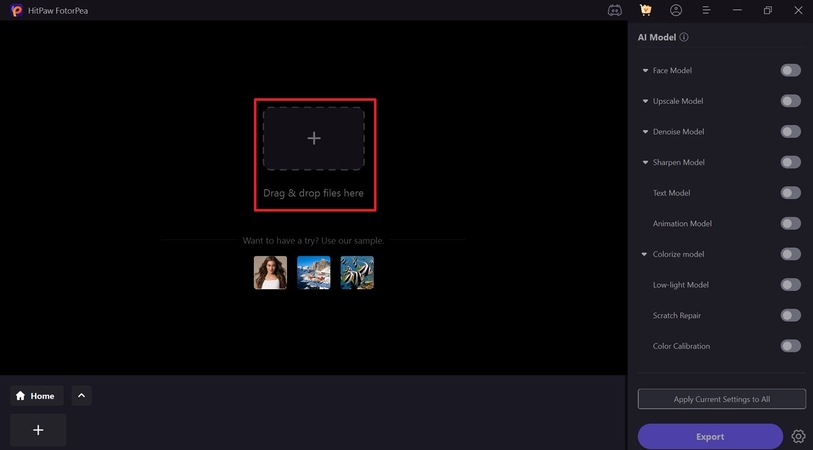
After this, click on the “Drag & Drop File Here” button to incorporate your Moto G grainy photo into the tool.
Step 3. Pick an AI Model and Check Your Results
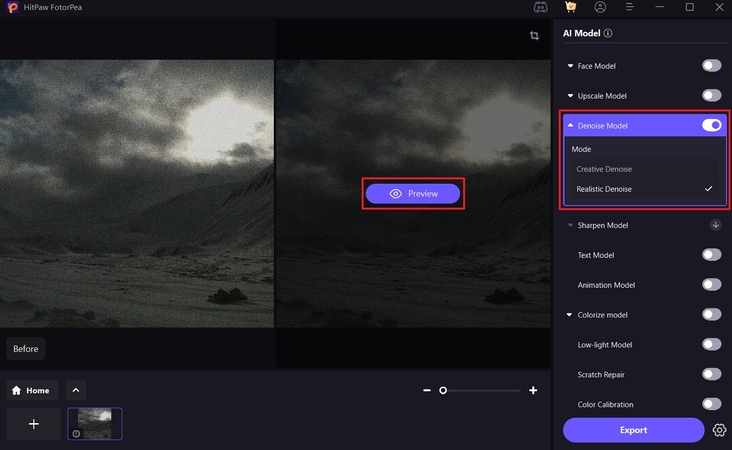
From the AI Model panel on the right side, turn on “Denoise Model” and choose the “Realistic Denoise” mode from the options. Now, head to the “Preview” button and see a grain-free image in front of you.
Step 4. Secure Your Grain-Free Image on Your Device
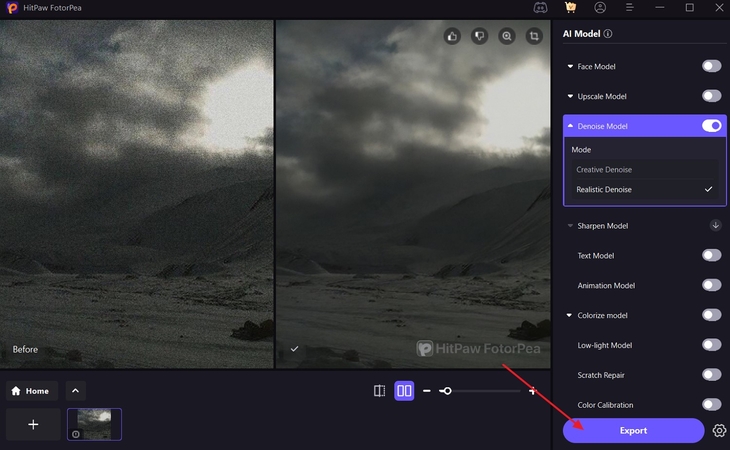
Finally, when you’re convinced, proceed to the “Export” button and save the improved image on your device.
Part 5. Tips to Avoid the Moto G Photo Noise Problem in the Future
The best way to deal with Moto G photo quality problem is to stop before it starts, and the following tips will help you do so:
1. It might sound basic, but a dirty lens can gradually reduce image clarity and increase the appearance of noise.
2. Your Moto G performs well in natural light, which eventually reduces the need for high ISO settings.
3. The digital zoom degrades the photo quality and amplifies noise, that decreases the overall quality.
4. High Dynamic Range (HDR) balances highlights and shadows, helping your camera handle contrast better.
Conclusion
In conclusion, Moto G photo noise problem doesn’t stand between you and the photos you deserve. With a bit of know-how and a few changes, your Moto G can deliver vibrant images that capture the moment immensely. If the graininess still exists, head to HitPaw FotorPea and experience a result that shows professionalism.


 HitPaw Edimakor
 HitPaw VikPea (Video Enhancer)
 HitPaw Univd (Video Converter)


Share this article:
Select the product rating:
Daniel Walker
Editor-in-Chief
This post was written by Editor Daniel Walker whose passion lies in bridging the gap between cutting-edge technology and everyday creativity. The content he created inspires the audience to embrace digital tools confidently.
View all ArticlesLeave a Comment
Create your review for HitPaw articles