Full Guide on How to Upload HDR Video to YouTube
High Dynamic Range (HDR) content has revolutionized the way viewers experience videos by delivering deeper contrasts, brighter highlights, and more vibrant colors. Uploading HDR video to YouTube ensures that your audience with HDR-compatible devices, such as modern smartphones and HDR-enabled televisions can enjoy content at its fullest potential. In this guide, we'll walk you through everything from basic HDR on YouTube support and technical requirements to step-by-step upload instructions and even how to convert standard SDR footage to HDR using HitPaw VikPea. Whether you're an experienced creator or just starting out, mastering HDR YouTube uploads will elevate your channel's visual impact and set you apart from competitors.
Part 1. What is HDR for YouTube?
High Dynamic Range (HDR) technology expands the color and luminance range of videos, offering viewers richer details in both shadows and highlights. On YouTube, HDR content stands out by showcasing more lifelike imagery compared to Standard Dynamic Range (SDR). Creators who opt for HDR YouTube uploads can tap into this immersive experience, attracting audiences seeking top-tier visual quality. Let's explore what HDR on YouTube means, how it's displayed, and whether your channel can benefit from uploading HDR video YouTube content.
Can I Upload HDR Videos to YouTube?
YouTube supports High Dynamic Range (HDR) videos, offering richer contrast, brighter highlights, and more vibrant colors for a more lifelike viewing experience. Creators can upload HDR videos to YouTube, and viewers with HDR-compatible devices like certain smartphones and HDR TVs can enjoy them in full quality. These videos will show a resolution tag such as "1080p HDR" or "4K HDR" in the settings menu.
If you're using a non-HDR device, YouTube will automatically play the SDR version, so the video remains viewable but without HDR effects. Up next, we'll walk you through the requirements and steps to upload HDR videos to YouTube, and how to easily convert your footage to HDR format if needed.
Note
Currently, YouTube does not support broadcasting HDR content. So, even if you have an HDR video to stream live, it will appear in a standard format with limited color space.
Part 2. Requirements for Uploading HDR Video on YouTube
Uploading HDR content to YouTube requires adherence to specific technical standards to ensure proper playback. YouTube examines certain metadata, encoding formats, and container specifications to detect and render HDR correctly. In this section, we'll detail the upload requirements, supported codecs, preferred formats for HDR YouTube videos, and how to add necessary HDR metadata with the YouTube HDR Metadata Tool to guarantee optimal playback.
1. YouTube HDR Upload Requirements
| Specifications | Requirements |
|---|---|
| Resolution | |
| Color Primaries | Rec. 709 / Rec. 2020 |
| Color Matrix | Rec. 2020 non-constant luminance |
| Color depth | 10 bits or 12 bits |
| Bit Depth | 10-bit or 12-bit |
| EOTF | PQ or HLG (Rec. 2100) |
| Frame Rate | 23.976, 24, 25, 30, 50, 60 fps |
| Bitrate | H.264 or HEVC encoded bitrate |
2. HDR Encoding Formats Supported by YouTube
| Container | Recommended Codecs |
|---|---|
| MP4 | H.264 10-bit, VP9 Profile 2, DNxHR HQX |
| MOV | ProRes 422, ProRes 4444, VP9 Profile 2 |
| MKV | HEVC, ProRes 422, VP9 Profile 2 |
3. Preferred Codecs for HDR YouTube Upload
Recommended Codecs: HEVC/H.265, VP9 Profile 2, AV1
Other Codecs: ProRes 422 / 4444, DNxHR HQX
4. How to Add HDR Metadata with YouTube HDR Metadata Tool
To properly display HDR video YouTube content, files must include accurate HDR metadata indicating transfer function, color primaries, matrix information, and mastering display details. While many editing tools embed this metadata automatically upon HDR export, some workflows require manual tagging. The YouTube HDR Metadata Tool simplifies this process by appending essential HDR metadata, such as PQ or HLG transfer functions, ensuring your HDR YouTube video is recognized and rendered correctly. Below are the steps to add HDR metadata.
Below are the typical steps for ingesting HDR metadata into a Matroska (MKV) container using the YouTube HDR Metadata Tool (which wraps mkvmerge from MKVToolNix). These steps assume you already have an HDR-graded source file (e.g., a .mov or .mp4 with HDR color grading) and want to embed the required HDR metadata so YouTube recognizes it as "HDR" upon upload.
1. Obtain the YouTube HDR Metadata Tool from Github
- Windows: Download the Windows 'mkvmerge.exe' from the "windows/64bits" (or "windows/32bits" for older CPUs) folder in the GitHub repo.
- macOS: Download the 'mkvmerge.app' bundle from the "macos" folder in the same repo. Inside that bundle is the 'mkvmerge' executable you'll run from Terminal.

2. Open a terminal or command prompt
- Windows: Shift-right-click in the folder where you placed 'mkvmerge.exe' and choose "Open PowerShell window here" (or "Open Command Prompt here").
- macOS: Open Terminal, then 'cd' into the folder containing 'mkvmerge.app'. To invoke it, you'll use:
"./mkvmerge.app/Contents/MacOS/mkvmerge"
3. Construct the mkvmerge command with required HDR flags
YouTube expects the following metadata fields for HDR playback:
- Colour matrix: Rec. 2020 non-constant luminance
- Colour primaries: Rec. 2020
- Colour transfer characteristics (EOTF): PQ (Perceptual Quantizer) or HLG (Hybrid Log-Gamma)
- Bit depth: 10-bit or 12-bit (this comes from your source codec)
- Max Content Light Level (MaxCLL) & Max Frame Average Light Level (MaxFALL)
- Mastering-display metadata (chromaticity coordinates and luminance range)

A typical command (for PQ-encoded mastering) looks like this (replace sample values with your project's actual numbers):
./src/mkvmerge \
-o output_PQ.mkv \
--colour-matrix 0:9 \
--colour-range 0:1 \
--colour-transfer-characteristics 0:16 \
--colour-primaries 0:9 \
--max-content-light 0:1000 \
--max-frame-light 0:300 \
--max-luminance 0:1000 \
--min-luminance 0:0.01 \
--chromaticity-coordinates 0:0.68,0.32,0.265,0.690,0.15,0.06 \
--white-colour-coordinates 0:0.3127,0.3290 \
input_HDR.mov
- Here, the track index '0' refers to the video track. If your source has multiple video streams, adjust the track number accordingly.
- --colour-matrix 0:9' denotes Rec. 2020 non-constant luminance.
- --colour-transfer-characteristics 0:16' specifies PQ. For HLG, use '0:18' instead.
- The chromaticity coordinates (e.g., '0.68,0.32' for red ×, y; '0.265,0.690' for green ×, y; etc.) come from your mastering display's color gamut.
- MaxCLL ('--max-content-light') and MaxFALL ('--max-frame-light') must match your grading settings.
- '--max-luminance' / '--min-luminance' set the mastering display's peak and black levels in nits.
4. (Optional) Attach a 3D LUT as a hint for SDR down-conversion
If you have a '.cube' file representing your 3D Look-Up Table (LUT) for YouTube's SDR generation, include these additional flags:
--attachment-mime-type application/x-cube \
--attach-file path/to/yourLUT.cube
This tells YouTube how to derive a faithful SDR down-converted version.
5. Run the command and wait for processing to finish
- Once you press Enter, 'mkvmerge' will ingest all the specified HDR color metadata into the output MKV.
- The resulting file-e.g., 'output_PQ.mkv' or 'output_HLG.mkv'-now contains embedded HDR metadata that YouTube can detect.
6. Verify the embedded metadata using mkvinfo (optional but recommended)
After 'mkvmerge' completes, you can confirm the color metadata by running:
"mkvinfo output_PQ.mkv"
Scroll to the "Video colour information" section. You should see entries like:
+ Colour matrix: 9
+ Colour range: 1
+ Colour transfer: 16
+ Colour primaries: 9
+ Max content light: 1000
+ Max frame light: 300
+ Video colour mastering metadata
+ Red colour coordinate x: 0.68
+ Red colour coordinate y: 0.32
+ Green colour coordinate x: 0.265
+ Green colour coordinate y: 0.690
+ Blue colour coordinate x: 0.15
+ Blue colour coordinate y: 0.06
+ White colour coordinate x: 0.3127
+ White colour coordinate y: 0.329
+ Max luminance: 1000
+ Min luminance: 0.01
If all values match your grading specs, your file is correctly tagged.

7. Upload the resulting MKV to YouTube
- In YouTube Studio, upload the '.mkv' file exactly as you generated it.
- YouTube will detect the HDR metadata automatically. Once processed, viewers on HDR-compatible devices will see "HDR" next to the resolution (e.g., "4K HDR").
Key Points Summary:
- Use the GitHub HDR Metadata Tool's mkvmerge binaries (Windows or macOS).
- Run 'mkvmerge' with flags specifying Rec. 2020 primaries/matrix, PQ or HLG transfer, mastering-display info (MaxCLL, MaxFALL, luminance, chromaticities).
- Optionally attach a 3D LUT ('.cube') for YouTube's SDR down-conversion hint.
- Verify with 'mkvinfo' to ensure proper ingestion.
- Upload the final MKV to YouTube; HDR metadata will be recognized automatically.
Part 3. How to Upload HDR Video on YouTube?
Once your HDR video file meets YouTube's technical specifications and contains the required metadata, uploading it is straightforward. The platform will detect the HDR metadata and process your video accordingly, adding an "HDR" tag to playback options. Below, follow a simple step-by-step guide to ensure your HDR YouTube uploads are seamless, providing viewers with the best possible HDR on YouTube experience.
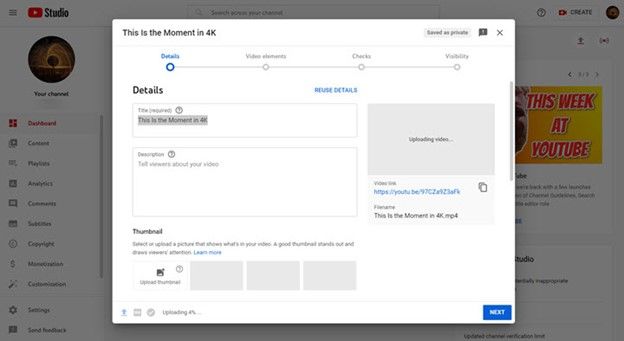
1.Sign in to your YouTube account.
2.Click the Create button at the top-right corner of the screen and choose Upload video.
3.You can drag and drop your video on the Upload Videos tab or click Select Files.

4.Wait for the uploading process to complete, then click Next.
5.Follow the prompts, making the necessary configurations until the last step (Visibility). If everything looks good, click Save.
6.YouTube will automatically detect the video and mark it as HDR if it's in a compatible format.

Note: HDR content can be obtained by using video shooting equipment supporting HDR or by upgrading the footage to HDR in post-production. For upscaling SDR video to HDR, try UniFab HDR Upconverter AI.
Part 4. How to Convert SDR to HDR Video?
Converting Standard Dynamic Range (SDR) content to High Dynamic Range (HDR) can breathe new life into older footage. HitPaw VikPea leverages advanced AI models to intelligently enhance color depth, brightness, and contrast, transforming flat SDR videos into dynamic HDR content. Whether you're preparing video for HDR YouTube uploads or simply want to improve visual quality, HitPaw VikPea offers user-friendly tools and presets to achieve professional-grade HDR results without extensive manual grading.
- AI-powered HDR enhancement for superior contrast and color depth.
- Automatic brightness and shadow adjustment for vivid highlights.
- Noise reduction algorithm that preserves fine details in dark areas.
- Color gamut expansion to cover Rec. 2020 range for cinematic visuals.
- Adaptive tone mapping for consistent HDR effects across scenes.
- Batch processing support to convert multiple videos quickly.
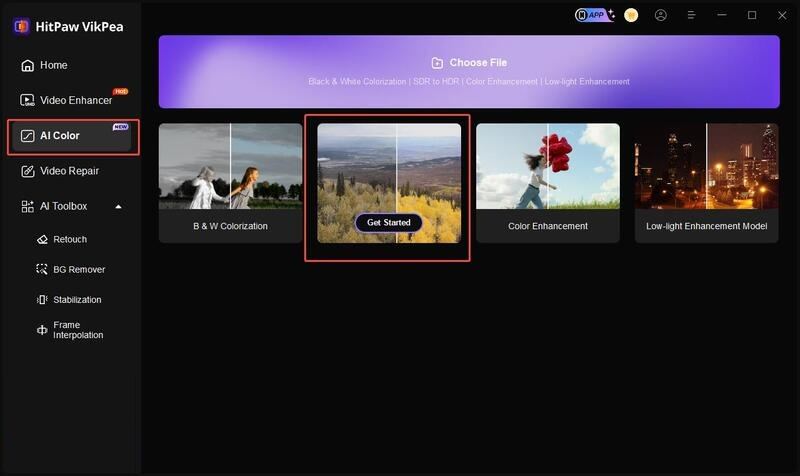
Step 1.Download and Launch HitPaw VikPea on your computer. Import your video by clicking on "Choose file." The drag-and-drop method also works for importing video into the software menu.

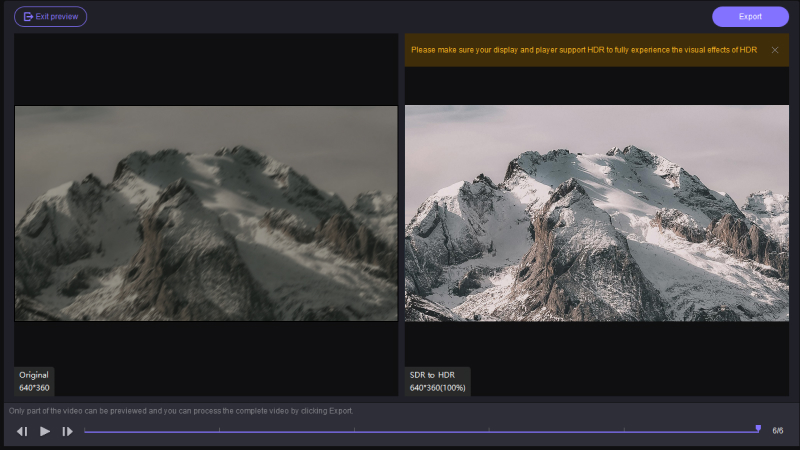
Step 2.Select the AI enhancement model. This software offers multiple AI models. The SDR to HDR enhancement transforms standard video into vivid, high-dynamic-range visuals with greater brightness, contrast, and color depth.

Step 3.Preview and export your HDR video. You can preview the video before finalizing it. Click on "Preview" to see your video. If satisfied, press the "Export" option to save your video.

Conclusion
Uploading HDR video to YouTube is an excellent way to stand out and provide viewers with a stunning visual experience. By understanding what HDR on YouTube entails, meeting the platform's technical requirements, correctly embedding HDR metadata, and following the recommended upload steps, creators can ensure their content displays as intended. Additionally, for those working with SDR source footage, HitPaw VikPea offers an intuitive solution for converting to HDR YouTube video quality with impressive AI-driven enhancements. Start sharing your vibrant, high-dynamic-range masterpieces on YouTube today and captivate audiences with the full spectrum of HDR YouTube video excellence.


 HitPaw Univd (Video Converter)
 HitPaw VoicePea
  HitPaw FotorPea


Share this article:
Select the product rating:
Daniel Walker
Editor-in-Chief
This post was written by Editor Daniel Walker whose passion lies in bridging the gap between cutting-edge technology and everyday creativity. The content he created inspires the audience to embrace digital tools confidently.
View all ArticlesLeave a Comment
Create your review for HitPaw articles