How to Set and Export 4K in Final Cut Pro
Final Cut Pro 4K has revolutionized the way content creators, videographers, and filmmakers work with ultra-high-definition footage on macOS. As more cameras and smartphones capture in 4K, understanding how to configure, export, and troubleshoot 4K projects in Final Cut Pro is essential for maintaining top-quality results. In this article, we'll explore why some 4K exports default to 1080p, step-by-step instructions for exporting and setting up 4K projects and answers to frequently asked Final Cut Pro 4K questions to ensure your Final Cut Pro 4K workflow is seamless and professional.
Part 1: Why Is My 4K Video Exporting at 1080p in Final Cut Pro?
Final Cut Pro 4K offers powerful tools for editing and exporting ultra-high-definition videos. However, many users find that, despite working in a 4K timeline, their final exports sometimes come out as 1080p. Understanding the underlying reasons can save you countless hours of frustration and ensure your Final Cut Pro 4K edits retain their intended resolution.
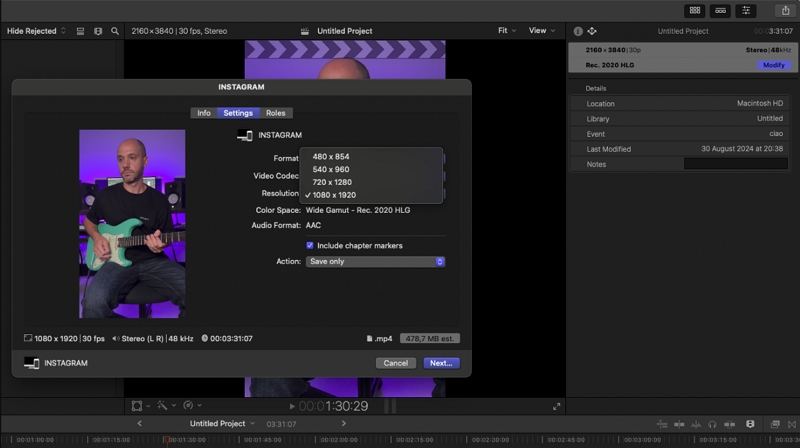
- Your project's video properties might still be set to 1080p. Check File > Project Properties and confirm "Video" is set to 4K.
- If you choose a 1080p export preset (or leave "Resolution" on HD), Final Cut Pro will downscale, even if your timeline is 4K.
- Exporting with proxy or optimized files (often 1080p) instead of original media can force a lower resolution.
- If most clips are 1080p, Final Cut may default to that resolution unless you manually override it in the Share dialog.
- Occasionally, old render files can cause mismatches. Deleting generated render files (File > Delete Generated Library Files) can clear it up.
By systematically reviewing project settings, share presets, and media resolutions, you'll quickly identify why a 4K project is exporting at 1080p and correct it to achieve the full benefits of Final Cut Pro 4K.
Part 2: How to Export 4K Videos in Final Cut Pro?
Exporting a 4K video in Final Cut Pro is straightforward once your project settings are configured correctly. By specifying a 4K timeline and choosing the appropriate "Master File" settings, you can maintain maximum visual fidelity. Whether you're working on a short film, a YouTube video, or a professional corporate presentation, this step-by-step guide will show you how to export your Final Cut Pro 4K timeline so that your audience experiences every detail in stunning resolution.
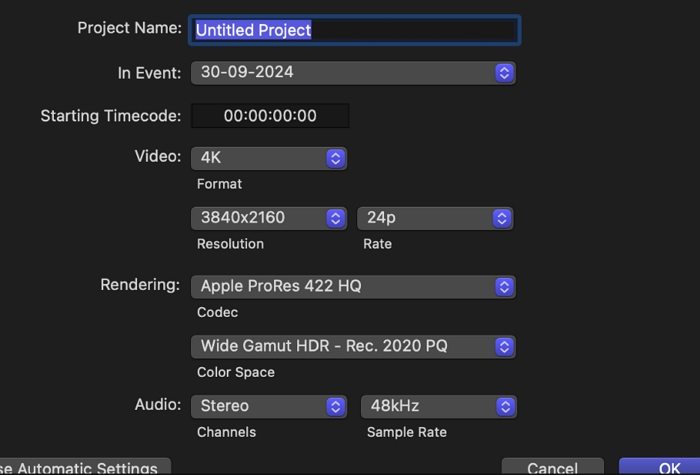
1. Verify Project Settings:
Go to File > Project Properties (or press Command-J). Confirm that the Video dropdown is set to 4K (3840*2160 or 4096*2160), matching your source footage.
2. Open the Share Menu:
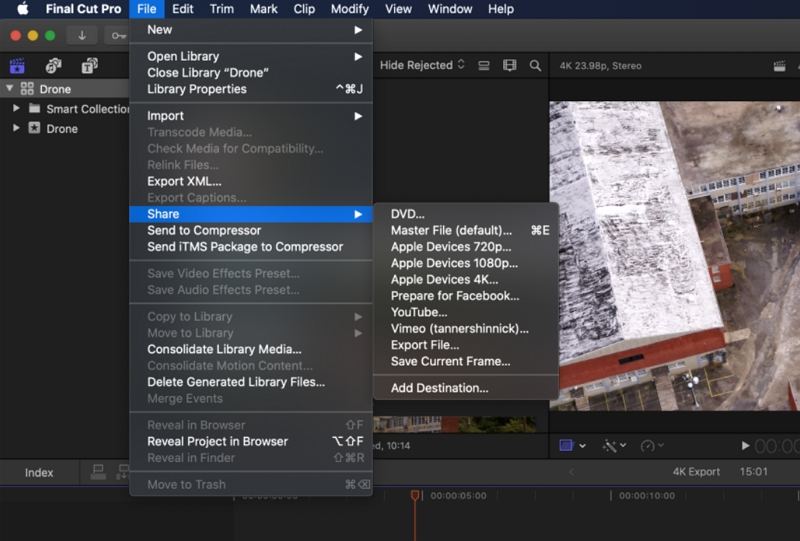
With your project selected in the Timeline, go to File > Share > Master File (Default). Alternatively, click the Share button (the icon resembling a square with an arrow) in the top-right corner.
3. Choose "Video and Audio" Format:
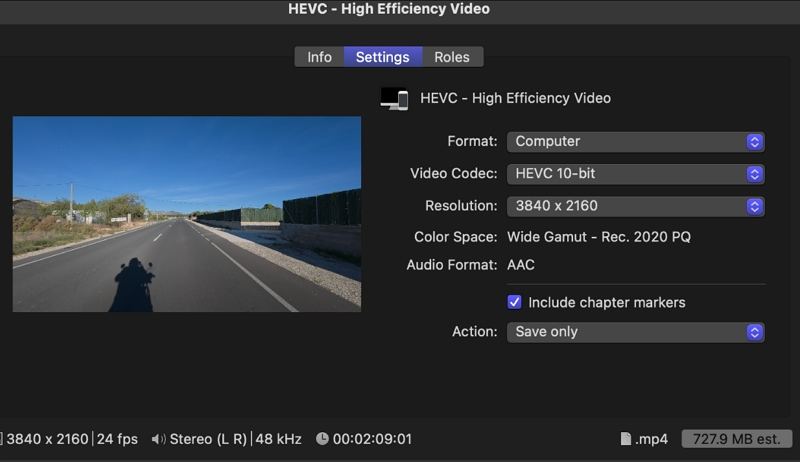
In the Share window, select Settings. Under Format, choose Video and Audio to ensure audio tracks are included in the 4K export.
4. Select "Source" in Video Codec:
In the Video Codec dropdown, pick Apple ProRes 422 (or ProRes 4444) for high quality, or choose H.264/ HEVC if you need smaller file sizes. Crucially, click Source in the Resolution field (or manually confirm 3840*2160 / 4096*2160 is selected).
5. Adjust Frame Rate (If Necessary):
Ensure the Frame Rate matches your project's native settings (e.g., 23.98, 24, 30, 60 fps). This avoids unwanted retiming or dropped frames.
6. Name and Destination:
Click Next, enter a descriptive file name (e.g., "Final Cut Pro 4K Promo"), and choose a destination folder on your Mac.
7. Initiate Export:
Click Save to begin rendering and exporting.
Monitor progress in the Background Tasks window (press Command-9).
8. Verify the Export:
Once complete, locate your 4K file in Finder and play it back in QuickTime or a 4K-capable player to confirm the resolution is 4K.
By following these steps carefully, your Final Cut Pro 4K export will reflect the full quality of your original footage, making your content stand out on any display.
Part 3: How to Set 4K Resolution in Final Cut Pro
Final Cut Pro 4K automatically adjusts project resolution based on the first clip you add, but sometimes you need to override this behavior to ensure your entire timeline is 4K-ready. Whether you're starting from scratch or importing mixed-resolution clips, these steps will help you configure a brand-new 4K project or adjust existing project settings so that your timeline supports true 4K editing without any downscaling.
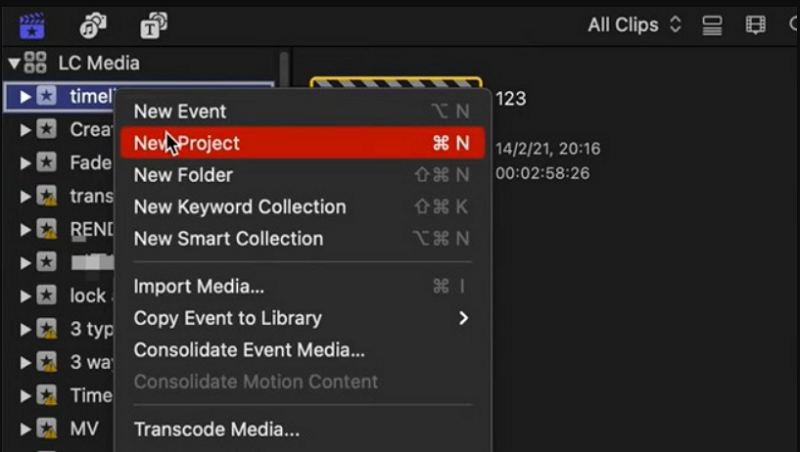
1.Open Final Cut Pro and Start a New Project: Go to File > New > Project (or press Option-Command-N)

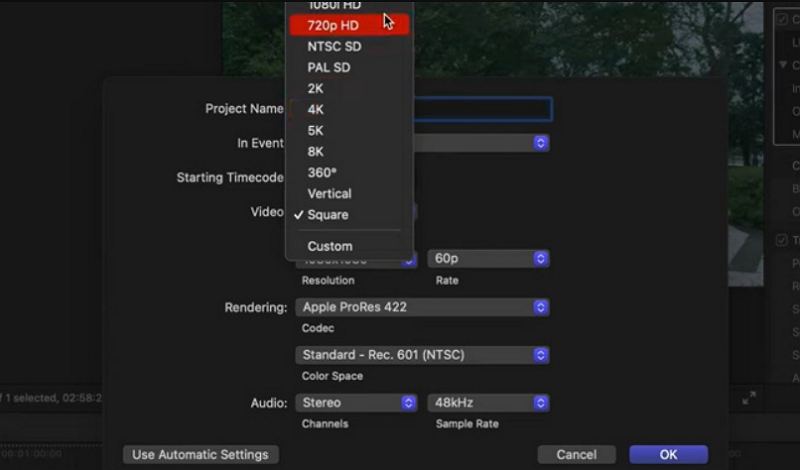
2.Name Your Project: In the New Project pop-up, enter a descriptive name (e.g., "4K Travel Vlog").
3.Choose 4K Resolution Manually: Under the Video section, click the Custom dropdown. Select 4K - 3840*2160 (Ultra High Definition) or 4K - 4096*2160 (DCI 4K) depending on your needs.

4.Set Frame Rate and Color Space: Choose the appropriate Frame Rate (e.g., 24 fps, 30 fps, or 60 fps) to match your source clips. For color, leave the default or select Rec. 709 for standard 4K projects, or choose Wide Gamut HDR if working with HDR footage.
5.Click "OK" to Create the Project: Final Cut Pro will open a blank timeline set to 4K resolution. Any clip you import into this project will automatically conform to the 4K timeline.
6.Verify Existing Project Resolution (Optional): To check or adjust an already-created project, select the project in the Browser, press Command-J, and confirm the Video dropdown is set to 4K.
By manually specifying 4K when creating a new project or confirming settings in an existing one, you ensure Final Cut Pro 4K editing remains uncompromised by automatic resolution adjustments.
Part 4: How to Convert 4K Videos to 1080p for Final Cut Pro
Although Final Cut Pro 4K supports many modern codecs, converting your 4K footage to 1080p ProRes or similar formats often yields smoother scrubbing, faster rendering, and fewer playback hiccups, especially on less powerful machines or when working with long timelines. Converting also ensures compatibility when sharing project files with collaborators who may not have the same codec support. HitPaw Univd is such a program that will convert large 4K files to a more editing-friendly 1080p Apple ProRes format to improve performance on older Macs or when collaborating on teams with varied hardware.
- Batch Conversion Capability for Multiple Files at Once
- Support for Apple ProRes, H.264, HEVC, and More
- Adjustable Frame Rate and Bitrate for Custom Outputs
- Built-in Video Trimmer and Cropper Before Export
- GPU Acceleration for Faster Encoding Speeds
- Preview Window to Verify Edits in Real Time
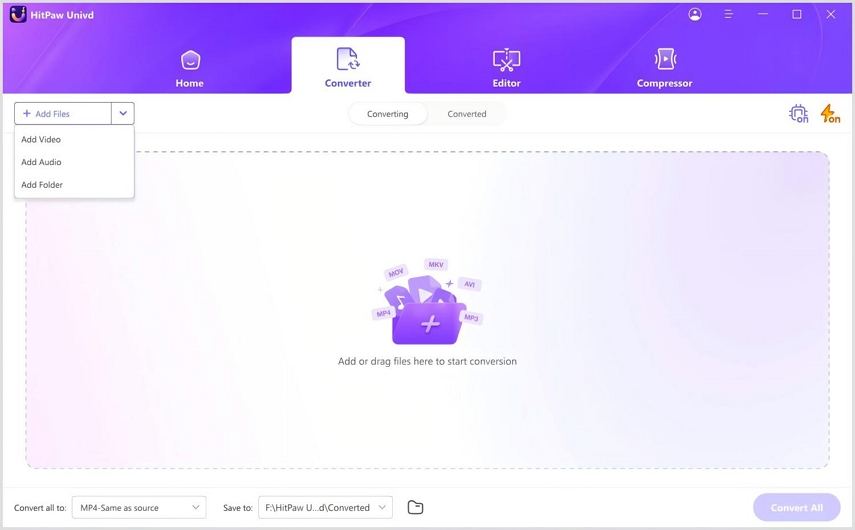
Step 1.Free Download and install HitPaw Univd. Launch HitPaw Univd and navigate to the Converter tab. In the Converter tab, click Add Video to import your 4K footage.

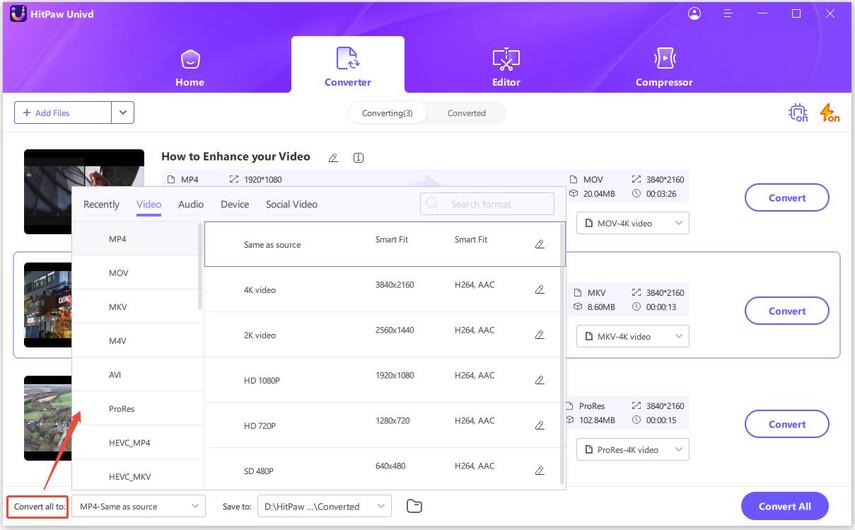
Step 2.Click the Convert All To dropdown. Select your desired 1080p format (e.g., Apple ProRes 422 (1080p) or H.264 1080p).

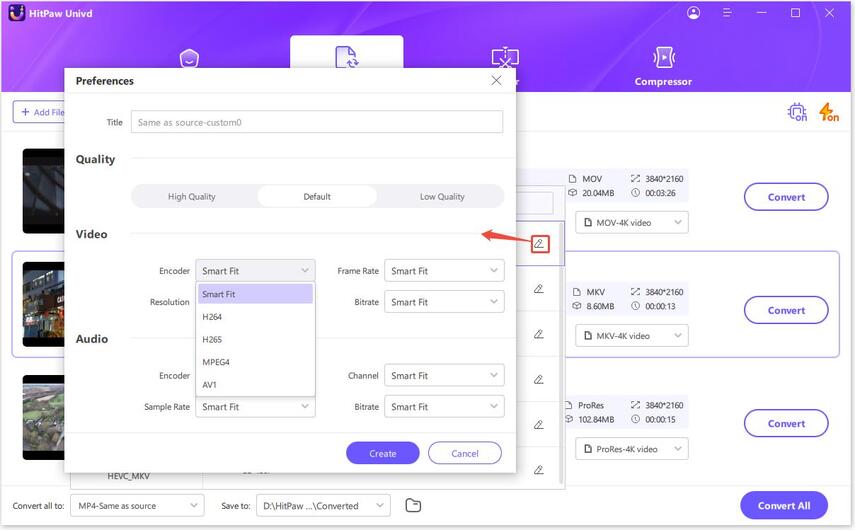
Step 3.Click the Edit icon next to the chosen output format. Under Resolution, select 1920*1080 (1080p). Modify Frame Rate, Bitrate, or Codec if desired to optimize for Final Cut Pro 4K.

Step 4.Once settings are confirmed, click the Convert All button at the bottom. HitPaw Univd will encode your 4K file to 1080p. Progress is displayed in real time.

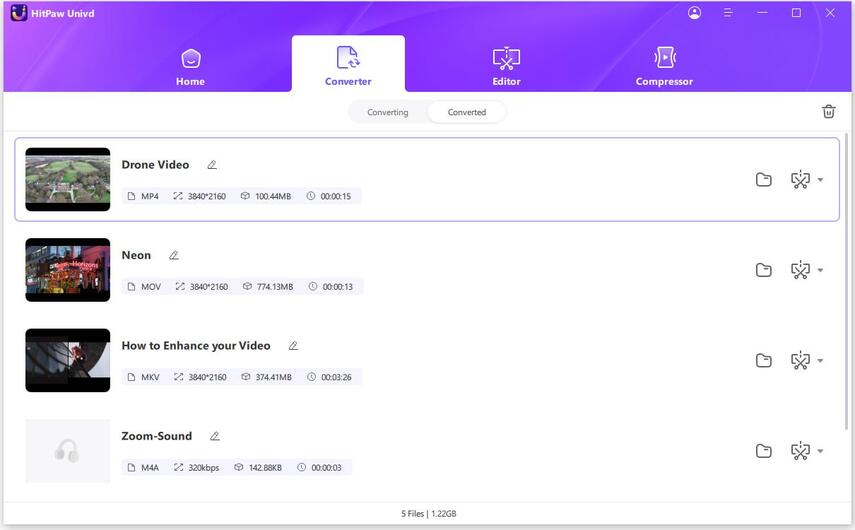
Step 5.After conversion completes, switch to the Converted tab. Click Open Folder to find the newly created 1080p video, ready for import into Final Cut Pro 4K.
By converting heavyweight 4K assets to a friendly 1080p ProRes or H.264 file, you can streamline your Final Cut Pro 4K editing process, reducing render times, smoothing playback, and preventing unnecessary strain on your Mac.
Part 5: Frequently Asked Questions About Final Cut Pro 4K
Q1. Can Final Cut Pro handle 4K resolution?
A1. Absolutely. Final Cut Pro 4K fully supports 4K editing, letting you import, edit, and export ultra-HD footage. You can create a 4K project, import native 4K media, and export at up to 4096*2160 or 3840*2160 without third-party plugins.
Q2. How do I change export resolution in Final Cut Pro?
A2. In the Share > Master File dialog, click Settings, choose Video and Audio, then select Source or manually choose 3840*2160 (4K) from the Resolution dropdown. Confirm your Video Codec is set to a format that supports 4K, such as Apple ProRes or H.264.
Conclusion
Mastering Final Cut Pro 4K elevates your video editing capabilities, enabling you to deliver pro-level ultra-HD content. By understanding why your 4K exports may default to 1080p, learning how to configure and export 4K projects, and converting footage to more editing-friendly 1080p formats when necessary, you'll maintain peak performance and creative control. Whether you're producing cinematic short films, detailed corporate videos, or vibrant YouTube content, these Final Cut Pro 4K tips and workflows ensure your final projects look crisp and professional on any display.





 HitPaw VoicePea
  HitPaw VikPea (Video Enhancer)
 HitPaw FotorPea

![[2026 Updated] Best Stranger Things Voice Changers](https://images.hitpaw.com/topics/covers/stranger-things-voice-changer-cover.jpg)

Share this article:
Select the product rating:
Daniel Walker
Editor-in-Chief
This post was written by Editor Daniel Walker whose passion lies in bridging the gap between cutting-edge technology and everyday creativity. The content he created inspires the audience to embrace digital tools confidently.
View all ArticlesLeave a Comment
Create your review for HitPaw articles