Fixes for Importer Reported a Generic Error in Adobe Premiere Pro
It's no secret that Adobe Premiere Pro is the industry standard for video editing tasks. Everyone, from filmmakers to YouTubers and online educators, uses it for editing and polishing their videos to perfection. Adobe Premiere Pro's extensive features are renowned and desired by professionals everywhere. However, the multitude of features and complexity of Adobe Premiere Pro also brings with it a host of new problems that may overwhelm casual and amateur users. For instance, sooner or later, you will encounter the "Importer Reported a Generic Error" in Adobe Premiere Pro. Compounding the challenge before you is the cryptic nature of the prompt, which provides no information or direction to help you even begin seeking a solution.
Thankfully, there are a few time-tested solutions that work. Today, we've brought you the common fixes to address this issue.
Part 1: What is "Importer Reported a Generic Error" in Adobe Premiere Pro?
When Adobe Premiere Pro encounters an unexpected problem while performing a normal function, such as importing a video, it attempts to inform you of the issue it is facing. However, it's unable to narrow it down to a specific bug or problem. So, it gives you a "generic" prompt stating, "Importer Reported a Generic Error."
Some common reasons for this issue include video format compatibility problems, file corruption, a corrupted Adobe Premiere Pro installation, media file cache issues, and others. Typically, the problems associated with this error message have quick and easy fixes. The challenge is honing on the underlying issue, which can be quite tricky. To make your task easier, we've given you step-by-step tutorials on how to address this issue. Follow them accurately for quick resolution.
Fix 1: Change the Video File Format and Codec
Just because you can open and play a video on your device using other tools, it doesn't mean Adobe Premiere Pro can do it, too. It has limited video format support, meaning that formats such as MKV and WebM are not supported in Adobe Premiere Pro. If you try to import these video formats into the tool, you encounter a generic error message. Fortunately, you can easily convert your videos to Adobe Premiere Pro-supported formats, such as MP4 and MOV, using Univd Video Converter. From small videos to large ones, Univd can convert all video formats to any other format of your choice without losing their original quality.
Why Choose HitPaw Univd for Converting Videos to Adobe Premiere Pro Formats
- Lossless Conversion: Univd preserves the original quality of your video during conversion.
- Full Compatibility: Select the video container format, video codec, audio codec, and metadata for conversion.
- Faster Conversion Speed: Unlike other tools like Premiere Pro, Univd converts videos at incredible speeds.
- Built-in Editing Tools: The wide variety of editing tools on Univd makes video editing fast and easy.
- Batch Conversion: Have a whole bunch of videos to convert? Univd can handle 5000 videos in a single batch.
- User-friendly: For Premiere Pro users, Univd is like a breath of fresh it. It's so easy to use, you'll be surprised.
Detailed Steps to Converting Videos to Adobe Premiere Pro Formats
- Step 1: Import Videos to Univd
- Step 2: Choose Output Format
- Step 3: Customize Output Quality
- Step 4: Convert Video to Premiere Pro Formats
Download, install, and launch HitPaw Univd. Go to the 'Converter' module, drag videos directly into the upload box, or click 'Add Files' to open the file manager and import videos.
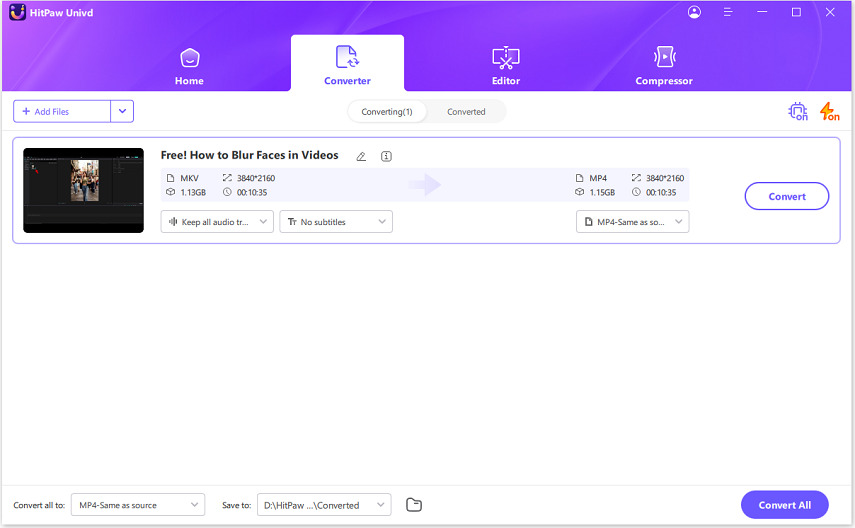
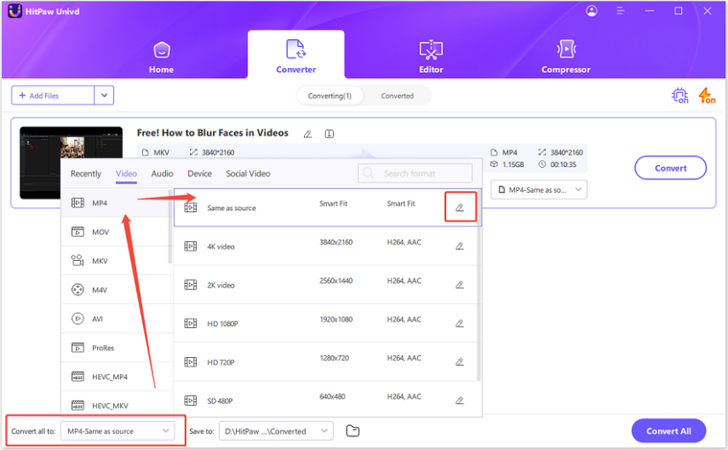
Click the 'Convert all to' menu >> Go to 'Video' >> Set output video format as one of the formats supported by Adobe Premiere Pro, like MP4, MOV, etc.
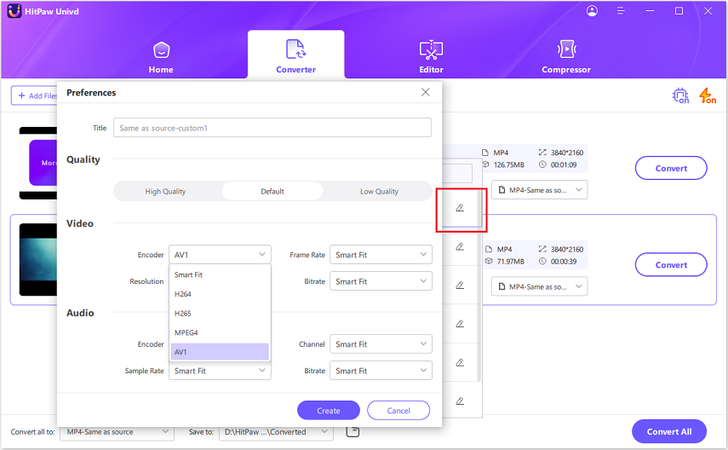
Click on the 'Pen' (settings) icon to open output settings >> Choose Video Codec, Audio Codec, and quality settings >> Click 'Create.'
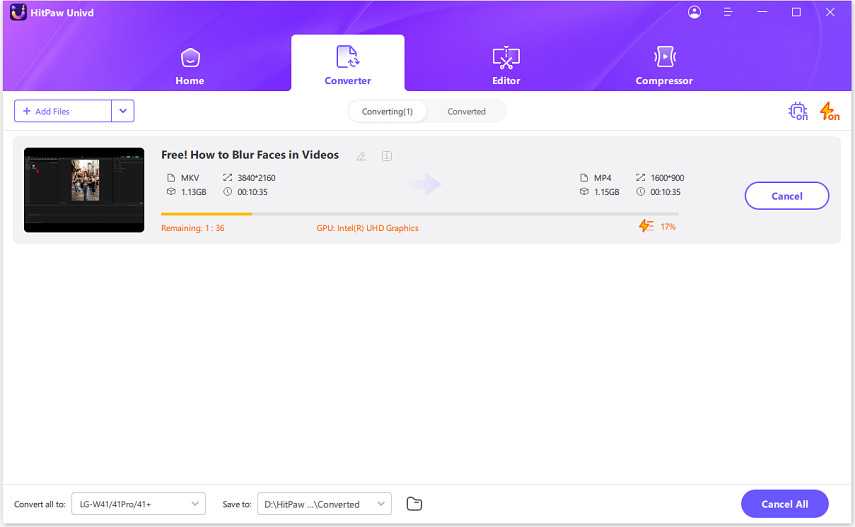
Hit 'Convert all.' to start convert videos to Premiere Pro-supported formats at faster speed.
Fix 2: Clear Media Cache Premiere Pro
Adobe Premiere Pro creates media caches to speed up certain tasks related to editing. These media cache files often become corrupted due to various reasons, and when they do, they trigger the "Importer reported a generic error" message. While you cannot prevent it from happening, you can certainly prevent it from interfering with your Adobe Premiere Pro operations. The quickest way to resolve this issue is by deleting the media cache files. It's quite simple, really.
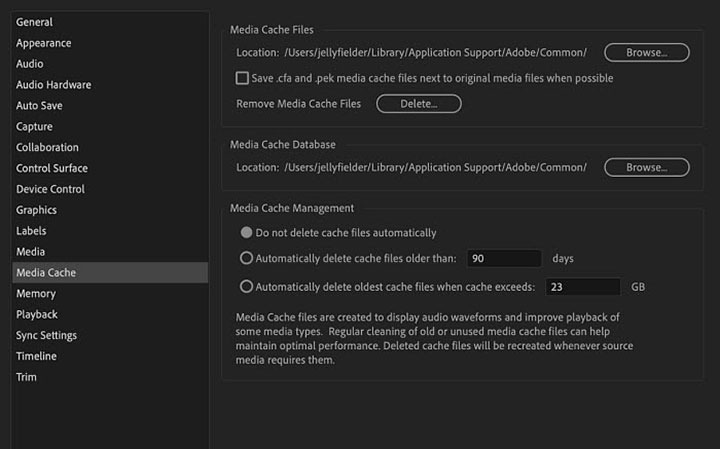
- Step 1:Launch Adobe Premiere Pro >> Go to 'Edit' >> Choose 'Preferences' >> Head over to 'Media Cache.'
- Step 2:Click the 'Delete' button next to Remove Media Cache Files.
Fix 3: Adjust the File Name or Location
Sometimes, the generic importer error can arise from an innocuous reason, such as unsupported characters in the file name. Adobe Premiere Pro is finicky like that. Your desktop may support special characters in file names, but Adobe Premiere Pro may not. If you've used special characters in the video file's name, then change it to a simple alpha-numeric name.
While you're at it, move the video file to another easily accessible folder with a simple directory path.
Fix 4: Update or Reinstall Adobe Premiere Pro
It's the classic it's-not-you-it's-me problem. Sometimes, Adobe Premiere Pro glitches, whether due to activation issues or conflicts with hardware or other software. Whatever the reason, a simple update or reinstallation should fix the issue. Updating and/or reinstalling Adobe Premiere Pro is also quite easy.
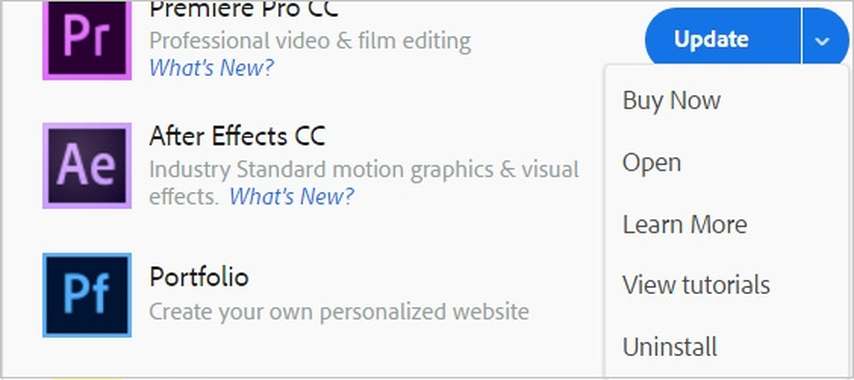
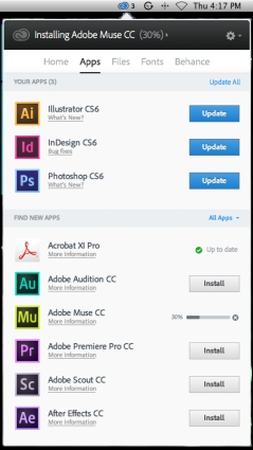
Step 1:Visit the Creative Cloud page on Adobe's website or open the Creative Cloud app on your desktop. Log in using your account credentials, navigate to 'Apps.'
Step 2:Find 'Adobe Premiere Pro' in the apps list.You can use the 'Down Arrow' button next to the 'Update' button accompanying the Adobe Premiere Pro app, click 'Uninstall.'

Step 3:Restart desktop, go to Creative Cloud again, find 'Adobe Premiere Pro' in the apps list, hit 'Install.'

FAQs on Importer Reported a Generic Error in Adobe Premiere Pro
Q1. Is this error related to system hardware or GPU?
A1. Not usually. However, enabling GPU acceleration or hardware acceleration is known to cause this issue on some occasions, although rare. So, you can try turning it off to fix the issue.
Q2. Can a corrupt Premiere project cause this import error?
A2. That's definitely possible, although rare. You can try creating a new project and importing the media file into it.
Q3. Why am I getting this issue only with my phone or camera footage?
A3. Some camcorder, camera, and phone manufacturers use proprietary video formats that may be unsupported in Adobe Premiere Pro. Use a tool like HitPaw Univd or Adobe Media Encoder to convert media files to Adobe Premiere Pro-friendly formats.
Conclusion
Seeing the "Importer Reported a Generic Error" message can be confusing, especially when you don't know what it means. But don't worry. It's easy to fix once you know what to look for. The easiest and most effective solution is to convert the media file to a format that's supported by Adobe Premiere Pro using HitPaw Univd. This method completely bypasses any file format-related compatibility issue. Additionally, Univd can repair corrupted media files and make them usable in Adobe Premiere Pro. Convert your first video with Univd today.



 HitPaw VoicePea
  HitPaw VikPea (Video Enhancer)
 HitPaw FotorPea


Share this article:
Select the product rating:
Daniel Walker
Editor-in-Chief
This post was written by Editor Daniel Walker whose passion lies in bridging the gap between cutting-edge technology and everyday creativity. The content he created inspires the audience to embrace digital tools confidently.
View all ArticlesLeave a Comment
Create your review for HitPaw articles