Why Premiere Pro Importer Reported A Generic Error and How to Fix It!
Adobe Premiere Pro is a pretty popular editing software, and thousands of content creators tend to edit their videos in this tool. Apart from content creators, many other users also opt to edit the video in Premiere Pro, citing the remarkable features of the software. However, many people complained that Adobe Premiere Pro, the importer reported a generic error when they decided to import a video in Adobe Premiere. Irrespective of the reasons behind this issue, we'll show how to get this problem solved in this guide.
Part 1: What Causes File Import Failure in Premiere Pro
If you're encountering a "media encoder file import failure" issue, there might be some key reasons behind this.
Here's the list of those reasons.
1. Unsupported Codecs
Every video recording device tends to use different codecs. If Adobe Premiere Pro doesn't support the codecs used in a video, it won't import the video. Hence, it would help if you considered altering the codec of your video files.
2. Unsupported Video file format
Although Adobe Premiere Pro supports many video file formats, it doesn't recognize some video file formats. Thus, if you're trying to import a video file in the Adobe Premiere that it doesn't seem compatible with, you'll probably receive the unwanted message you're currently receiving.
3. Activation issues
Due to activation issues, you might face some difficulties importing files in Adobe Premiere Pro. Hence, you'll need to activate the software according to the rules and regulations and use a Creative Cloud account.
4. Video File Name
Sometimes, the issue might be with the video file's name. Some symbols in your video's name can cause the issue you're currently facing.
After knowing the root causes of the issues you're facing, you can navigate the solutions section.
Part 2: How to Fix File Import Failure in Premiere Pro
There are several possible causes for this problem. Several solutions will be listed here, follow the steps below to find the right way to solve your problem.
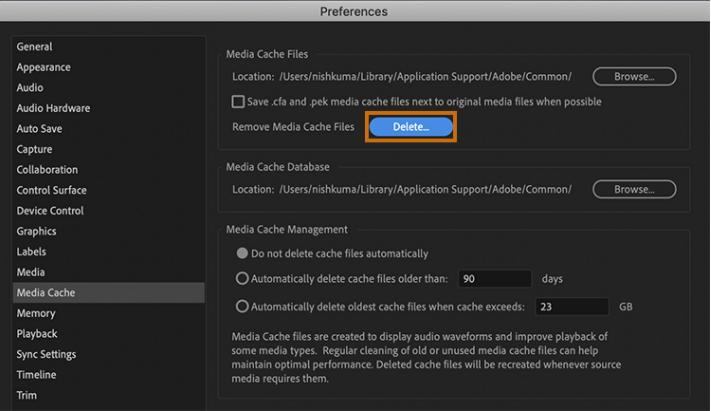
1. Clear the Media File Cache
You can also clear the media files cache before importing a video in Premiere Pro to ensure you don't face any issues with it. Moreover, clearing the caches will also help the Premiere Pro perform better.
Here's how to do it.
Step 01After closing Adobe Premiere Pro, you'll need to visit the Users icon and navigate the Common directory.
Step 02Moreover, you'll need to visit App Data, Roaming, and Adobe icons before navigating to the Common directory. In addition, you'll need to unhide AppData as it is hidden by default.
Step 03Launch the Premiere Pro after deleting the files.
2. Rename the file or move them to a different location
The specified path of your audio or videos might be the reason behind the issue you're facing. You might consider changing the path of a video. For instance, you can transfer a video file to another folder to see how it goes.
Moreover, you can change the name of your file as it has been noted that Premiere Pro tends to have some issues with the video or audio files' name.
3. Reinstall Premiere Pro
If nothing works for you and you're still having trouble importing video files to Premiere Pro, you must consider reinstalling Premiere Pro. Sometimes, the installation file might get corrupted, which creates the whole chaos for you.
Follow the guide below to install the Premiere Pro again.
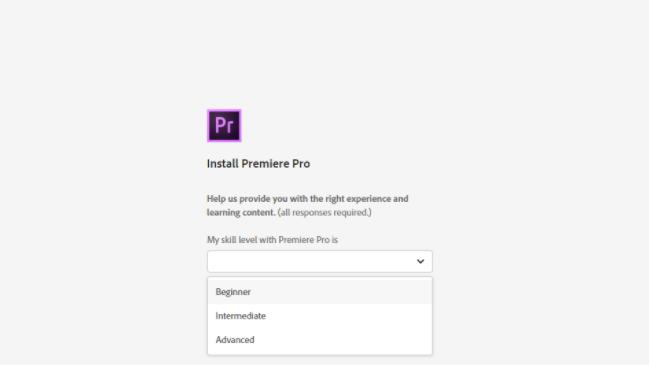
Step 01After launching Creative Cloud, you'll need to uninstall Adobe Premiere Pro, having kept the preferences.
Step 02Now, you'll need to install the Adobe Premiere Pro again and try importing a video file to see whether the issue you were facing is solved or not.
4. Check the Video File format and codec
First of all, you'll need to check the codec of the video format of a video you intend to import into Premiere Pro. For instance, Premiere Pro doesn't support the QuickTime codec, and you'll need to convert the codec to Premiere Pro supported codec to fix the issue.
Similarly, Premiere Pro doesn't support MKV format. Hence, it would help if you did not opt for the "MKV not supported Premiere Pro" format.
You can convert the video file to Premiere Pro-supported format by reading the guide below.
Part 3: How to Fix File Format Not Supported Premiere Pro with HitPaw Univd (HitPaw Video Converter)
If you're facing a "Premiere Pro file import failure" issue, you can blame some things for causing this issue. For instance, Adobe Premiere file format not supported MKV, if you're using MKV, you won't be able to import and edit the video in Adobe Premiere Pro.
Hence, to ensure you don't face issues editing a video in Premiere Pro, you'll need to convert the video into Premiere Pro-supported format.
Many tools offer you to convert the videos, but HitPaw Univd remains top-notch and superior to its competitors. It is a remarkable and breathtaking video converter that holds the ability to convert your video or audio files into 1000+ file formats.
Surprisingly, the video you convert using HitPaw Univd won't lose resolution quality, courtesy of the tool's immaculate features.
Aside from video conversion, HitPaw is fairly effective at editing the video as it can perform basic editing operations on your video.
1. Features of HitPaw Univd:
-
1
HitPaw Univd allows you to transform the video into Premiere supported format video.
-
2
It allows you to edit the video and audio with minimal effort.
-
3
You can also download videos from thousands of online websites.
-
4
It supports converting videos or audio to 1000+ file formats.
-
5
The premium package of HitPaw Univd is available at affordable rates.
-
6
It doesn't compromise the resolution quality of the video.
2. How to Get Adobe Premiere Supported Formats
Here's the step-by-step guide to fixing the "file import failure media encoder" issue by converting the video to Premiere Pro supported file format.
Step 01Download and launch HitPaw Univd.
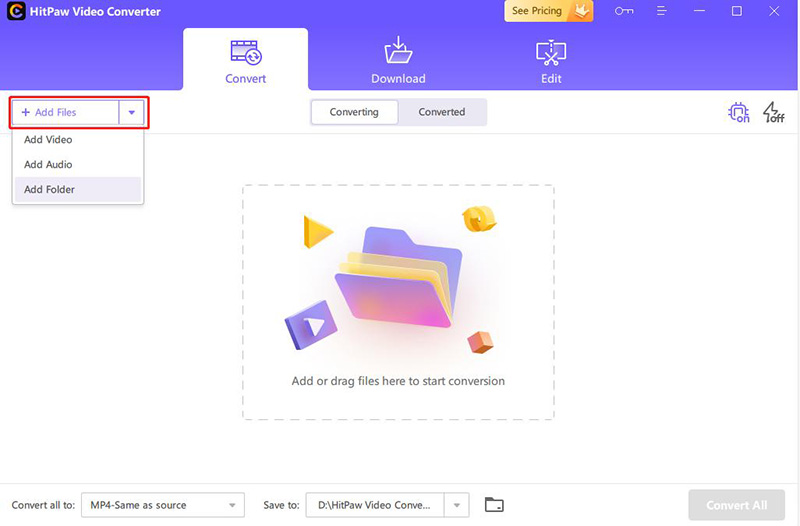
Step 02After visiting the HitPaw Univd's interface, you'll need to tap "Add Video" and import the video to the tool's timeline.
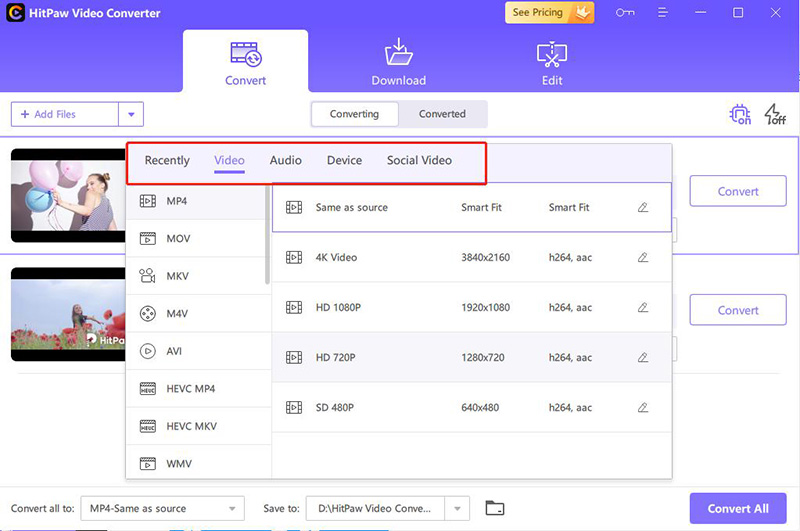
Step 03Now, you can select the format in which you'd like to convert the video. For instance, you can convert the video to MP4, AVI or MOV and more.
Step 04After selecting the output format, you'll need to hit "Convert" to start converting the video file for you.
Once the conversion process gets finished, you'll need to import the converted video into the Premiere Pro timeline and check if the issue you were having is taken care of.
Conclusion
If you're having issues uploading the video files due to the "Premiere Pro file format not supported" issue or other reasons, we've got the magnificent methods to fix this issue. However, if things don't get better for you, don't waste any before getting HitPaw Univd on board to convert the videos to Premiere Pro-supported video file format.
It is a mind-blowing tool that can convert the videos into your desired formats without compromising the quality of your video.


 HitPaw Screen Recorder
 HitPaw VikPea (Video Enhancer)


Share this article:
Select the product rating:
Daniel Walker
Editor-in-Chief
My passion lies in bridging the gap between cutting-edge technology and everyday creativity. With years of hands-on experience, I create content that not only informs but inspires our audience to embrace digital tools confidently.
View all ArticlesLeave a Comment
Create your review for HitPaw articles