Effortlessly Convert MOV to GIF on Mac with 5 Simple Methods
Whether you're a content creator, marketer, or just someone who loves sharing fun animations, learning how to MOV to GIF Mac opens up a world of creative possibilities. Converting your MOV files into shareable loops can make tutorials more engaging and social media posts stand out. In this guide, we'll cover four reliable ways to MOV to GIF on Mac from powerful third-party tools to built-in macOS features, so you can pick the best method for your needs.
Part 1. Best Video to GIF Converter for MOV to GIF on Mac
For those who demand precision and flexibility, HitPaw Univd is the ultimate solution when you want to convert MOV to GIF Mac with professional-grade controls. This desktop application combines speed, quality, and an intuitive interface so you can customize every aspect of your animated output. Whether you're making marketing content or simply looping home videos, HitPaw Univd streamlines your Mac MOV to GIF workflow without compromising on quality.
- Batch convert MOV file to multiple high-quality GIFs quickly and efficiently.
- Customize frame rate and resolution for precise animated GIF output.
- Preview your GIF conversion in real time before exporting final file.
- Support for various video formats beyond MOV for versatile conversion.
- Lightning-fast conversion speed optimized for Mac's hardware performance.
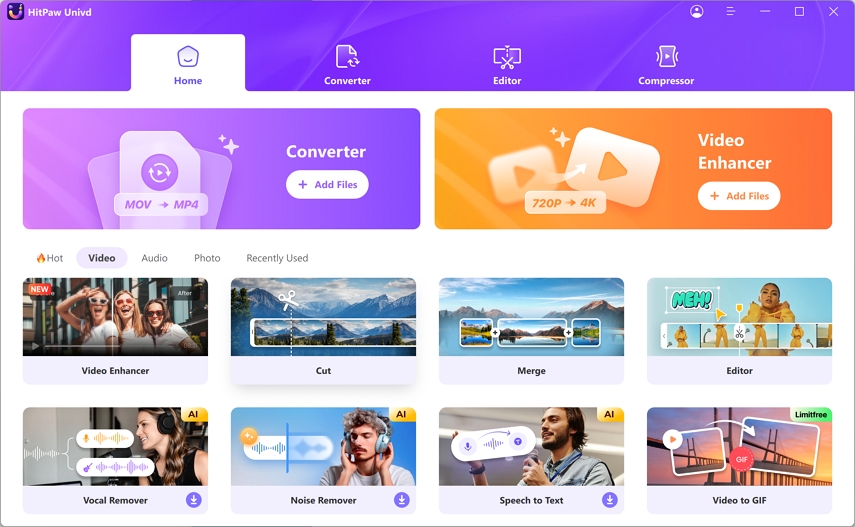
Step 1.Install the HitPaw Univd and start the program. In the Video tab of the Home interface, choose the Video to GIF feature. Then choose the target video to import to the program.

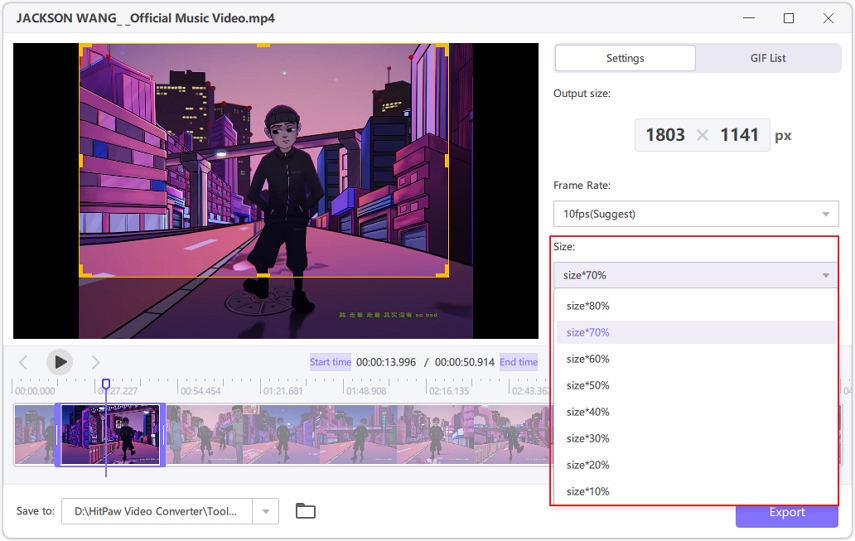
Step 2.Navigate to the 'Settings' tab and set your output GIF's frame rate, output resolution, and size.

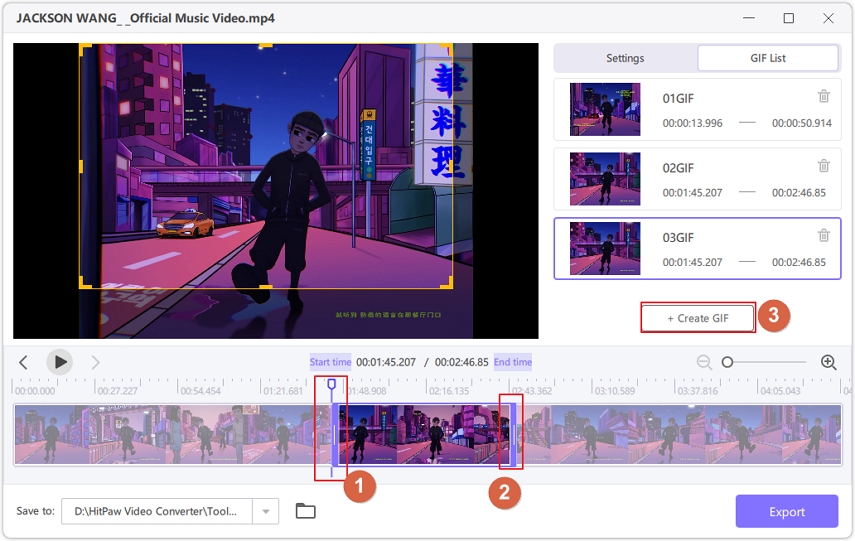
Step 3.After setting all the parameters, you'll only need to tap on 'Create GIF' to generate a perfect GIF.

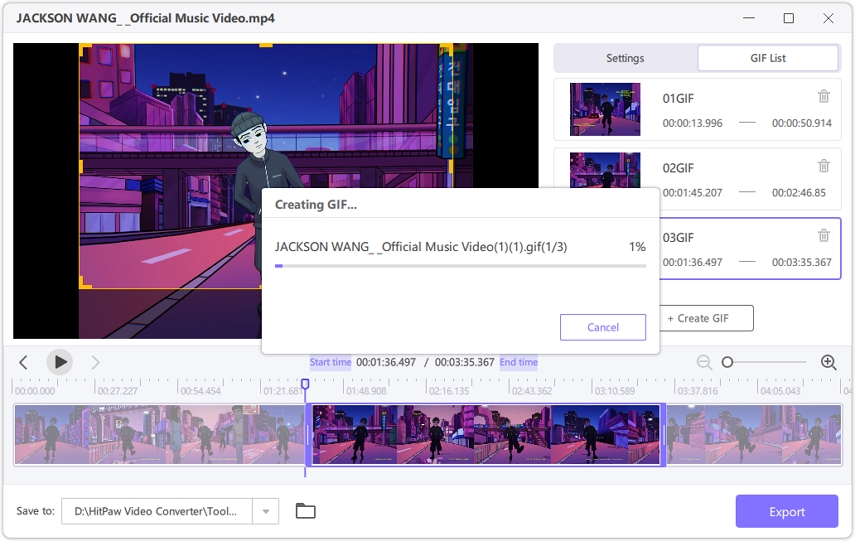
Step 4.After creating the GIF, click on 'Export' to begin downloading the GIF into the desired location.

Part 2. How to Convert MOV to GIF on Mac in Preview
If you're looking for a quick, no-install method to convert MOV to GIF Mac users already have at their fingertips, Preview can surprisingly handle basic video-to-image exports. While Preview is best known for handling PDFs and images, it also supports exporting individual frames or short MOV clips as GIFs. This built-in trick lets you Mac os convert MOV to GIF without relying on third-party apps-perfect for simple animations or single-frame shares.
1.Open the Preview program. Launch Preview from your Applications folder or via Spotlight.
2.Navigate to the "File" menu and hit "Open."
3.Select your MOV files, then click "Open." Preview will load each frame as separate images.
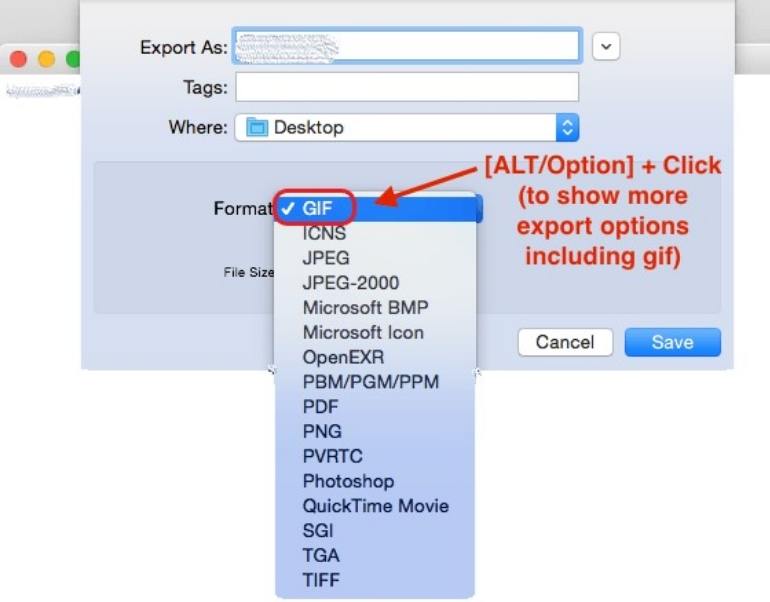
4.Scroll back to the File menu and tap "Save As." Access the Format dropdown menu and choose "GIF."

5.Use the Quality slider to improve the appearance of the exported image.
6.Click "Where" to choose a destination folder, and type a new name in the "Save As" field if desired.
7.Click "Save" to convert your original frames into a GIF.
Note: Preview's export creates a basic animated GIF from the sequence of frames it imports. For smoother, fully animated results-especially for longer clips-you may need third-party tools to polish animation qualities when you convert MOV to animated GIF Mac.
Part 3. How to Convert MOV to Animated GIF Mac Using Automator
If you're a Mac user looking for a free and efficient way to convert MOV to animated GIF, Automator is a built-in app that can do the job-no third-party software required. Whether you want to turn a video clip into a shareable meme, an instructional loop, or a social media animation, Automator is a powerful tool for batch processing and automation.
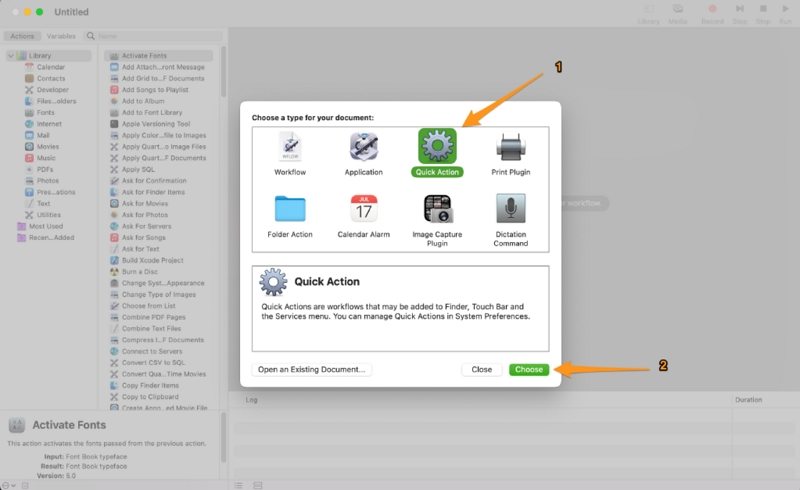
1.Open Automator from your Applications folder. When prompted, select "Quick Action" (or "Service" in older macOS versions). Click "Choose."

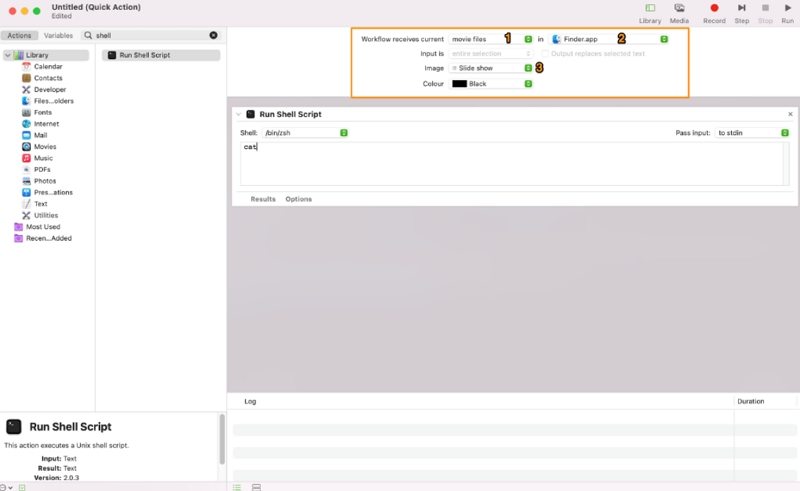
2.At the top of the workflow: Set "Workflow receives current" to "Movie Files". Set "in" to "Finder". This setup ensures you can right-click any video file in Finder and run this workflow.

3.In the Library panel on the left, search for "Encode Media." Drag the "Encode Media" action into the workflow. In the dropdown, select:
- Setting: Custom
- Format: Audio and Video
- Video Format: H.264 (Leave as default)
- Audio Format: Leave as default or disable if you want silent output
While this step technically re-encodes to MP4, it's often used as an intermediary step in workflows that manipulate video. You can skip this if you already have clean MOV input.
4.In the Library panel, search for "Run Shell Script" and drag it in after "Encode Media".
Configure it as:
Pass input: as arguments
Paste the following code:
for f in "$@"
do
/usr/bin/ffmpeg -i "$f" -vf "fps=10,scale=480:-1:flags=lanczos" -loop 0 "${f%.*}.gif"
done
Explanation:
- fps=10 controls the GIF frame rate (adjust as needed)
- scale=480:-1 resizes width to 480px, maintaining aspect ratio
- loop=0 makes the GIF loop infinitely
- Output will be saved in the same directory as the original video
Note: You need FFmpeg installed on your Mac to use this method.
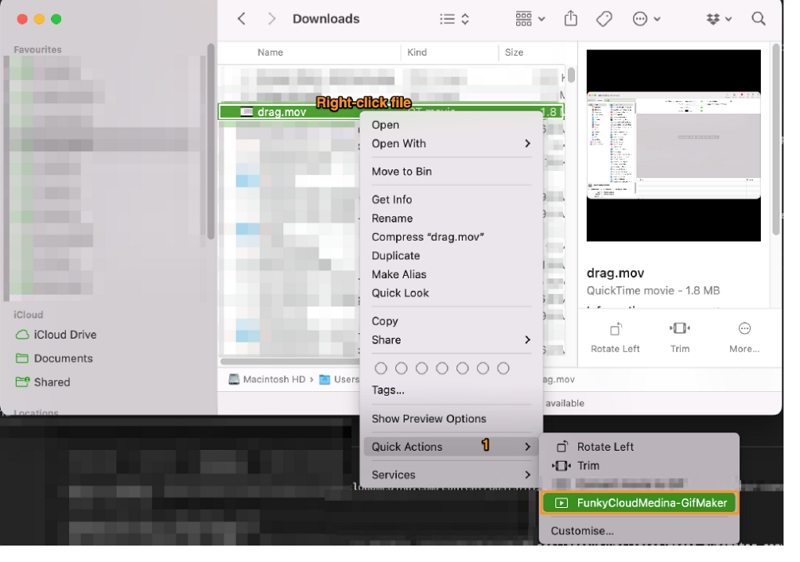
5.Go to File > Save, name your Quick Action something like "Convert to GIF". Now, right-click any MOV file in Finder, go to Quick Actions > Convert to GIF. The animated GIF will appear in the same folder as your MOV.

Part 4. How to Convert MOV to GIF Mac with GIPHY Capture
For quick screen-capture conversions, the free GIPHY Capture app makes Mac os convert MOV to GIF tasks a breeze. Rather than importing files, you simply record the portion of your screen playing the MOV, and GIPHY Capture handles the rest. It's perfect for creating short, social-ready animations from tutorials, gameplay, or video calls-no video editing experience required.
- 1.Download GIPHY Capture from the App Store and launch it; a green capture frame will appear.
- 2.Play your MOV video in any media player and position the capture window over it.
- 3.Click Start Recording to capture the segment you want as a GIF.
- 4.When done, click Stop, noting GIPHY Capture supports up to 30 seconds per clip.
- 5.Trim and resize your GIF within the GIPHY Capture interface as needed.
- 6.Click Save GIF (or the export icon) to store your animation in the desired folder.
Part 5. How to Convert MOV to GIF on Mac with Adobe Photoshop
Besides editing your photos, Photoshop can also turn videos into GIFs. If you intend to convert MOV to GIF Mac, Photoshop is a good idea. However, turning Mac MOV to GIF through Photoshop might be a bit complicated for many people's liking, but it is undoubtedly worth a try. Here's how to convert MOV to GIF Mac on Photoshop:
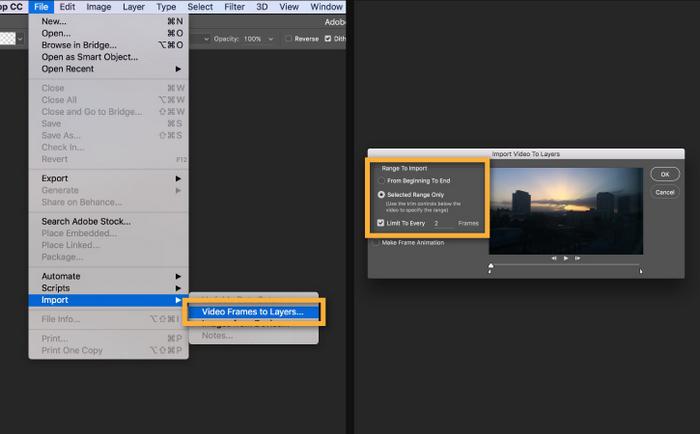
Step 1.Install Photoshop on your Mac and launch Adobe Photoshop. Next, you'll need to turn the video's frames into individual layers. Navigate to the File icon and click on the "Import" option. Proceed ahead by selecting the Video Frames to Layers.

Step 2.Browse and launch the MOV files you'd like to turn into GIFs. Next, tap on Import Video to Layers and click OK once you successfully upload the MOV video.
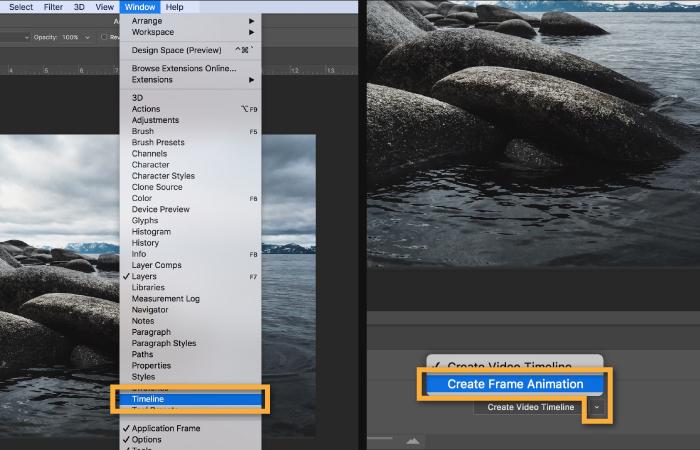
Step 3.Select the "Timeline" icon after hitting the Window option. Next, tap on the" Create Frame Animation" icon after hitting the arrow option. Now, you can tap the button to create the new frame animation.

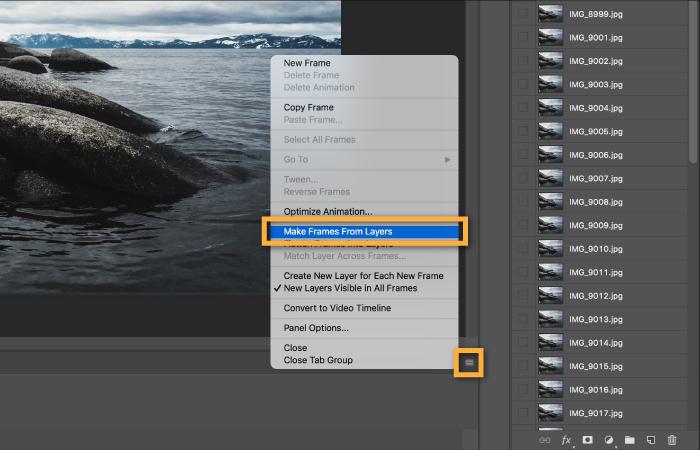
Step 4.Navigate to the Timeline panel's upper right corner and tap on the menu icon After clicking the "Make Frames From Layer", you'll be able to turn all the panel's layers into individual frames in the animation.

Step 5.Visit the Timeline Panel's bottom and tap on the repeat menu before specifying the number of times you'd like to repeat the gif. Once you're done selecting it, you can tap on the" Play" icon to preview the GIF.
Step 6.Select " Save for Web" after navigating to the File icon and hitting the Export icon.
- Choose GIF 128 Dithered after visiting the Preset Menu.
- Navigate to the Colors menu and choose 256
- Change the image size.
Select the destination of your animated GIF file after clicking on the Save icon.

Frequently Asked Question about Mac Convert MOV to GIF
Q1. Can QuickTime convert video to GIF?
A1. No, QuickTime Player cannot directly convert videos to GIFs. While it allows you to trim and export MOV videos, it doesn't support exporting in GIF format. However, you can use QuickTime to trim your video and then use another tool like Automator with FFmpeg or a third-party GIF converter to complete the process.
Q2. Can iMovie convert to GIF?
A2. No, iMovie doesn't support exporting videos as GIFs either. You can edit and export your MOV file as an MP4, then use another tool (such as Automator with FFmpeg, HitPaw Video Converter, or an online converter) to turn the exported video into a GIF.
Q3. Can I convert MOV to GIF with FFmpeg on Mac?
A3.
Yes, FFmpeg lets you turn a MOV straight into a GIF with a simple Terminal command. After installing FFmpeg via Homebrew (brew install ffmpeg), run for example:
ffmpeg -i input.mov -vf \"fps=10,scale=480:-1:flags=lanczos\" -loop 0 output.gif
fps=10 sets the frame rate (adjust as needed)
scale=480:-1 resizes the width to 480 px, preserving aspect ratio
-loop 0 makes the GIF loop infinitely
Conclusion
Converting MOV to GIF Mac has never been easier thanks to these four versatile methods. Whether you need the professional controls of HitPaw Univd, the convenience of Preview, the automation prowess of Automator, or the simplicity of GIPHY Capture, there's a solution tailored to your workflow. Pick the approach that best fits your needs and start creating eye-catching animated GIFs on your Mac today!




 HitPaw VoicePea
  HitPaw VikPea (Video Enhancer)
 HitPaw FotorPea


Share this article:
Select the product rating:
Daniel Walker
Editor-in-Chief
This post was written by Editor Daniel Walker whose passion lies in bridging the gap between cutting-edge technology and everyday creativity. The content he created inspires the audience to embrace digital tools confidently.
View all ArticlesLeave a Comment
Create your review for HitPaw articles