How to Remove Blur From Video in Premiere Pro
Even the well-thought-out video may become unusable due to blur. No matter whether there are motion blurs inflicted by quick camera moves or out-of-focus pictures, compression defects, or other kinds of blur, there often is the necessity to eliminate it out of your videos to achieve the professional-like outcome. Adobe Premiere Pro has a number of in-built options that can be used to tackle the problem of blur. This article is a full-fledged guide to the best practices of removing blur from video in Premiere Pro and the state-of-the-art ways of blurring video with the help of AI.
Part 1: Why Is Your Video Blurry in Premiere Pro?
It is an effort to go through the cause of blurring in your footage, and then you are able to go ahead with correction. There are a number of reasons why videos may become blurry in Premiere Pro:
- Camera shake while shooting can introduce unwanted blur.
- Low-light conditions often cause videos to appear soft due to noise and limited sensor performance.
- Motion blur occurs when fast-moving subjects are captured with a slow shutter speed.
- Compression artifacts from highly compressed videos can significantly reduce image clarity.
- Fine details are often lost when video files are compressed for the web or to save storage space.
- Export settings in Premiere Pro can also introduce blur if not configured correctly.
- Using low bitrates, improper resolution scaling, or the wrong codec can degrade video quality during export.
- Low-quality stabilization systems can lead to shaky or blurry clips.
With the causes being clear, we now embark on how we can use manual means that Premiere Pro offers to take care of them.
Part 2: How to Sharpen Video in Premiere Pro
The professional video editing software offers a number of in-built transformation tools to enhance and defocus video clips. Although these techniques need to be manually adjusted and somewhat know the technical knowledge of using these techniques, they can work well on removing blur from video.
Method 1: Apply Unsharp Mask for Basic Sharpening
One of the most basic sharpening tools in Premiere Pro is that of Unsharp Mask. Such an effect, though named after the type of cut it creates, nevertheless, this effect in the real sense makes footage sharp by adding contrast to notes of its borders. To use it, go to the Effects Panel, then type Unsharp Mask, and drag it to your clip.
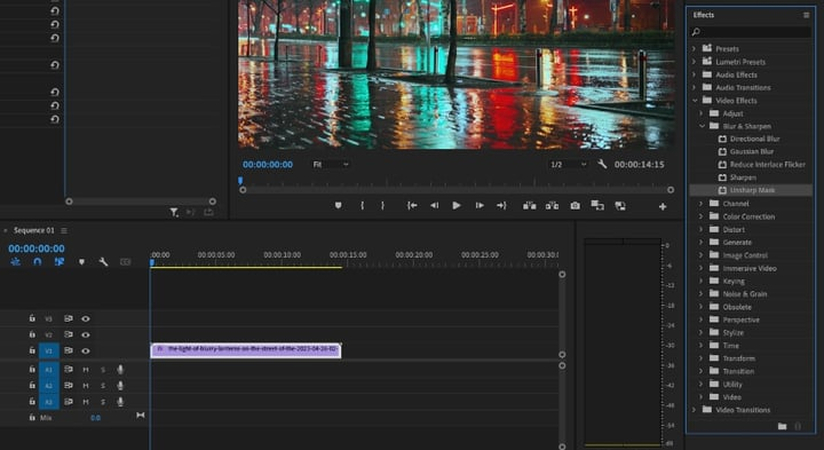
In most programs, the parameters that should be set are Amount (regulates the intensity of sharpening), Radius (decides which pixels can be affected by the sharpening), and Threshold (determines how much contrast difference is needed to be sharpened).
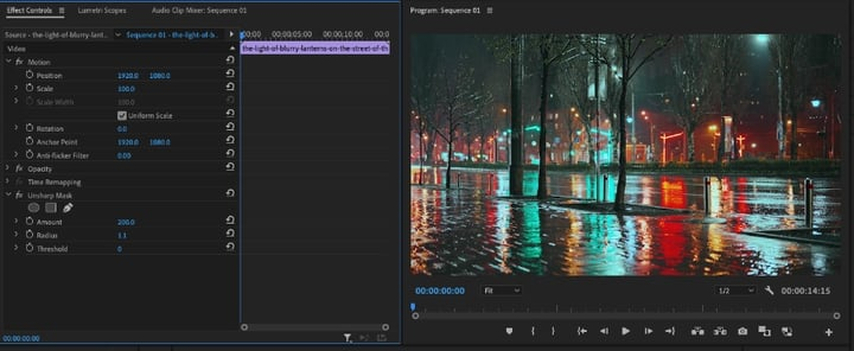
Begin the settings conservatively. Amount as 100-150%, Radius between 1-2 pixels and Threshold as 0-5. This is a combination of methods and very effective on mild softness, but causes artifacts when over-applied.
Method 2: Adjust Lumetri Color (Contrast, Clarity)
Lumetri Color control has the great capabilities of making the video more clear. The Clarity slider specifically works on midtone contrast which may be used in recovering detail in soft footage. Raising the clarity value can also sharpen your video looking smoother without the ugly sharpening artifacts which other sharpening modes might cause.
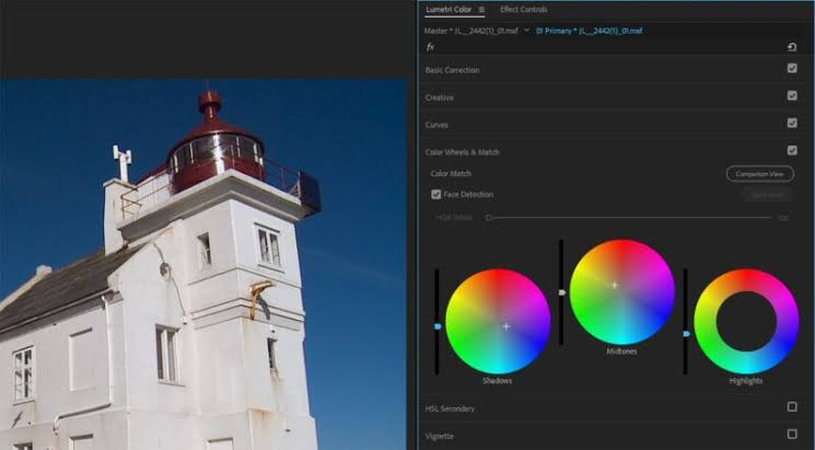
In the Basic Correction tab, you can also work on overall contrast, highlights and shadow to increase the perceived level of sharpness on your own footage. The slider Texture is another chance to control, adjusting the level of slim details, without altering the skin tones significantly.
Method 3: Scale or Crop Footage to Minimize Blurry Areas
In some cases, it is best to just remove out-of-focus areas in your shot. In case blur occurs in specific regions of your footage only, you give a chance to crop the problematic areas using the Scale and Position settings. This technique is very useful when countering lens distortion containing edge blur or when the edges of your picture are out of focus although the middle is in focus.
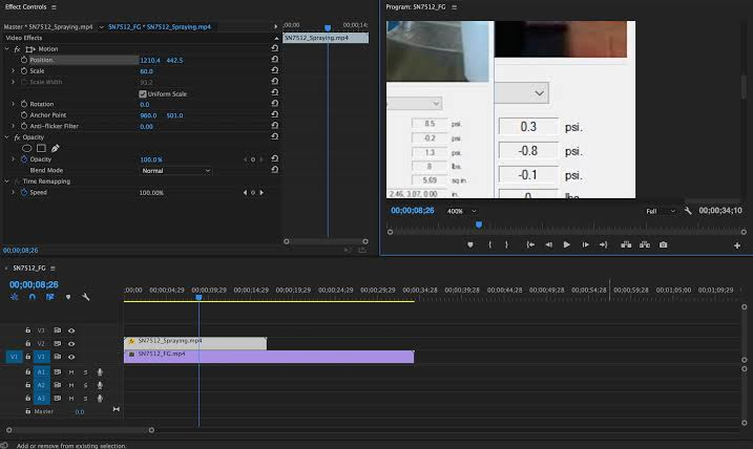
Scale your footage and move it up and down using Motion controls of the Effect Controls panel without allowing blurred parts to be seen. Remember that up-scaling will lower your effective resolution, so don't employ this to the extreme.
Method 4: Disable or Adjust Any Blur Effects (like Gaussian Blur)
Before using corrective actions, make sure that you have not unnecessarily introduced blur using effects or transitions. Under your Effect Controls, be sure to remove any effects involving blur-Gaussian Blur, Directional Blur, or Motion Blur. In case they are present, disable them so that they do not have the same effect or change their settings most so that they have less effect.
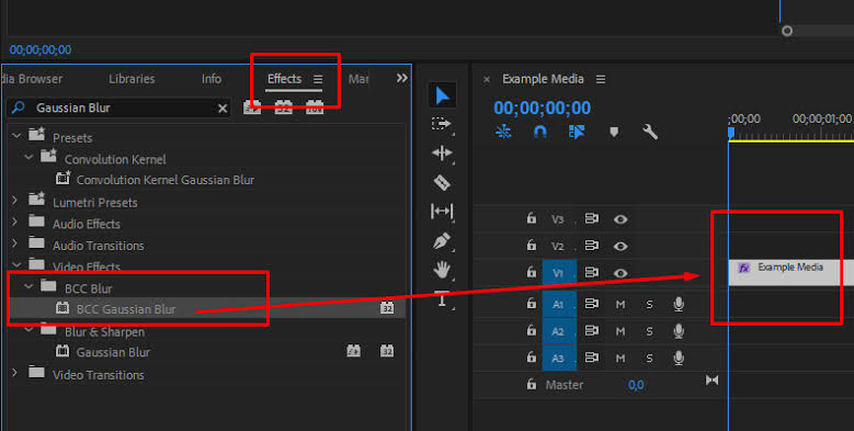
Occasionally the blur can be added in nested sequences or adjustment layers. Have a look at the way your project is structured so you can see whether there are any lurking causes of blur that are being applied to your footage.
Method 5: Advanced Masking with the Layered Clips
In more complicated blur scenarios, it is possible to apply several versions of the same clip by setting various sharpening to different areas of your choice. With masks, it is possible to isolate regions that require various degrees of correction. The method is especially helpful in case of videos that have blurred parts and those that are focused.
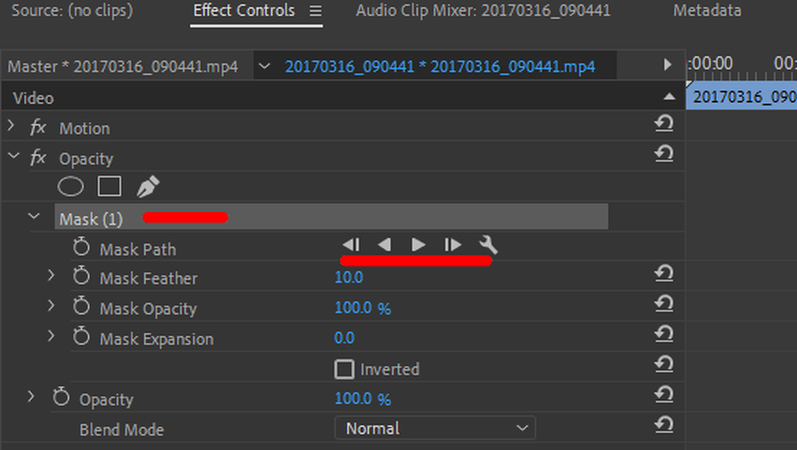
Duplicate your clip to a higher video track, and set different settings on each of the two or more layers, and hide and reveal using masking tools, the best corrected sections of each layer. It is more time-consuming but has the potential of producing better results in the case of difficult footage.
Typical Restraints of Manual Methods in Premiere Pro
These manual methods may be good, but they have a number of shortcomings in common. They need considerable time, and skills in technology to either give best results. Halos or grain may be generated by excessively sharpening. Moreover, they are usually not very efficient when it comes to extreme blur or motion blur, and may not perform very well with compressed footage.
Part 3: Manual vs. AI: What's the Best Way to Remove Blur?
AI-powered deblurring technology has revolutionized video enhancement by automatically analyzing and correcting blur with minimal user intervention.
| Aspect | Manual (Premiere Pro) | AI-Powered Solution |
|---|---|---|
| Learning Curve | Steep - requires technical knowledge of effects and parameters | Minimal - automated processing with simple interface |
| Speed | Time-consuming - requires manual adjustment and fine-tuning | Fast - automated processing in minutes |
| Quality | Variable - depends on user skill and footage type | Consistent - advanced algorithms deliver reliable results |
| Supports Motion Blur | Limited - basic tools struggle with complex motion blur | Excellent - specifically designed to handle motion blur |
| Output Quality | Depends on technique - can introduce artifacts if overdone | High - preserves original quality while removing blur |
This comparison clearly demonstrates why AI-powered solutions like HitPaw VikPea are becoming the preferred choice for video enhancement professionals.
Part 4: AI Unblur a Video with Premiere Pro Alternative
Unlike Premiere Pro, which relies heavily on manual adjustments, VikPea uses AI-powered video enhancement to intelligently restore clarity. You don’t need professional editing experience to get impressive results. HitPaw VikPea is an AI-powered video enhancement software designed specifically for restoring clarity, detail, and sharpness in blurred footage.
The software is capable of recognizing the blur type and using suitable correction algorithms to correct blur of various types automatically.
Important Characteristics of HitPaw VikPea
- AI-Powered Deblurring: Complex algorithms tailored to work specifically on removing motion blur, focus blur, and compression artifacts without sacrificing natural video quality.
- Batch Processing: Load several videos at once and spend less time on them, saving time to the content creator and professionals dealing with numerous videos.
- User-Friendly Interface: The software has an easy-to-understand interface that lets people, regardless of their expertise, use professional-level video enhancement.
- Various Convergence Models: Several AI models customized to work well with different kinds of video such as general video, animation, and face-centric models.
- Superior Quality Results: The device supports up to the 8K resolution output, which makes your edited videos highly professional.
- Format Compatibility: Plays nearly all the well-known video formats removing compatibility issues.
How To Remove Blur and Sharpen Video with Premiere Pro Alternative
The process of deblurring videos with HitPaw VikPea is straightforward and requires minimal technical knowledge:
Step 1.Visit HitPaw VikPea and download it on your PC or Mac.
Launch the program and choose Video Enhancer feature from the main interface. Drag and drop your blurring video to the control panel.

Step 2.Select a General Model, Sharpen Model, Portrait Model or Video Quality Repair Model according to the requirements.

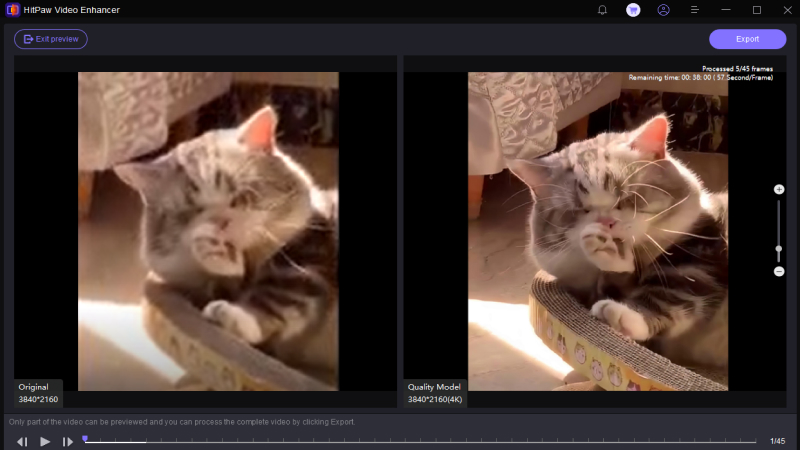
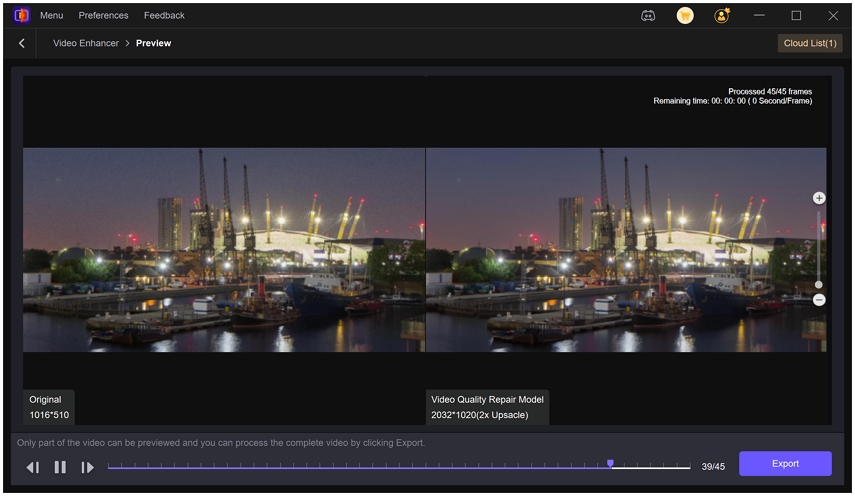
Step 3.Hit Preview to view upgraded video. Click on Export in case you are satisfied.

Click the video to learn more about enhancing your video with HitPaw VikPea.
Part 5: Premiere Pro or HitPaw VikPea - When Should You Use Which?
Whether to use manual techniques of Premiere Pro or HitPaw VikPea is determined by what you need, technical knowledge, and the project in hand.
Use the Manual Techniques of Premiere Pro in the Situations Where:
- You require an executive manipulation of certain features about sharpening
- The footage has minimal softness problems, which you are dealing with
- You are already familiar with the interface of Premiere Pro, and you had time to adjust manually
- It is a working project where you have to be in full creative control of all the parameters you use
- The limitation of finances does not allow investment in the AI-based software
Use HitPaw VikPea in Following Situations:
- The blur or motion blur is too serious to be solved by hand methods
- You have to work with several videos that require processing in the shortest time possible and efficiently
- You do not have the technical skills to do manual sharpening parameters adjustment
- You do not want the trial and error approach rather you need the predictable results you can be consistent with
- What you have to work on is highly compressed footage which you can only improve using advanced algorithms
- In your workflow, time is of essence
HitPaw VikPea is more effective and efficient especially to most users who may be experiencing moderate to severe blur problems.
FAQs About Removing Blur in Premiere Pro
Q1. How to remove the blur effect from video in Premiere Pro?
A1. In order to eliminate the blur effect in the Premiere Pro software, begin by determining the cause of the blur. With simple sharpening use Unsharp Mask with conservative values, make adjustments using Lumetri Color to increase clarity and contrast, etc. It requires a high skill level.
Q2. What's the easiest way to fix a blurry video?
A2. The most convenient solution to the problem of a blurred video is to make use of Artificial Intelligence-powered applications like HitPaw VikPea. Manual mode of editing software is time-consuming, technical and some of the modifications carried out might not be satisfying every time.
Q3. Is HitPaw better than Premiere Pro for removing blur?
A3. In the case of blur removal in particular, HitPaw VikPea tends to be better when compared to manual methods of Premiere Pro. It operates at a higher level of AI-based algorithm particularly tailored towards deblurring, is much faster, and more consistent.
Conclusion
Making video clips clear is one of the frequent problems all video producers have to cope with. Although Adobe Premiere Pro offers some manual solutions dealing with the blur problem, they need high technical knowledge and consume much time and sometimes fail to be effective, particularly in the cases of severe blur or motion blur.
HitPaw VikPea is a game changer in the video enhancement technology prevailing in the market as its key offerings include AI-enabled technology that automates the process of producing the end result which is much better in quality compared to other technologies available in the market.



 HitPaw Univd (Video Converter)
 HitPaw VoicePea
  HitPaw FotorPea
![[2026 Updated] How to Get Realistic Kafka AI Voice Easily](https://images.hitpaw.com/topics/covers/kafka-ai-voice-cover.jpg)

Share this article:
Select the product rating:
Daniel Walker
Editor-in-Chief
This post was written by Editor Daniel Walker whose passion lies in bridging the gap between cutting-edge technology and everyday creativity. The content he created inspires the audience to embrace digital tools confidently.
View all ArticlesLeave a Comment
Create your review for HitPaw articles