Video Compression Artifact Removal: Pro Tips
If you compress videos to save space, you might notice video compression artifacts during the process. They not only degrade the viewing experience by introducing unnatural elements and visual noise but also distract the viewers. Notably, the root causes are low-resolution sources and compression algorithms becoming aggressive, and removing them becomes essential to meet high-quality standards. In this article, we will elaborate on how to remove artifacts to achieve a polished look.
Part 1. Understanding Video Compression Artifacts
To understand video artifact types clearly in order to remove them, let’s now discuss their causes and impacts first in a table:
| Artifact Type | Common Cause | Impact on Video |
|---|---|---|
| Blockiness | It occurs when you compress a video at a low bitrate. | Creates square pixel blocks, which causes the image to lose detail. |
| Banding | Banding results because of reduced color depth, especially in gradients. | Leads to harsh color transitions, and the smooth areas look artificial. |
| Blurring | Blurring comes from excessive compression or noise reduction. | Makes faces and objects lose sharpness and appear soft. |
| Mosquito Noise | Occurs due to edge prediction errors in video compression algorithms. | Flickering appears around edges, forming distracting outlines around objects. |
| Color Bleeding | Comes from chrominance compression, which inaccurately represents colors. | Causes colors to spill beyond edges, leading to inaccurate visuals. |
Part 2. Video Compression Artifact Removal: 4 Top Tools
Are video compression artifacts making your footage appear blurry or just plain unwatchable? In this case, explore the following section packed with incredible platforms specifically designed to smooth out those imperfections:
1. HitPaw VikPea - The Best Tool to Move Video Artifacts
Among many video artifacts examples, HitPaw VikPea (formerly HitPaw Video Enhancer) excels in delivering 8K results, overcoming every obstacle. It removes these artifacts with precision by sharpening even minor details that other similar platforms often ignore.
Key Features of HitPaw VikPea
- Its Detail Recovery Model can be used to remove blurriness in videos and achieve clear and distortion-free visual effects.
- Through the Video Quality Repair Model, all noise artifacts caused by compression can be eliminated, making the video clear.
- The General Denoise Model allows users to effectively remove compression artifacts while preserving original details.
- Its Frame Interpolation Model converts videos with low-frame-rate artifacts into high-frame-rate videos, making their resolution higher.
How to Move Video Compression Artifact With HitPaw VikPea?
Explore the provided stepwise guide to remove video artifacts with HitPaw VikPea and stop the video from falling apart:
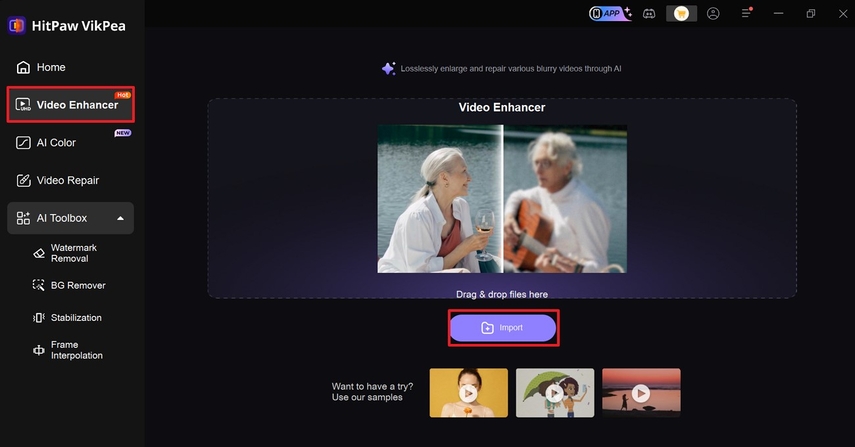
Step 1. Install HitPaw VikPea and Enable the Video EnhancerCommence the software on your device and access “Video Enhancer” from the home interface. Now, press the “Import” button to add your low-quality, blurry video to the tool.
Step 2. Turn on the AI Model and Analyse Your Results
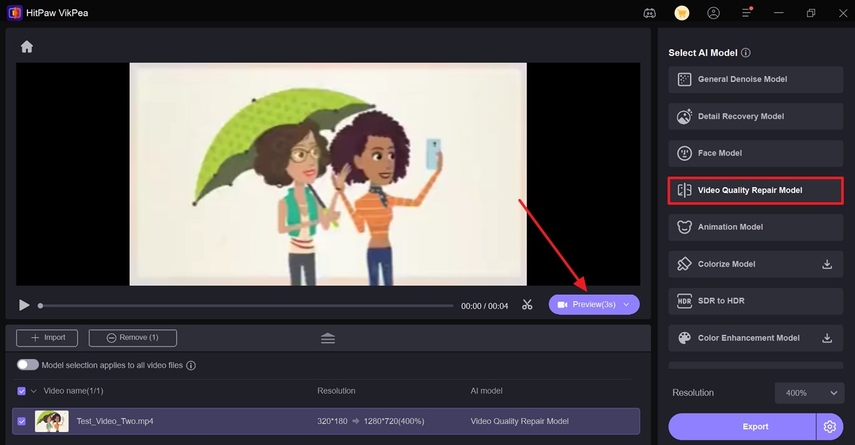
From the right panel, choose the “Video Quality Repair Model” and navigate to the “Preview” button to examine the results.
Step 3. Export Your Upscaled Video to the Device
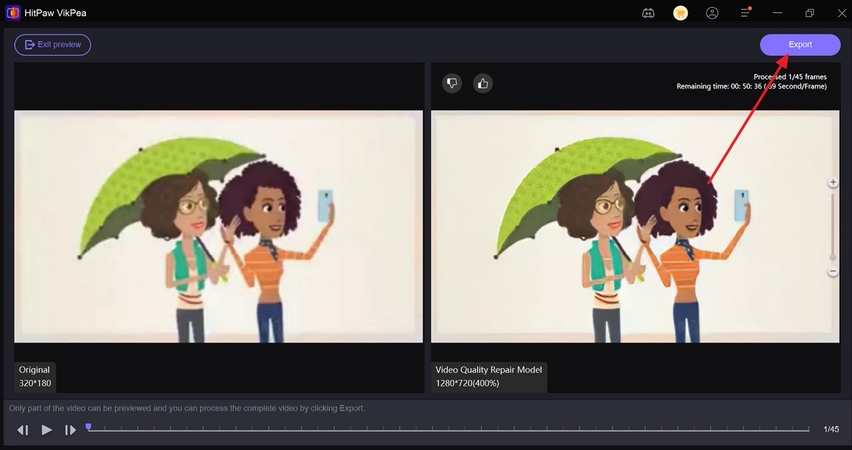
Ultimately, proceed to the “Export” button in the top right corner and preserve your upscaled video to device.
2. Topaz Video AI
Key Features1. With AI, you can retrieve lost details and improve edges, delivering a clearer image.
2. It allows individuals to specify the resolution to remove video compression artifacts.
3. For more enhanced results, users can opt for models like Artemis and Proteus.
Pros
- When upscaled through, it minimizes artifacts and improves viewing on large screens.
- Supports adjustable parameters with AI models for optimal artifact reduction and detail.
Cons
- The AI requires substantial computing power, resulting in lengthy process durations.
- Its optimal performance evokes the need for high-end GPU and sufficient RAM.
Stepwise Guide to Remove Artifacts With Topaz AI
Step 1. Commence Topaz Video AI and hit the video importing button to add the video with compression artifacts.
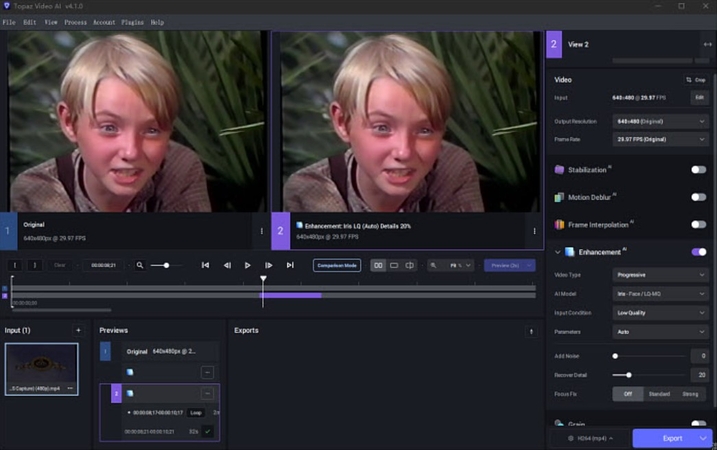
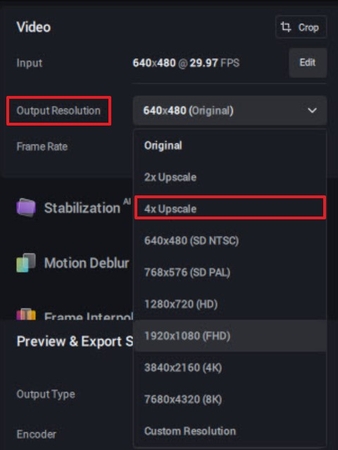
Step 2. From the right-hand panel, extend the “Output Resolution” menu and choose a resolution from the given options.
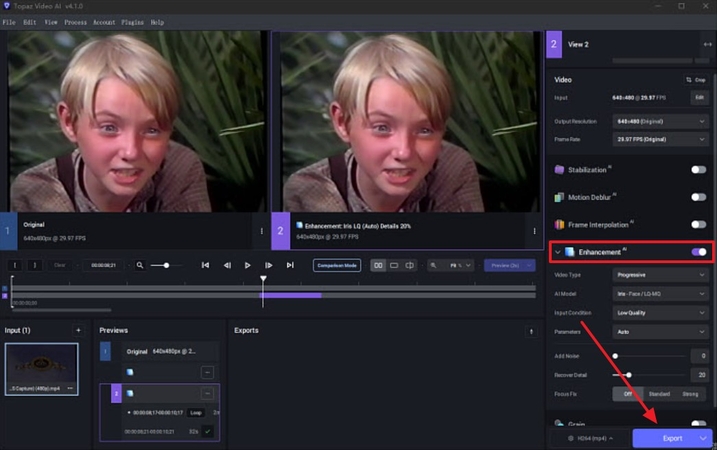
Step 3. Toggle the “Enhancement” feature and proceed to the “Export” button at bottom right corner of your screen.
3. Handbrake
Key Features1. Its Deblock functionality, eliminates blocky artifacts found in heavily compressed videos.
2. You can consider Denoise filters, like HQDN3D and NLMeans, for kinds of noise.
3. Use the Video tab to modify the encoding settings for improved overall quality.
Pros
- The software enables Rate Control to preserve details from constant quality to lower RF.
- It facilitates removing interlacing and telecine artifacts mostly found in older content.
Cons
- With standard upscaling, individuals cannot remove artifacts from the videos.
- Extensive use of incorrect settings might introduce new artifacts or worsen them.
Tutorial to Remove Artifacts With Handbrake
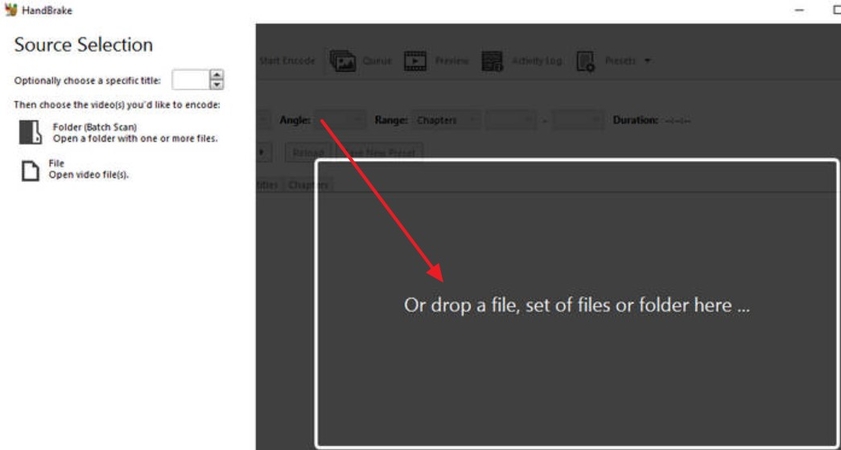
Step 1. First, install Handbrake on your device and click the “Files” option to import video with compression artifacts.
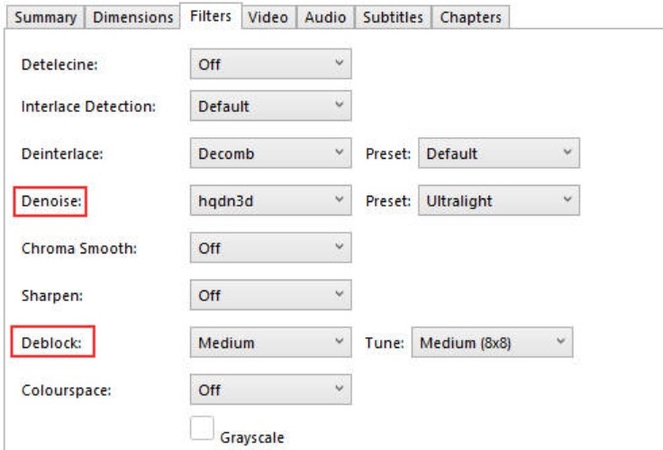
Step 2. Once video is added, proceed to the “Filters” tab at top and choose the “hqdn3d” option from the drop-down menu for Deblock. Under the “Denoise” section, select the “Medium” option after accessing the menu.
Step 3. After this, choose a specific destination for your output by pressing the “Browse” button.
4. Winxvideo AI
Key Features1. Beneath Model Settings, you can prefer to upscale video from 2x to 4x.
2. Its Super Resolution panel provides levels to remove video compression.
3. With Winxvideo AI, users can import multiple videos for batch artifact removal.
Pros
- This tool facilitates uplifting lower-resolution videos to up to 4K and 8K.
- Before exporting, you can adjust the Output Codec, Quality, and Folder for video.
Cons
- The artifacts removal performance varies on a specific high-performance GPU.
- Trial version has limitations like a 5-minute video length and prominent watermarks.
Tutorial to Remove Video Artifacts with Winxvideo AI
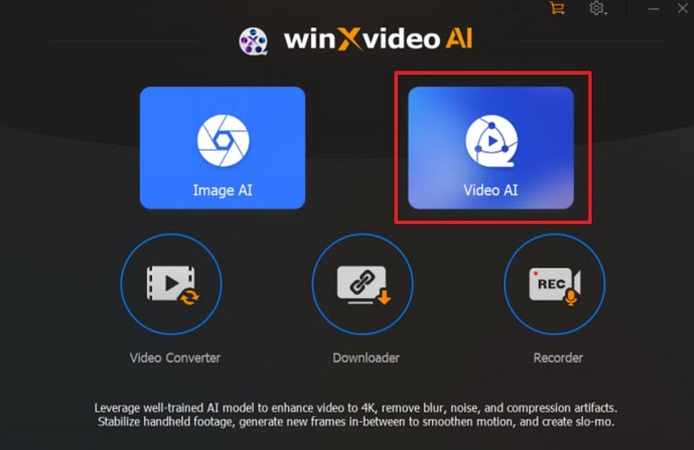
Step 1. Install the Winxvideo AI first and press the “Video AI” option after running it. Afterward, drop the video from which you want to remove video compression artifacts.
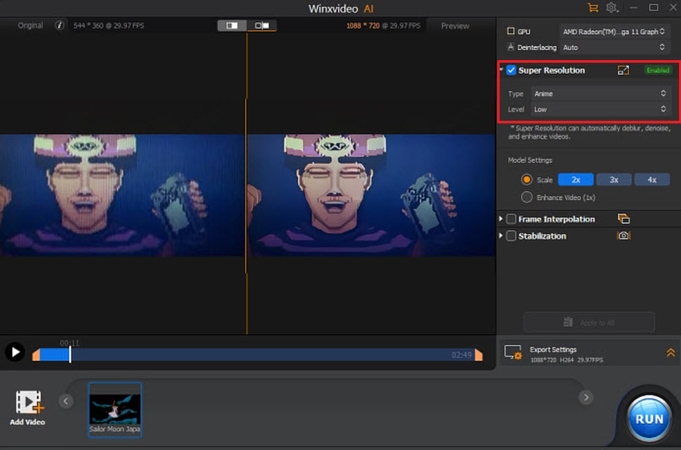
Step 2. Navigate to the “Super Resolution” panel and choose the video type and level of resolution, respectively.
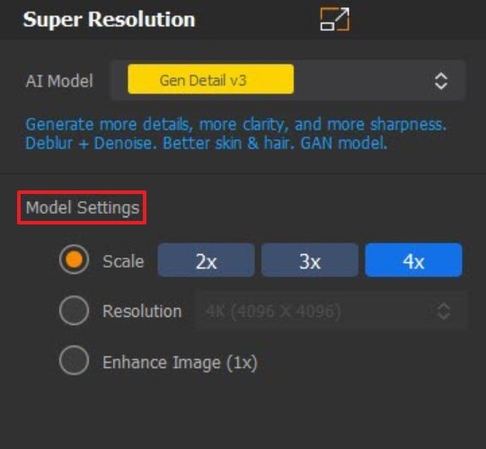
Step 3. Under the “Model Settings”, select the “Scale” option from 2x to 4x as per preference. Later on, check boxes for “Resolution” and “Enhance Image” for more improved results. Lastly, press “Export Settings” option to adjust quality and hit the “Run” button to remove artifacts.
Part 3. Proactive Approaches to Avoid Video Compression Artifacts
To prevent video compression artifacts, apply smart shooting techniques and optimize your export settings as explained in this section:
Shooting Tips
1. Capture footage at a higher resolution (shoot in 4K when exporting in 1080p) to preserve detail after compression.
2. Avoid fast motion in low-light scenes because it can strain the bitrate and introduce artifacts.
3. Use manual camera controls to reduce noise, exposure shifts, and flickering issues in videos.
4. Maintain proper lighting during filming; well-lit scenes compress more clearly than dark scenes.
Export Settings to Minimize Compression Loss
| Export Format | Recommended Bitrate | Codec | Best Use Case |
|---|---|---|---|
| MP4 (H.264) | 15–20 Mbps (1080p) | H.264 | Online platforms |
| MOV (ProRes) | 45+ Mbps | ProRes | Archival quality |
| MKV (HEVC) | 10–15 Mbps (1080p) | H.265 | High-efficiency |
Part 4. FAQs About Video Compression Artifacts
Q1. Can you completely remove artifacts from old videos?
A1. Although you can not remove video artifacts entirely from an old video, a significant reduction can be done through various tools. For example, platforms like HitPaw VikPea offer many AI models, such as the Video Quality Repair Model, which helps in removing compression artifacts using AI.
Q2. Which is better: reducing artifacts manually or using AI tools?
A2. It generally depends on the quality of your source video, as both methods address different needs. Manual method gives you more control over filters or denosing, while AI tools are a better choice for speed.
Q3. What are the 5 types of compression?
A3. The 5 common types of compression include Lossy Compression (removes some data) and Lossless Compression (compression without original data). Other types are, Intra-Frame Compression (reduces each frame individually), Inter-Frame (compress multiple frames) and Run-Length Encoding for simplifying repetitive data.
Q4. What causes video compression artifacts?
A4. While the video compression artifacts are caused by loss of data during compression, particularly in lossy formats. Still many causes include low bitrates that limit amount of data per frame and fast motion or complex textures.
Conclusion
In conclusion to the above article, it is clear that video compression artifacts are the silent quality-killers of digital footage. These blocky textures, strange blurs, and sudden color branding can immediately take your viewers away from your video. For a simple solution, we recommend using HitPaw VikPea, which provides more realistic results compared to other competitors.


 HitPaw Edimakor
 HitPaw FotorPea
 HitPaw Univd (Video Converter)



Share this article:
Select the product rating:
Daniel Walker
Editor-in-Chief
This post was written by Editor Daniel Walker whose passion lies in bridging the gap between cutting-edge technology and everyday creativity. The content he created inspires the audience to embrace digital tools confidently.
View all ArticlesLeave a Comment
Create your review for HitPaw articles