Ultimate Dark Video Enhancer Guide to Illuminate Your Footage
Shooting in low-light conditions often leaves your footage looking flat, noisy, and underexposed. A dark video enhancer is the perfect solution for transforming dull clips into vivid, broadcast-quality material. Whether you're a content creator, filmmaker, or casual video grapher, enhancing shadow details and boosting color saturation can breathe new life into your recordings. In this guide, we'll explore desktop software, built-in apps, and free online services that excel at bringing out hidden details plus best practices to avoid dark footage from the start.
Part 1. Best AI Dark Video Enhancer to Make Dark Videos Brighter and Clearer
HitPaw VikPea sets a new standard for enhancer dark video technology, leveraging state-of-the-art AI to rescue underexposed footage. Its advanced AI Video Enhancer intelligently expands dynamic range, converts SDR to HDR, and revives shadow detail without introducing noise. With VikPea, you can restore faded clips, enrich colors, and deliver crystal-clear, lifelike videos perfect for both amateur creators and professional editors.
- Transforms SDR footage to HDR for richer contrast and vibrant color detail.
- Boosts low-light visibility by intelligently brightening shadow regions without noise.
- Preserves original metadata and ID3 tags during batch enhancement.
- Applies noise reduction filters to maintain sharpness in dark scenes.
- Restores color vibrancy in faded videos with one-click enhancement.
- Supports up to 8K resolution output for future-proof quality.
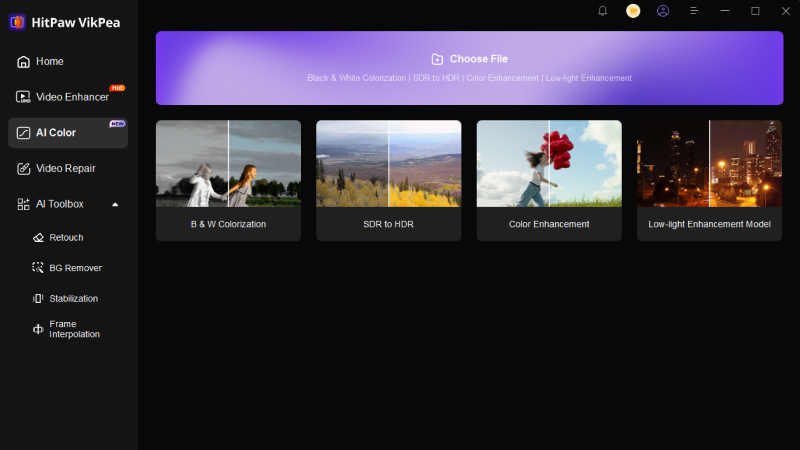
1.Download and Launch HitPaw VikPea on your computer. From the main interface, select theAI Color feature. Here are multiple models like Color Enhancement Model, SDR to HDR and Low-light Enhancement Model.

2.Select Low-light Enhancement Model or SDR to HDR and then import the dark video you want to brighten.
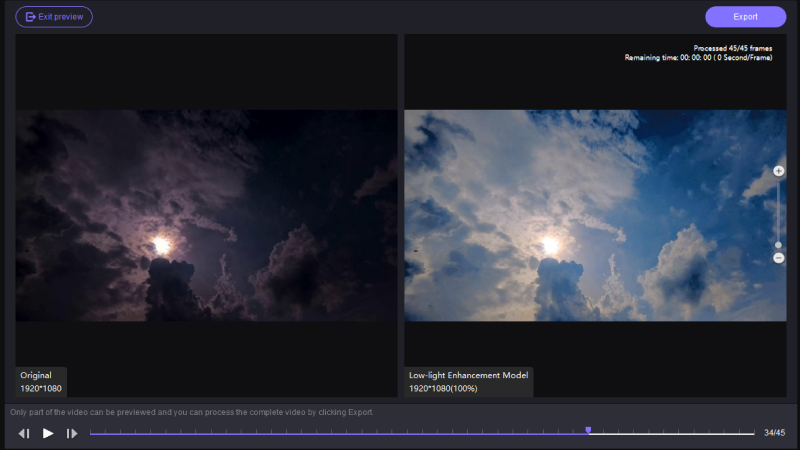
3.Click on Preview to see your video before finalizing it. If satisfied, press Export to save your enhanced video.

Part 2. How to Make a Dark Video Brighter Using iMovie
If you're on macOS, iMovie offers a quick, no-cost way to brighten dark footage. While it doesn't match the power of dedicated AI tools, iMovie's color-correction controls let you adjust brightness, contrast, shadows, and highlights with ease. Perfect for simple projects and quick fixes, it remains a solid choice for beginner editors.
1.After opening the iMovie app on your Mac system, go to Create New > Movie. Import the dark or dull video from your media library.
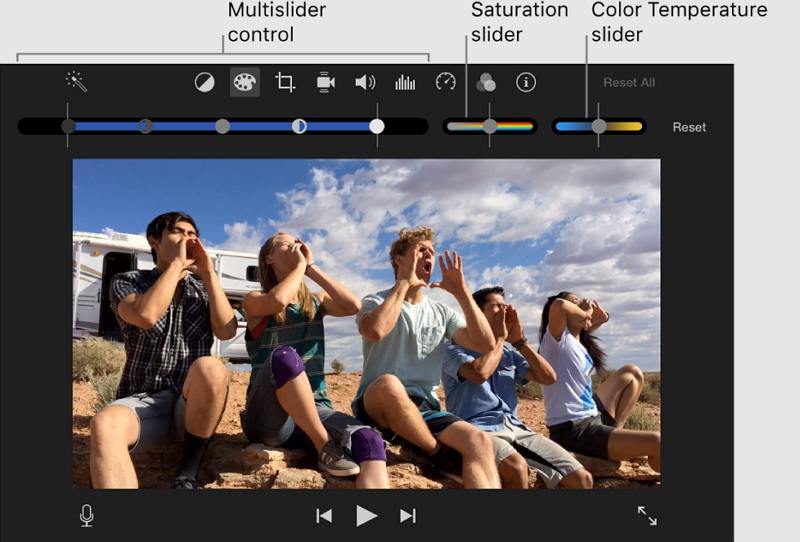
2.Drag and drop the imported video to the timeline. Select Color Balance buttonto access show the color balance controls.

3.Click the Auto button.The clip's color values are automatically adjusted, removing any color casts and maximizing contrast.
4.To manually adjust the color, you can:
- Adjust shadows: Drag the black slider in the multislider control.
- Adjust brightness: Drag the gray slider in the multislider control.
- Adjust contrast: Drag either of the half-moon sliders in the multislider control.
- Adjust highlights: Drag the white slider in the multislider control.
- Adjust color saturation: Drag the Saturation slider.
- Adjust color temperature: Drag the Color Temperature slider.
Pros
- Built-in Mac tool requiring no additional downloads.
- Simple interface for quick brightness adjustments.
- Real-time preview to fine-tune video settings.
- Seamless export to compatible Apple devices.
Cons
- No batch processing for multiple videos at once.
- Export formats limited compared to specialized software.
Part 3. How to Enhance Dark Video Free Online
For occasional tweaks or when you're away from your desktop, free online brighteners can come to the rescue. These browser-based services require no installs and deliver surprisingly good results though they may impose file-size limits or fewer manual controls compared to desktop AI tools.
1. Vmake AI Video Brightener
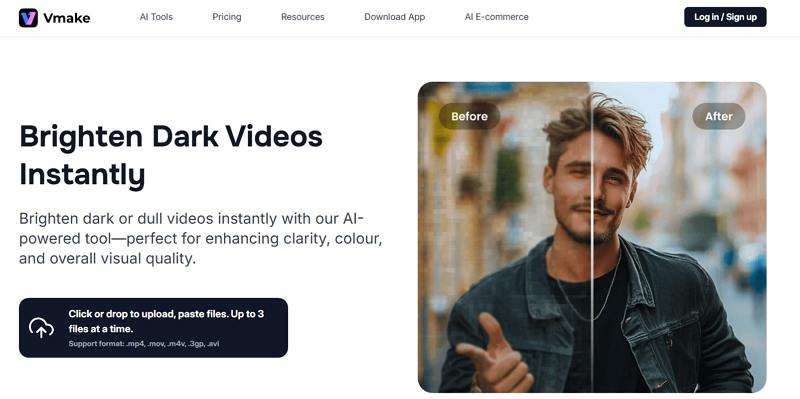
Vmake AI Video Brightener harnesses cloud-based neural networks to intelligently auto-adjust exposure and color balance. It's ideal for creators needing a fast, one-stop solution without installing any software. Just upload, choose resolution, and download, no technical expertise required.
1.Select a video file under 200MB and in an appropriate format; wait a few seconds for upload.

2.Choose your upscaling target resolution: 1080p, 2K, or 4K.
3.Once upscaling completes, download your brightened video in the chosen resolution.
Pros
- No software installation required; works in any browser.
- Automatic AI adjustment for quick brightness enhancement.
- Supports upscaling to 4K resolution easily.
- Processing under 200MB ensures speedy uploads.
Cons
- File size limit restricts large video uploads.
- Depends on stable internet for effective processing.
- Limited manual control over color grading options.
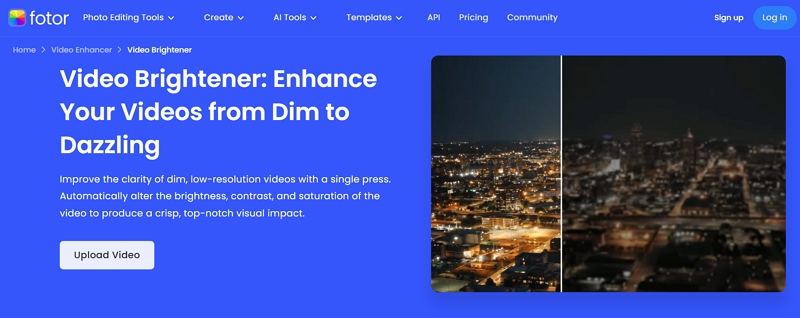
2. Fotor Video Brightener
Fotor AI video brightener offers an intuitive "Enhancer" mode that automatically optimizes brightness, color, and saturation. With instant previews and a clean UI, it's perfect for users who want an effortless workflow without diving into technical settings.
1.Open the Fotor website and upload your dark video in a supported format.

2.The AI tool will auto-adjust brightness, color, and saturation under the Enhancer panel.
3.Preview the brightened clip, compare with the original, and download when satisfied.
Pros
- AI-powered enhancer automatically corrects brightness and saturation.
- User-friendly interface requires no technical expertise.
- Instant preview lets you compare before and after.
- Direct download without watermark or sign-up.
Cons
- Supports limited video formats for uploads.
- No resolution upscale beyond original file size.
- Occasional over-saturation in highly complex scenes.
Part 4. Best Practices for Preventing Dark Videos in the Future
While post-processing can rescue most footage, nothing beats capturing properly exposed video in-camera. Adopting a few simple on-set habits will save you editing time and preserve maximum quality.
- Use Adequate Lighting: Employ key, fill, and backlight sources to evenly illuminate subjects.
- Monitor Histogram: Check exposure levels in real-time to avoid clipping shadows or highlights.
- Adjust ISO Prudently: Keep ISO as low as possible to minimize noise in dark scenes.
- Shoot in Log/RAW: Capture a wider dynamic range for more flexibility in post.
- Plan for Golden Hour: Utilize natural light during sunrise or sunset for soft, even illumination.
- Employ Reflectors: Bounce existing light to fill in dark areas without adding extra lamps.
- Test Exposure Settings: Run quick test clips before rolling the final shot.
- Frame for Light Direction: Position your subject relative to your strongest light source.
Conclusion
Enhancing dark footage has never been easier thanks to powerful AI-driven software like VikPea, built-in editors such as iMovie, and convenient online brighten-and-enhance tools. By selecting the right dark video enhancer for your workflow and adopting solid on-set lighting practices, you'll ensure every frame is clear, vibrant, and ready for your audience. Whether you're polishing archival footage or brightening a nighttime scene, these solutions and tips will keep your videos looking their best.



 HitPaw Univd (Video Converter)
 HitPaw VoicePea
  HitPaw FotorPea

Share this article:
Select the product rating:
Daniel Walker
Editor-in-Chief
This post was written by Editor Daniel Walker whose passion lies in bridging the gap between cutting-edge technology and everyday creativity. The content he created inspires the audience to embrace digital tools confidently.
View all ArticlesLeave a Comment
Create your review for HitPaw articles