The Complete Guide to Sharpen Images in Photoshop
Blurry edges can happen in low light, with handheld shots, or when a lens is soft at wider apertures. Photos may also look softer after resizing for web, social media, or print. Sharpening helps by boosting edge contrast so details like eyes, hair, and textures look clearer at the final viewing size.
Photoshop gives you precise control through layers, masks, and editable Smart Filters. But sharpening needs restraint-too much Amount, an oversized Radius, or no noise control can cause halos, speckles, and harsh texture. This guide shows a safe, non-destructive way to sharpen photos and keep results natural.
If you're searching for how to sharpen an image in Photoshop, the steps below will walk you through the best options.
Why Is Sharpening an Image So Crucial?
Sharpening increases edge contrast so small details appear clearer at the final viewing size. It won't truly "refocus" a missed shot, but it can restore snap to images that are slightly soft.
Sharpening vs. focus-what's really happening
Sharpening boosts micro-contrast along edges to make lines and textures look crisper.
- Focus determines whether real detail exists in the file; sharpening cannot recreate detail from heavy blur.
- Sharpening can make lashes, fabric, and text look more defined by increasing contrast at borders.
- Over-sharpening creates halos and "crunchy" textures instead of real clarity.
Before-and-after cues to judge real improvement
Check sharpening at 100% zoom and toggle the effect on/off in the same spot.
- Edges look thin and clean (no bright/dark rims).
- Skin and skies stay smooth (no gritty noise or banding).
- Hair and fabric gain detail without looking brittle.
- Highlights keep natural color (no weird cyan/magenta fringing).
Practical benefits of proper sharpening
A careful sharpening pass improves consistency across platforms and reduces "redo" work later.
- Cleaner detail after resizing or compression.
- Better legibility for product edges, UI elements, and small text.
- More predictable output for web and print.
Now you can follow our guide to sharpen images using Photoshop.
How to Sharpen Blurry Images in Photoshop
To sharpen a picture in Photoshop the right way, follow this order: work non-destructively, preview at 100%, pick the right sharpening filter, mask the effect, and apply a light output sharpen at the final size. This workflow helps you sharpen cleanly while avoiding halos, noise, and color shifts.
Non-destructive setup (recommended)
Use Smart Objects so sharpening stays editable:
- Right-click your layer → Convert to Smart Object
(or go to Filter → Convert for Smart Filters). - Zoom to 100% (View → 100%) before judging sharpness.
- Apply sharpening filters as Smart Filters so you can reopen settings anytime.
- Use the Smart Filter mask to target sharpening only where it belongs (eyes, edges, textures).
Method 1 - Unsharp Mask (classic, fast)
Simple starting settings (adjust at 100%):
- Radius: 0.8-2.0 px for most photos (set Radius first)
- Amount: increase until detail looks crisp but not gritty
- Threshold: 0-5 to protect smoother areas (like skin)

Method 2 - Smart Sharpen (edge-aware, cleaner)
Recommended setup:
- Remove: Lens Blur (best general option)
- Radius: 0.5-1.2 px for portraits; 1.2-2.0 px for products/landscapes
- Amount: raise until the subject looks clear (stop before halos appear)
- Reduce Noise: use lightly if smooth areas start to look gritty
- Highlights/Shadows (Advanced): fade highlights/shadows if you see halos or noisy dark areas

Method 3 - High Pass (quick, selective)
High Pass is great when you only want to sharpen specific details (eyes, hair, text, product edges).
Steps:
- 1. Duplicate the layer (Ctrl/Cmd + J)
- 2. Go to Filter → Other → High Pass
- 3. Set a small Radius until edges are visible but not thick
- 4. Change blend mode to Overlay (stronger) or Soft Light (gentler)
- 5. Lower Opacity and use a mask to sharpen only the subject

Sharpening Images with AI Photo Enhancer Easily
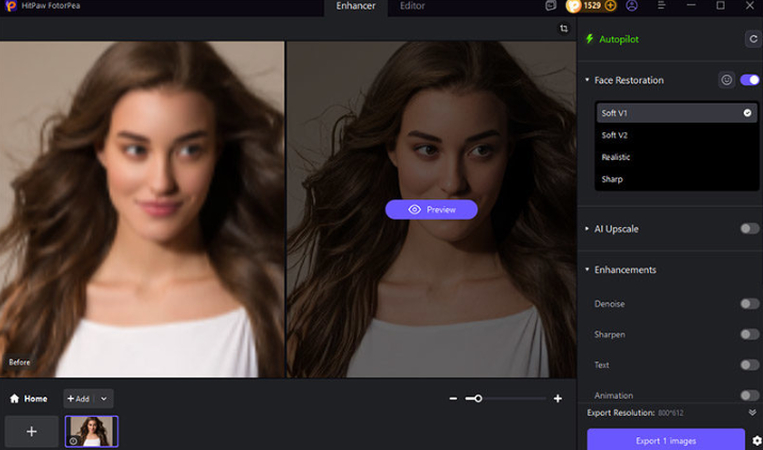
When it comes to the best alternative to improve photo quality in Photoshop, then HitPaw FotorPea is your ideal choice. Unlike Photoshop, it improves even the most blurred or damaged photos with a one-click. With the user-friendly interface, it is a great tool that can be used to upscale an image without losing quality while gives the best effect for painting, animation images and also landscapes. Besides, you can use this tool in just a few clicks, no technique skills required.
Features
- One-click enhancement with a preview so you can judge sharpness properly
- Noise-aware sharpening for more natural textures
- Face-focused enhancement to improve eyes and fine facial detail
- Batch processing for consistent results across many images
- Upscaling options to increase resolution while keeping edges cleaner
Steps to Sharpen Images Without Photoshop
Step 1: Download and install HitPaw FotorPea
Download from the official HitPaw website, install it, and open the app. Click the "Enhance Now" button and import the images that need to be enhanced.

Step 2: Upload your image
Click Enhance Photos Now and upload your file (or drag and drop). Common formats like JPG/PNG/WEBP are supported.

Step 3: Choose the right model
- For portraits: select the Face Model to recover facial detail cleanly.
- For general upscaling: select the Upscale option and choose a multiplier like 2× or 4×.
Click Preview and inspect at 100% zoom to confirm results look natural.
Step 4: Export the result
If you like the preview, click Export to save the enhanced image. It is so easy to sharpen the image with HitPaw FotorPea with one click.

FAQs
Convert the layer to a Smart Object (or duplicate it), view the image at 100%, then apply Smart Sharpen, Unsharp Mask, or High Pass. Mask the sharpening to the subject and use Luminosity blending to reduce color shifts.
If the blur is mild, you can fix softness by using Smart Sharpen (often with Remove: Lens Blur), keeping Radius controlled, and sharpening selectively on the subject. This is one of the safest ways to sharpen blurry pictures without creating halos or heavy noise.
Yes-basic sharpening is possible in the Photos app, but results are limited. For a stronger fix, HitPaw FotorPea can sharpen and upscale to a 4K-quality result in one click, which is often better for social posts, portraits, and older low-resolution images.
Conclusion
If you want maximum control, Photoshop is the best option: you can sharpen non-destructively with Smart Objects, refine results using masks, and choose the right method (Unsharp Mask, Smart Sharpen, or High Pass) depending on the photo. If you want speed-especially for batch work or one-click enhancement-HitPaw FotorPea provides a simpler AI workflow that can sharpen and upscale quickly while keeping results clean.
Leave a Comment
Create your review for HitPaw articles


