How to Enhance Retouched Photos: Boost Quality and Resolution with Powerful AI Tools
I once sat across from my mother as she leafed through an old album, her fingers gently tracing a picture of her wedding day. "It's faded," she whispered, half to me, half to herself. The colors had dulled over time. The lace on her gown was barely visible. But in her eyes? That moment was as vivid as yesterday.
That's the thing about photos-they hold emotions, memories, and people in pixels. And when we retouch a photo, we try to bring those things forward. But often, it's not enough. The image looks cleaner, maybe brighter, but it still feels... flat.
This is where enhancement makes its entrance. If retouching is the act of cleaning the canvas, enhancing is what adds the finishing brushstrokes. If you've ever stared at a photo and thought, "It's good, but it could be more," then this guide is written for you. Whether you're a creator, a small business owner, or someone like me-just trying to hold onto moments-we're about to dive deep into the tools and techniques to enhance pictures the right way.
Enhancement is no longer reserved for professionals with $500 software. Today, the tools are smarter, faster, and more accessible than ever. But knowing which one to choose-and how to use it well-is what sets the amateur apart from the artist.
Part 1. Why Enhancing Retouched Photos Matters
Have you ever seen a picture that looked perfect but felt off? Like it missed something intangible? That's what happens when a photo is retouched but not enhanced. You see, retouching cleans. Enhancement reveals.
When I first started editing photos, I was obsessed with fixing. I'd clone out shadows, smooth skin, whiten teeth. But when I looked at the final images, they felt too clinical-almost like they'd lost their soul. Then, I discovered enhancement. Not just fixing, but elevating.
Today, we scroll past thousands of photos every week. But the ones we pause on-the ones that linger-they're not just sharp. They feel alive. That's what enhancement offers. It brings out the veins in the leaf, the twinkle in someone's eye, the subtle glow of golden hour that gets lost in a basic edit.
Enhancing retouched photos isn't about overdoing it. It's about honoring the subject and intention. A product shot becomes compelling. A portrait becomes poetic. A travel snapshot becomes timeless. That's the power of knowing how to enhance photo quality.
And in a world that thrives on visuals-LinkedIn headshots, Instagram feeds, ecommerce listings-enhancement isn't optional anymore. It's the secret ingredient that makes your photos work.
Part 2. What Makes a Good Photo Enhancer?
Imagine this: You're in a dim room holding a photo under a soft lamp. You squint, tilt it side to side, trying to see more than what's visible. A good enhancer is that lamp. It brings out what's already there-it doesn't impose, it reveals.
So what exactly should you be looking for?
- Intelligent AI: The best tools understand the content of the image. A face gets different treatment than a building. Trees aren't sharpened the same way as eyes.
- Clean upscaling: Increasing resolution without losing detail or adding artificial edges. It should feel natural-like the image was alwaysthat sharp.
- Facial fidelity: Especially for portraits, an enhancer should preserve pores, lashes, and textures-without giving people plastic-skin syndrome.
- Noise reduction that preserves texture: Many tools smooth out noise but kill the life in the photo. Look for software that cleans while keeping the grit.
- Flexible formats and resolution options: Whether you're posting online or printing a poster, the tool should deliver.
- Speed and simplicity: A tool should work with you, not against you. Bonus points for batch processing!
These qualities aren't bells and whistles-they're the backbone of how to enhance picture resolution without destroying the magic.
Part 3. Step-by-Step Guide to the Best Tools for Enhancing Retouched Photos
1. HitPaw FotorPea (Desktop App)
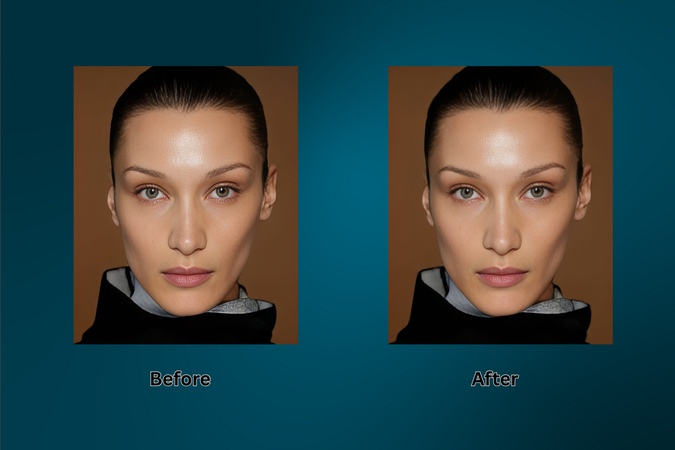
This is our secret weapon.
An ultra-powerful, desktop-based AI enhancer, HitPaw FotorPea (formerly HitPaw Photo Enhancer) takes your retouched photo and pushes it to its highest form. It's like giving your image a personal trainer, therapist, and stylist-all in one.
Steps to Use:
- 1.Visit: HitPaw FotorPea
- 2.Click Try it Free to download the application.
- 3.Install and launch the software.
- 4.Click Enhance Photos Now.
- 5.Upload your retouched photo.
- 6.Under the upscale model, select your aspect ratio (1x, 2x, 4x, or 8x).
- 7.Choose an enhancement mode: High Quality, Fast, or High Fidelity.
- 8.Want more control? Try other models like Face Restoration or Denoise.
- 9.Hit Preview to review the transformation.
- 10.Export your image (Premium members only). Watermark appears on the preview for free users.
Why It Stands Out:
- Enhances up to 16K in resolution.
- Restores old photos and brings back clarity to blurry faces.
- Removes noise with precision.
- Batch processes multiple images.
- Features DeepSeek AI: turn photos into breathtaking digital art.
Whether it's a 10-year-old vacation shot or a studio portrait that needs a touch more finesse, HitPaw FotorPea adapts to your needs. The clarity, the color balance, and the preservation of original detail-it all comes together in just a few clicks.
Note: Free versions include a watermark. Premium unlocks full capabilities at $22.39/month (with a 7-day free trial).
2. Canva (Web-Based Editor)
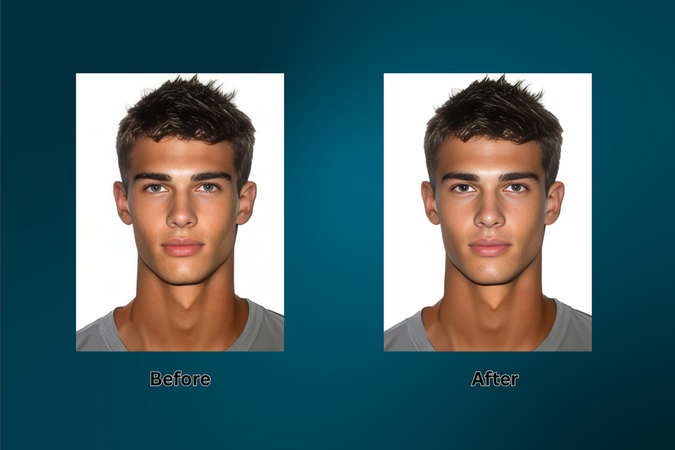
Canva may be known for its drag-and-drop design tools, but its image enhancement feature is a gem hiding in plain sight. With the same smooth UI and simplicity, it offers impressive upscaling capabilities.
Steps to Use:
- 1.Visit: Canva Image Enhancer
- 2.Upload your photo.
- 3.The workspace will open with an image upscaler panel.
- 4.Select resolution: 2x, 4x, 8x, or 16x.
- 5.Click Upscale and wait.
- 6.If satisfied with the result, hit Replace to replace the old image with the enhanced version.
- 7.Click Download.
What You'll Love:
- Elegant interface.
- Multiple upscale levels.
- Seamless transition to further edits in the Canva workspace.
If you're a content creator looking to enhance photos for thumbnails, blog headers, or presentations, Canva offers a fast and accessible solution.
Note: The image upscaler feature is available with Canva Pro, but the good news is-you can try it free for 30 days and make the most of it without spending a dime.
3. Fotor (One-Tap Web Tool)
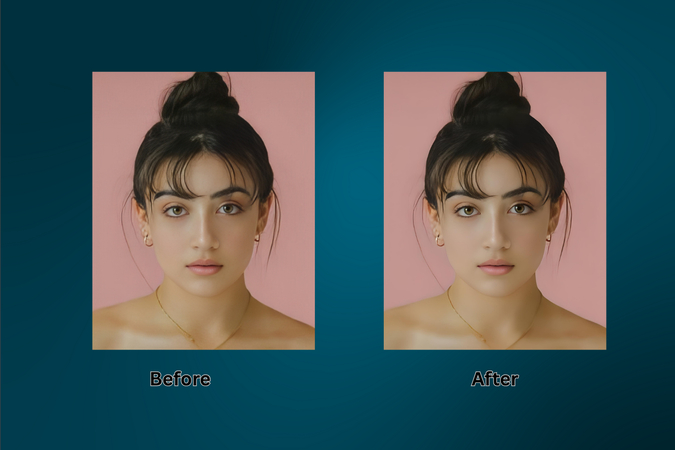
Sometimes, simplicity is genius. Fotor offers one of the easiest ways to improve your images instantly-no learning curve, no complexity.
Steps to Use:
- 1.Go to: Fotor One-Tap Enhance
- 2.Upload your photo.
- 3.The enhancement is automatic.
- 4.Click Download.
- 5.Choose Low-Res (Free) or HD (Pro).
Strengths:
- No learning curve.
- One-tap processing.
- Great for busy professionals or beginners.
Whether it's a vacation photo or a quick business headshot, Fotor gives you a noticeable improvement in seconds. It's perfect for those just stepping into the world of digital image enhancement.
4. Picsart (AI Enhancer Platform)
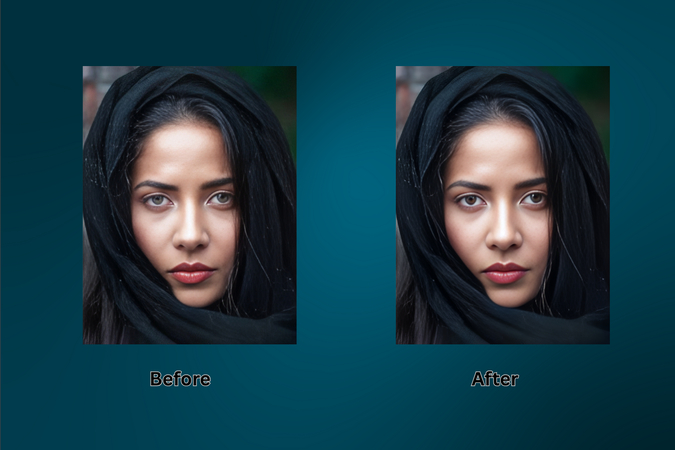
Picsart blends creativity and functionality beautifully. Whether you're looking to enhance photos for Instagram or refine your visual brand, Picsart's AI-enhancer handles it quickly and efficiently.
Steps to Use:
- 1.Visit: Picsart AI Enhancer
- 2.Upload the image.
- 3.AI begins enhancement instantly.
- 4.Download the result as Low-res (Free) or HD (Plus).
Key Features:
- Mobile-friendly.
- Clean, intuitive interface.
- Good balance between speed and quality.
If you're creating content on the go or prefer working from your phone or tablet, Picsart is a dependable tool to have in your creative toolkit.
5. LetsEnhance (AI-Based Web Tool)
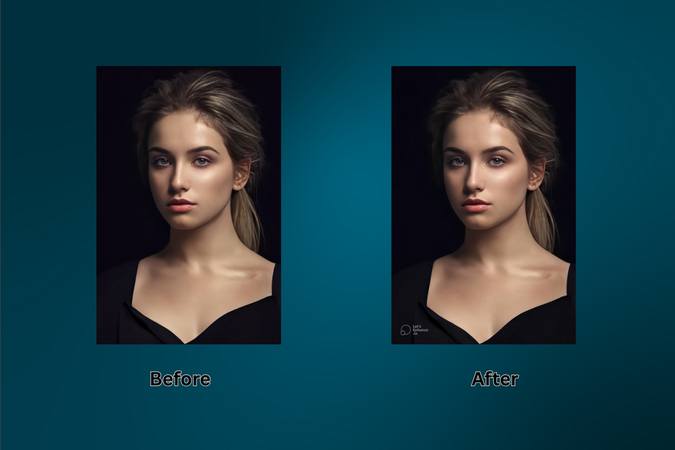
LetsEnhance is like a digital photo lab at your fingertips. With its diverse model selection and fine control over output, it's favored by professional photographers and designers.
Steps to Use:
- 1.Go to: LetsEnhance
- 2.Click Start Free and upload your image.
- 3.Under "Upscale and Enhance," pick a mode:
- Gentle
- Balanced
- Strong
- Magic
- Digital Art
- try all (to test different modes all at once)
- 4.Set the output size (auto or scale 1x,2x,4x,8x (paid),or16x(paid)).
- 5.You can also set the width and height of the enhanced image, but that option is only available for paid customers.
- 6.Explore Advanced Options for tone and color.
- 7.Select output format: JPEG, PNG, Auto.
- 8.Click Enhance.
- 9.Download the result (watermark for free version).
Unique Benefits:
- Multiple artistic modes.
- Custom control over enhancement.
- Great for fine art, commercial prints, and marketing visuals.
Part 4. Real-World Use Cases for Enhancing Retouched Photos
I enhanced a scanned photo of my parents dancing. My mom cried when she saw it. "I forgot how bright my dress was," she said. That moment reminded me why this matters.
- Weddings and portraits: Bring out the sparkle in someone's eye or the delicate details in a dress.
- Product photography: Let texture, shine, and shape stand out.
- Blog and brand visuals: Make your message visually credible.
- Historical or family archives: Keep heritage alive.
- Digital art: Add finesse to every pixel before printing.
- Marketing campaigns: First impressions matter-sharp images elevate brand trust instantly.
- Travel and landscape: Recover lost atmosphere, sharpness, or depth that standard retouching can't reach.
These aren't just photos. They're touchstones. Enhancing them means giving weight to the stories they hold.
Part 5. Pro Tips to Get the Best Results
- Zoom in-really close. Eyelashes, threads in fabric, edges of text-these reveal if the enhancement was clean.
- Enhance, then edit. It's easier to color-correct or crop aftersharpening details.
- Use the right format. PNG for crisp edges, JPEG for smaller files.
- Test side-by-side. Always compare enhanced and original.
- Layer enhancements. Subtle passes often yield better results than one heavy-handed run.
- Name and sort files carefully. When working with multiples, this keeps your workflow clean.
- Learn your tool's strengths. Each one has a "sweet spot" for certain images.
- Avoid shadows and highlights burnout. Preview your images in both bright and dark screens before publishing.
- Consider printing needs. If your final use is in print, always export in the highest resolution and test print a sample.
- Trust your instincts. Enhancement is both art and science-lean into your taste.
Part 6. How AI Is Changing Everything
Once, you had to study Photoshop for months. Now, AI tools learn for you. They've seen millions of images and know exactly how to restore a soft jawline, bring out texture in shadows, or upscale a cityscape without jagged lines.
Tools like HitPaw FotorPea aren't just smart-they're intuitive. And that's the future. Enhancing photos no longer means hours in front of a screen. It means smarter choices in less time. The results? Stunning.
The future of photography is not about tools replacing us. It's about tools revealing what we already captured-and maybe even more.
Conclusion
If you've ever taken a photo and wished it could say more, enhancement is how you let it speak.
And when the photo matters-when it carries emotion, legacy, or business value-choose tools that respect that. Choose tools that listen.
That's why I recommend HitPaw FotorPea. It doesn't just enhance your images. It honors them.
"Give your photos the second breath they deserve. Start with HitPaw FotorPea."
FAQs
Q1. Do I need both retouching and enhancement?
A1. Yes. Retouching prepares the canvas. Enhancement completes the painting. They're partners, not alternatives.
Q2. What if I over-enhance by mistake?
A2. Most tools offer previews. Trust your eyes and scale back if needed. Less is often more. Save incremental versions if unsure.
Q3. My photo looks fake after enhancement-why?
A3. You may have used the wrong model or gone too far. Try using High Fidelity or a lower upscale ratio. Authenticity should always win.
Q4. Can I enhance photos from my phone?
A4. Definitely. Tools like Picsart and Fotor are mobile-friendly and effective. You don't need a studio setup to create professional results.
Q5. What's the best resolution to export in?
A5. Export in the highest possible quality if you're printing. For web, balance between size and load speed-usually 2K or 4K works great.


 HitPaw Univd (Video Converter)
 HitPaw VoicePea
  HitPaw VikPea (Video Enhancer)


Share this article:
Select the product rating:
Daniel Walker
Editor-in-Chief
This post was written by Editor Daniel Walker whose passion lies in bridging the gap between cutting-edge technology and everyday creativity. The content he created inspires the audience to embrace digital tools confidently.
View all ArticlesLeave a Comment
Create your review for HitPaw articles