How to Remove a Pimple on Photoshop Easily: 4 Best Ways
In the modern digital era, individuals desire their images to be refined, be it in their professional profile or as a personal souvenir. Adobe Photoshop is considered to be the most potent photo-retouching program, particularly in the process of removing pimples. In this article, you will learn to remove a pimple using Photoshop and an even more appropriate solution.

Part 1. How to Clear Pimples in Photoshop: 4 Primary Tools
Among the many editing tools available, Adobe Photoshop stands out as the most powerful and widely used software for portrait retouching. Which is why users can find the best methods on how to clear pimples in Photoshop in the following:
Method 1. Spot Healing Brush Tool
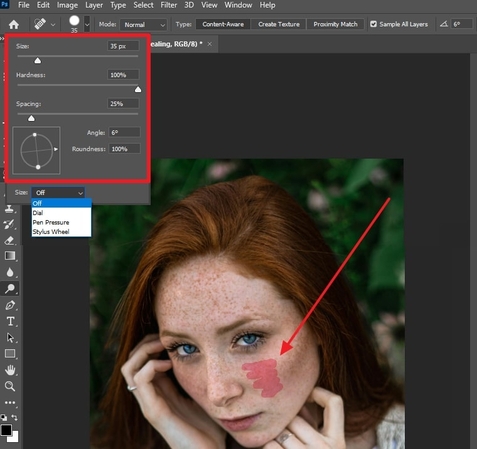
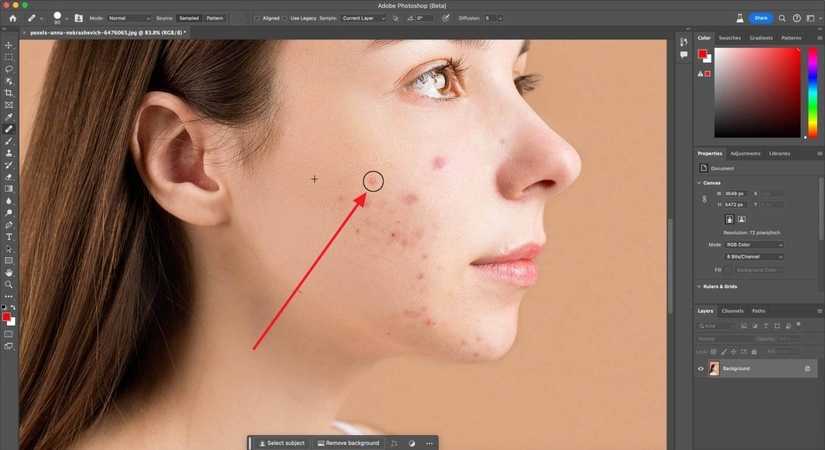
You can remove various types of small blemishes and imperfections from the face, like pimples, by using the surrounding areas to match them with. It also comes with various brush sizes, hardness, and spacing adjustments so that you can make the blending look natural. Now, go through the following steps and learn how to delete pimples in Photoshop and achieve a perfect image:
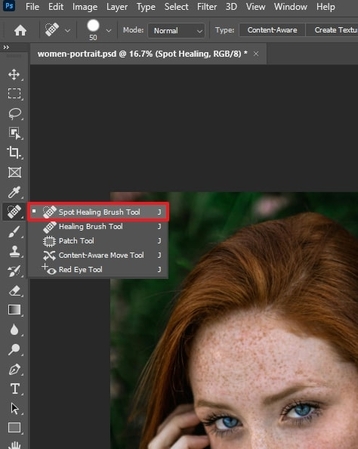
Step 1.Open Photoshop software on your device, head to the "Layer" tab, and choose to create a new layer after importing the suitable image. After that, click the "Band-Aid" icon on the left panel, and select "Spot Healing Brush Tool" from the sidebar.

Step 2.Moving forward, choose a brush "Type" from the top toolbar, like "Content-Aware," or "Proximity Match." Next, brush over the areas or pimples on your image to remove them instantly with excellent blending. After brushing out all the pimples, save the file in a suitable format on your device.

Method 2. Healing Brush Tool
You can control the Spot Healing Brush by manually selecting a clean source area to copy and blend into the target blemish area. This tool works by sampling pixels from a source point over the pimple while matching the surrounding tone. To get the ideal, perfect skin, follow the given steps on how to get rid of pimples in Photoshop:
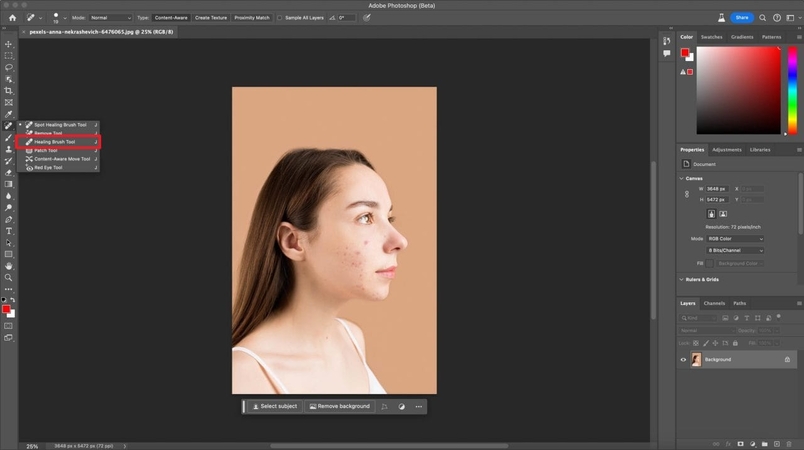
Step 1.On the Photoshop interface, insert the blemished photo, and access the "Spot Healing Brush Tool" icon. From the side menu, select the "Heading Brush Tool" option to proceed.

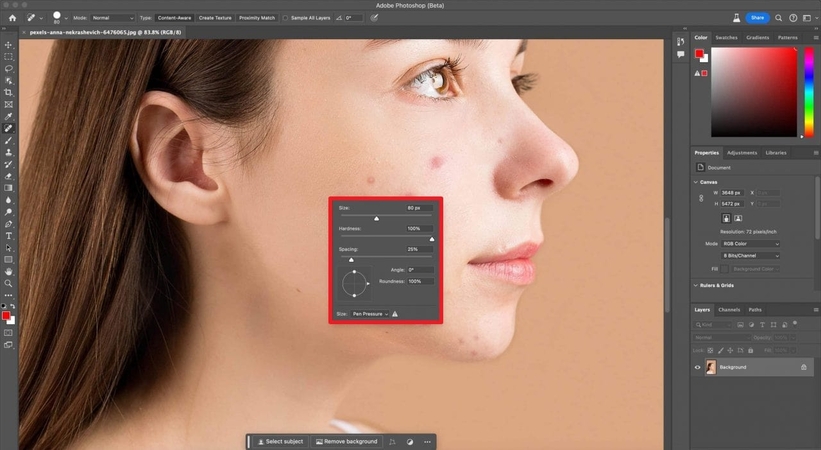
Step 2.Once the spot is selected, a small dialogue box will appear, where you can choose the brush "Size," "Hardness," and "Spacing" according to your preference.

Step 3.When chosen, brush over the pimples that will get removed automatically as you finish brushing them over. After blending all the pimples, download this perfect skin image to your device.

Method 3. Clone Stamp Tool
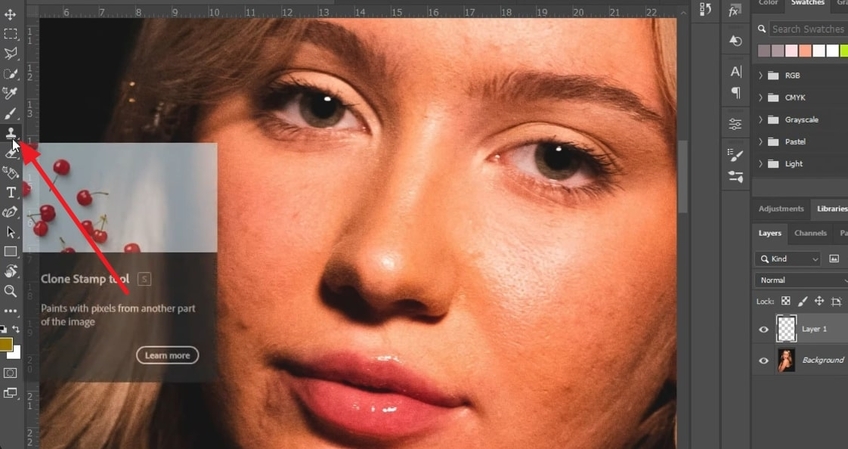
If you want a tool that can copy pixels from one area of an image to another, without automatically blending them, the clone stamp is a good choice. It is useful for removing pimples when the area surrounding the blemish has complex textures. Now, to get that ideal smooth-skin face, follow these steps on how to remove pimple in Photoshop:
Step 1.After opening the image with pimples in Photoshop, create another layer over the added image. Now, click the "Clone Stamp" icon, and select the "Clone Stamp Tool" option.

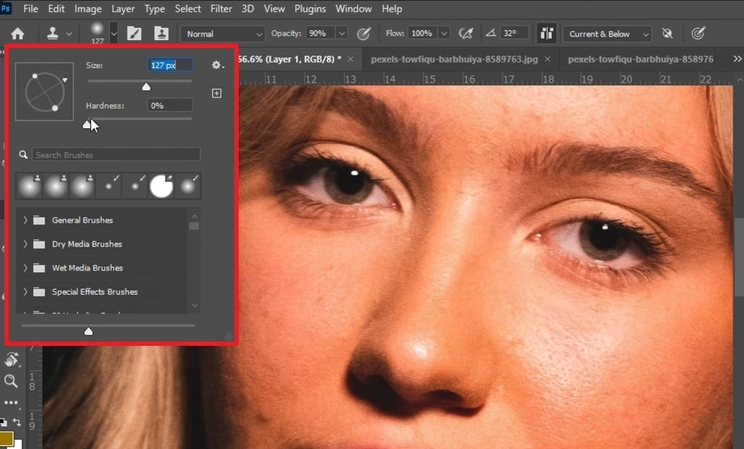
Step 2.Next, drop down the "Settings" menu of the clone tool, and adjust it in various options, like "Size" and more.

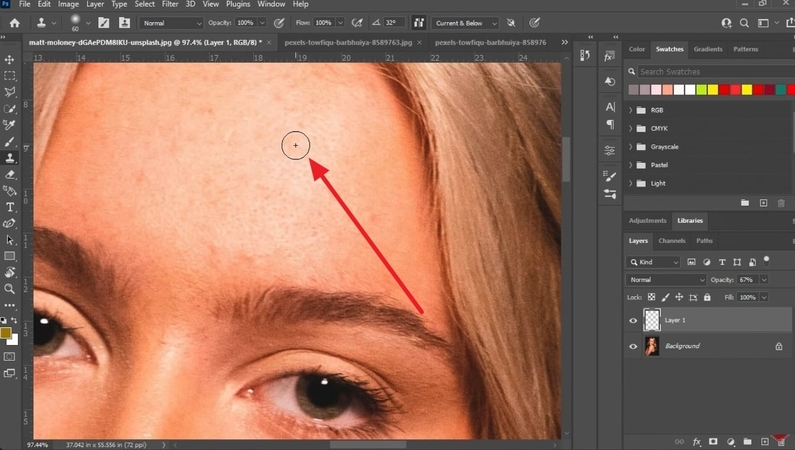
Step 3.After that, clone the smooth skin surface to replicate it over the pimples, and remove them one by one, which you can export after it's done.

Method 4. Patch Tool for Larger Spots
The Patch Tool allows the elimination of larger spots or acne lesions through the process of choosing the area of interest and substituting it with a sampled area. Moreover, the tool blends the texture, color, and shading of the pimple with the skin to make it clear and smooth. The following steps will help you understand how to fix pimples in Photoshop and manage large blemish areas:
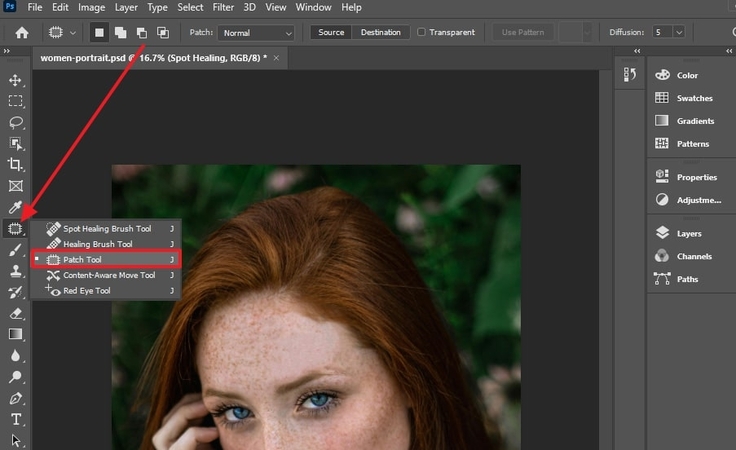
Step 1.Access the "Spot Healing Brush Tool" icon on the software, choose the "Patch Tool" option from the drop-down menu, or simply click the "J" key.

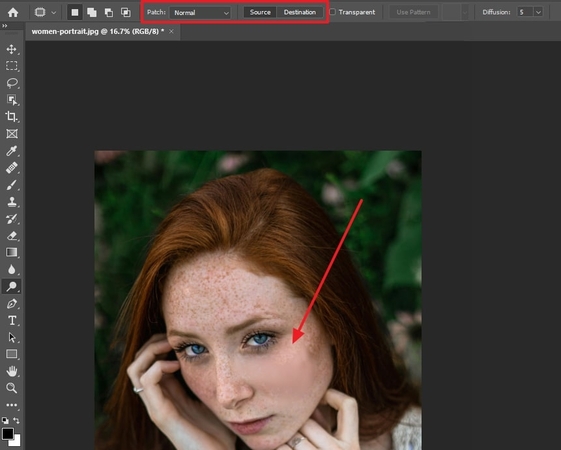
Step 2.From the above toolbar, select the "Normal" option in the "Patch" box, and choose "Destination" in the "Source" box. Now, select the large pimple area, and drag the selected area over to the smooth facial surface to get a pimple-free image.

Part 2. Photoshop Alternative: Remove Pimples Fast With HitPaw FotorPea
As discussed, Photoshop not only represents itself as an expensive option, but it also holds a steep learning curve which makes it difficult for various users. For those who do not own Photoshop on their device, getting a quick fix is a much better option. HitPaw FotorPea (formerly HitPaw Photo Enhancer) represents itself as a great option for removing pimples with its AI-integrated features.
Key Features
- 1.Easily remove pimples with simple text prompts-clear, flawless skin in seconds.
- 2.Adjust the size of the partial repaint brush to get rid of the smallest blemish.
- 3.Upscales the overall pictures by 8x using the Upscale Model within the platform.
- 4.Allows users to make edits into the images via adding different filters and effects.
- 5.Maintains the original features intact, avoiding unnatural edits or effects.
Quick Guide to Remove Pimple with FotorPea AI Replace
Now, let's go through the following steps and understand how HitPaw FotorPea can remove pimples from your face without losing the details:
Step 1. Open AI Photo Editor
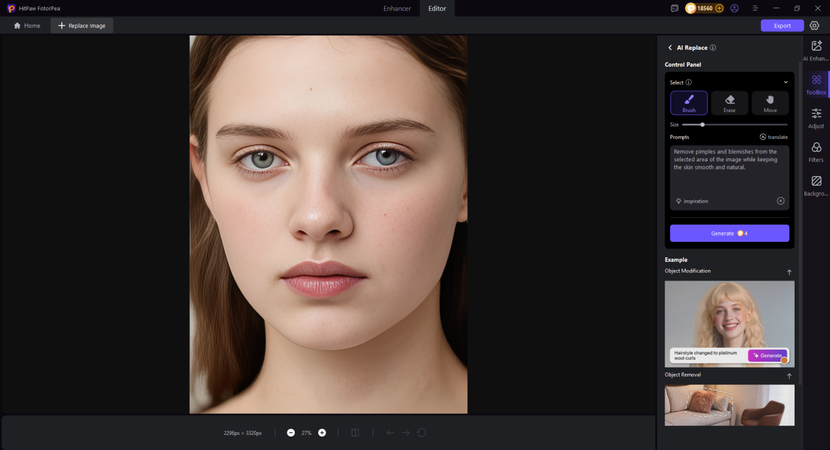
As you launch FotorPea across your computer, look for the newly-introduced "AI Photo Editor" feature in the list and tap to import your raw image.

Step 2. Access the AI Replace Feature
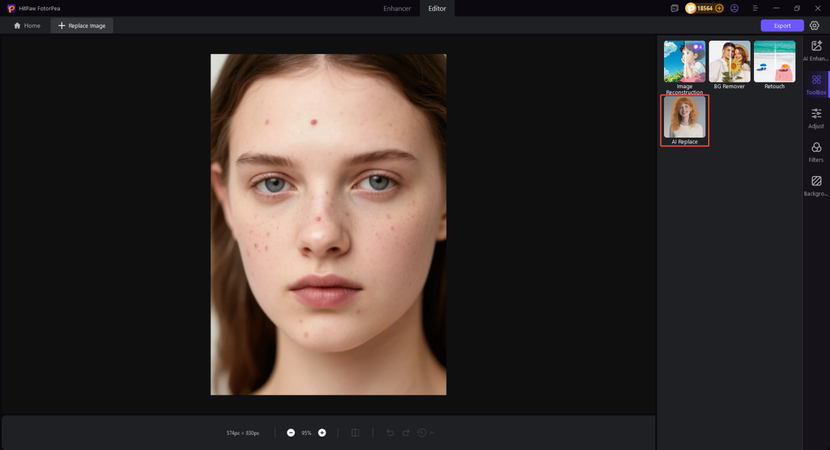
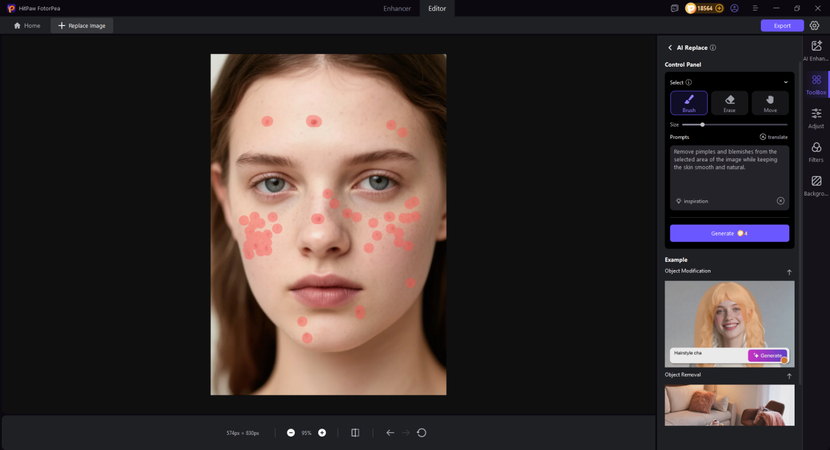
Click the Toolbox and select the AI Replace feature to import your photo. Use the Brush to mark the pimples you want to remove, then enter your text prompt and click Generate.
Step 3. Export the Final Pimple-Free Result
When the final image is pimple-free, preview the results, and press the "Export" button to save the result.
FAQs on How to Delete Pimples in Photoshop
The Spot Healing Brush Tool in Photoshop is the most appropriate tool to be used in achieving natural results. It combines the pixels around a pimple and blends it with the skin, giving it a natural and smooth look without causing the skin to blur.
Yes, you can use the tool on mobile devices like Android and iOS for removing pimples. It offers simplified features, including a spot healing feature, that allow you to remove pimples and other blemishes directly from your phone.
There are several free alternatives with AI-powered blemish removal tools that create natural-looking edits. One of them is HitPaw FotorPea, which offers AI prompt and brush selection to seamlessly erase pimples and provide smooth skin quickly without any complications.
Several pimples could be corrected at once using the Photoshop Spot Healing Brush Tool to brush over several spots. To be more accurate, the Patch Tool or Healing Brush Tool can be applied over several different areas, so that each and every blemish is chosen and removed.
Conclusion
In conclusion, to achieve flawless skin in photos, you need to learn how to remove a pimple on Photoshop. This article offers you comprehensive methods of Photoshop, like using the Spot Healing Brush and Patch Tool for natural and precise pimple removal. However, for users seeking a budget-friendly alternative, HitPaw FotorPea's AI-powered partial repaint feature provides easy, accurate blemish removal while preserving facial details.
Leave a Comment
Create your review for HitPaw articles


