How to Put a Grid on a Picture: Step-by-Step Tutorial?
While designing or editing an image, you may encounter a situation where the composition appears odd. A photo grid can be a tremendous help in such situations, but the real task is placing a grid on a photo. Hence, in this article, we will explain how to put a grid on a picture on an iPhone or Android using specific tools.
Part 1. What Are the Benefits of a Photo Grid on a Picture?
Before we go into much detail about how to add a grid to a photo, let us look into the advantages of placing a grid on a photo:
1. Improved Composition: Such rules as the rule of thirds are applied to grids and arrange the elements to create a pleasing and balanced photo.
2. Precise Layout: Since grids provide the accurate positioning of items or features, they create a symmetrical layout in a design and editing task.
3. Consistent Proportions in Resizing: As images or designs are resized, grids uphold scale integrity and aid in aspect ratio, preventing distortion.
4. Enhanced Perspective Drawing: Grids can be used to retain depth, angles, and spatial relationships in complex drawings and allow artists to plot realistic viewpoints.
5. Better Typography Alignment: They provide a structure that offers consistency in baseline alignment and a hierarchy of text, enhancing coherence and the overall visual flow of the design.
Part 2. How to Add a Grid to a Photo on an iPhone?
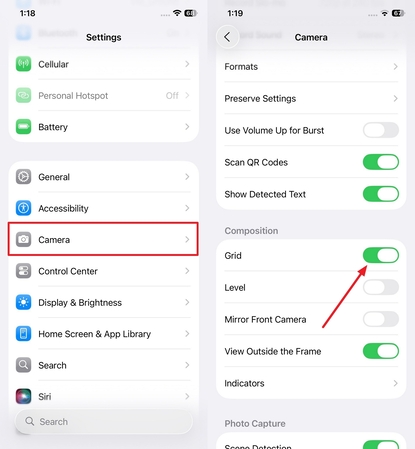
iPhone allows you to create a photo grid easily by enabling the Grid feature within its settings. Moreover, users can customize their image according to the grid by choosing options like “0.5, 1, and 2x” to zoom. Below are the simple instructions mentioned:
Instructions. On your iPhone, access the "Settings" app and select the "Camera" option. Now, within the "Composition" section, toggle the "Grid" button to get the grids to appear on your Camera.
Part 3. How to Add a Grid to a Photo on Android?
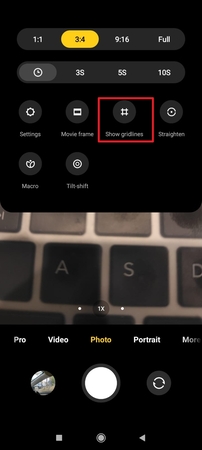
While learning how to add a grid to a photo, know that Android users can zoom in on their pictures up to 10x while inserting the grid. Within the settings option available in the Camera, users can enable the photo grid feature, which can be done by following the given guide:
Instructions. After opening the Android phone, select the “Camera” app. Afterwards, tap the “Hamburger” icon at the top right and enable the “Show gridlines” button to display grids.
Part 4. How to Add a Grid to a Picture with Image Grid Maker?
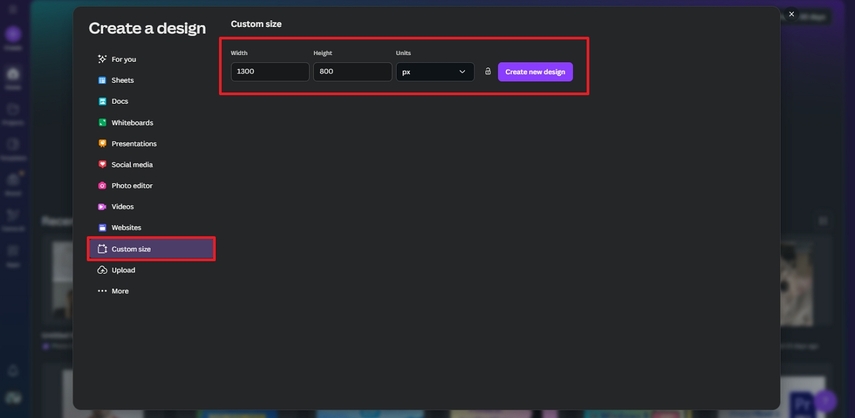
Canva also allows you to add photo grids while being a comprehensive creative editing suite. You can browse through its existing countless grid elements, free and paid, and choose an appealing one. To get started, follow the given steps to apply a grid layout on picture through Canva:
Step 1. From Canva’s homepage, tap the “Create” icon to select “Custom size” and create new design.
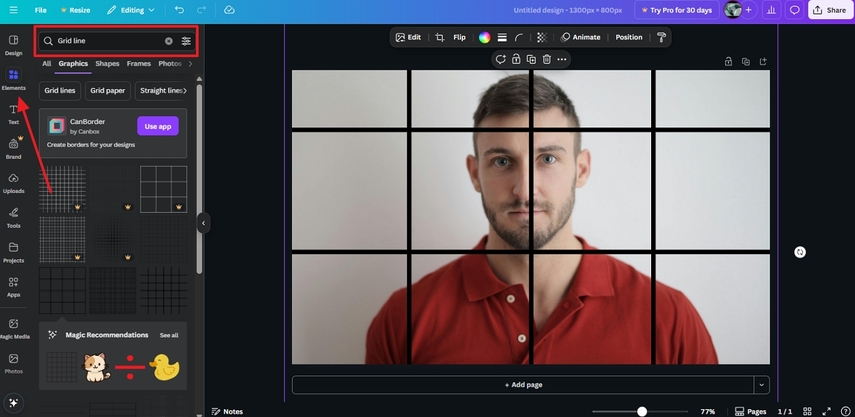
Step 2. Here, upload your image by choosing “Upload” icon at the left panel and “Upload files” button.

Step 3. Then, tap the “Elements” icon, write “Grid” in the given search bar, and pick the required one to set over the image.
Part 5. How to Add a Grid to a Photo Online for Free?
There are free online photo grid maker tools mentioned below that are designed specifically for beginners and non-tech-savvy users:
1. YoMotherboard
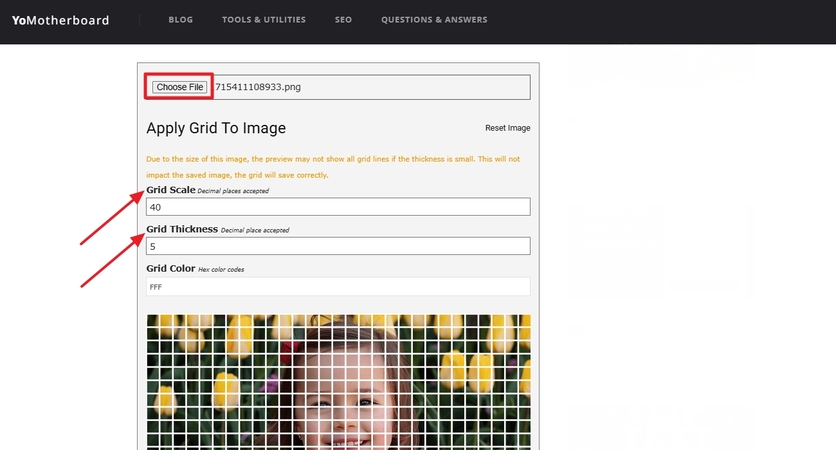
This is a simple tool that requires an image and a selection of grid parameters, such as color and thickness, before implementing it. You can then save your grid photo in multiple formats, including PNG or GIF. Here’s how you can add a photo grid using YoMotherboard:
Step 1. On the tool page, click “Choose Files” to upload the image and adjust the grid parameters, including “Grid Thickness” and “Grid Color.”
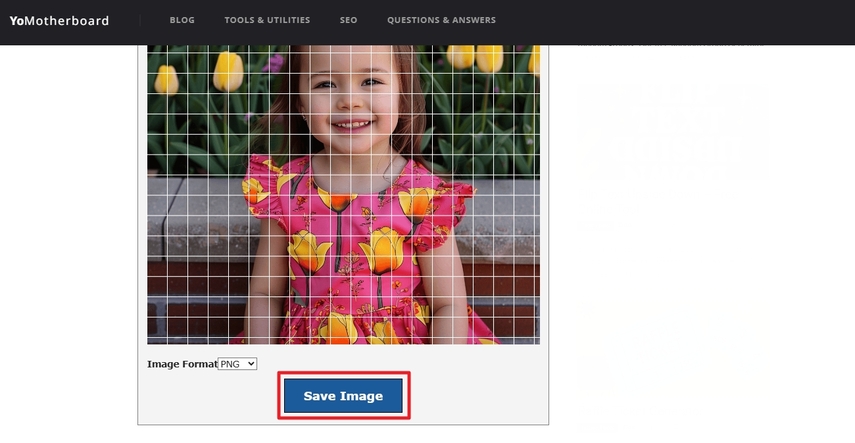
Step 2. Once the grid matches your preference, download it by selecting the desired format from the “Image Format” menu and clicking the “Save Image” button beside it.
2. GridMyPic.com
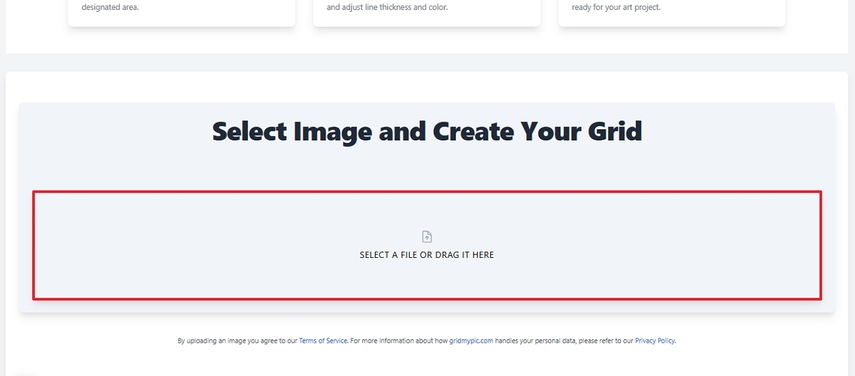
Another free online photo grid tool, Grid My Pic, provides a simple upload of pictures, after which you can select the type of grid, adjusting the parameters. You can also enable and tweak the show edges feature to alter the Gaussian blur and customize boundary lines. To find out the exact steps for putting a grid on photos, use the following steps:
Step 1. Press the “Select A File or Drag It Here” section and upload the image.
Step 2. Click on the “Grid” icon beside the toolbar and adjust settings like “Line thickness” and “Grid Color.”

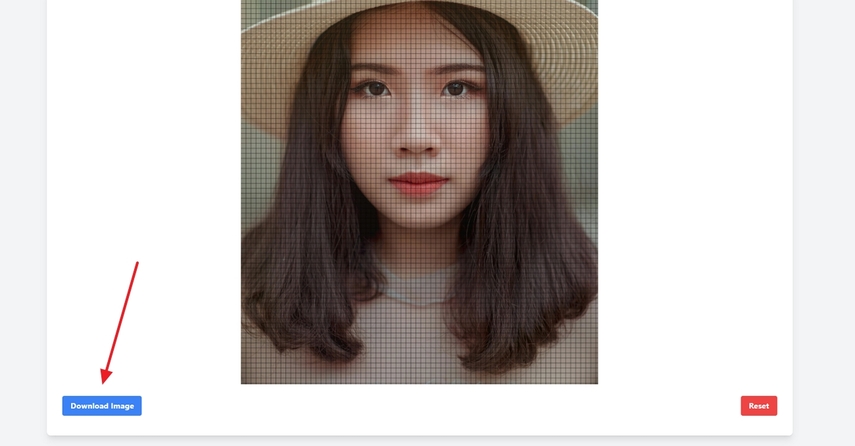
Step 3. Once ready, save the image by clicking the “Download” button beneath.
Part 6. How to Add a Grid on a Picture with HitPaw FotorPea?
Imagine you are editing a marketing product, and you want to use grids to ensure every element is accurately aligned. However, you don’t want to use the above-discussed method as it only offers basic features. At this point, we recommend using the HitPaw FotorPea Image Generator tool to create grids within your pictures.
Key Features
1. Allows you to generate up to 4 outputs at once to save time and effort.
2. Enable users to select image sizes ranging from 1024x1024 to 1280x720.
3. Easily enables Flux-Kontext model to execute intelligent editing for precise adjacencies.
4. Lets you use prompt strength to control how much the AI follows the input prompt.
5. Offers you both Random and Custom seeds to generate consistent results.
Guide to Adding a Grid on a Picture with FotorPea
Now, if you want to create a grid using a free online photo grid maker, then follow the beginner-friendly guide given below:
Step 1. Enter the HitPaw FotorPeaUpon entering the tool, select the “AI Photo Editor” to further navigate to the grid adding process.

Step 2. Click “Adjust” to Add Grid
In this interface, select the “Adjust” to add the grid. You can adjust the image ratio, color or add filters.

Step 3. Use Various AI Model
Here you can choose other AI models, such as blur removal, color correction, photo restoration, object removal, etc.

Conclusion
In conclusion, grids are essential for editors to ensure that every element is properly aligned within the image. We have narrowed down the best methods for generating grids within images on both Android and iOS in this article. While learning how to put a grid on a picture, we recommend using the HitPaw FotorPea tool, which lets you customize the canvas and offers detailed examination with the Magnifier option.


 HitPaw Edimakor
 HitPaw VikPea (Video Enhancer)
 HitPaw Univd (Video Converter)



Share this article:
Select the product rating:
Daniel Walker
Editor-in-Chief
This post was written by Editor Daniel Walker whose passion lies in bridging the gap between cutting-edge technology and everyday creativity. The content he created inspires the audience to embrace digital tools confidently.
View all ArticlesLeave a Comment
Create your review for HitPaw articles