[Guide] How to Transfer Photos from Google Drive to Google Photos: Different Aspects
Many people save memorial photos due to the phone storage limits or switching to another device. However, some users have trouble storing their collections in Google Drive and Google Photos. In this article, we will discuss how to transfer photos from Google Drive to Google Photos, and vice versa.
Part 1. How to Move Photos From Google Drive to Google Photos?
At this point, you understand the distinction between Google Drive and Google Photos. Here is how to move photos from Google Drive to Google Photos via two different methods.
1. Manual Method
For those who want hands on management of their photo transfers, here are the steps on how to transfer photos from Google Drive to Google Photos manually.
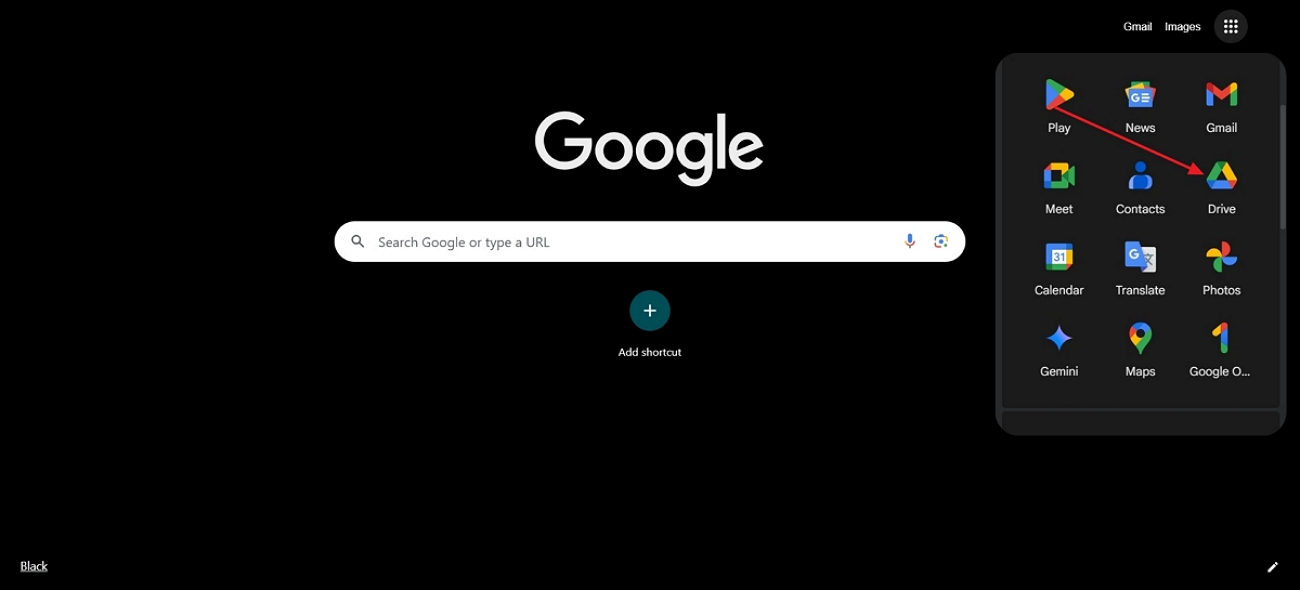
Step 1.Start by logging into your Google Drive account.

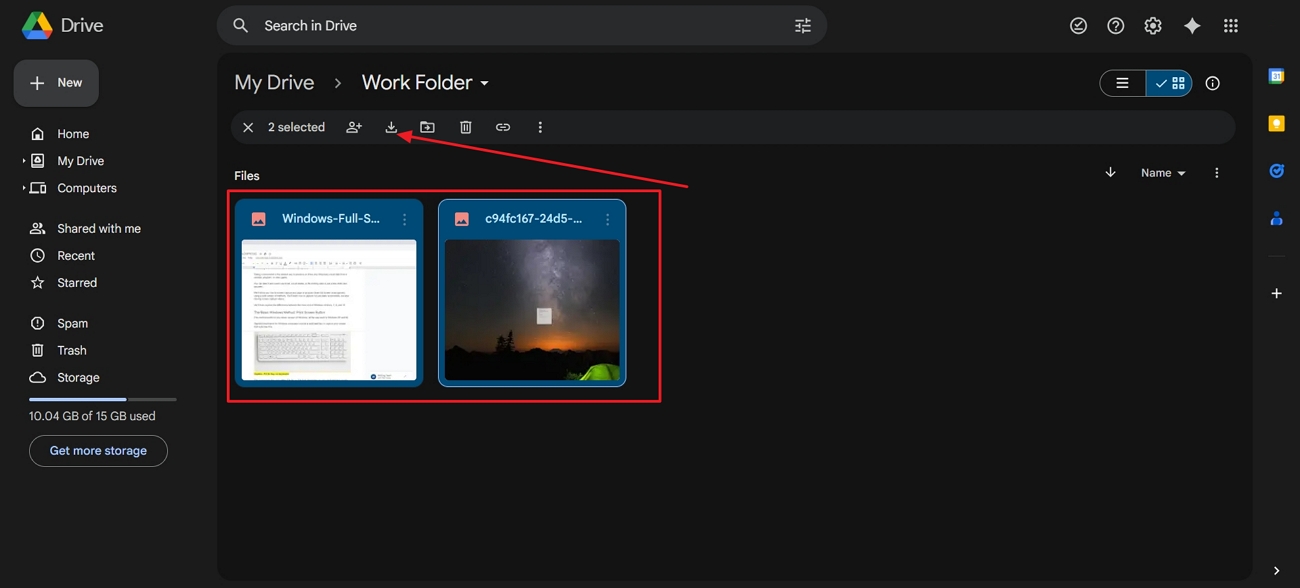
Step 2.Open the folder containing images, choose the photos, and click the "Download" icon.

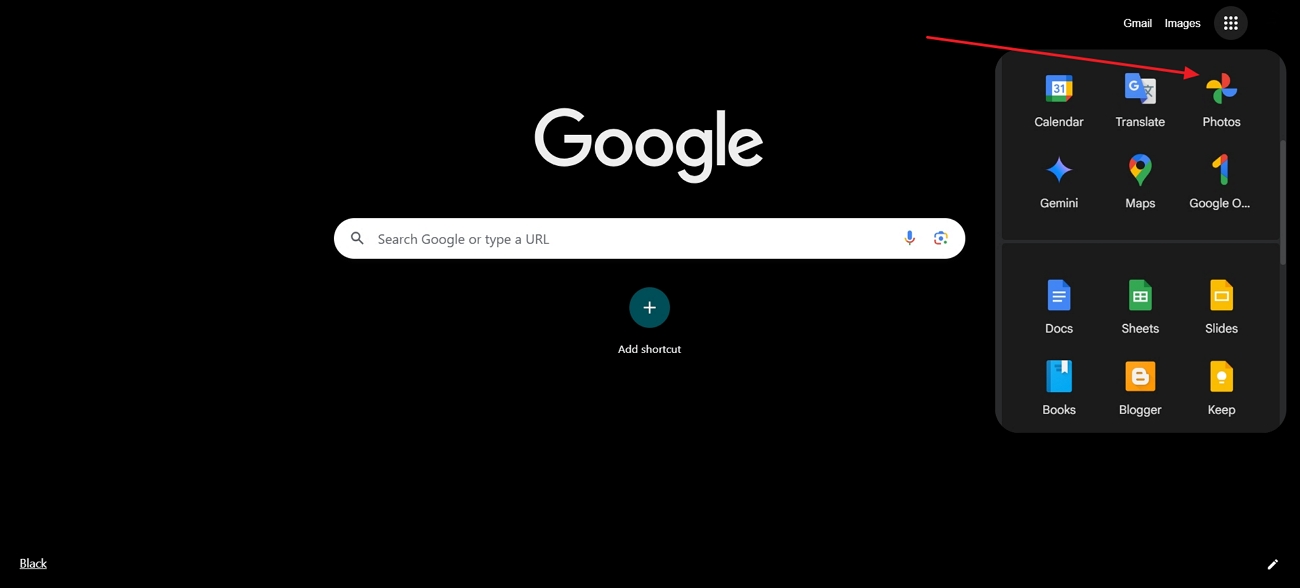
Step 3.Redirect to "Google Photos" and log into your personal account.

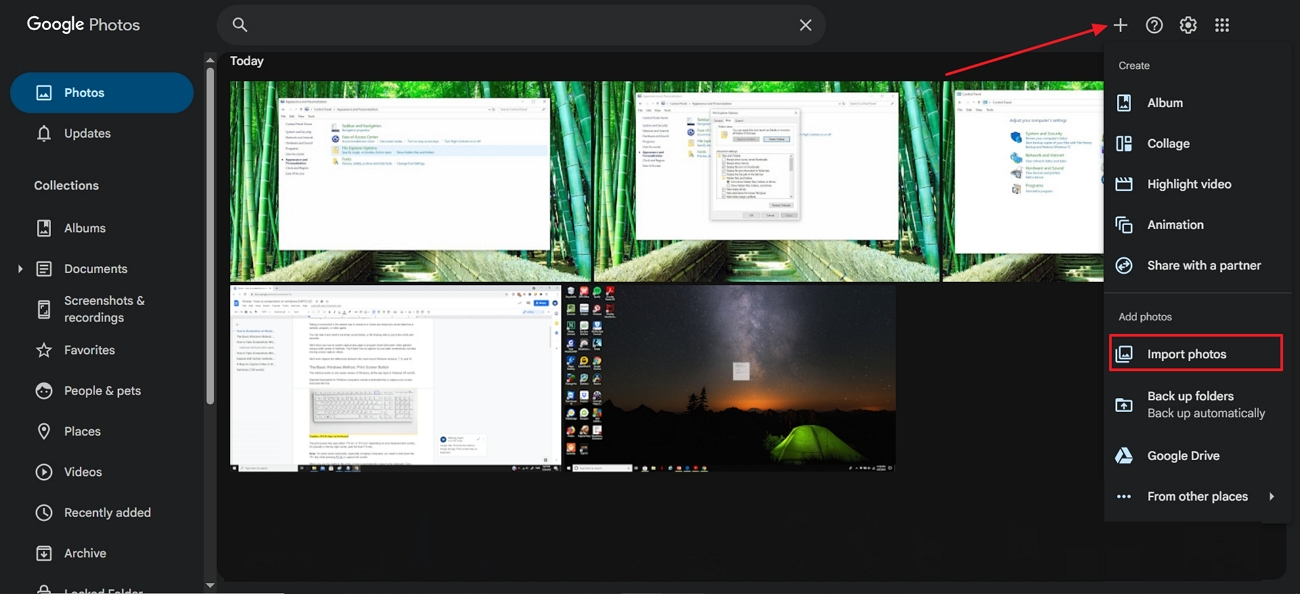
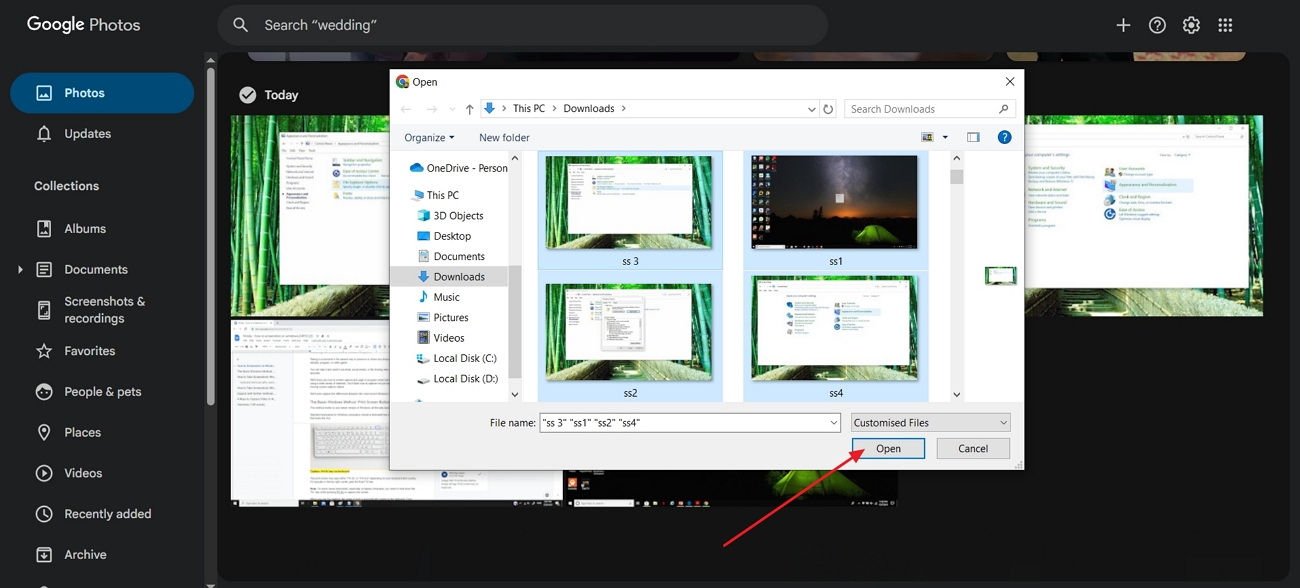
Step 4.Go to the top right corner to click the "Add Photos" icon and tap the "Import Photos" option to proceed.

Step 5.Click the photos that should be transferred and press the "Open" button to upload.

2. Direct Method
If you don't want to be in the hassle of downloading photos due to large photo sizes or a shortage of time. Follow this guide to move photos from Google Drive to Google Photos directly.
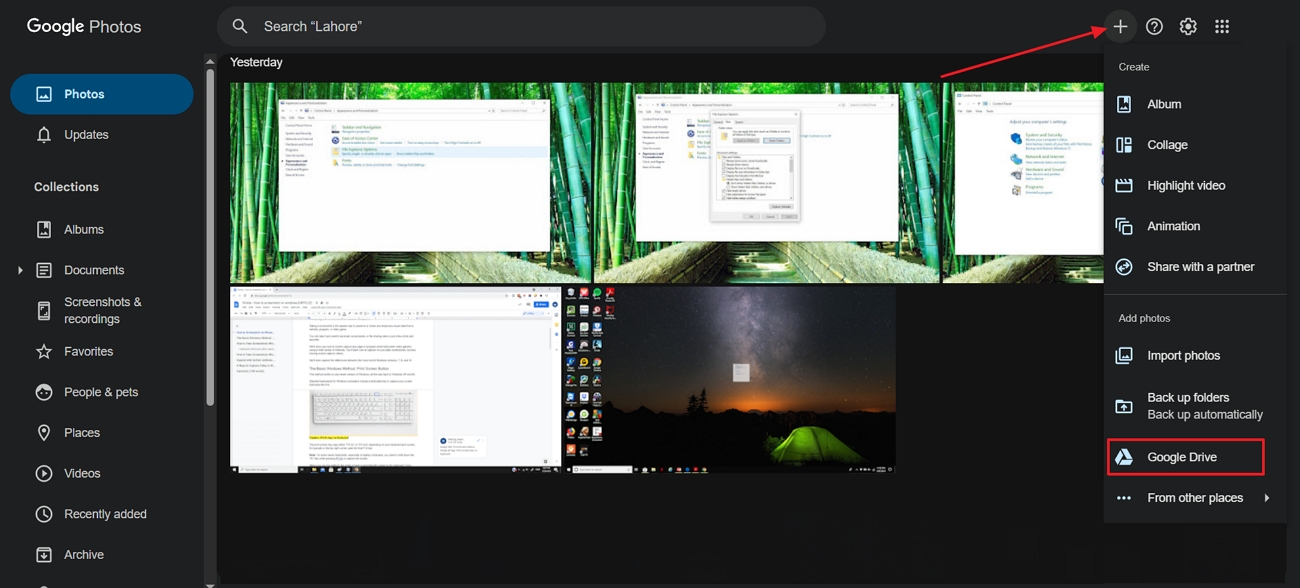
Step 1.From your Google Photos Account, access its right corner and click the "Add Photos" section to choose the "Google Drive" option in the list.

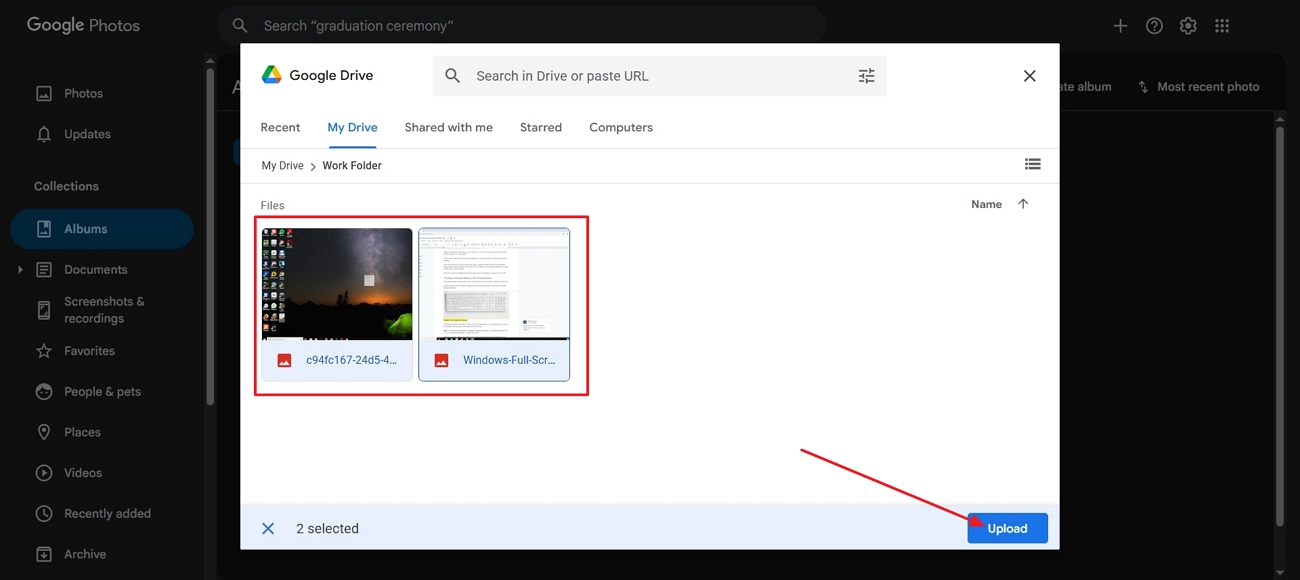
Step 2.Choose the folder along with the photos you want to move, then hit the "Upload" button to transfer them from Google Drive to Google Photos.

Part 2. How to Back Up Google Photos to Google Drive?
Now we will discuss how to backup Google Photos to Google Drive in 2 easy ways to have easy access and protection.
1. Manual Method
The easiest method to back up Google Photos to Google Drive is to download the target photos and upload them to Google Drive manually by following these steps.
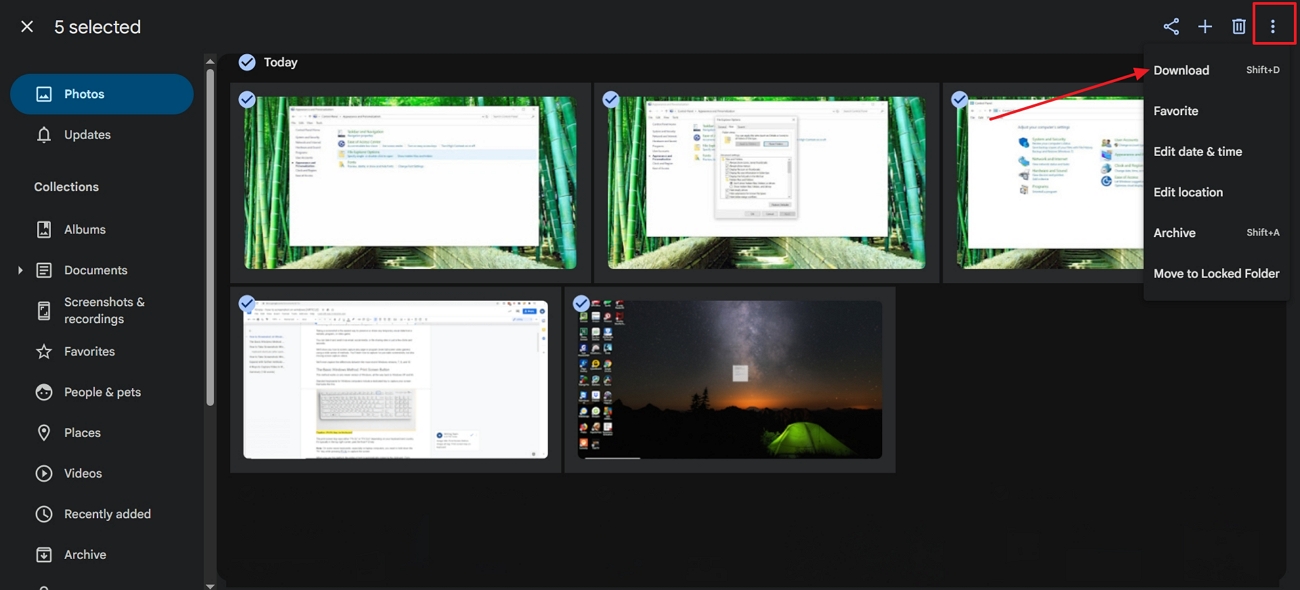
Step 1.After signing into Google Photos, select the photos to be backed up, click the "Three Dots" icon, and "Download" successfully.

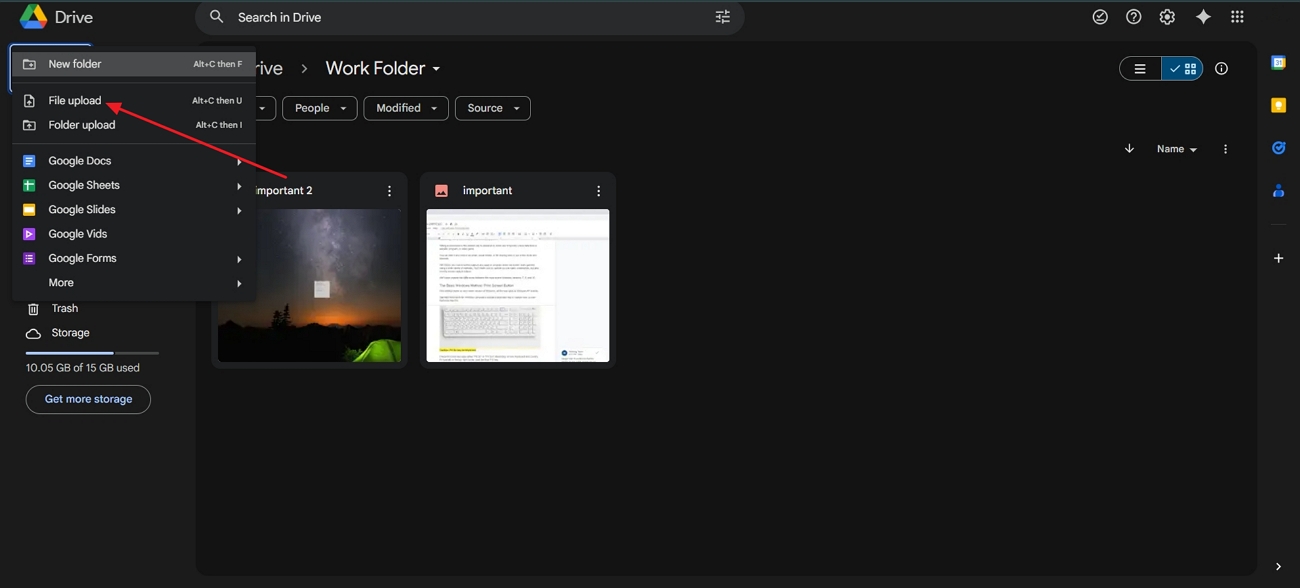
Step 2.Access your Google Drive account and press the "+ New" icon. Select the option labeled "File Upload", and you will be moved to the Open dialogue. Choose your photos and successfully save them from your Google Photos to Google Drive.

2. Using Google Takeout
Follow these steps on how to move Google Photos to Google Drive without the hassle of downloading and uploading.
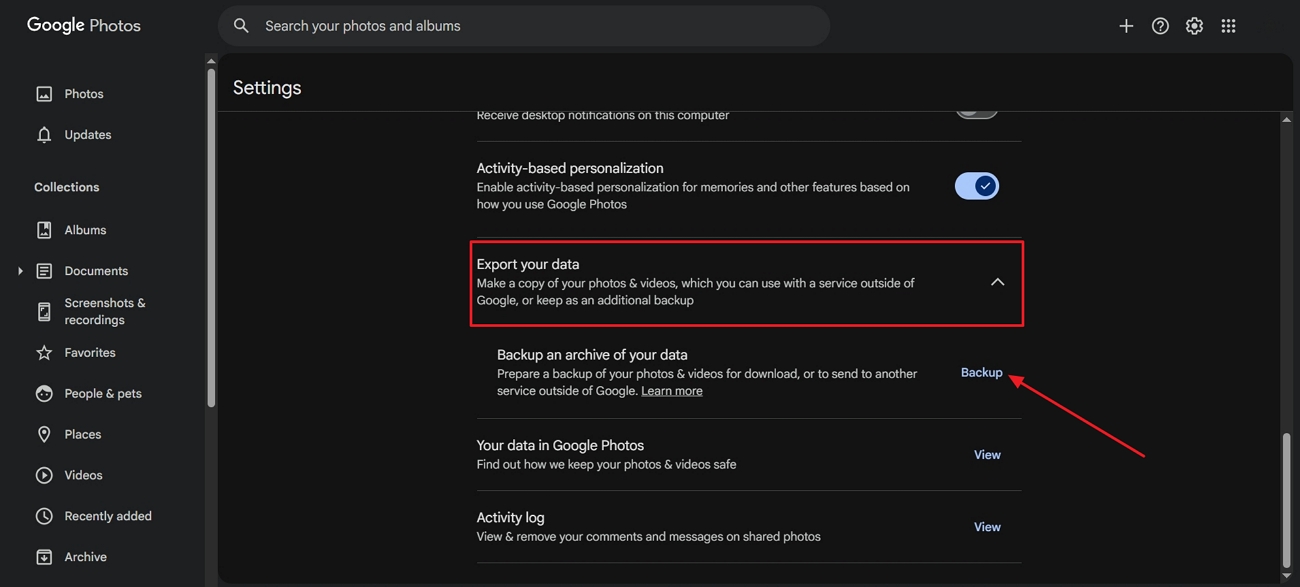
Step 1.On your Google Photos, look for the "Settings" icon on the top-right corner. As you lead into the next window, scroll down to find the "Export your data" option and expand to select the "Backup" button.

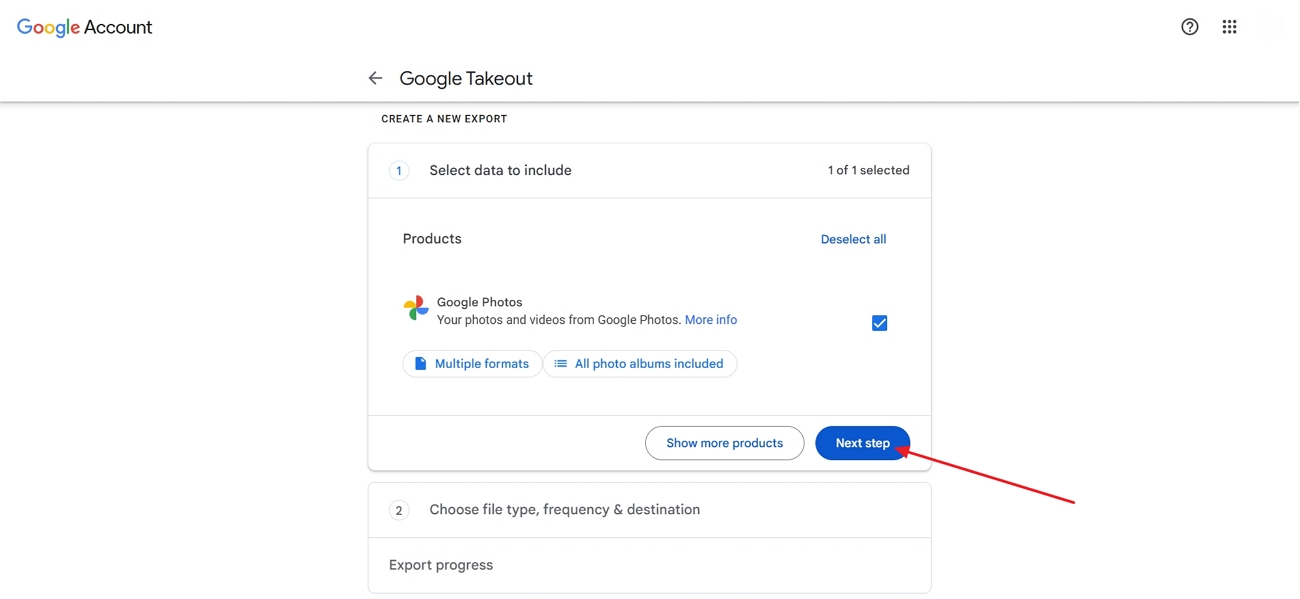
Step 2.The following page will have Google Photos selected as the default choice, where you need to select "Next Step".

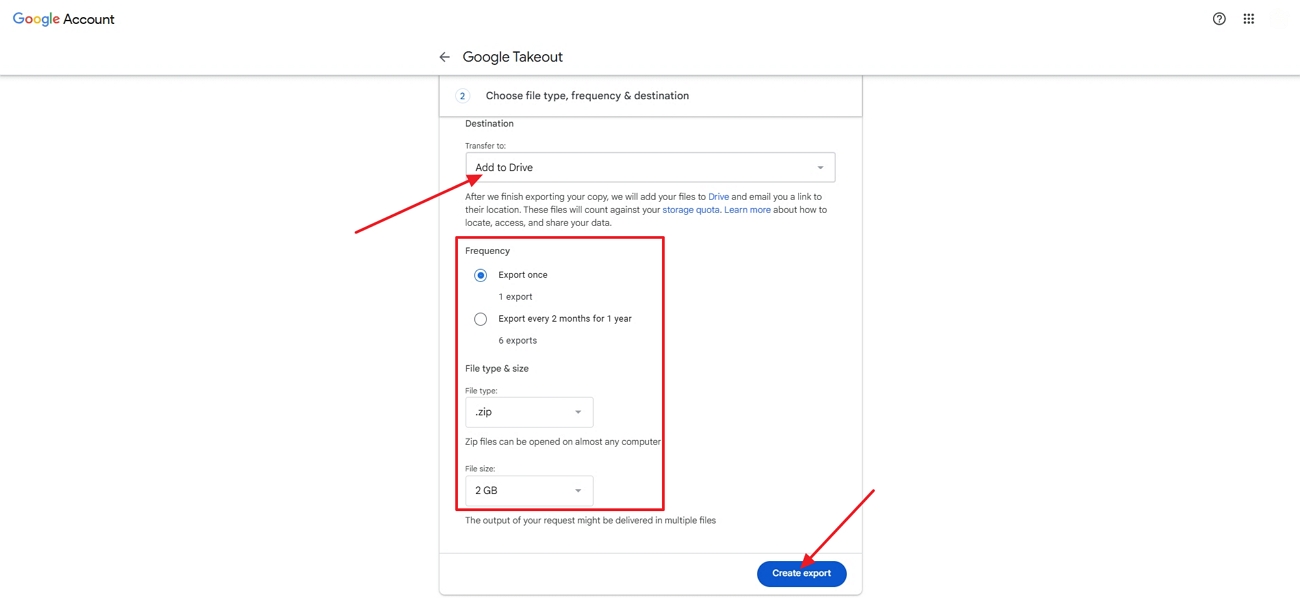
Step 3.Define a frequency, file type, and file size in the drop-down menu by clicking the "Add to Drive" option. Once you have checked everything, press the "Create Export" button.

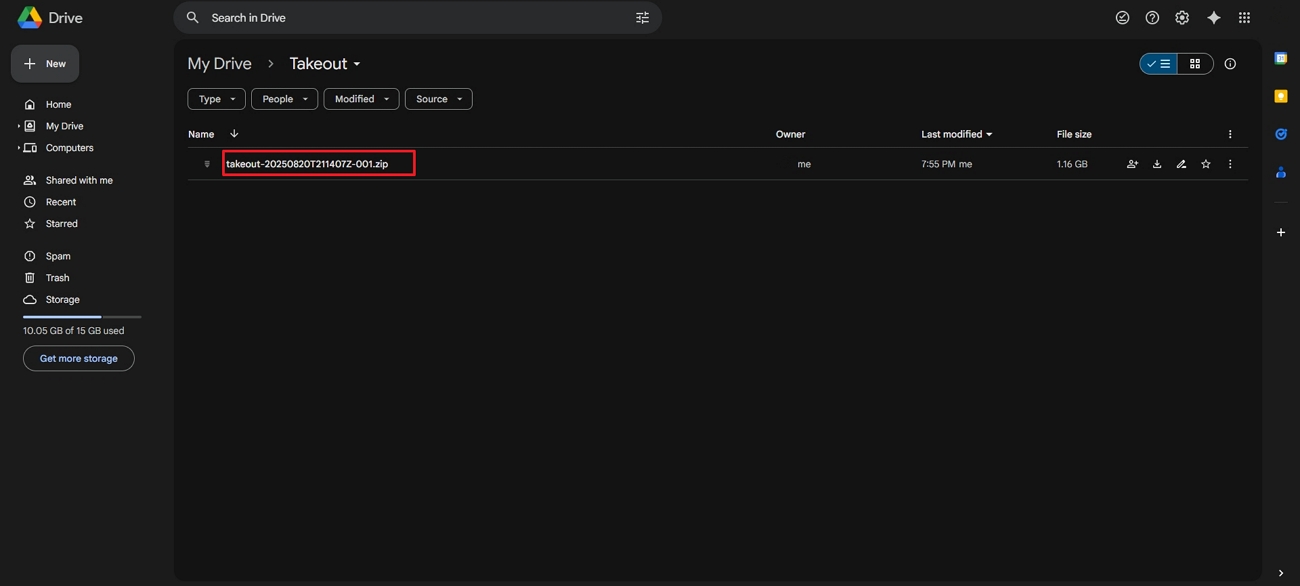
Step 4.Log into your Google account upon prompting and start executing the process. As the backup concludes, click "Go to Drive" to view the ZIP file of the exported Google Photos data.

Part 3. How to Transfer iCloud Photos to Google Photos?
Here's how to transfer iCloud photos to Google Photos without downloading them to storage:
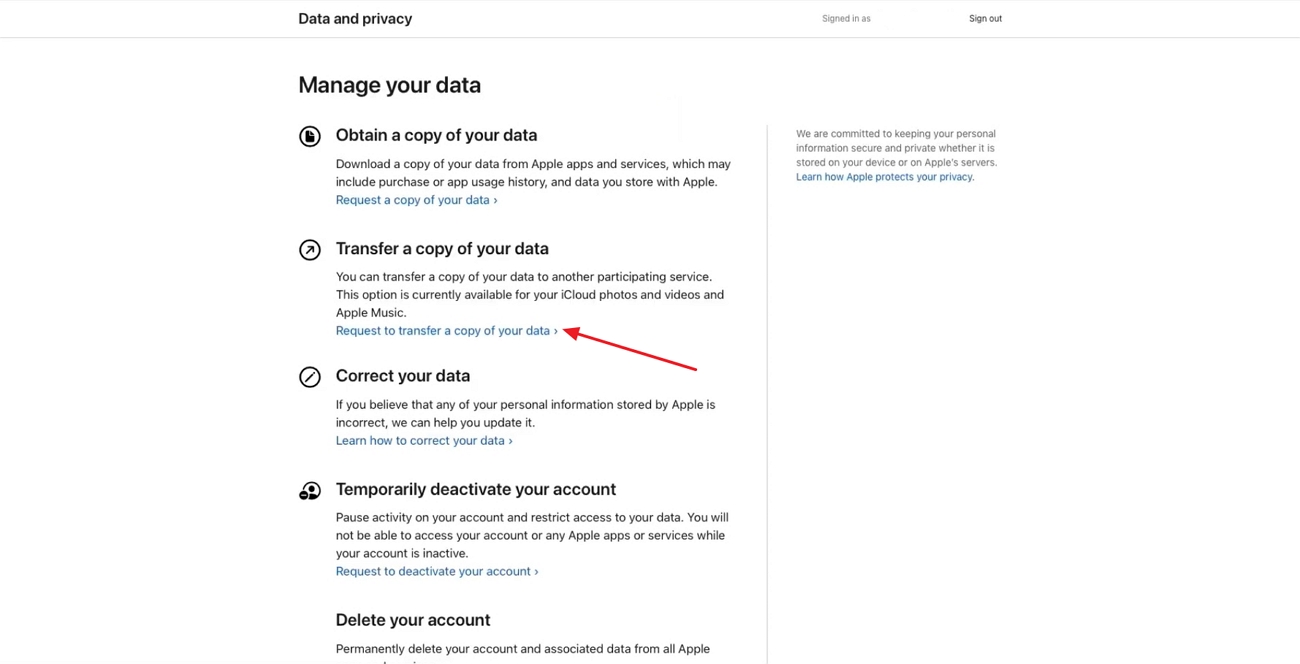
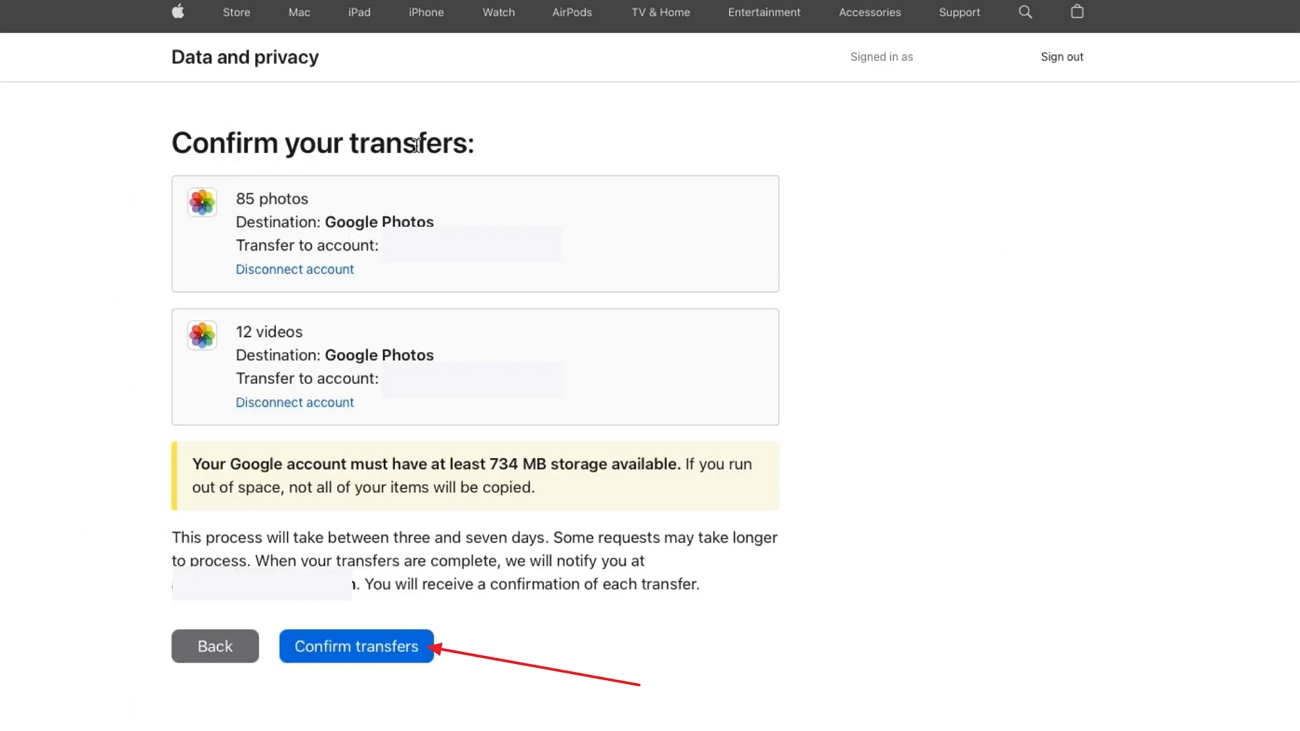
Step 1.Look for Apple's "Data and privacy" website and log into your account. In the next window, click the "Request to Transfer a Copy of Your Data" option under "Transfer a Copy of Your Data".

Step 2.Choose the "iCloud Photos and Videos" button and press the "Next" button.

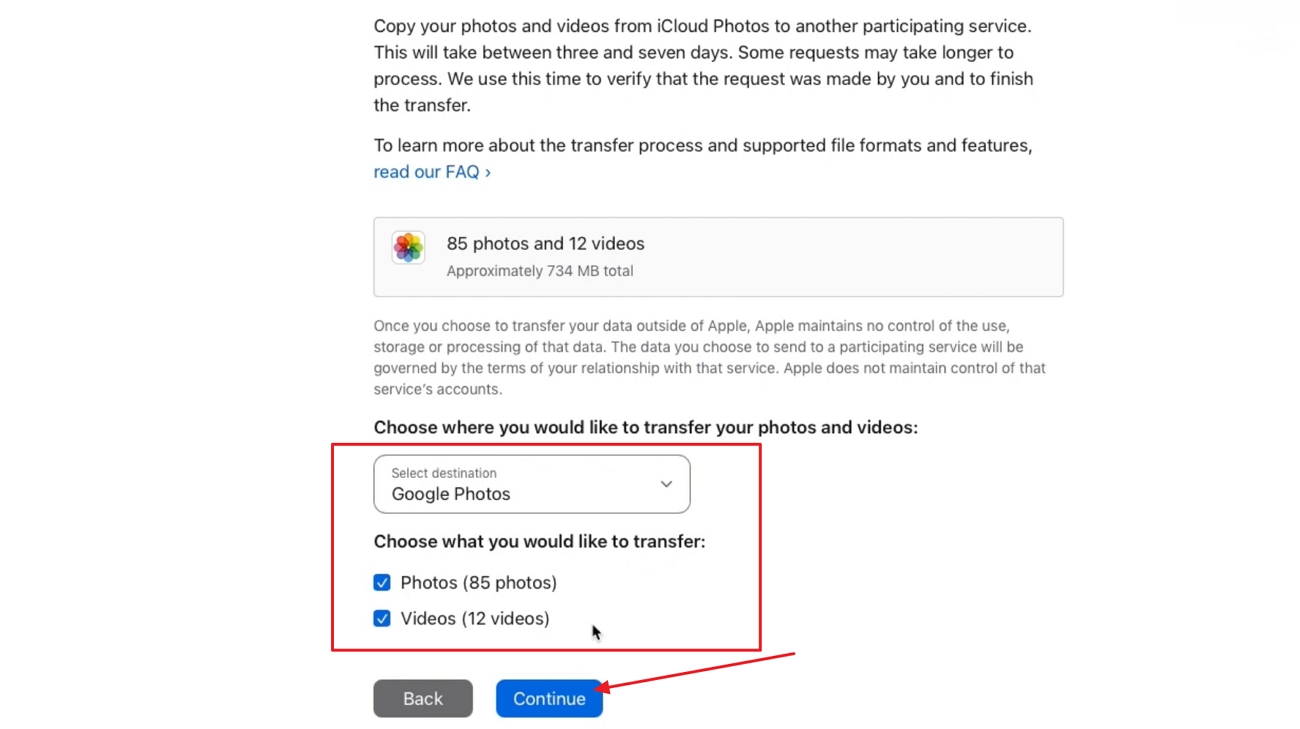
Step 3.Select the destination as Google Photos and tick the checkbox for photos, videos, or both, and press "Continue".

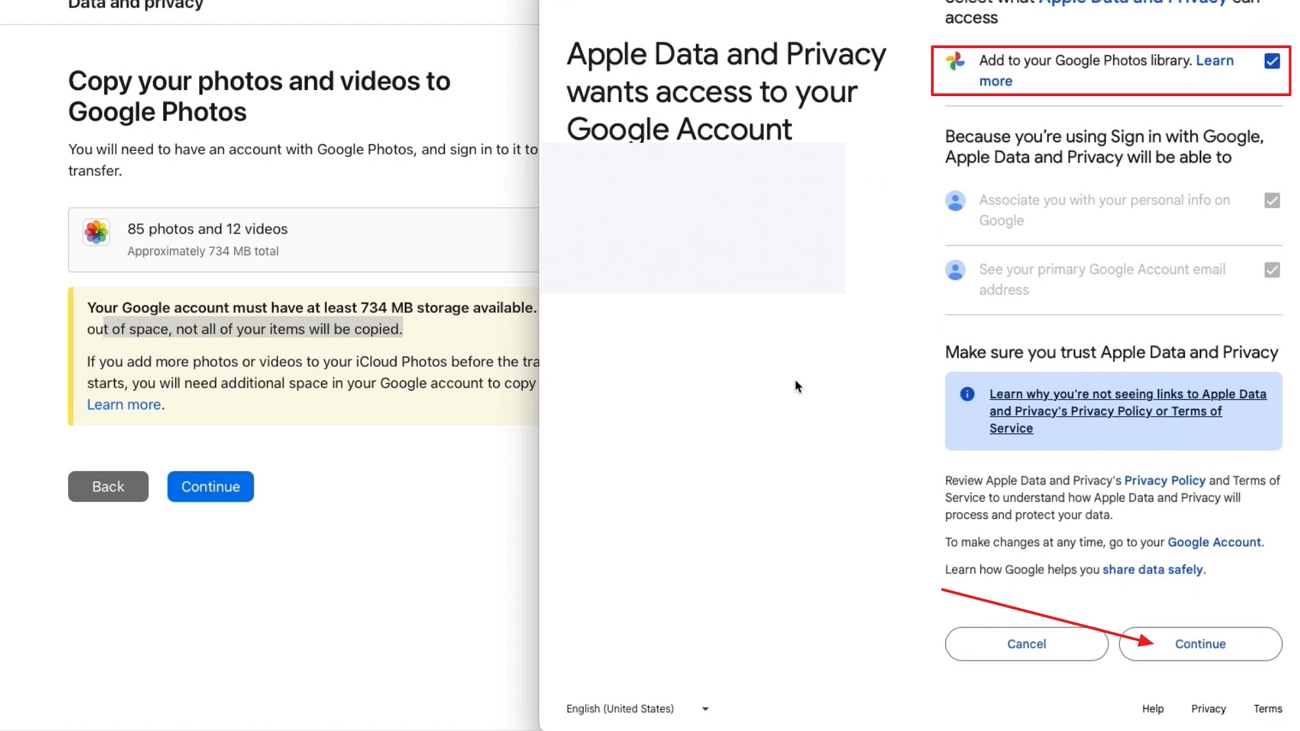
Step 4.After confirming the requirement, log in to the Google account to which you want to transfer photos. Grant access to your Google account by ticking the "Add to Your Google Photos Library" check box and pressing the "Continue" button at the bottom.

Step 5.Hit the "Confirm Transfer" button, and your iCloud photos will be transferred to Google Photos within 3 to 7 days.

Part 4. Some Exceptional Practices to Manage Photos
Upon knowing how to transfer iCloud Photos to Google Photos, there are some other practices that you should know of for managing your photos well:
- 1. Back Up Two Places:Keep a minimum of two data copies in Google Photos and an external drive so that you are not vulnerable to a single point of failure or loss of a device. Check backups periodically and have an offline or offsite copy to increase security against accidental deletion.
- 2. Automate With Cloud-to-Cloud Services:Automate the repetitive movement between clouds so that a secondary archive is kept up to date without manual effort. Set up selective album syncing, versioning where applicable, and set up alerts on failed jobs. This removes human error, gives platform consistency, and has a time-stamped rolling backup.
- 3. Eliminate Duplicates and Handle Large Videos:Do regular duplicate searches and delete near-duplicates to reclaim space. With videos of large size, trim, transcode to efficient codecs, or archive originals separately to libraries used daily.
Part 5. Bonus: Improve Your Google Photos With HitPaw FotorPea
We have discussed photo transfers for the users asking how to move photos from Drive to Google Photos or vice versa. Many users find their pictures blurry due to repetitive transfers between their phone, computers, and cloud storage. If you're one of them, then use HitPaw FotorPea (formerly HitPaw Photo Enhancer) to automatically enhance image colors and upscale your images so you can print them for a lifetime appearance.
Key Features
- 1.Upscales low-quality images to ultra-high resolution up to 8K clarity.
- 2.Allows batch picture processing to import multiple pictures at once.
- 3.Offers AI-powered picture enhancement and blur correction for crisp visuals.
- 4.Restores aged or damaged photos, turning them into sharp, polished images.
- 5.Removes and replaces unwanted objects with creative backgrounds.
How to Enhance Photos Before Adding to Google Photos With FotorPea
Moving from the key features that HitPaw FotorPea offers, follow these simple steps to enhance your low-quality photos before adding them to Google Photos.
Step 1. Select Enhance Photos Now Across FotorPea
Launch the HitPaw FotorPea and press the "Enhance Photos Now" button to move to the next window.

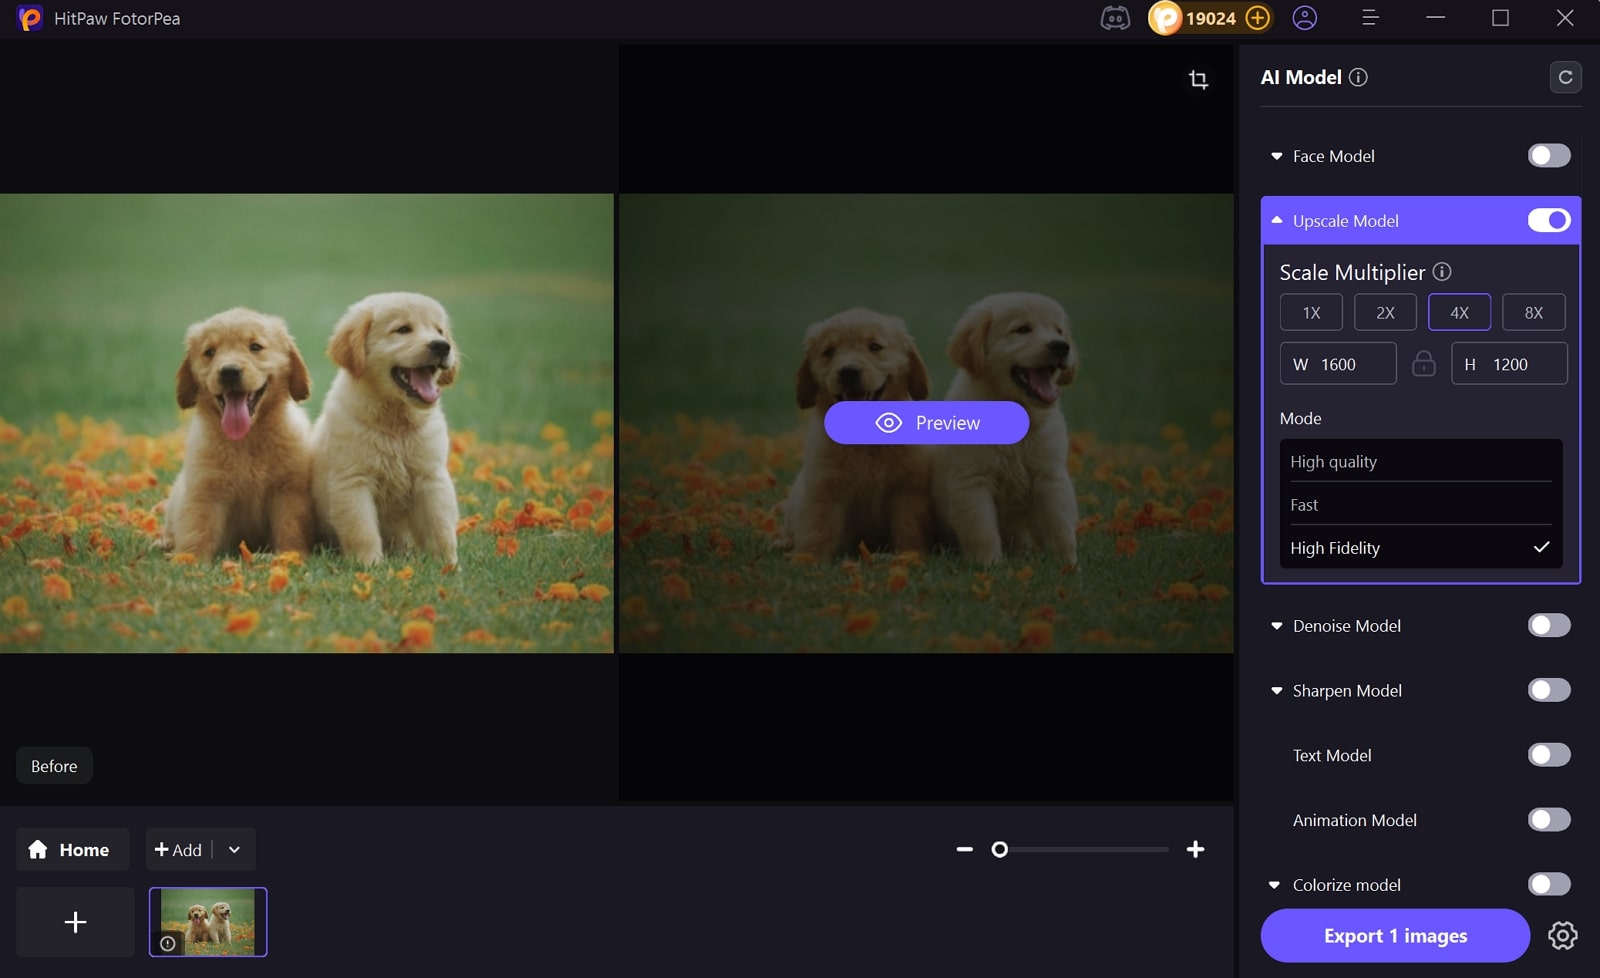
Step 2. Import Your Photos and Proceed to Upscale
Press the "+Add" button to import your photos, select the "Upscale Model," and click the "Preview" button on each photo to see your enhanced pictures.
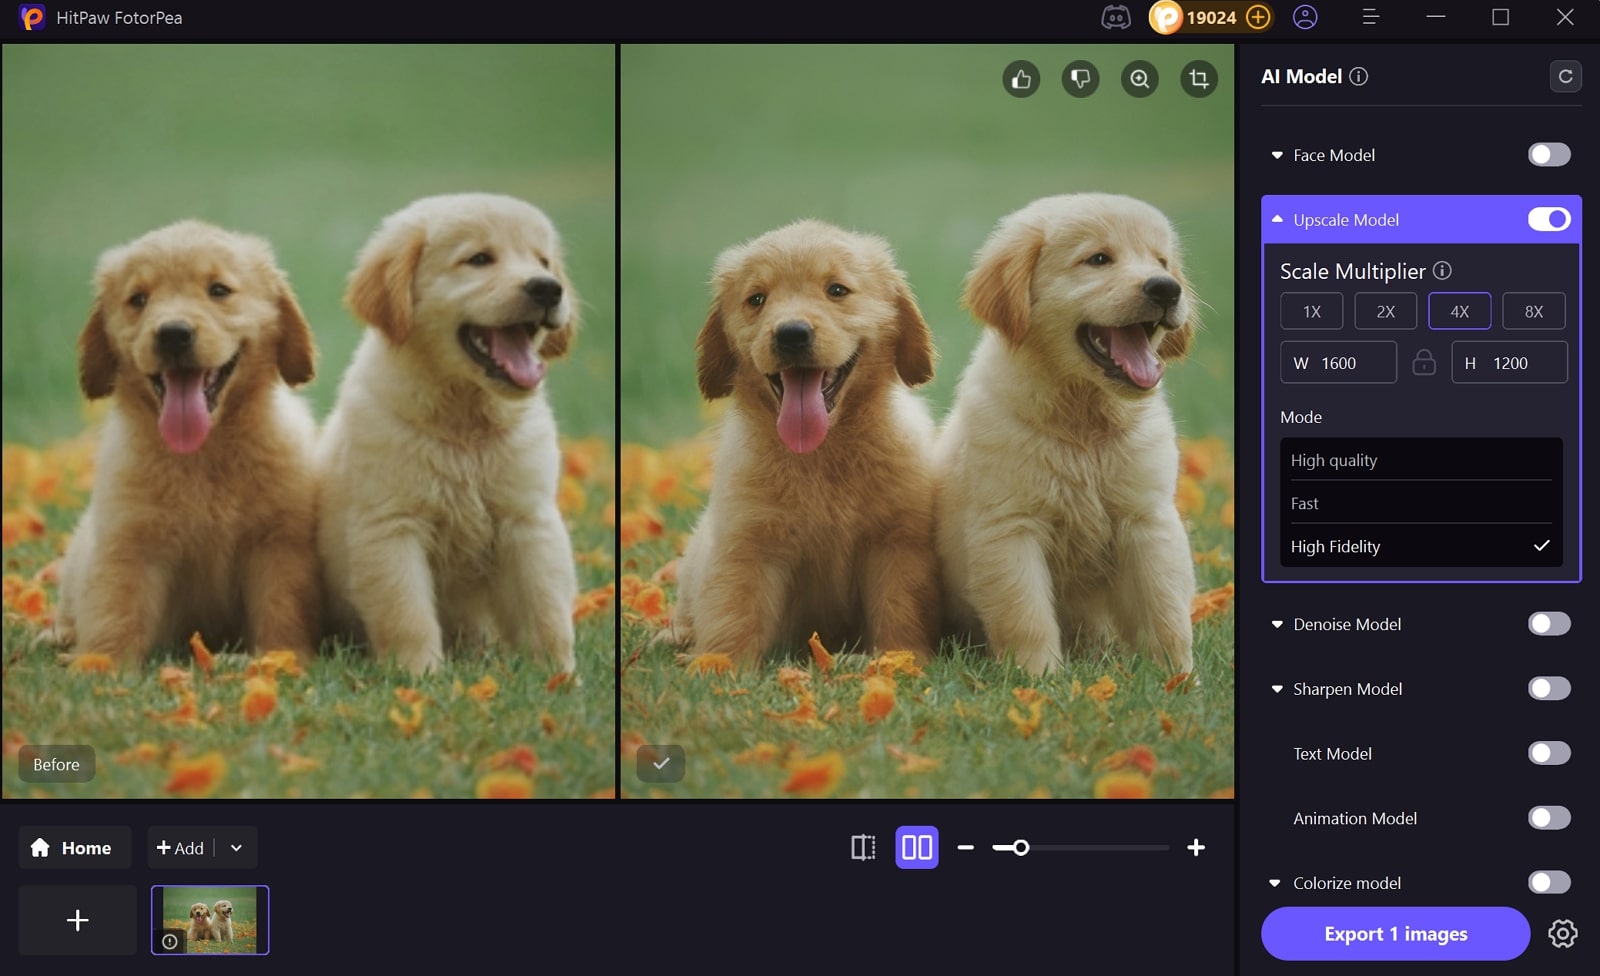
Step 3. Export the Enhanced Photos From FotorPea
After you preview your enhanced photos, hit the "Export (x) Images" button in the same window to save the enhanced photos.
FAQs on How to Move Google Photos to Google Drive
No, the sync between Google Drive and Google Photos was cancelled in July 2019. You can download your pictures and upload them to another service manually.
To do so, the most straightforward way is to use the Google Drive app on iPhone to upload photos and videos of choice. Automatically back up Google Photos and then export desired files to Drive when needed to store or share.
The answer to how to move Google Photos to hard drive is, Save the photos locally from Google Photos and then move the files to the external drive. To create a ready-made archive, apply such tools as HitPaw FotorPea to enhance and upscale your images for a polished backup.
Conclusion
To conclude this article, we have discussed how to move photos from Google Drive to Google Photos in simple steps. Regardless of whether you are using manual transfers or direct imports to transfer the bulk of your memories, each of these methods will help you keep your memories organized. Before creating a backup of your photos, use HitPaw FotorPea to polish your photos so every backup looks its best.
Leave a Comment
Create your review for HitPaw articles


