A Guide to Effortless Object Removal with Google Photos Magic Eraser
Have you ever taken a perfect photo only to realize that there is something in the background that ruins the whole scene? Maybe it's a trash can, a photobomber, or a power line. Whatever it is, you wish you could just erase it from your image and make it look flawless.
Well, you're in luck, because Google Photos has a powerful feature that can do just that: the Magic Eraser. This tool allows you to remove unwanted elements from your photos with just a few taps, without compromising the realism of your image. Wondering how? We have got you covered. In this comprehensive guide, we'll show you the full potential of magic eraser Google photos.
Part 1. What is the Google Photos Eraser?
Google Photos isn't just your average photo storage platform; it's a powerhouse of functionalities designed to streamline your photo management experience. Along with offering unlimited free storage for high-quality photos and videos, this cloud-based platform offers a variety of smart features that help you organize, edit, and share your photos with ease.
At its core lies the Google Magic Eraser, a built-in tool engineered to get rid of unwanted elements from photos. So whether it's a person, an animal, an object, or a background, the Google Photos Magic Eraser can erase it from your photo and fill in the gap with matching pixels from the surrounding area.
Part 2. Unleashing the Power of the Magic Eraser in Google Photos
The Google Photo Magic Eraser is an easy-to-use tool that doesn't require any additional editing skills. However, to use this, you must be a Google One member or Pixel owner.
How to Use Magic Eraser on Google Photos
And if you are wondering where is magic erase in Google photos, and how to use magic eraser in Google photos, here's how:
- Open the Google Photos app on your device, and select the photo you want to edit.
- Tap on the Edit icon at the bottom of the screen. This will open the editing menu, where you can adjust the brightness, contrast, color, and other aspects of your photo.
- To erase distractions from photos, tap on Tools and select Magic Eraser. (Sometime, for a photo with too many people in it, the Magic Eraser icon may appear in the Suggestion tab.).
- For some photos, you might notice that the Magic Eraser is giving suggestions for people or powerlines to erase from the photo. Tap on “Erase All” to remove the suggested elements.
- However, if suggestions don't appear, with the magic eraser tool selected, use your finger or mouse to draw over the unwanted objects or backgrounds in the photo that you want to remove.
- As you draw over the unwanted elements, the Magic Eraser will automatically detect and remove them from the photo. You can adjust the brush size and opacity for more precise erasing by using the slider or options provided.
- Once you've finished erasing the unwanted objects, preview the result to ensure it meets your expectations. If satisfied, tap on the "Save" or "Done" button to apply the changes.
- Now, press and hold the image to see the difference between the original and edited image.
- If you are satisfied with the result, tap on the “Save Copy” button to save your edited photo.
That's it! You've successfully used the Magic Eraser in Google Photos to remove unwanted objects from your image.
Customization Options for the Magic Eraser Tool:
- Brush Size: Adjust the size of the eraser brush to control the area being erased. Larger brushes are useful for removing larger objects or backgrounds, while smaller brushes are ideal for detailed work.
- Opacity: Control the transparency or strength of the eraser brush. Lower-opacity settings will result in more subtle erasing, while higher-opacity settings will produce more pronounced effects.
- Undo/Redo: If you make a mistake or want to backtrack, you can use the undo button to revert changes. Conversely, the redo button allows you to reapply undone edits if needed.
By following these steps and utilizing the customization options provided, you can unleash the power of the Magic Eraser in Google Photos to effortlessly remove unwanted elements and enhance your photos with precision and ease.
Part 3. Advanced and Robust Magic Eraser with HitPaw FotorPea
While the Magic Eraser in Google Photos is a great tool for removing unwanted elements from your photos, it has some limitations. Therefore, you need one-in all tools to help you erase backgrounds and objects with more accuracy and flexibility, such as HitPaw FotorPea.
This advanced and robust photo editor tool offers a plethora of features beyond your imagination. Apart from seamlessly removing backgrounds and objects from the images, this AI-powered tool can enhance photos, fix blurry images, restore the details, and improve the texture of your images. In short, HitPaw FotorPea stands as your ultimate editing companion.
Some of the other features of HitPaw FotorPea include:
HitPaw FotorPea - All-in-one Photo Editing Tool for Win & Mac
Secure Verified. 212,820 people have downloaded it.
- Automatic Background Removal and AI Object Removal
- One-click Enhancements for Portrait Beautify
- AI-based Editing Tools
- Easy-to-Use Interface
- Compatible with Popular Formats
Secure Verified. 212,820 people have downloaded it.
How to use the magic eraser of HitPaw FotorPea:
Wondering how to use HitPaw FotorPea to erase objects seamlessly? Here are the detailed steps:
Step 1: Launch the software to PC
Download and install HitPaw FotorPea from the official website.
Step 2: Start with the removal tool
Launch the software and select “Object Removal” from the main interface.

Step 3: Upload the photo you want to process
Now click on “Remove Now” and select the desired image.
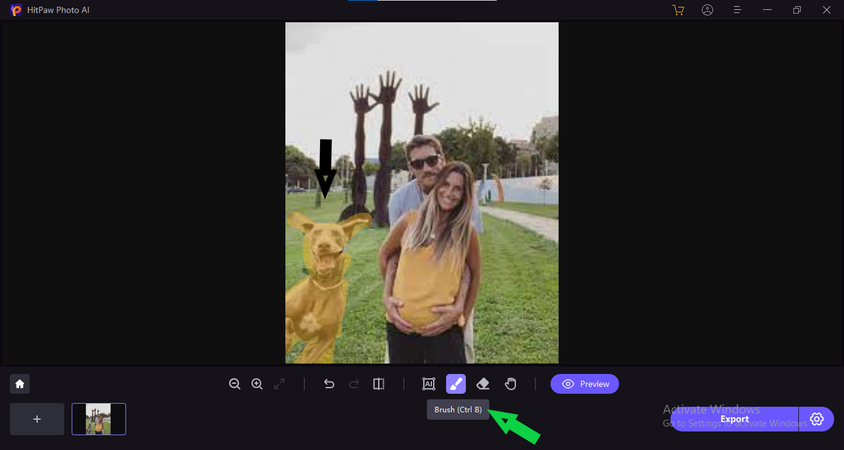
Step 4: Next, click on the Eraser tool and select the object you want to remove.

Step 5: Once it's done, click on Preview and let the AI do its work.

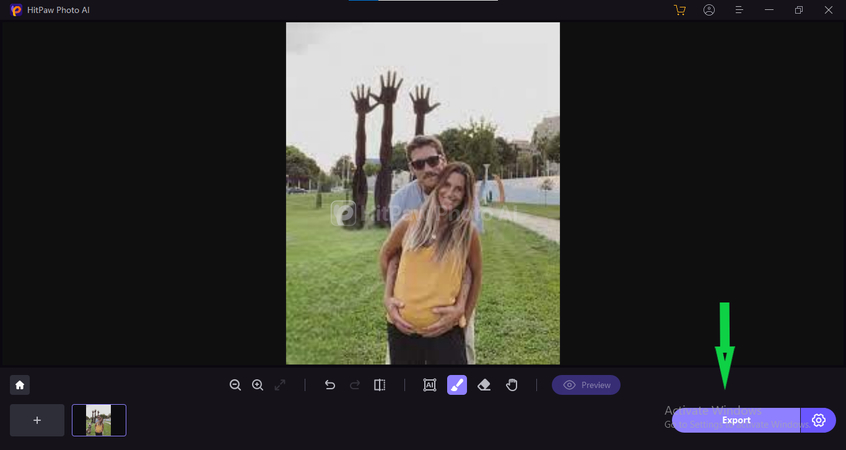
Step 6: Now preview the edited image and click on Export to save the edited image.

This is the ultimate guide of HitPaw Photo AI
Conclusion on Google Photo Magic Eraser
The Google photo magic eraser is a powerful and convenient feature that can help you remove unwanted elements from your photos with just a few taps. It's ideal for both beginners and advanced users who want to quickly and effortlessly improve their photos.
However, this magic eraser in Google photos does have some limitations that can be frustrating. Therefore, if you want to erase backgrounds and objects with more accuracy and flexibility, consider trying HitPaw FotorPea, a complementary tool that can help you achieve stunning results. So, what are you waiting for?


 HitPaw Univd (Video Converter)
 HitPaw VoicePea
  HitPaw VikPea (Video Enhancer)
Share this article:
Select the product rating:
Daniel Walker
Editor-in-Chief
This post was written by Editor Daniel Walker whose passion lies in bridging the gap between cutting-edge technology and everyday creativity. The content he created inspires the audience to embrace digital tools confidently.
View all ArticlesLeave a Comment
Create your review for HitPaw articles