How to Change Skin Color in Photoshop: Easy Methods for Perfect Tones
The skin color editing is an important part of portrait photography because it ensures the professional, natural, and balanced results. Uneven light causes distortion of complexions, poor camera configurations or post-processing issues and must be fixed attentively. Learning how to change skin tone in Photoshop empowers creators to fix flaws with precision. This foundation supports retouching that respects diversity, preserves texture, and avoids artificial results.
For photographers, sensitive tone control delivers consistent galleries, faster workflows, and satisfied, returning clients everywhere. Designers benefit by matching brand palettes, harmonizing campaign visuals, and extending stylistic coherence across deliverables.
Part 1. How to Change Skin Tone in Photoshop?
The tone of the skin in a photograph can be changed and this makes the portraits more natural and sophisticated. Photoshop allows you to fix the light or undesired colors, which is unevenly distributed. By learning how to change skin colour in Photoshop, improve photos and highlight each person's natural beauty with ease.
How to Change Color Skin in Photoshop Using Hue/Saturation
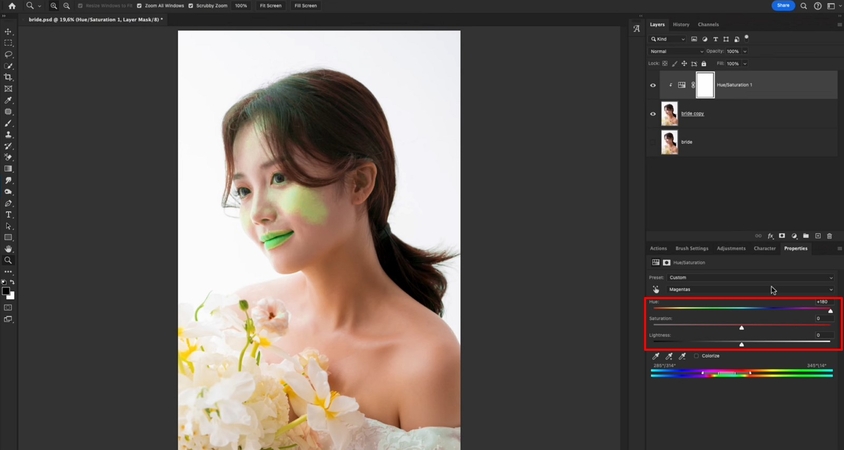
Hue/Saturation is a Photoshop tool that is usually utilized by photographers to make quick and natural adjustments to tones. It aids in the correction of uneven lighting, elimination of color casts, and the maintenance of the portraits to appear natural. Such a minor change brings a lot of difference by improving uniformity in the skin tones. Let's move into the steps of how to change color skin in Photoshop:
Step 1.First, open the image in Photoshop and add a new "Hue/Saturation" adjustment layer by following Layer > New Adjustment > Hue/Saturation.

Step 2.Access the "Hue/Saturation" properties panel, move the "Hue" slider left or right to shift the skin color. You can also tweak the "Saturation" and "Lightness" sliders for more natural results.

How to Match Skin Color in Photoshop With Selective Color
Photoshop gives you the Selective Color option that lets you adjust tones with a fine degree of control. It is used by photographers to align the skin tones in a natural way without interfering with the entire picture. This method ensures portraits remain realistic while giving editors flexibility to correct specific color ranges. Next, follow the guide below for how to change skin color in Photoshop by using Selective Color:
Step 1.To start this, click on the "Adjustment Layer" icon on the bottom right corner and choose "Selective Color" to proceed further.

Step 2.Next, you will see the "Selective Color" properties panel to adjust the colors by moving sliders left or right. Make sure to choose the "Relative" option while editing this.

How to Match Skin Tone in Photoshop With the Solid Color Layer
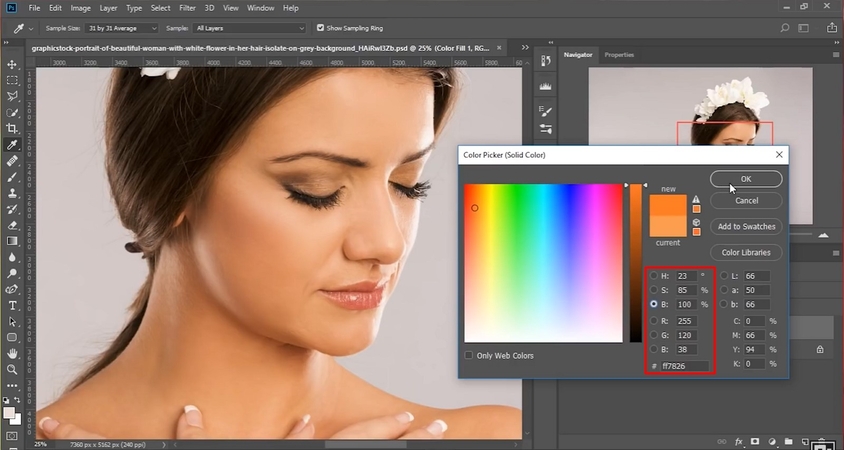
Using a Solid Color Layer in Photoshop helps create smoother, more balanced skin tones. This tool overlays a selected shade and blends it naturally to correct uneven patches. It makes a clear difference by refining portraits without losing texture. Let's go through the step-by-step guide on how to adjust skin tone in Photoshop using a Solid Color Layer:
Step 1.Open your image in Photoshop, look for the "Layer" option on the bottom and choose "Solid Color" out of the list.

Step 2.Go for the "Solid Color" properties panel from where you will make adjustments. Set the solid color layer's blending mode to "Color" or "Soft Light" for subtle color.

How to Adjust Skin Tone in Photoshop With CMYK Curves Adjustment
The CMYK Curves Adjustment in Photoshop helps in refining skin tones with accurate color balance control. Editors can correct shadows, highlights, and midtones for natural results by adjusting each curve. This method shows how to increase skin tone in Photoshop while keeping details intact. So, let's move into a stepwise process of using Curves for precise skin adjustments:
Step 1.First of all, create a "Curve" adjustment layer by following Layer> New Adjustment Layer> Curves.

Step 2.Use the "Eyedropper" tool to sample skin in a midtone, non-highlight area and check its CMYK values and adjust them accordingly.

Part 2. How to Adjust Skin Color in Photoshop: Common Mistakes to Avoid
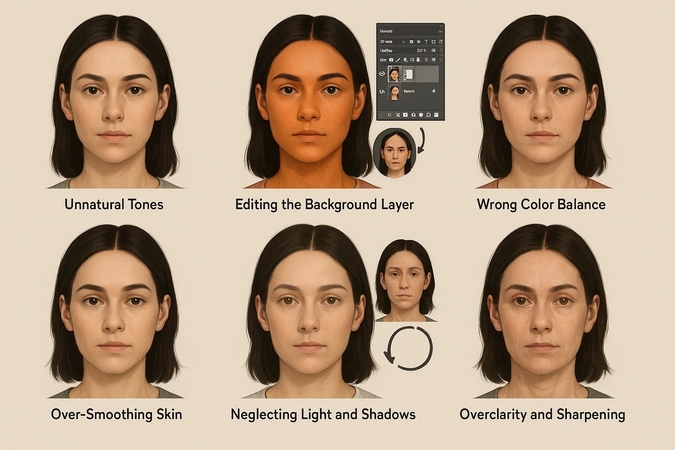
While understanding how to edit uneven skin tone in Photoshop, many beginners make common mistakes. These are some of the mistakes that should be avoided to have realistic portraits with natural-looking color of the skin. Some of the major pitfalls to be guarded against in this process will be pointed out below:
- 1. Unnatural Tones:Pushing saturation too high makes skin look fake, orange, or unnatural. Adjust colors slowly and compare before & after to keep tones realistic and convincing.
- 2. Editing the Background Layer:Directly editing the background layer limits flexibility and makes changes permanent. Always use adjustment layers with a mask so edits remain reversible and safe.
- 3. Wrong Color Balance:Ignoring white balance correction causes unwanted red, yellow, or green skin tones. Fix white balance first and use neutral references to achieve accurate colors.
- 4. Over-Smoothing Skin:Over smoothing takes away the natural skin texture, giving a fake, plastic appearance. Apply smoothing sparingly to retain authentic details and make portraits appear natural.
- 5. Neglecting Light and Shadows:It is disregard of natural light direction and shadows, which result in flat, dull, and lifeless portraits. Always verify references and maintain subtle edits to maintain depth and realism.
- 6. Over-clarity and Sharpening:Clarity is applied in excess, illustrating wrinkles and other imperfections of the skin, which makes the face look harsh. Sharpen very lightly and selectively to make the results natural, soft, and flattering.

Part 3. Photoshop Alternative: How to Change Skin Colour on HitPaw FotorPea
Many people get frustrated using complicated tools when trying how to change skin tone color in Photoshop because the tools seem too complex. With so many menus, sliders, and layers, editing becomes slow and stressful. Instead of enjoying creativity, users spend too much time trying to understand the steps. As a solution to this problem, HitPaw FotorPea's (formerly HitPaw Photo Enhancer) AI Replace provides an easier way to edit portraits naturally.
By entering simple prompts, both beginners and professionals can adjust skin tones quickly. This reduces patchy areas, keeps complexions balanced, and makes every portrait look more natural. With AI Replace in FotorPea, users can directly swap uneven tones with natural-looking shades.
Key Features
- 1.Changes skin color or other elements by typing text instructions that specify color and targeted area.
- 2.Replaces individual parts of the image without disturbing other elements via basic prompts.
- 3.Mixes new skin colors and retains facial expressions and natural shadows.
- 4.Allows rapid tweaks, ensuring the skin matches the reference color perfectly.
- Keeps the original image intact while delivering sharp, professional-quality results
Stepwise Guide to Use AI Replace to Change Skin Color
To put this innovative tool into practice, here is a stepwise guide for using AI Replace to change skin color effectively:
Step 1. Access the AI Photo Editor
After running the tool, select "AI Photo Editor" on the main interface to proceed with further editing.

Step 2. Select the AI Replace from Toolbox
After adding your images, click on "Toolbox" in the right-side menu to further select the "AI Replace".

Step 3. Enter Prompt and Proceed With Skin Color Changing
In the following screen, enter your requirements in the "Prompt" bar and hit "Generate" to start processing. Finally, preview the results and click on the "Export" button to save it to your device.

FAQs on How to Change the Skin Tone in Photoshop
Adjust tones on the face using tools such as Hue/Saturation or Selective Color. Use masks to add edits to ensure that details are natural and realistic.
Adjustment layers to be used include Curves, Solid Color and Hue/Saturation layer. Use selective edits on the skin only, and make sure that the blending is smooth and natural.
The uneven tones may be removed with either the Brush tool at a low level of the Opacity or selective adjustments. Mixed in order to match patches without losing texture to make it look natural.
Conclusion
In conclusion, mastering how to change skin color in Photoshop helps creators produce polished, realistic, and professional portraits. Skin tones are natural and balanced by preventing mistakes and using the right tools. If Photoshop feels overwhelming, HitPaw FotorPea provides a simple, stress-free alternative. It helps beginners and professionals adjust ski tones quickly with its AI Replace feature.
Leave a Comment
Create your review for HitPaw articles


