Effective Techniques to Denoise Video in After Effects
If you've ever worked on a video production, you'll know how annoying noises can be. Whether its grainy footage captured in low light or distracting background noises, noise can degrade the overall quality of your video.However, by learning to denoise video in After Effects, you can easily erase that noise, allowing your graphics to shine. In this article, you will discover several easy and effective ways for removing noise from your video in After Effects, resulting in cleaner and more professional pictures. Let’s get started.
Part 1. What is Noise in Video Footage
A. Definition of video noise and its types
Video noise can be defined as the noise grain or distortion that may be visible in video and footage so that it becomes less smooth or indistinct. It usually reveals small dots or unwanted brightness and color changes. The major types of video noise are:
- Luminance Noise: This noise affects the brightness and creates lightness variation in the image.
- Chrominance Noise: This one impacts the colors in a video and creates random color hue and saturation shifts
- Temporal Noise: The noise is within different frames which can cause flickering or jittering effects in video
B. Common causes of noise in video recordings
There are various causes of noise in your video capture, some of which are as follows:
- Low Light Conditions: It is quite common when recording low light environment that the camera should not be able to take enough light resulting in a fair amount of noise in your captured video.
- High ISO Settings: The camera makes high ISO in order to take bright images. More noise is introduced in the video capture.
- Compression Artifacts: While compressing files is good for web delivery, overcompression makes the footage blocky or noisy which reduces the quality of video.
- Sensor Limitations: In cameras with small sensors, there's not enough detail being captured, and thus noise increases.
C. Importance of addressing noise for professional video production
Noise reduction is very important when trying to remove noise from video content because it makes it polished or professional in quality. High levels of noise can:
- Lower Visual Attractiveness: Noisy or grainy video does not look professional and may disturb the material content.
- Impact Post-Production: The post-production tasks like special effects or color grading would be even painful when it gets noisy because the noise would interfere with clean results.
- Lower Sense of Production: Commercial projects require noise-free clear-footage to uphold a good production standard of value.
Part 2. Adobe After Effects Noise Reduction Techniques
A. Overview of built-in noise reduction tools in Adobe After Effects
Adobe After Effects includes certain features that make it easier to eliminate noise from video. The most widely used effect is Remove Grain, which eliminates both luminance and chrominance noises without significantly affecting the video's original quality. You may want to use Median or Dust & Scratches to achieve a smoother grainy footage. Combining such with fine-tuning may result in clean, professional-looking videos with little complexity.
B. Step-by-step guide on using the Remove Grain effect
Here's how you can apply the Grain Removal effect in Adobe After Effects to reduce noise in your video footage:
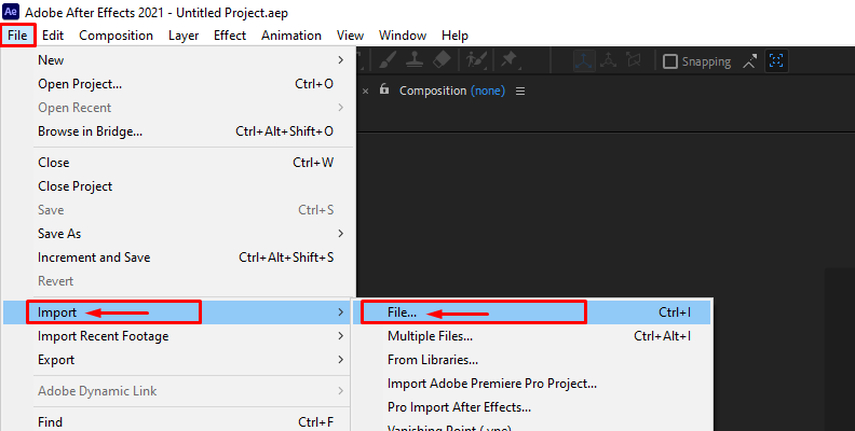
Step 1: Import FootageImport your noisy video by going to File > Import, then dragging the clip into a new composition.
Step 2: Add Remove Grain Effect
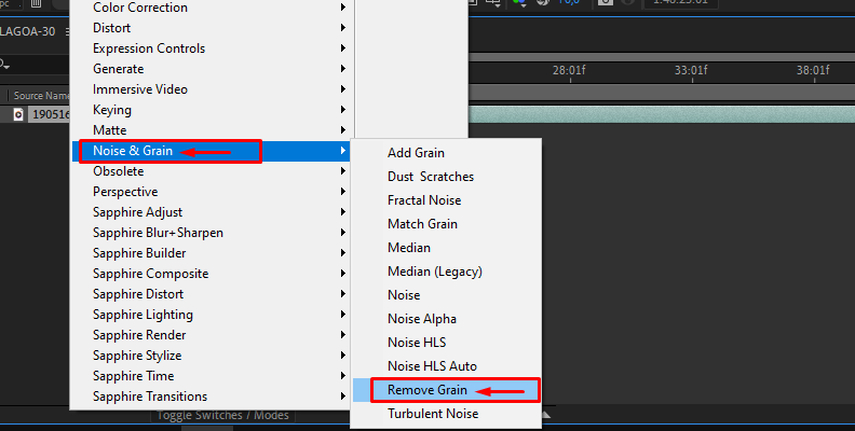
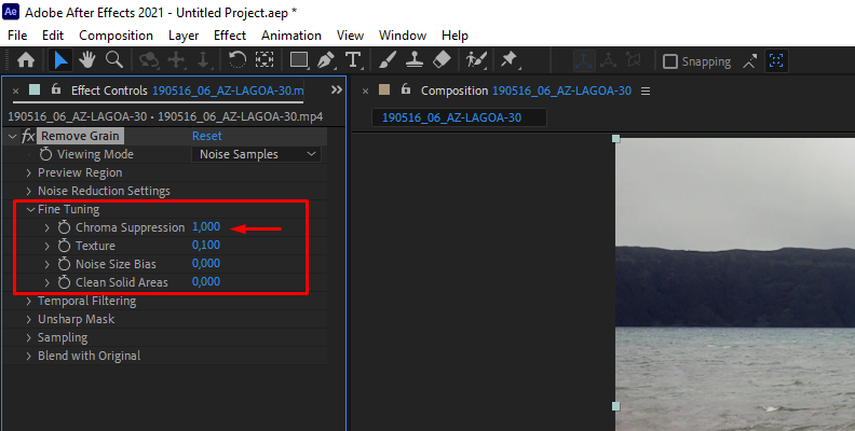
Go to Effect > Noise & Grain > Remove Grain and add the effect. Adjust settings in the Effects Control panel and preview the changes in the preview box.
Step 3: Select Noise Sample
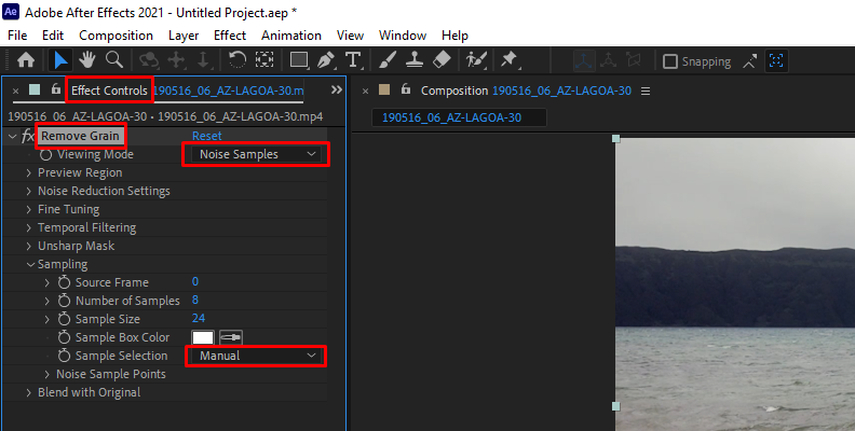
Change Viewing Mode to Noise Sample at the Sampling tab, enabling Manual sample selection and designing sample points, size, and number.
Step 4: Tweak your Noise Reduction Settings
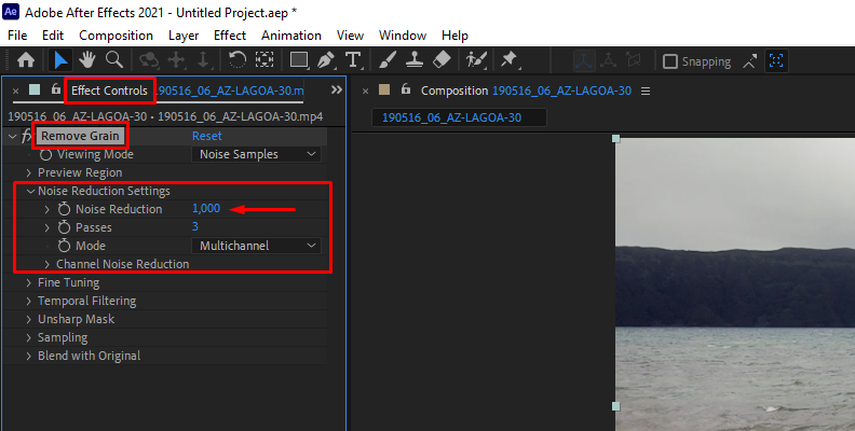
In Noise Reduction Settings, tweak your Noise Reduction and Passes. Apply noise-reducing settings in each of these color channels by using the Channel Noise Reduction tab.
Step 5: Sharpen to fine-tune
You can achieve noise reduction and detail preservation with a balance by adjusting the Chroma Suppression, Texture and Noise Size Bias. You can add an Unsharp Masking if your video is too blurred.
Step 6: Rendering and Export
To render and export your noise-free video, navigate to File > Export > Add to Media Encoder Queue. Select your video settings and click on the Render button.
By utilizing Adobe After Effects noise reduction techniques you can enhance your video quality and achieve professional results.
C. Tips for optimizing settings for effective noise reduction
- Avoid Over-smoothing: Reduce the noise settings gradually to avoid over-smoothing and detail loss.
- Use Temporal Filtering: Use temporal filtering to average noise across frames, particularly for footage with little or no movement.
- Apply Grain Matching: The Match Grain effect helps to reintroduce grain, which brings an image to life and makes it appear more organic.
- Work in small chunks: Save time and fine-tune outcomes by focusing on parameters for smaller sections of a video.
- Combine Effects: You can use other effects like Median or Dust & Scratches to focus on certain noise while preserving details.
Part 3. Enhancing Video Quality with HitPaw VikPea
HitPaw VikPea (formerly HitPaw Video Enhancer) is a sophisticated AI-driven video upscaler that promises to boost the quality of your movies. It can upscale lower resolution videos to high resolution of 4k or even 8k along with repairing damaged files and stabilizing unstable videos. The new edition includes advanced models such as Frame Interpolation and Stabilize Model, which produce a clean, clear, smooth, and professional-grade outcome. Its utility can be expanded with a simple and clean interface that includes watermark-free preview options that allow you to examine the results before exporting.
Features
- AI Upscaling: Enhance videos up to 8K.
- Repair & Stabilize: Used to restore damaged footage and stabilize unsteady videos.
- Frame Interpolation: Improves the flow between frames to ensure smooth motion.
- User-Friendly Interface: it’s very easy to use, so people of all skill levels can easily use.
- Water-mark free:There is no watermark in the preview, so you can check the video's upgrades before exporting.
Steps
Step 1. Visit the HitPaw VikPea website and download the software on your PC.
Step 2. Launch the software and select “choose file” button to import the video from the 1900s which you want to upscale.

Step 3. Choose the best denoising AI model for your video, whether you want to reduce noise for clear video, improve the quality of a favorite video.
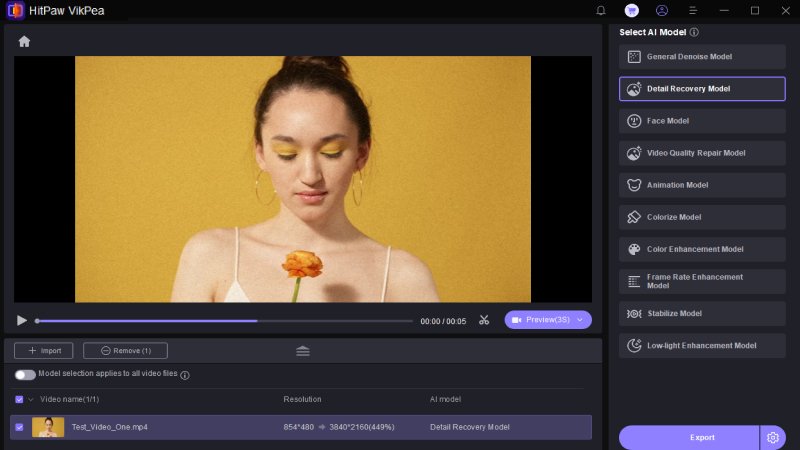
Step 4. Once you've completed the noise reduction procedure, you can preview the improved video. Once you're done, click the Export option. Your video will now be saved in the specified location.

Part 4. FAQs of Adobe After Effects Noise Reduction
Q1. Which video editor is best for noise reduction?
A1. HitPaw VikPea is a great software for noise reduction. Its advanced AI seeks to clean up the video while maintaining quality. Its simple interface allows video improvement, upscaling resolution to 8K, and removing grain to make it a good choice.
Q2. How do I reduce audio in After Effects?
A2. To eliminate noise from your audio, use the DeNoise effect in After Effects. Apply the effect by going to Effects > Noise Reduction/Restoration > DeNoise. In the Effects Control panel, you can adjust the reduction settings to reduce background noise while maintaining clear dialogue or music.
Q3. How do I reduce noise when filming?
A3. Use adequate lighting for your shots because film noise increases dramatically in low light. Use a lower ISO on your camera and take a stabilized photo with a tripod. Avoid underexposure in the footage. Better camera sensors and high-quality lenses can result in significantly reduced noise.
Bottom Line
Reducing noise in video is essential for producing professional-quality results. If the video has good noise reduction, its clarity can be boosted. The HitPaw VikPea is ideal, with an easy-to-use feature that includes AI-based noise reduction and upscaling capabilities. Test it out for smooth video improvement!


 HitPaw Edimakor
 HitPaw FotorPea
 HitPaw Univd (Video Converter)


Share this article:
Select the product rating:
Daniel Walker
Editor-in-Chief
This post was written by Editor Daniel Walker whose passion lies in bridging the gap between cutting-edge technology and everyday creativity. The content he created inspires the audience to embrace digital tools confidently.
View all ArticlesLeave a Comment
Create your review for HitPaw articles