Sony a6400 Low Light Grain Fix: Ultimate Guide to Cleaner Photos
Low-light photography seems aesthetic, but it's challenging, even with a versatile camera, the Sony a6400. Besides having the extraordinary lenses, the images have grainy or excessive noise. This affects the overall picture’s appearance, which occurs due to various reasons, like inappropriate camera settings.
To cover this issue, the following guide will address the Sony a6400 low-light grain fix by covering its causes and optimizing approaches. Moreover, this article will introduce you to the most appropriate upscaling tool to enhance your photo. So, continue reading this article to get the most aesthetic images.
Part 1. Common Causes of Grainy Images on Sony a6400 in Low Light Conditions
Grain is digital noise that usually comes in our photos and seems like an uneven texture, mainly in dark areas of photographs. Before diving into the Sony a6400 grainy image fix, let's have a look at why your pictures get grainy:
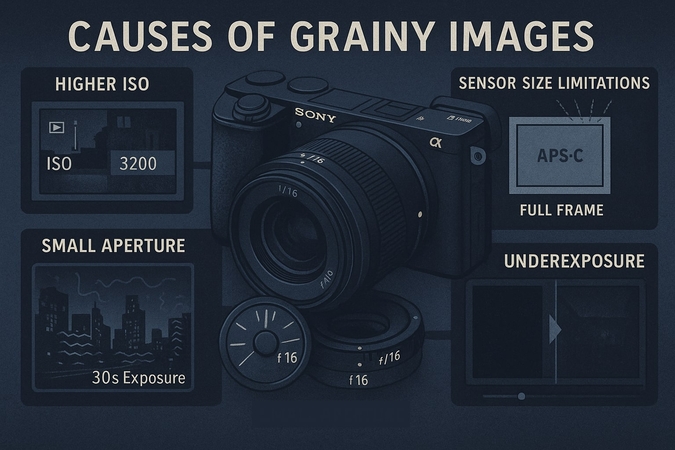
1. Shooting at the Higher ISO: It uses a higher ISO equal to 1600 or greater to expose the picture, generating digital noise.
2. Role of APS-C Sensor Size: A slightly compact sensor makes grainy images as it covers less light.
3. Narrow Aperture Effects: By using a narrow aperture such as f/11, this limits the light passage in cameras.
4. Long Shutter Time: This device uses long exposures that increase the temperature and create thermal noise.
5. Under- Exposed Images: Users try to brighten the photos later in post-production, which adds grainy textures to the outcome.
Part 2. Optimizing Sony a6400 Settings for Low Light Photography
Let's dive into the Sony a6400 night photography settings to lessen grainy photos and get more professional images:
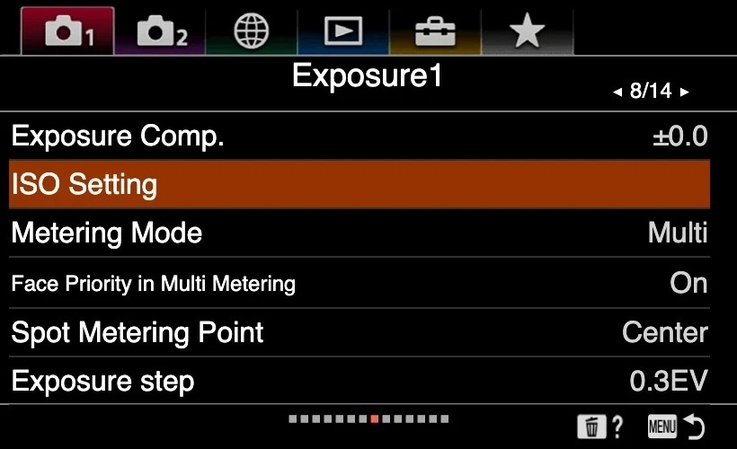
Approach 1. ISO Settings for Sony a6400 Low Light Grain Fix
Ensure the ISO is from 100 to 400 for indoor settings, as ISO determines light exposure to your camera. For shooting well-lit areas like streets, keep the ISO between 800 and 1600. Alternatively, one can use ISO above 3200 only when there's no natural light at all.
Approach 2. Aperture and Shutter Speed Adjustments for Better Low-Light Shots
Aperture is measured in f-stops, which refers to the lens opening; a lower f-stop, like 1.4 to 2.8, is mainly used for low-light performance. However, shutter speed controls the time limit of light exposure to the camera. One should use between 1/30 seconds and 1/15 seconds for handheld photography and 1/60 for motion photography, keeping the shutter speed and aperture balanced.
Approach 3. Using Manual Exposure Mode for Cleaner Low-Light Images
While learning Sony a6400 low-light photography tips, know that manual mode allows users to maintain the slow shutter speed and wide aperture to reduce higher ISO. It ensures consistent results throughout the shoot in each picture, especially in night mode or creative low-light shots. Thus, one should use the exposure meter from the viewfinder to fine-tune settings manually beforehand.
Approach 4. Activating Sony a6400 High ISO Noise Reduction Settings
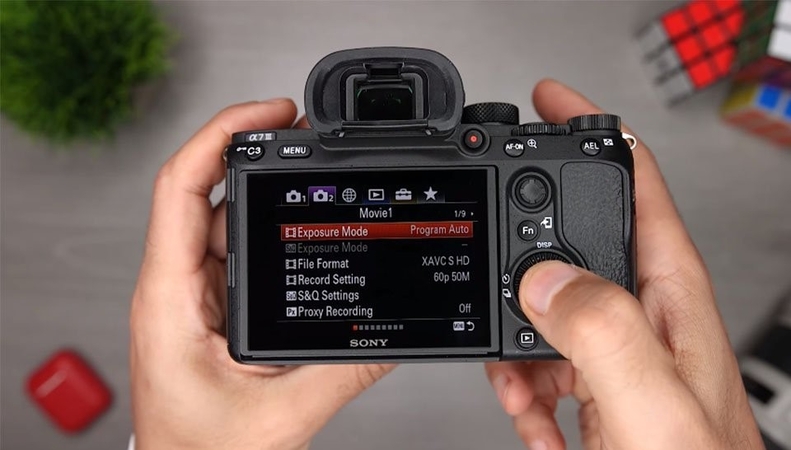
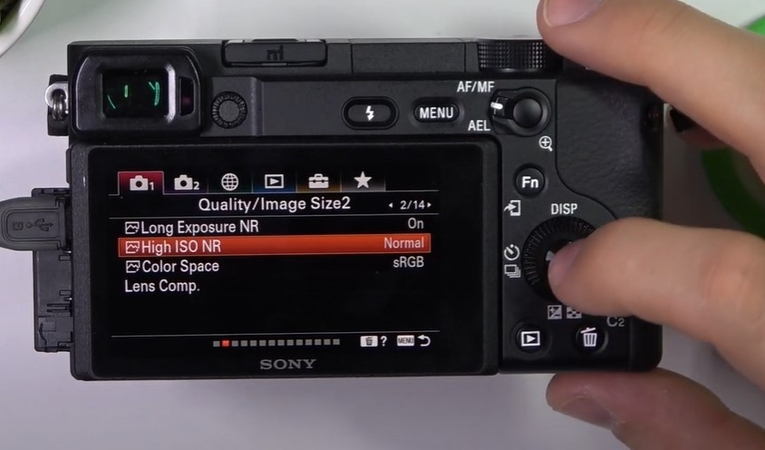
Sony a6400 has a built-in high noise reduction (NR) feature that creates clearer images by removing grains and blurriness. So, continue reading this to know how to activate Sony a6400 noise reduction settings.
Step 1: After accessing the menu, select the “High ISO NR” from the given camera settings.
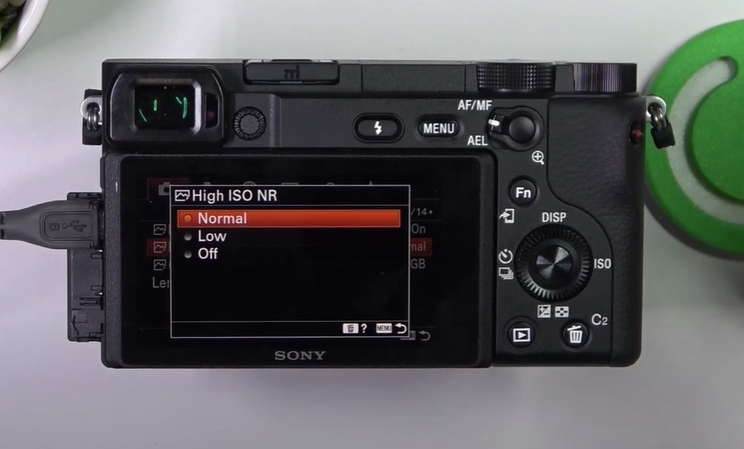
Step 2: Now, from the drop-down options, choose the “Normal” option to start taking professional photographs.
Part 3. Utilizing Picture Profiles for Noise Reduction on Sony a6400
Use the given expert’s Sony a6400 picture profile settings for low-light conditions, and you’ll be able to take sharper, more well-defined photos.
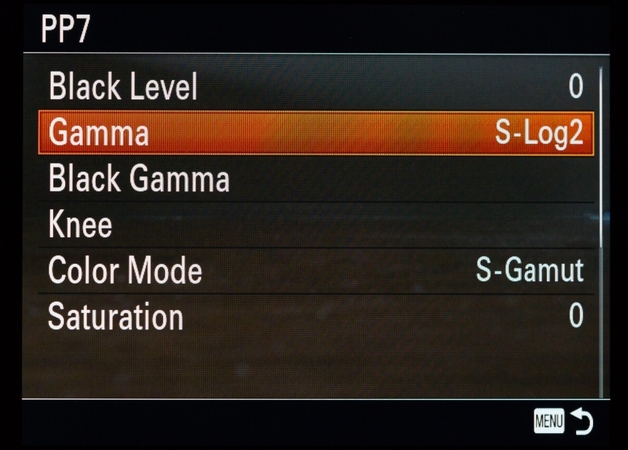
Approach 1. Using S-Log2 and S-Log3 for Cleaner Low-Light Video and Photos
S-log2 and S-log3 are profile pictures created to get more highlights and shadows, which makes them perfect for color grading. S-log3 is more challenging to use than S-log2, as it can generate visible noise when not exposed correctly. To control over-exposure, use ISO 800 for S-log and a fast lens of (f/1.8-f2.8). By using these, the picture will have more details to consider in post-processing.
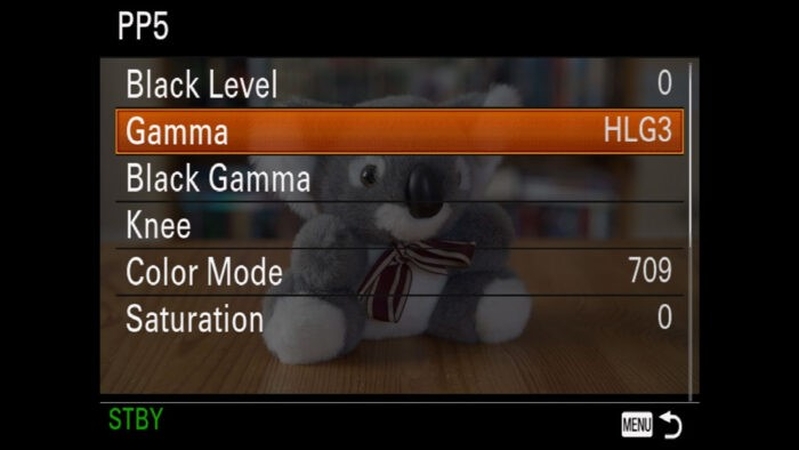
Approach 2. Applying HLG and Cine Profiles for Enhanced Low-Light Results
HLG (hybrid log-gamma) and cine profiles (Cine2 or Cine 4) are alternatives to a profile that offers better low-light performance. Users can use HLG2 and HLG3 for better HDR videos without using heavy grading. In contrast, one can use Cine2 profiles for low-light photography and Cine4 to balance the contrast and color of the picture.
Part 4. Best Noise Reduction Desktop Software to Fix Sony a6400 Low Light Grain: HitPaw FotorPea
Suppose after learning the Sony a6400 grainy images fix, you shot a low-light picture, but still, it gets grainy and pixelated. To tackle these issues, there are many image-enhancing tools available, like HitPaw FotorPea. Using its "Upscale" model, users can enhance the pixelated pictures without ruining their actual vibe. Its "Face" model offers you 3 modes: "Soft, Soft(V2), and Sharp," depending on your required photoshoot.
Additionally, one can preview the generated picture before exporting. By using its "Colorization" model, it is possible to restore old sentimental black-and-white images to colored ones. Within the settings, users can even choose the export quality from "Low, Medium, and High." To brighten up the pictures taken in the nighttime environment, there is a "low-light" model. Moreover, it lets you edit all your photos simultaneously through the "Batch Processing" system.
Key Features
1. Denoise Model: To remove noise artifacts or compression effects, use either of its 2 modes, "Creative or Realistic," according to desired results.
2. Sharpen Model: This tool lets you fix lens blur, motion blur, or any kind of artifact created due to compression.
3. Color Calibration: One can use this tool to balance out the pictures that are underexposed or lacking saturation.
HitPaw FotorPea Noise Removal Guide: Clean Up Grainy Photos Easily
After knowing all the necessary tips for the best Sony a6400 night photography settings. Let's dive into an expert guide to using HitPaw FotorPea and get professional photographs:
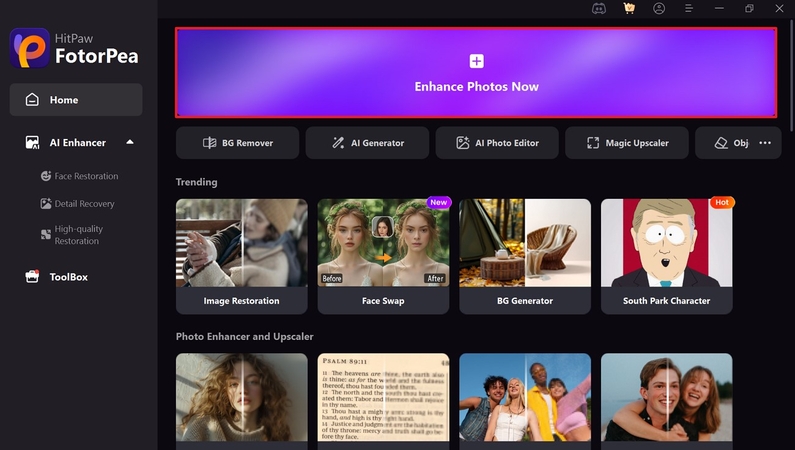
Step 1: Access the HitPaw FotorPea App to start Photo EnhancingAs you launch the tool, select the “+ Enhance Photos Now” button to get the desired pixelated photo imported from your device.
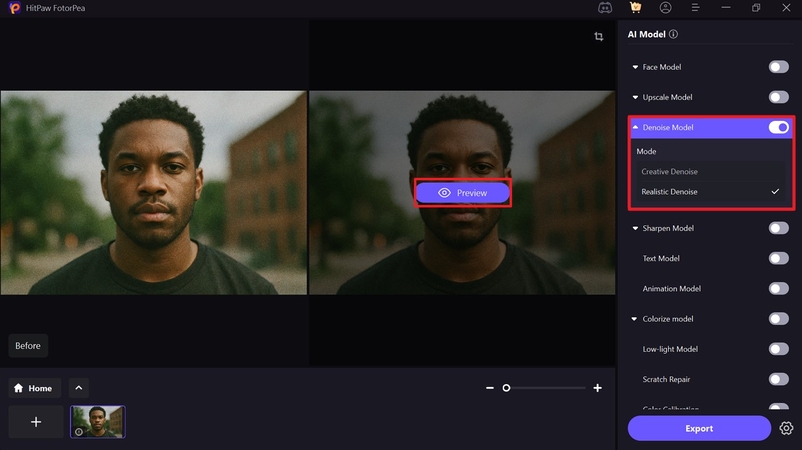
Step 2: Toggle the Desired Mode of the Denoise Model
After inserting the photo, enable the “Denoise” model to select the “Realistic” mode from the drop-down options. Then hit the “Preview” button to start upscaling the grainy low-light photos.
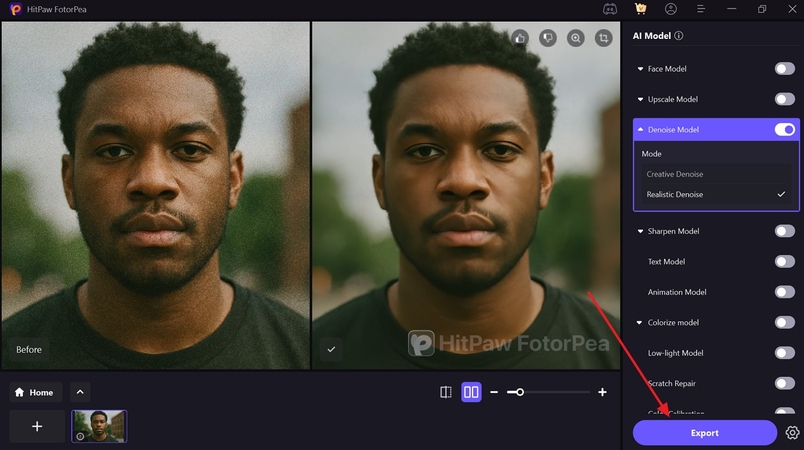
Step 3: Export the Upscaled Low-Light photo to the Device
Finally, after the outcome is generated, preview the upscaled photo and hit the “Export” button to get it saved on your device.
Part 5. Ideal Camera Settings to Avoid Noise in Sony a6400 Low Light Photography
Besides learning other approaches, camera setting also plays a crucial role while shooting pictures in a low-light environment. Here’s a breakdown of ideal settings one should use for the Sony a6400 high ISO noise reduction:
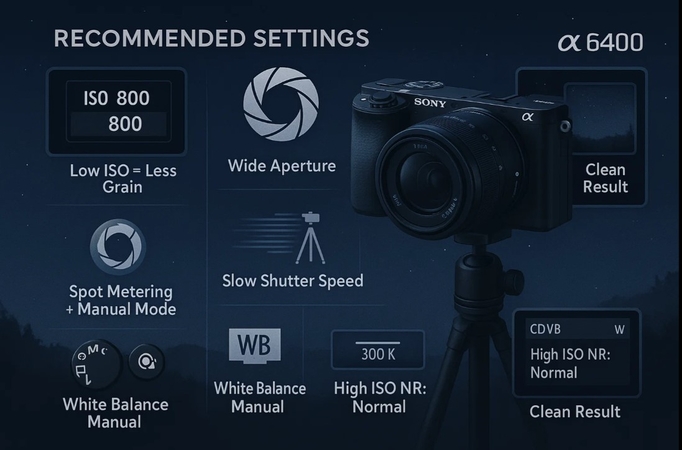
1. ISO: Keep the ISO between 100 and 1600 to avoid a grainy texture in the low-light pictures.
2. Aperture: While shooting in low light, opt for wider apertures like f/1.4 and f/1.8 to get more light to enter the camera.
3. Shutter Speed: One should go for a slower shutter speed when using a tripod during shooting to avoid high ISO.
4. Metering Mode: Merge Spot metering and Manual mode for controlling light and reducing over-exposed backgrounds.
5. White Balance: Always select the white balance manually (Fluorescent and Custom Kelvin) to reduce unnatural colors.
6. Noise Reduction: Toggle the built-in high ISO NR to “Normal” mode while shooting for JPEG formats.
Conclusion
Summing up, in this article, we have covered you all with Sony a6400 low light photography tips, its causes, and expert camera settings one should know. However, sometimes, after using these tips, your picture gets grainy and pixelated, and you can't do anything. So, to tackle this, we have also introduced a professional and easy upscaling tool like VikPea HitPaw to enhance your photos with ease.


 HitPaw Edimakor
 HitPaw VikPea (Video Enhancer)
 HitPaw Univd (Video Converter)


Share this article:
Select the product rating:
Daniel Walker
Editor-in-Chief
This post was written by Editor Daniel Walker whose passion lies in bridging the gap between cutting-edge technology and everyday creativity. The content he created inspires the audience to embrace digital tools confidently.
View all ArticlesLeave a Comment
Create your review for HitPaw articles