The Best Approach for Nikon Z50 Noise Reduction in Photos
Imagine you are taking pictures at night during a festival your Nikon Z50. You increase the settings to capture more light, but the photos contain grain because of the low light. The details are muddled, and the colors are less accurate, making the picture look less sharp and unprofessional.
However, there are certain tools and techniques that can help you clear your images effortlessly. In this article, we will discuss different Nikon Z50 noise reduction methods that you can try.
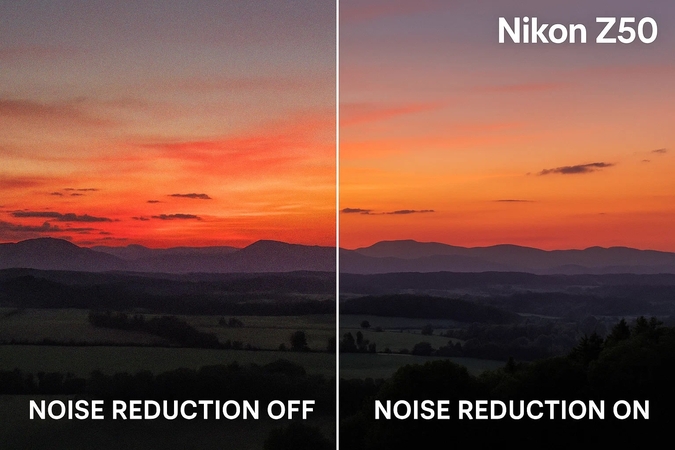
Part 1. What is Noise in Nikon Z50 Images and Why Does It Occur?
The noise in Nikon Z50 images is the fluctuation in color and other elements that appear as grains in the results. These are noticeable, particularly in low-light scenarios. Although the Z50 is a capable mirrorless camera with an APS-C sensor, it sometimes captures digital noise. Mentioned below are some of the reasons why this noise occurs when taking photos with this digital camera:
1. Low Light Conditions: The sensor of the camera might struggle to capture sufficient light in low-light scenarios, resulting in Nikon Z50 low-light performance issues.
2. Long Exposure: When you extend the shutter, it heats up the sensor and produces thermal noise.
3. Underexposed Pictures: The noise in the images becomes more visible when the pictures taken at night are brightened in post-processing.
4. Small Pixel Pitch: The camera has smaller pixels as compared to full-frame sensors, which can make it more prone to grain.
Part 2. Ways to Optimize Nikon Z50 Settings for Noise Reduction
If you have just bought this camera and do not know how to optimize the settings to reduce noise in the photos, refer to the section below:
1. High ISO Settings for Noise Reduction
This professional camera offers a built-in feature that automatically applies noise reduction when shooting in low light or at night. When you set it to normal, a balanced reduction without overly softening the images is maintained. Moreover, you can opt for high if you are shooting in an extremely dark environment. You can enable the Nikon Z50 noise reduction settings by following the instructions mentioned below:
Instructions. Place your camera in a steady position and focus on the scene you want to capture. Now, locate the numbers in the center tab of the camera's screen. Press the forward button to increase the ISO numbers and the reverse button to decrease it according to your preferences.
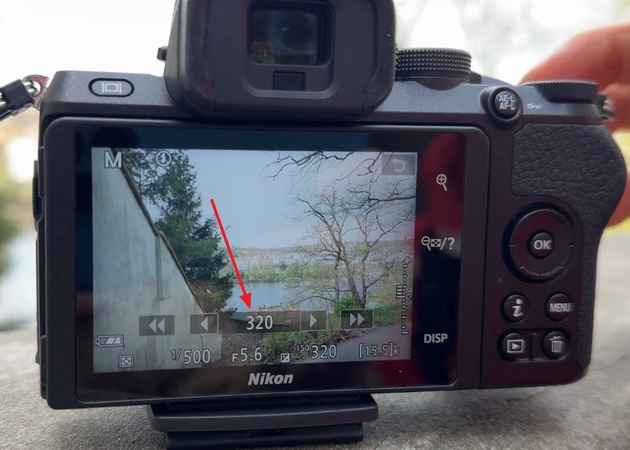
2. Auto ISO Sensitivity Control
When the camera is optimized to the Auto ISO settings, it maintains proper exposure while letting the camera adjust the ISO automatically. This reduces the chance of excessive noise in the results. Here is how you can enable the Auto ISO Sensitivity Control on this camera:
Instructions. Head to the Movie Shooting Menu of your camera and locate the "ISO Sensitivity Settings." Press the "Auto ISP Control" and tap on "On" to enable it successfully.
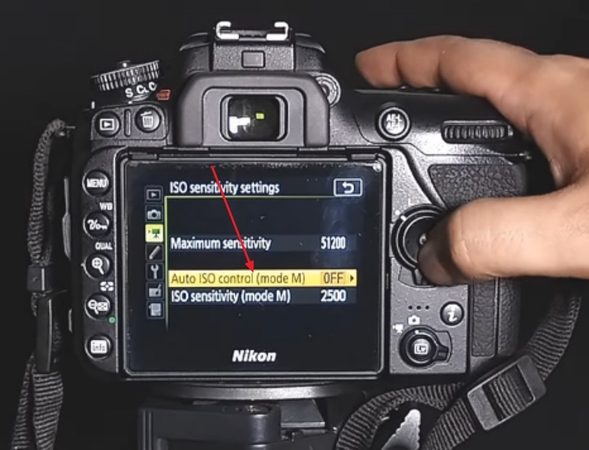
3. Useful Exposure Techniques
One of the most effective ways to reduce noise in your images is by shooting at the lowest ISO possible. Moreover, adjust your shutter speed to let in more light but use a tripod in low-light conditions to keep the camera steady. Here is a simple way to adjust the exposure of your Nikon Z50 low-light noise fix:
Instructions. Keep a tripod and adjust the aperture or shutter speed for better light, enable the exposure delay mode, and switch to Highlight-Weighted Metering from the settings.
Part 3. The Best Approach for Nikon Z50 Noise Reduction: HitPaw FotorPea
Did you capture an image from the Nikon Z50, and it contains compression and blur instead of the sharp details you were expecting? It does not look like anything you were expecting and demands a lot of amendments while you’re already short of time. When such a situation arises, HitPaw FotorPea rises as your best friend.
The tool lets you edit multiple photos simultaneously and can also compare and contrast the original and the result with each other. Users can save a file with a specific name and pick a folder to save it in before exporting. With the Upscale Model of HitPaw FotorPea, you can make your images look sharper and bigger than before.
Key Features
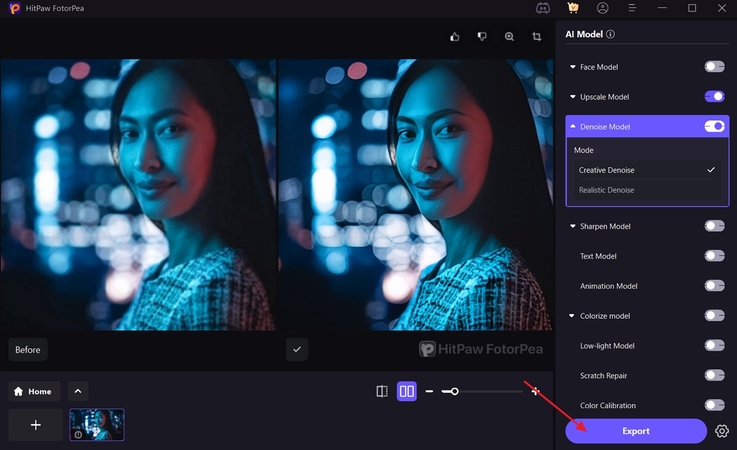
1. Extensive Denoising Models: In HitPaw FotorPea, users can access 2 kinds of denoising models: Creative and Realistic.
2. Color Calibration Model: With this model, you can fix those pictures that lack saturation and are underexposed.
3. Multiple Export Formats: The tool lets you export your images in multiple high-quality export formats.
Steps to Reduce Noise in Your Nikon Z50 Shots with HitPaw FotorPea
Below are the steps for Nikon Z50 photo noise reduction using HitPaw FotorPea:
Step 1. Open FotorPea for Nikon Z50 Noise ReductionStart by opening FotorPea on your device and click the “Enhance Photos Now” option to import your Nikon image to minimize noise.

Step 2. Turn the Denoise Model On and Press Preview
Next, turn the toggle on for the “Denoise Model” and other AI models, press the “Preview” option to completely remove noise from your Nikon image.
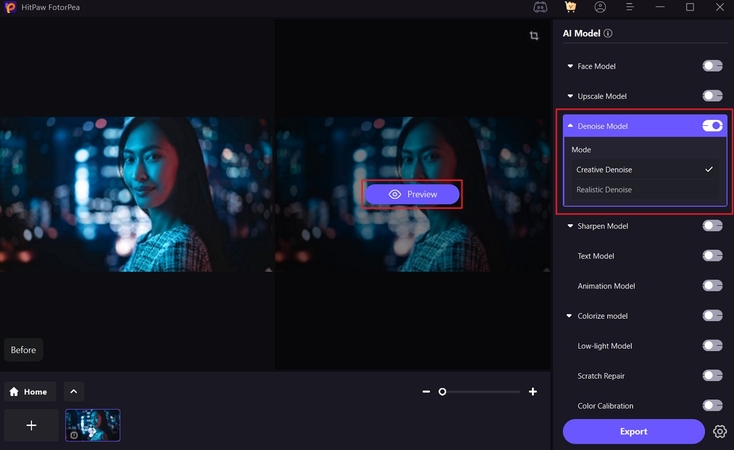
Step 3. Export Your Nikon Fixed Shot
Finally, when the FotorPea removes noise from your Nikon shot, compare it with the original one and download it through the “Export” option.
Part 4. The Ideal Camera Settings to Adopt to Take Noise-Free Photos
Here are the ideal camera settings that you must adopt to refine your Nikon Z50 denoise images:
1. ISO Settings
You can get the cleanest pictures with the lowest possible ISO setting. You can shoot in dim light to avoid taking grainy and unclear photos. If you use Auto ISO, in which the camera picks it, ensure to set a limit.
2. Aperture (f-stop)
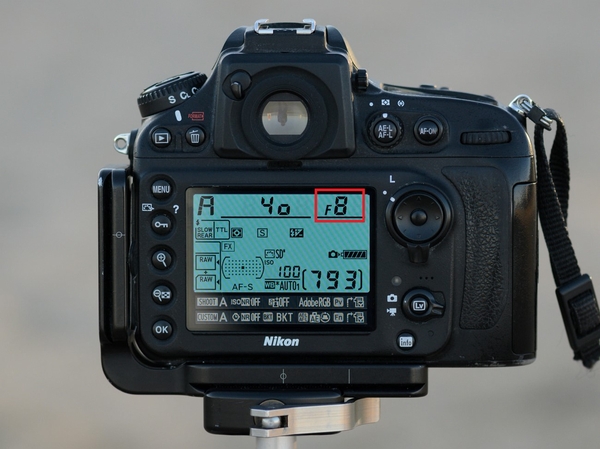
If you are taking pictures at night or in low light, always try to use a wide aperture. It lets in more light, so your camera would not have to increase the ISO, which helps to reduce noise. If you’re shooting landscapes, you must choose a smaller aperture like f/8.
3. Shutter Speed
In low light, you often need to use a slower shutter speed, which can keep your ISO low and reduce noise. When using slow shutter speeds, always put your camera on a tripod to avoid blurry shots. If you hold it by hand, keep the speed fast to make your photo look less sharp without noise.
4. Noise Reduction Settings
There are the best settings for noise control on the Nikon Z50, such as “High ISO NR” in the camera’s menu. When you turn this on, you can help the camera reduce noise right after taking a picture. Setting this feature to “Normal” will make your photo look neither too smooth nor too artificial.
5. Exposure Compensation
Sometimes, your camera might underexpose a scene and make your photo look too dark. However, to prevent that, you can use exposure compensation and set a small positive value to make the image brighter from the start.
Part 5. Practical Tips for Minimizing Noise in Nikon Z50 Photography
The following are the practical tips for Nikon Z50 ISO noise handling:
1. Always shoot in RAW format to capture maximum image data and reduce noise without losing quality.
2. Keep your ISO as low as possible for the given lighting conditions to prevent the sensor from introducing excessive noise.
3. Use additional light sources such as LED panels to ensure that your subject gets full light, so there is no need for high ISOs.
4. Use a tripod for low-light situations to allow for longer shutter speeds at lower ISOs and enable cleaner images.
Part 6. Extra Tips: Optimize Nikon Z50 Photography with Specific Gear and Techniques
Here are the extra tips for Nikon Z50 high ISO noise control, along with their specific gear and techniques:
1. Use fast lenses with wide apertures to gather lighter and lower the ISO settings.
2. Regularly clean your camera’s sensor to prevent dust from appearing in your pictures.
3. Keep a strong tripod and a remote shutter release to enable long exposures without a camera shake.
4. Utilize external lighting like LED panels to put light on your subject and reduce the need for high ISOs.
5. Save frequently used low-light or noise-optimized settings into custom banks for consistent results.
Conclusion
To conclude, this article elaborated on how to make Nikon Z50 noise reduction effectively without learning advanced editing. It also mentioned a tool, HitPaw FotorPea, that contains a Denoise Model for removing any kind of noise in seconds. With this tool, you can remove compression and blur from your multiple Nikon shots simultaneously.


 HitPaw Edimakor
 HitPaw VikPea (Video Enhancer)
 HitPaw Univd (Video Converter)


Share this article:
Select the product rating:
Daniel Walker
Editor-in-Chief
This post was written by Editor Daniel Walker whose passion lies in bridging the gap between cutting-edge technology and everyday creativity. The content he created inspires the audience to embrace digital tools confidently.
View all ArticlesLeave a Comment
Create your review for HitPaw articles