Ultimate Guide to Fujifilm X-S20 Photo Noise: Top Tools to Fix It
Many individuals, especially photographers, dream of capturing with the Fujifilm X-S20 camera. However, even this powerful mirrorless camera is not immune to the frustrating photo noise. Users have found themselves struggling to deal with Fujifilm XS20 photo noise and maintain clarity. Hence, in this guide, we'll break down exactly why this camera experiences noise in photos and reveal the top desktop and web-based tools that can reduce it.
Part 1. Why Does the Fujifilm X-S20 Exhibit Photo Noise?
Multiple factors could be causing photos from the Fujifilm X-S20 to turn out noisily, some of which are listed below:

1. High ISO Settings: The performance of X-S20 is exceptional up to an ISO setting as high as 1600, but beyond this range, noise gets introduced in the images.
2. Underexposure: Pictures with underexposed areas in them, especially those taken in shadows, can show noise after processing.
3. In-Camera Noise Reduction: Some XS20 camera settings for less noise could cause smudges in details, which leads to a considerable loss in the clarity of the image.
Part 2. Top 8 Tools to Reduce Fujifilm X-S20 Photo Noise - Desktop & Web
After going through the possible reasons for noise in X-S20 pictures, we will introduce you to 8 amazing tools for noise reduction below:
1. HitPaw FotorPea
While you’re struggling with noise in your X-S20 photos, HitPaw FotorPea offers a solution with its advanced AI-powered features like the Creative and Realistic Denoise Model. These features are designed for enhanced noise removal, along with other models, to upgrade photos like the Sharpen Model, designed for removing blurs. Apart from this, there is a color calibration option for enhancing colors in desaturated photos with exposure problems.
After enhancing the photos, users can preview the pictures before downloading them to the system. An option to zoom in on your pictures is also given to avoid missing any detail. There is an additional feature named Text Model, made for bringing clarity to images containing text. To fix grainy photos on XS20, there is an option in the advanced settings for High Resolution Acceleration as well.
Key Features
1. Upscale Model: For expanding and sharpening images, the Upscale Model can be used, which also allows customization of the aspect ratio.
2. Low-light Model: Pictures taken in low-light conditions can be treated with this tool to enhance their color clarity and sharpness.
3. Creative Denoise: This feature is designed for noise reduction while improving texture in pictures, resulting in enhanced quality pictures with less noise.
A Comprehensive Guide for Denoise Process Using HitPaw FotorPea
By following the given steps, you can remove noise from your XS20 pictures using HitPaw FotorPea:
Step 1. Enter Enhance Photos on First InterfaceEnter the main interface and press “Enhance Photos Now” to exit to the next screen.

Step 2. Add the Fujifilm Noisy Images to FotorPea
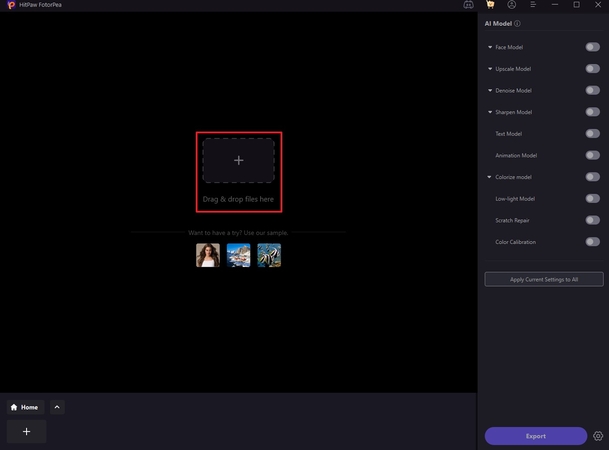
Next, import the relevant picture into the tool by clicking on “+” in the center of the screen.
Step 3. Choose the Denoise Feature to Remove Noise
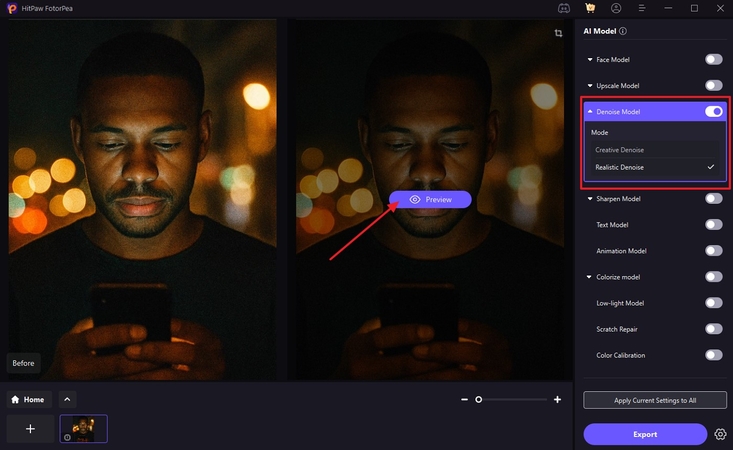
After this, turn on the “Denoise Model” and select the “Realistic Denoise” for eliminating noise from your XS20 photo.
Step 4. Check Results and Save
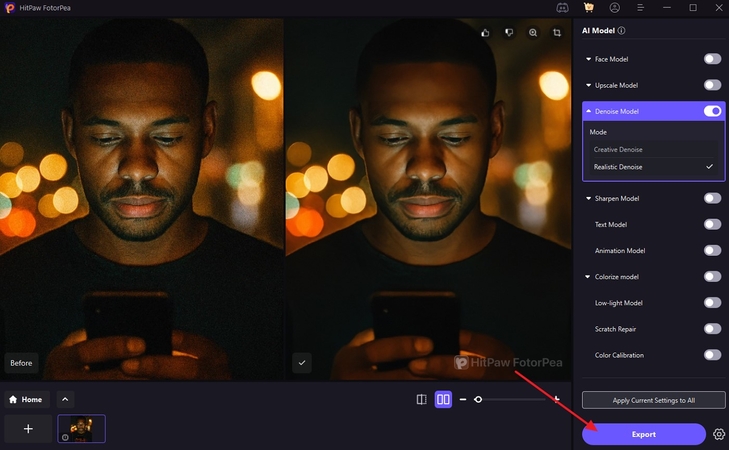
After you’re done with the denoise process, press “Export” to save the image to your computer.
2. Topaz DeNoise AI
With its AI-based technology, this tool automatically removes the noise from the blurry and pixelated images. Topaz DeNoise AI offers you an Unblur tool with various intensities, such as V1. V2 and V4, to choose from.

Key Features
1. Preview the image before you save it to check the before-and-after results.
2. Works with all types of images, whether it's a portrait, a landscape, or any other.
3. For Fujifilm XS20 noise reduction, it enables you to choose the picture subject.
Limitations- Requires a higher system and lags sometimes with older devices.
- The denoising process takes a lot of time, especially when working with batch photos.
3. Fotor
Whether it's a picture in JPG or HEIF, this tool allows you to sharpen the images. You can do an XS20 low-light grain fix, using its enlargement tool that enhances the photo to 2X or 4X.

Key Features
1. Refines the loss details in the picture to bring the Color and light.
2. Check the Before and After results to know if it's worth considering.
3. Offers a Magic Eraser to remove the unwanted objects from the image.
Limitations- Requires getting a subscription plan to access advanced tools and effects.
- The payment for this tool cuts automatically, which has frustrated many users.
4. Adobe Lightroom Classic
If you want to reduce image noise in the Fujifilm XS20, use this tool, which increases the photo quality with its Denoise feature. You can adjust the strength of how sharp you want your pictures to be using the toolbar.

Key Features
1. Recognize the facial features, such as eyes, skin, and others, to enhance them.
2. It offers layer editing, which lets you achieve higher-quality results.
3. Has an HDR feature that sharpens the edges of the subject in the photo.
Limitations- A bunch of tools on its main interface can overwhelm users, especially beginners.
- Limited editing options can make users look for an alternative.
5. PhotoGrid
Another tool for the Fujifilm XS20 ISO noise solution is this, which lets you turn your blurry photos into 4k Ultra HD quality. With its Batch Edit feature, you can enhance more than one picture at a time.

Key Features
1. Let you download the enhanced photos without any watermark or logo.
2. Enhance low-quality historic pictures to turn them into HD ones.
3. Offers a toolbar to adjust contrast, lighting, and brightness of the photos.
Limitations- Unnecessary ads that pop up while using the free version can be distracting during the edit.
- The iOS version of the tool has limited features compared to the Android version.
6. Adobe Express
The best denoise tool for Fujifilm XS20 is Adobe, which lets you sharpen the image with its shadows and brightness sliders. You can quickly change the enhancement and warmth of the photo to make it smoother.

Key Features
1. Blur the background while keeping the main subject sharp and high quality.
2. Use the basic features of enhancement free without any subscription plan.
3. Provides other AI tools, such as text-to-image, for content creators.
Limitations- For beginners and non-technically savvy individuals, the interface can be confusing.
- Unexpected menus pop up when you do specific actions, which can be frustrating.
7. Canva
With the auto-adjust tool, Canva immediately enhances the photo and extracts the noise grains from the images. It allows you to adjust the brightness and contrast of the picture to make it clean and sharp.

Key Features
1. Fix grainy photos on XS20 with its Image Upscaler that unblurs the images with the Sharpness and Clarity tool.
2. Preview the image results, and see if there's a need for further editing.
3. Choose to sharpen the whole image or simply the subject.
Limitations- With limited free exports, users need to get the subscription plan.
- While downloading the file, there is a chance that it lowers its quality.
Part 3. Optimizing Fujifilm X-S20 Settings to Minimize Photo Noise
Now that you know the noise reduction apps for XS20, let’s adjust the camera settings with the recommendations in the given table:
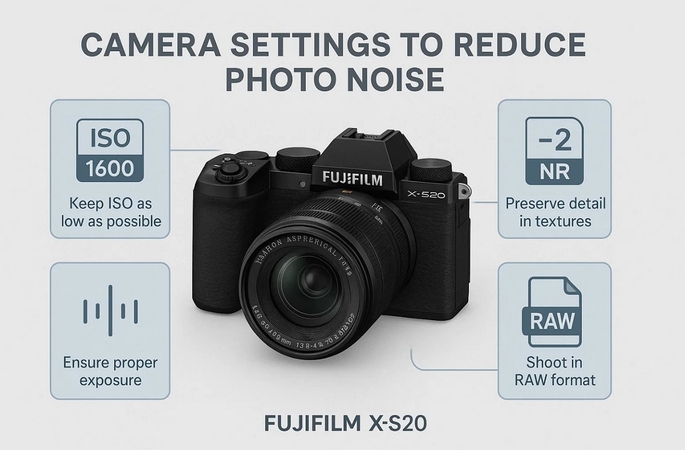
| Setting | Recommendation | Explanation |
|---|---|---|
| ISO | Keep ISO as low as possible: ideally up to 1600 | It rescues the camera sensor sensitivity to light, resulting in cleaner images. |
| Noise Reduction | Set in camera noise reduction to -2 or lower | Reduce the noise reduction setting, which can preserve more image details, especially in texture and delicate patterns. |
| Exposure | Check the proper exposure during shooting | Proper exposure reduces the need to brighten shadows in post processing, which can amplify noise. |
| File Format | Shoot in RAW format | RAW files retain more image data, allowing for more effective noise reduction during post processing without losing detail. |
Conclusion
In conclusion, this guide has covered all the top tools for Fujifilm RAW noise cleanup. Plus, with the tips of ideal camera settings that you can use to avoid the blurriness at first. Among those tools, HitPaw FotorPea stand out the most as they are more reliable and easier to use than others.


 HitPaw Edimakor
 HitPaw VikPea (Video Enhancer)
 HitPaw Univd (Video Converter)
![[Step-by-Step] How to Use Object Eraser on iPhone Photos](https://images.hitpaw.com/topics/fotorpea/guide-to-use-iphone-object-eraser.jpg)

Share this article:
Select the product rating:
Daniel Walker
Editor-in-Chief
This post was written by Editor Daniel Walker whose passion lies in bridging the gap between cutting-edge technology and everyday creativity. The content he created inspires the audience to embrace digital tools confidently.
View all ArticlesLeave a Comment
Create your review for HitPaw articles