How to Fix Grain from XT30 Night Shots Using Smart Tools and Settings
For photographers who aim to capture the highest-quality and portfolio-ready images, graininess is a significant issue. It's especially troublesome during night shots as it comes with unwanted side effects, even if you have a Fujifilm X-T30. Therefore, utilizing innovative AI-based noise reduction tools can help you fix grain from XT30 night shots. This article provides suitable camera settings, top fixes, and more.
Part 1. Why Do Fujifilm X-T30 Users Experience Grain in Night Photography
Digital noise is a visible distortion that appears randomly on your picture, mainly noticeable in nighttime photography. It can be created due to insufficient light reaching the sensor or getting insufficient signals during low-light pictures. Before knowing how to remove noise from XT30 night photos, one should understand why it gets grainy and the limitations of the XT30:
Impact of High ISO and Long Exposure
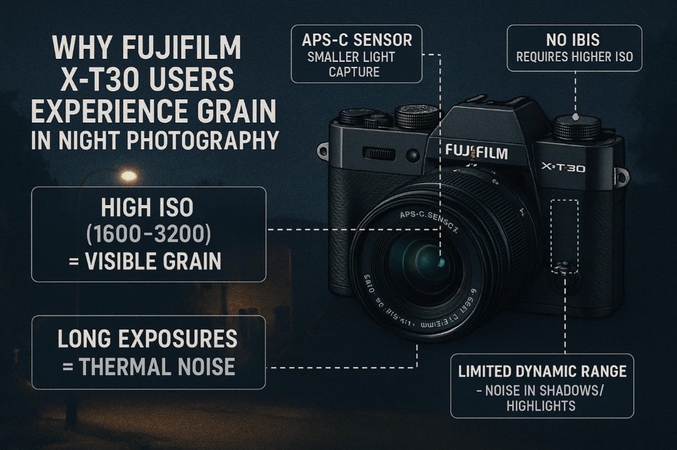
In low-light photography, users typically brighten up by keeping the ISO high and using more prolonged exposures. Keeping the ISO around 1600-3200 can add prominent grain or unwanted texture. On the other hand, long exposures can heat up the device, which can ultimately create thermal noise in darker areas.
Limitations of X-T30
1. This camera possesses an APS-C sensor, which allows less light to gather compared to other cameras.
2. Dynamic rage doesn't save highlights and shadows, which can create noise in post-processing.
3. X-T30 doesn't have In-Body Image Stabilization, which ultimately results in high ISO.
4. It doesn't offer focus on the main character, due to which it is a blurred photo at night.
5. This camera doesn't provide an external battery to use in outdoor shoots.
Part 2. How to Utilize Fujifilm X-T30's Built-In Settings to Reduce Noise
When you want to improve the XT30 image quality in low light, the best thing to do is personalize the Fujifilm built-in camera settings, given as such:
Method 1. Adjusting the Noise Reduction Settings
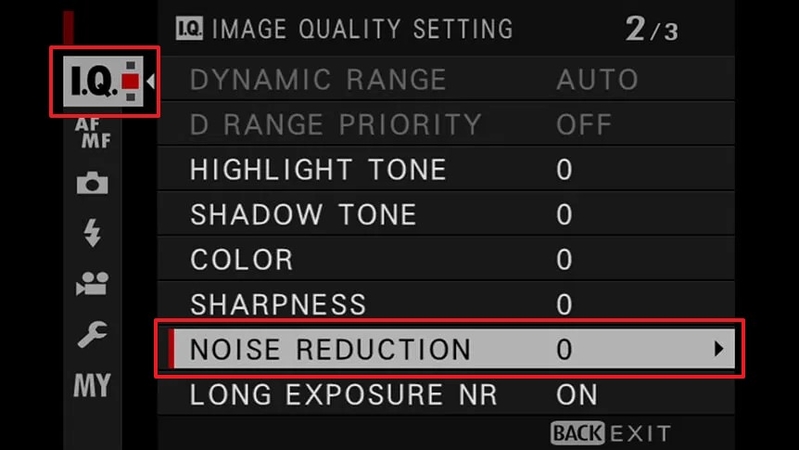
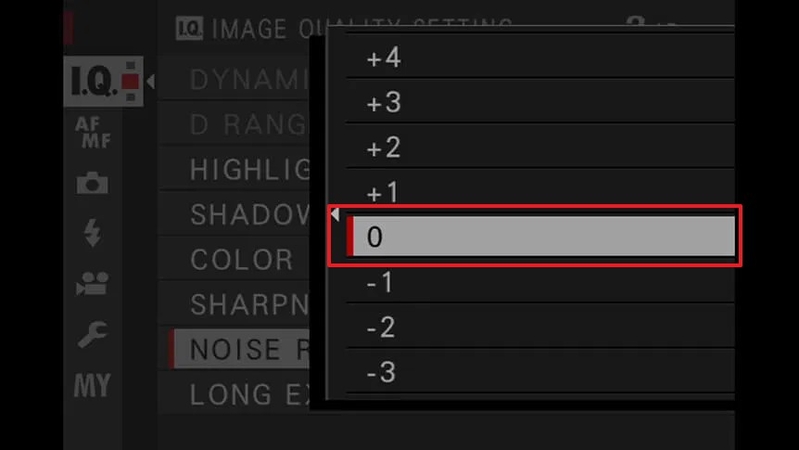
The X-T30 allows you to fine-tune noise reduction levels from -4 to +4, thus retaining more details with natural textures. Moreover, it gives you control and balances the sharpness and cleanliness of images. Now, let's learn how to remove noise from XT30 night photos by adjusting the noise settings on your camera with these steps:
Step 1. On the Fujifilm X-T30 camera, head to the “Image Quality Settings” and choose the “Noise Reduction” option.
Step 2. Now, choose between the given values, +4 to -,3 from the pop-up menu to fix the setting.
Method 2. Utilizing Long Exposure Noise Reduction
With the adjustment of exposure settings, photographers can reduce noise that builds up during night shots, as it works by capturing a second dark frame. Also, this setting significantly improves the image quality of night images and light trails. So, follow the given steps and fix the grain from the XT30 night shots:
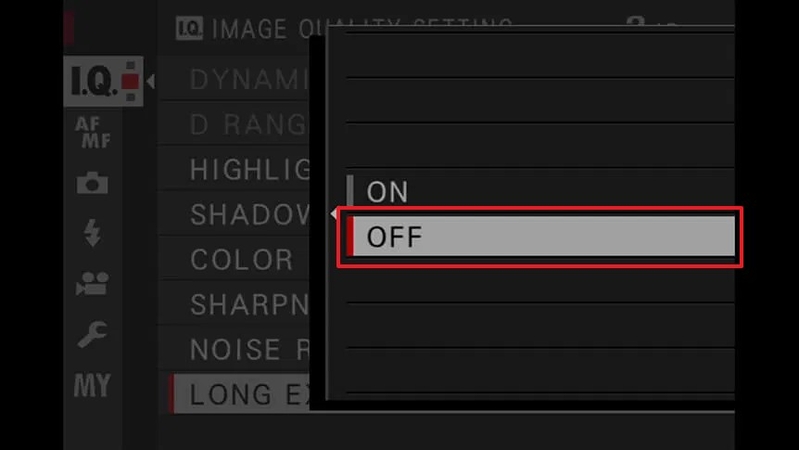
Step 1. From the “Image Quality Settings,” select the “Long Exposure NR” option to open a small side menu.
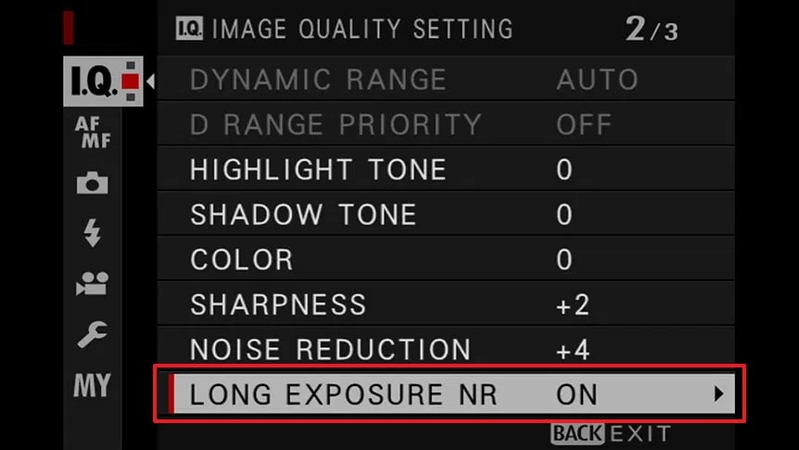
Step 2. Next, turn the setting “OFF” to reduce the noise from nightly shots.
Method 3. Applying Custom Film Simulation Recipes
On the Fujifilm X-T30, film simulation recipes help optimize tone, color, shadows, and graininess to achieve a specific look. For example, Jeff Davenport’s Night recipe includes settings of Noise Reduction: -4, Sharpness: +1, and Grain Effect: Weak. To achieve this level of precision and clean images, add your own custom file simulation:
Step 1. After clicking the “I.Q.” icon from the left panel, select the “Image Quality” option to proceed.
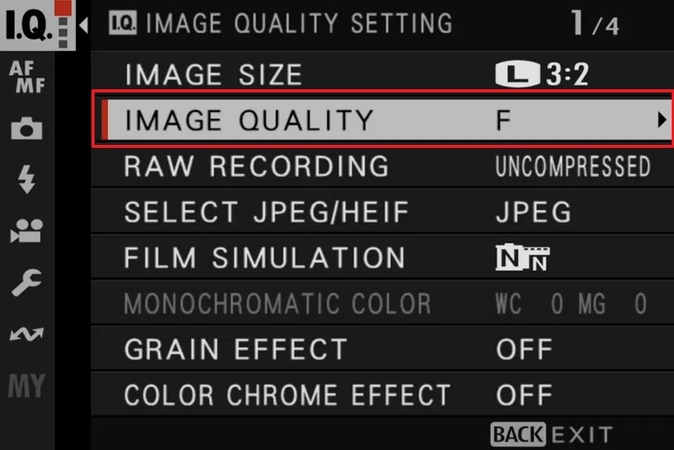
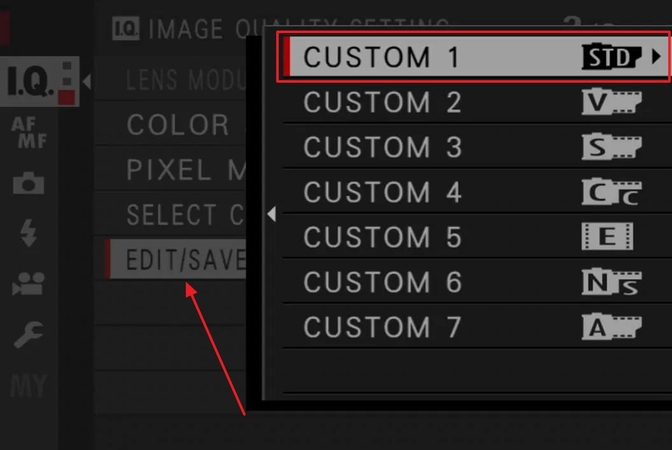
Step 2. After that, choose “Edit/Save Custom Settings” and pick a custom preset number to select the desired camera settings. Once done, confirm the options by pressing the “OK” button.
Part 3. How to Fix Noisy XT30 Night Pictures in One Click: HitPaw FotorPea
Suppose that after using the methods mentioned above to fix the Fujifilm XT30 night grain, the outcome is still highly pixelated. To address this issue, there are many upscaling tools available, like HitPaw FotorPea, to enhance the XT30 image quality in low light. With its Sharpness Model, one can sharpen the picture details by removing motion blur and artifacts. Additionally, this tool lets you edit all blurred pictures at once with its Batch Processing System.
This tool allows you to sharpen the face with its Face Model, which offers different modes such as Soft, Soft(V2), and Sharp. One can also Preview the outcome as well as compare it with the original one before exporting. Moreover, within the setting option, users can select the quality from Low, Medium, and High. With its Low Light Model, you can brighten the nighttime pictures without ruining its vibe.
Key Features
1. Denoise Model: This feature provides different modes, such as "Creative and Denoise," to remove any kind of noise and compression effects in night shots.
2. Upscale model: By using its Upscale Model, you can enhance the night shot image by enlarging it without ruining its original quality.
3. Color Calibration: This tool allows adjusting colors within the desaturated and underexposed areas of nighttime photos.
Comprehensive Guide to Remove Grains while Using HitPaw FotorPea
Now that you want to upscale your pixelated images follow the following guide to reduce grain in Fujifilm XT30 low-light images using HitPaw FotorPea:
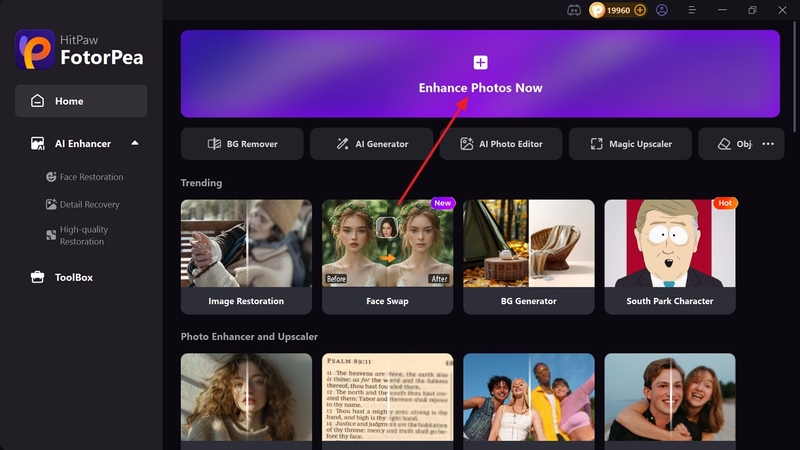
Step 1. Select Enhance Photos Now on the Home PageAs you enter the homepage, tap on the “Enhance Photo Now” button to get into the enhancement interface on the next screen.
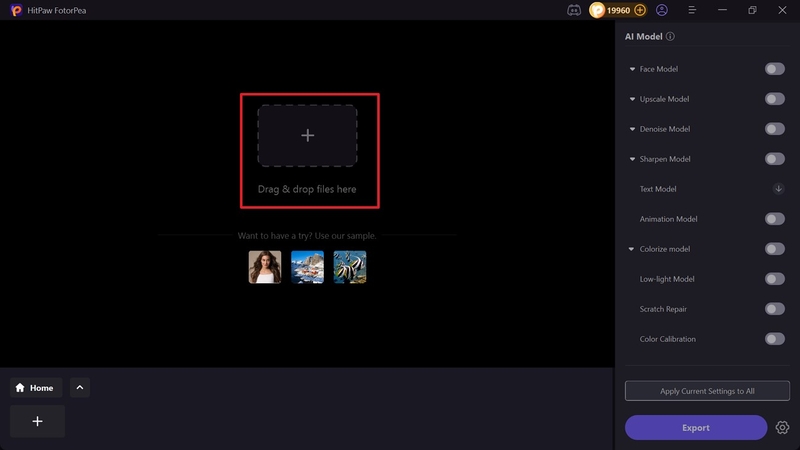
Step 2. Insert the Pixelated Images From the Device
Within this interface, tap on the “+” icon to get the pixelated image imported from the file explorer.
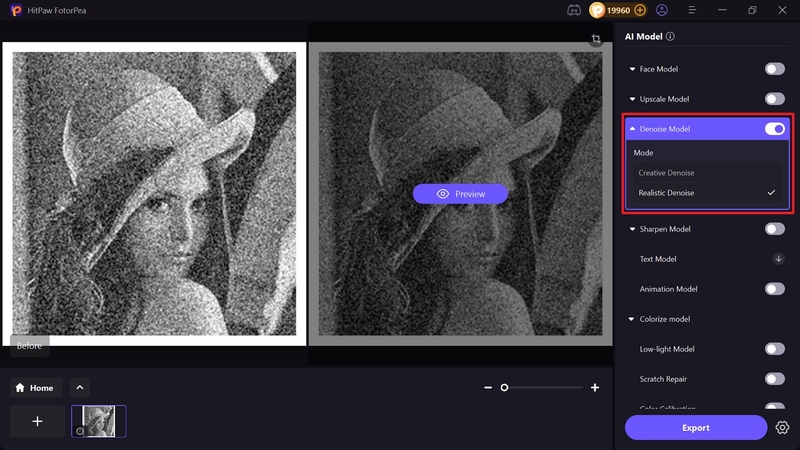
Step 3. Enable the Desired Mode Within the Denoise Model
As the image is added, toggle the “Denoise Model” to select “Realistic Denoise” mode to remove any unwanted noise. Now, hit the “Preview” button located on the right image to see the upscaled outcome.
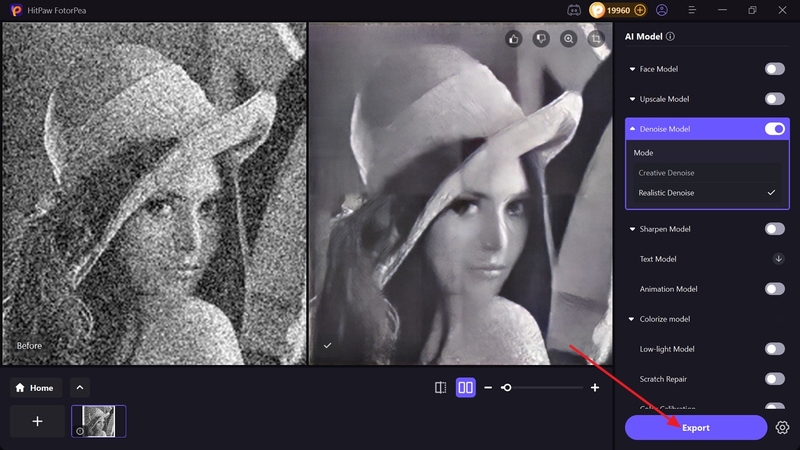
Step 4. Render the Upscaled Outcome to the Desired Folder
Finally, click on the “Export” button to get the image saved to the desired folder on your device.
Part 4. What Are the Best Camera Settings Tips to Reduce Grain in XT30 Night Photography?
As we have discussed, there are different methods to remove noise from XT30 night photos; keep in mind that correct camera settings can also reduce noise, which are discussed below:
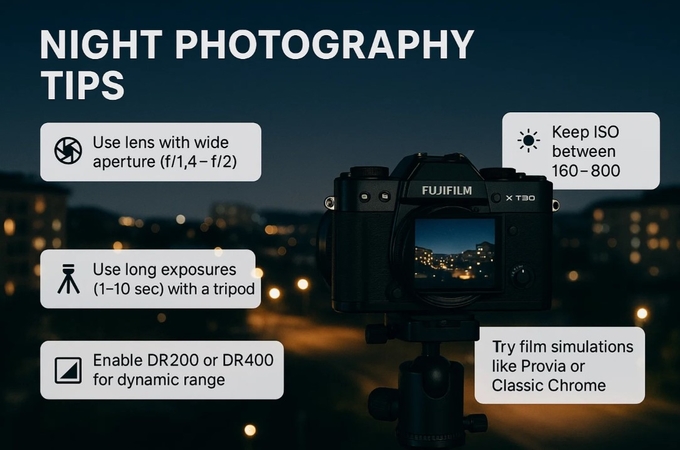
1. Lens Having a Wider Aperture: One should use a lens with a wider aperture, like f/1.4, to let in more light and capture sharper, more detailed images.
2. Lowest Possible ISO: On the Fauji XT30, always keep the ISO between 160-800 to make the image clear and brightness balanced.
3. Using Tripod for Long Exposures: In low light, always go for a long shutter speed of max 10 sec to let more light in, which creates shakiness, so use a tripod to avoid that.
4. Dynamic Range Settings: Photographers can use the DR200 or DR400 modes to balance the highlights and shadows, specifically in nighttime photography.
5. Experimenting with Film Simulations: Use its different simulation modes to remove noise, such as "Provia" for a natural look and "Classic chrome" for a film-like feel.
Conclusion
Summing up, this article provides a guidebook to reduce grain in Fujifilm XT30 low-light images, along with methods and expert tips to reduce grainy texture from pictures. However, sometimes, after following all guidelines, you still get unsatisfactory results, and you can't do anything. So, in those situations, we have introduced you to a user-friendly tool: HitPaw FotorPea is the best option. Using its advanced features, this tool lets you upscale pictures without ruining their actuality.


 HitPaw Edimakor
 HitPaw VikPea (Video Enhancer)
 HitPaw Univd (Video Converter)
 ![[Step-by-Step] How to Use Object Eraser on iPhone Photos](https://images.hitpaw.com/topics/fotorpea/guide-to-use-iphone-object-eraser.jpg)


Share this article:
Select the product rating:
Daniel Walker
Editor-in-Chief
This post was written by Editor Daniel Walker whose passion lies in bridging the gap between cutting-edge technology and everyday creativity. The content he created inspires the audience to embrace digital tools confidently.
View all ArticlesLeave a Comment
Create your review for HitPaw articles