Controlling Camera Sensor Noise: Measuring All Options
Capturing moments looks simple but grainy results make it hard to document memories. The limitations in the image sensor’s performance cause random distortions that do not reflect the actual scene. This electronic error can be confused with film grain, a natural result of the film’s chemical makeup used for aesthetic purposes.
It is essential for photographers to know the nuances of this artifact and its distinguishing factors from film grains. The article below helps beginners and experts learn about camera sensor noise and how it can be removed from images.
Part 1. Types of Camera Sensor Noise: A Detailed Guide
Before you discover the methods of getting rid of camera grains, it is important to learn about the main types. The following table briefly and comprehensively describes each digital noise in cameras:
| Types | Description | Appearance | Impacts on the Image | Common Areas Affected |
|---|---|---|---|---|
| Luminance Noise | Variations in brightness levels across pixels | Looks like grainy black-and-white speckles | Reduces image clarity and detail, but is often less visually distracting | Mostly in shadows, sometimes midtones |
| Chrominance Noise | Variations in color across pixels | Appears as colored blotches or speckles in red, green, and blue | Very noticeable and distracting, reduces color accuracy | Mostly in shadows, occasionally highlights |
| Sensor Noise | Digital interference | Random, artificial specks | Degrades image quality | Entire image |
| Grain | Chemical texture in film | Uniform texture | Can be aesthetically pleasing | Evenly across the image |
Part 2. The Main Causes of Camera Sensor Noise in Images
Fixing the image sensor noise gets easier when you have an idea of the causative factors. The list below features the main causes of this issue in photos:
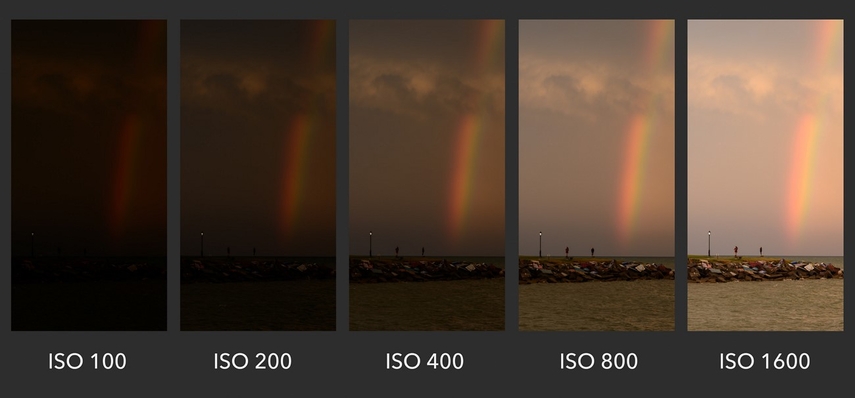
1. The Contribution of ISO Sensitivity
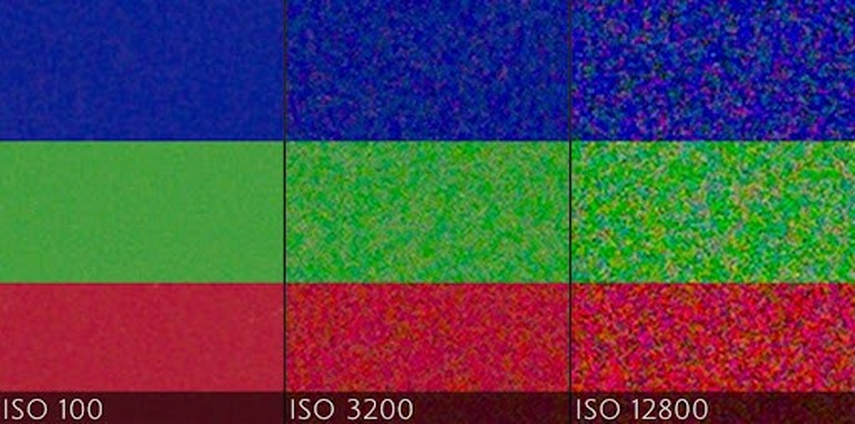
By increasing the ISO settings, your camera brightens the image by boosting the sensor’s response to light. Low-light conditions call for a higher value of ISO, but results in a grainy image output.
2. The Role of Sensor Size
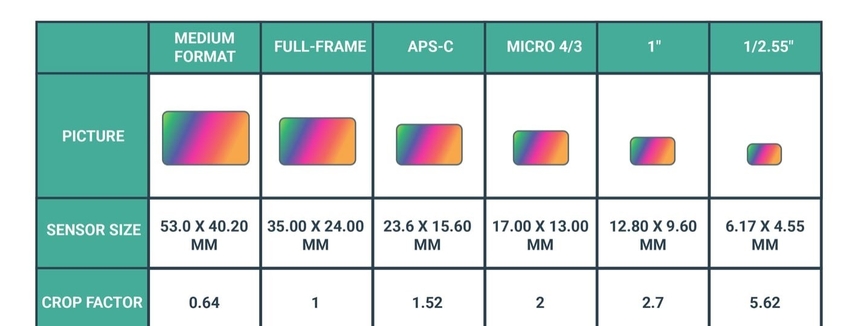
When a small sensor has a high megapixel count, its tiny pixels don’t get much light and make your photos noisy. Therefore, professional cameras have bigger sensors and perform exceptionally well in low light.
3. Sensor Heat and Exposure Time
Heat generated during long exposures can cause thermal noise, which appears as random colored pixels or patterns in an image. This thermal energy interferes with the sensor’s ability to accurately capture light, leading to digital noise in cameras.
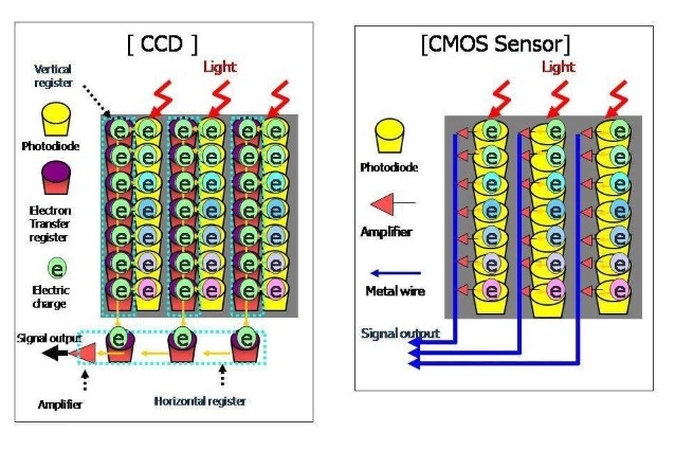
4. CCD vs CMOS Sensor Technologies
The CCD sensors are known for their low noise and even image quality, but they require more electricity to run. Modern cameras rely on CMOS sensors because they offer fast performance without eating up battery life.
Part 3. Camera Noise Reduction Techniques: Featuring Basic Options
Now that we understand the intricacies of this grain, let’s dive into the following list of potential solutions:
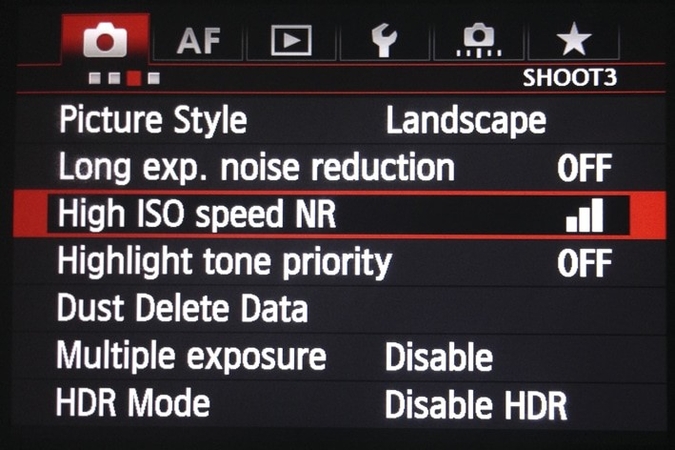
1. Smart Camera Processing: In-Camera Noise Reduction
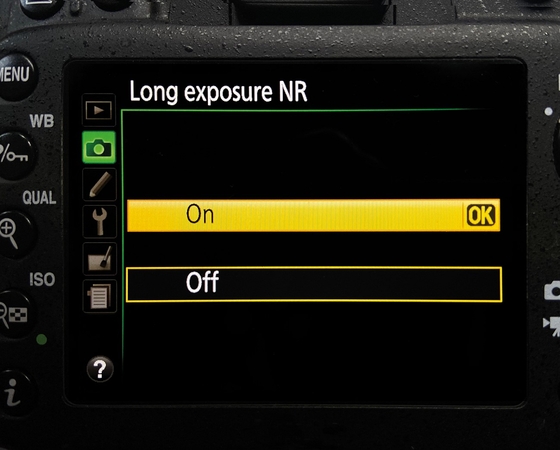
Modern digital cameras have built-in noise reduction algorithms that work during long exposures or high ISO shooting. These algorithms detect and even out random noise patterns in the image to preserve important details. Therefore, it is always ideal to choose this technology during photography.
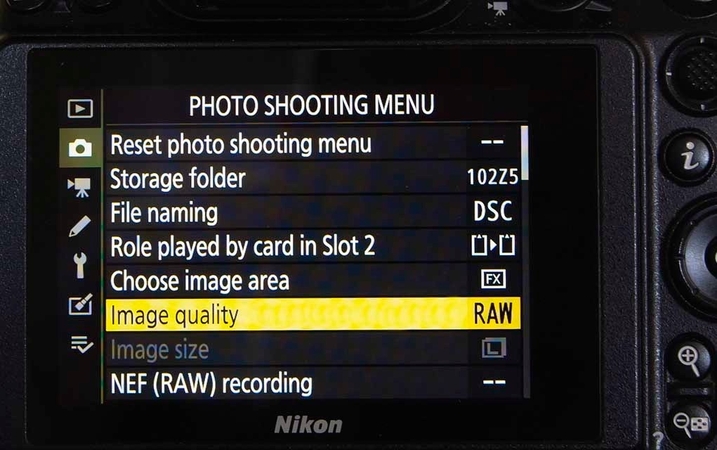
2. RAW Advantage in Editing
Shooting in RAW keeps more image detail and gives you better control over noise when editing. For this reason, it is recommended for photographers to prefer RAW images over JPEG for camera noise reduction.
3. Mastering Settings
Keeping ISO low gives you better image quality and a slow shutter helps keep things bright. A wide aperture adds light and cuts down on noise. Balancing these settings helps you get sharp photos with less grain.
4. The Power of Exposure and Lighting
Underexposed images often require brightening in post-processing to amplify noise in shadow areas. With the right exposure, the camera reduces the need for heavy editing, preserves cleaner image data, and reduces the noise.
Part 4. How to Reduce Camera Sensor Noise in Low Light
As mentioned, low-light conditions are more likely to contribute to camera sensor noise. The instructions below explain the method for reducing this noise for better quality outcomes:
1. Stabilization and Light: Using a tripod help stabilize the camera, allowing for slower shutter speeds without motion blur, which lets you keep ISO settings low and reduce noise. Longer exposures give the sensor more time to collect light, resulting in cleaner, brighter images in dark conditions.
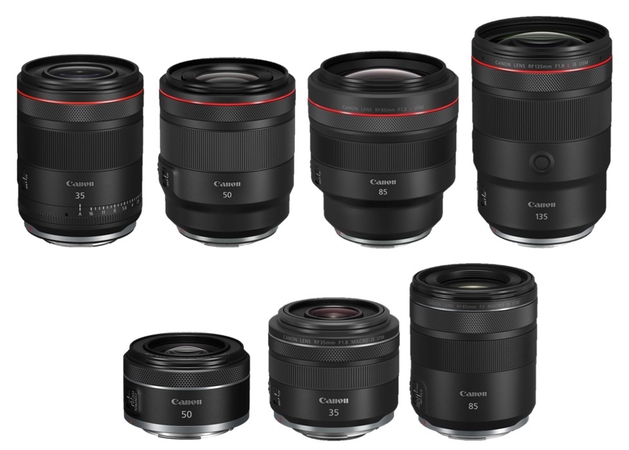
2. Wide Aperture Lenses: Fast lenses with f/1.8 or f/2.8 apertures let in more light, allowing you to shoot at lower ISO settings in low-light conditions. This significantly reduces digital noise in dim environments and helps you maintain the quality.
3. Using Noise Reduction Software: If you cannot set the high photography standards mentioned above, leave the noise reduction to the post-processing. You can use image sensor noise reduction software and enhance the image quality by removing the grain and other artifacts.
4. Street vs Indoor Event Photography: In low-light street photography, you should rely on fast lenses and wide apertures and use the available light. In contrast, indoor event photography often uses external lighting or high-quality noise reduction to capture expressions and action.
Part 5. How to Improve Post-Processing Enhancement of Camera Sensor Noise in Photos?
If the solutions mentioned above are not practical for you, you must use a post-processing enhancer for better outcomes. A platform like HitPaw FotorPea can help you reduce the grain significantly while enhancing the overall quality as well. With numerous AI face models, this tool caters to all causes of image distortion. The one-click enhancement solution allows for a streamlined workflow while effectively reducing the noise.
Your image quality upgrades can be further sped up by using the batch enhancement utility. Once you have executed the camera noise reduction, it can be exported in your desired settings. From the image quality to the destination folder, all the specifications can be mentioned.
Key Features of HitPaw FotorPea
1. Realistic Denoise: Using this desiccated AI model, users can enhance the image with extensive grains and restore the original details.
2. Old Photo Restoration: If you have a grainy, vintage image on the phone, use this tool to upgrade its quality and remove the noise.
3. AI Image Enlarger: The Image Enlarger utility of HitPaw FotorPea allows you to upscale the image to 2K, 4K, and 8K.
A Complete Demonstration of Reducing Camera Sensor Noise Using HitPaw FotorPea
Follow the instructions below to learn how to reduce camera sensor noise in low light using HitPaw FotorPea:
Step 1. Start by Entering the Enhancement InterfaceFirst, open the main interface of HitPaw FotorPea and select the “Enhance Photos Now” button to enter the next screen.

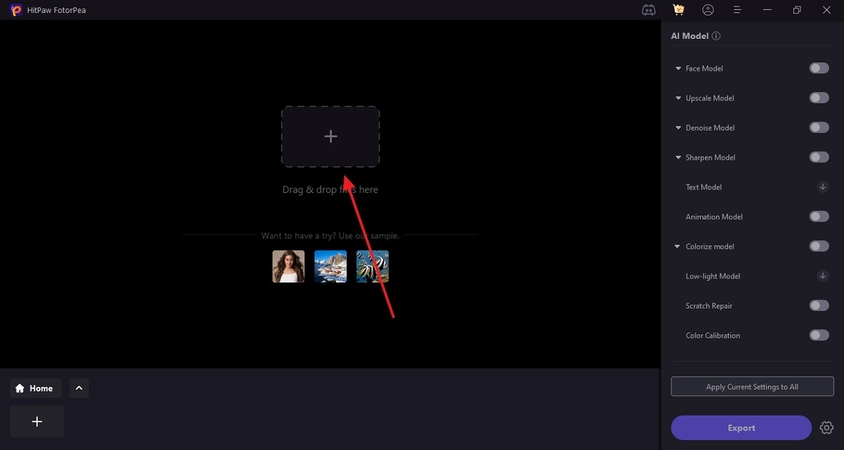
Step 2. Select and Import a Picture with Camera Sensor Noise
Using the “+” button on the next screen, select and import the images from your device that have camera sensor noise.
Step 3. Select the Realistic Denoise Model for Enhanced Correction
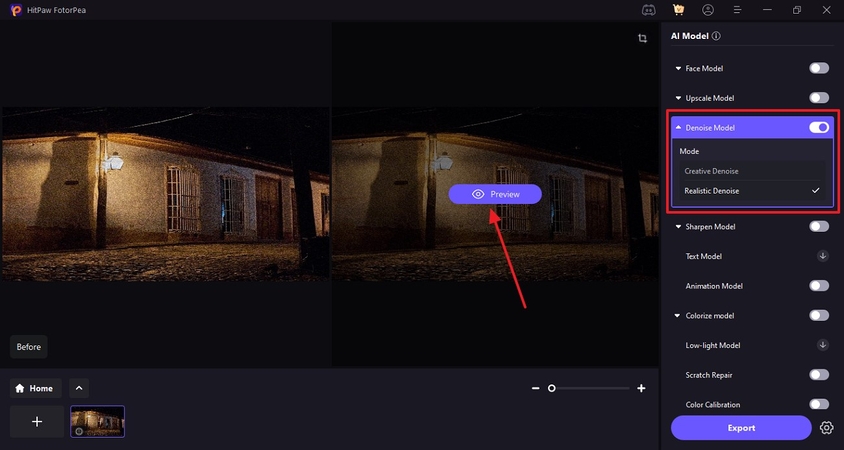
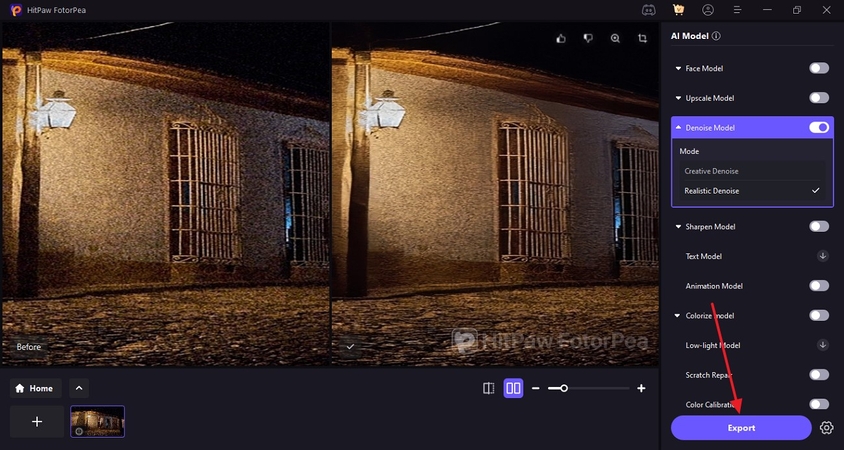
As the image appears on the screen, refer to the right panel and select the “Realistic Denoise” model by enabling and expanding the “Denoise Model.” Select the “Preview” button on the result image to see the enhanced outcome.
Step 4. Save the Enhanced Picture After Removing the Camera Sensor Noise
As soon as the enhanced image appears on the right side, select the “Export” button to save it to the device.
Part 6. Sensor Noise Performance by Camera Type
The digital noise in cameras performance varies with each camera type, a concept explained below:
1. Comparing Camera Classes: Entry-level DSLRs and mirrorless cameras have smaller APS-C sensors, which produce more noise in low-light conditions. While the Mirrorless cameras have more modern sensor designs and in-body image stabilization, which can help reduce noise at similar ISO settings.
2. How BSI Sensors Reduce Noise: Backside-illuminated sensors reposition the wiring behind the light-sensitive photodiodes, allowing more light to reach each pixel. This design increases the sensor’s efficiency and improves its performance in low-light situations by reducing all types of noise.
3. Innovations Transforming Low-Light Performance: Technologies like dual gain ISO, stacked sensors, and AI-driven noise reduction transform how cameras handle low light. These innovations allow photographers to shoot in darker environments with less dependence on artificial lighting and without sacrificing image quality.
Conclusion
Conclusively, this article was a detailed guide on camera sensor noise and the factors that contribute to the formation of this artifact. We looked into some practical tips on preventing and getting rid of this noise, including the use of AI image enhancers. HitPaw FotorPea is an effective noise reduction tool that offers a useful Realistic Denoise model to remove deep noise from your images.


 HitPaw Edimakor
 HitPaw VikPea (Video Enhancer)
 HitPaw Univd (Video Converter)


Share this article:
Select the product rating:
Daniel Walker
Editor-in-Chief
This post was written by Editor Daniel Walker whose passion lies in bridging the gap between cutting-edge technology and everyday creativity. The content he created inspires the audience to embrace digital tools confidently.
View all ArticlesLeave a Comment
Create your review for HitPaw articles