How to Use Content-Aware Fill in Photoshop in the 2026 Version?
With the new updates by Adobe Photoshop, Content-Aware Fill has caught user's eye to retouch images simply and fast. Whether you need to eliminate distracting elements or extend backgrounds, this powerful tool applies advanced AI to intelligently blend pixels. The feature essentially provides the user with even more editing capabilities than ever before. Thus, if you are wondering how to use Content-Aware fill in Photoshop, this guide will cover it all.
Part 1. What Is Content-Aware Fill in Photoshop?
Before you dive into how do you use Content-Aware fill in Photoshop, first you should be aware of its basics, which are as follows:
Definition & Purpose
Content-Aware Fill is a powerful editing tool in Photoshop that allows users to remove unwanted elements or fill in missing areas of an image seamlessly. The main purpose of this tool is to retouch photos faster and more naturally by automatically sampling and blending textures. As compared to Adobe Photoshop's manual method, this tool saves significant time for editors by utilizing its AI technology.
How It Works
It uses advanced AI-powered texture and color matching to analyze the pixels around a targeted area and intelligently fill or replace that space. When users select an unwanted area, Photoshop examines the surrounding image to generate pixels to fill the space that matches the background. It can be efficiently used for removing objects, blemishes, stains, or even reconstructing complex backgrounds.
Popular Uses
After learning its basics, now let's explore its popular usage while knowing how to use Content-Aware fill:
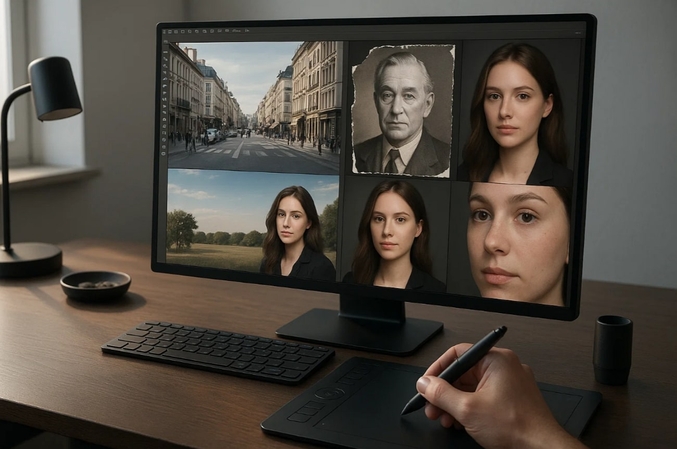
- 1. Removal of Unwanted Objects:This is a widely applied technique to remove distracting objects in the pictures, like people, cars, or power lines.
- 2. Repairing Torn Old Photos:Old photographs are repaired by editing the missing parts using Content-Aware Fill in a matter of seconds.
- 3. Expanding Backgrounds:Users will use the tools to enlarge the backgrounds, such as sky or landscapes, to enhance composition or to get an aspect ratio suitable for social media.
- 4. Eraser of Shadows:You can clear undesired shadows or reflections to make a portrait image look more professional.
- 5. Removal of Blemishes:The skin can be used to clean blemishes on the face, such as acne or scars, so that a natural skin is maintained.
Part 2. How to do Content-Aware Fill in Photoshop: Step-by-Step Guide
Now, let's explore a detailed expert stepwise guide to know how to use the Content-Aware tool in Photoshop:
Step 1. Open Your Image in Photoshop
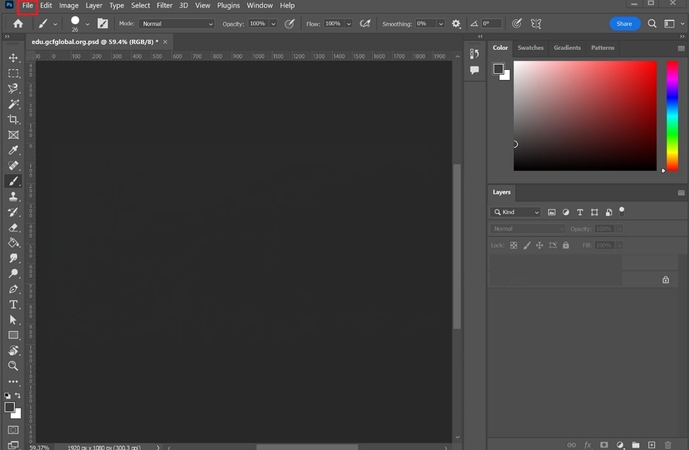
Begin by opening the Adobe Photoshop and clicking on the "File" menu to import your desired image to the main interface.
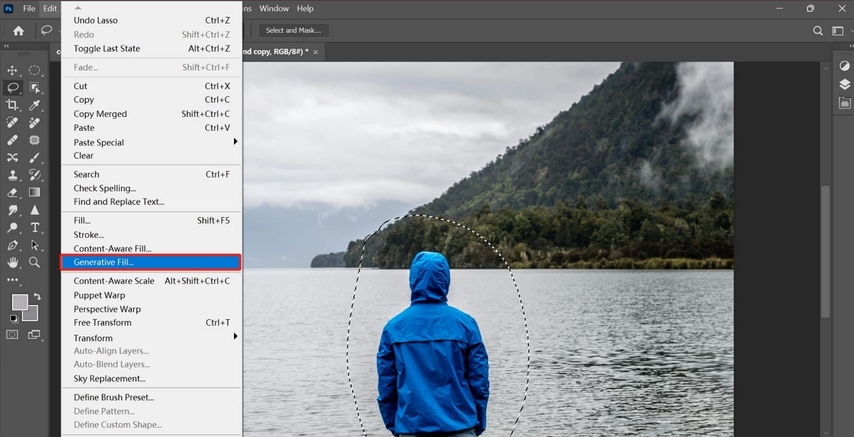
Step 2. Make a Selection
Now, select the "Lasso" tool available on the left tab to roughly outline the cloud area of the inserted image.

Step 3. Apply Content-Aware Fill
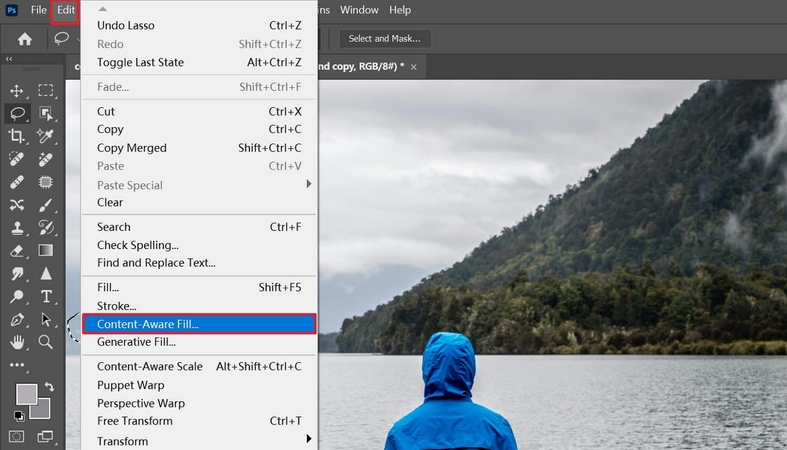
Afterwards, lead into the "Edit" menu available on the top, and select the "Content-Aware Fill" option from the given options. It will instantly fill the targeted area according to the background pixels.
Step 4. Refine the Fill
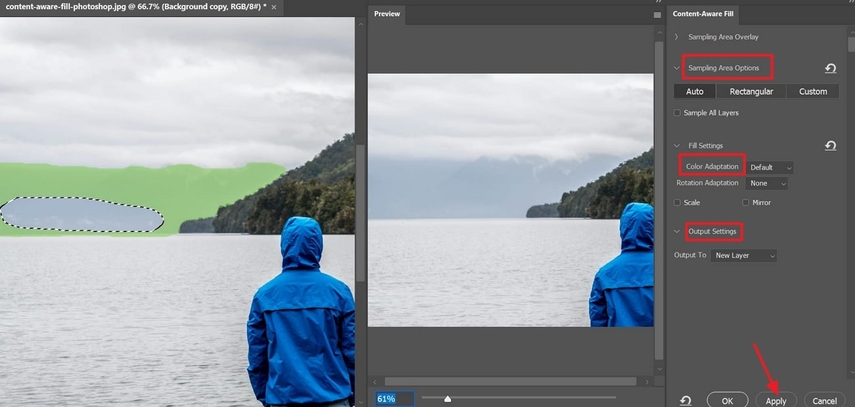
Here you can also refine your Content-Aware fill by choosing desired settings like "Sampling Area," "Color Adaptation," and "Output Settings." To save these changes, hit the "Apply" button available at the bottom of the interface.
Step 5. Final Touch-Ups
At the end, you can also opt for Adobe's other tools, like "Generative Fill" for enhancing your image by removing extra elements.
Part 3. Pro Tips for How to Use Content Aware in Photos
As you have learned how to Content-Aware scale in Photoshop, here are some tips that you should consider using:

- 1. Use Feathered Selections:Ensure you add a little feather to your selection so you can prevent harsh lines and visible lines showing in the image.
- 2. Zoom In to Refine Tricky Details:Always zoom in on your picture while working so you can precisely adjust your selection and the sampling area for better blending.
- 3. Duplicate Layer for Safety:Apply Content-Aware Fill to another layer to easily revert changes, and compare the edit to the original one instantly.
- 4. Use Multiple Smaller Selections:While editing, always opt for smaller sections to give Photoshop a better context for sampling, which often results in cleaner images.
- 5. Experiment with Fill Settings:When using this feature, try to mix and match different settings to refine your generated outcome, making it more natural.
Part 4. Easier & More Effective Photoshop Alternative: HitPaw FotorPea
After knowing how to use Content-Aware fill in Photoshop, you might want to try it for your image. Unfortunately, you don't have access to the Adobe Photoshop due to its pricey packages. This is where we come with an easier and better option in performing a similar task. HitPaw FotorPea (formerly HitPaw Photo Enhancer) has introduced its inpainting feature which will provide everything what Photoshop does.
Features of HitPaw FotorPea
- 1.Efficiently add new elements to your characters or fix the flaws present in the AI-generated images.
- 2.Lets you remove passerby, objects, and background clutter, which is what Content-Aware Fill does.
- 3.Easily eliminates blemishes or stains from images, while filling in missing areas of old photos.
- 4.Extends you canvas and expands images with its Outpainting feature, which is not available in Content-Aware Fill as well.
- 5.Provides an AI Enhancer to upscale your pixelated images up to 8x, making them visually appealing.
- 6.Gives a batch processing system to edit all your images simultaneously.
Quick Guide to Using FotorPea Partial Repaint
Now, if you want to use HitPaw FotorPea after examining how to use Content-Aware fill in Photoshop, follow the given guide:
Step 1. Launch FotorPea and Navigate into AI Photo Editor
Upon entering the tool, click on the "AI Photo Editor" tool and insert the desired image into the editing interface.

Step 2. Select The Desired Area and Add Prompt
Now specify the target area and add a detailed text idea in the "Prompt" section to specify what to add to it. Afterwards, hit the "Generate" button to begin the repainting process within seconds.

Step 3. Render The Outcome by Clicking the Export Button
Finally, the edited outcome is generated, now you can preview it or save it to your device by clicking the "Export" button on the right-top.

Part 5. FAQs on How to Use Content-Aware Fill in Photoshop
No, it doesn't work with images that contain transparent backgrounds. This utility copies the sample from the background image and then pastes it.
In some cases, the image looks unrealistic as Content-Aware Fill sometimes picks the sample from areas with mismatched colors and textures. As a result, the images clearly look unreal, and people notice that you have done something with the picture.
Yes, Content-Aware Fill can be used for text removal in Photoshop, often with very good results. Users simply need to select the text and apply a Content-Aware tool, and it will pick the sample from the background to fill it.
If you don't have Photoshop and want to use Content-Aware tools, then there are numerous alternatives available. Users can opt for tools like HitPaw FotorPea, which is an AI-driven tool and has newly launched its repaint tool.
Conclusion
Summing up, most people still wonder how to use Content-Aware Fill in Photoshop to edit their damaged images. In this article, we have provided a detailed stepwise guide on how to use this feature and also provided essential tips that can be used. However, if you don't have access to Adobe Photoshop, we recommend using HitPaw FotorPea, which provides repaint features along with other advanced features.
Leave a Comment
Create your review for HitPaw articles


