How to Use CapCut Stabilizer and Best Alternative
Handheld footage, action shots, vlog walking sequences — they all look lively, but a little (or a lot of) camera shake can ruin the final cut. CapCut Stabilizer is a built-in tool many creators rely on to quickly reduce unwanted motion. In this guide you'll learn what CapCut Stabilizer actually does, full step-by-step tutorials for PC, online, and mobile, practical tips for best results, and when to pick an AI-powered alternative such as HitPaw VikPea for professional stabilization and enhancement.
Part 1. What is CapCut Stabilizer & CapCut Video Stabilization Features
Developed by ByteDance, CapCut Stabilizer is a processing feature inside CapCut that analyzes frame-to-frame motion and reduces jitter by smoothing apparent camera movement. It works by estimating motion vectors and subtly repositioning/cropping frames so the subject appears steadier. This is perfect for casual creators, social clips, and quick fixes.

Core Advantages of CapCut Stabilizer
One-Click Automation: AI automatically stabilizes footage without manual adjustments, ideal for quick processing.
Customizable Parameters: Adjust stabilization strength, cropping ratio, and frame buffer range to balance stability and composition.
Multi-Format Support: Compatible with MP4, MOV, and other formats, exporting up to 4K 60fps resolution.
Limitations
Performance Issues with Long Videos: Processing efficiency may drop for lengthy footage (recommend splitting clips).
Extreme Shake Scenarios: Severe motion blur may require external stabilization tools (e.g., tripods) for optimal results.
Tip: HitPaw VikPea delivers AI-powered precision stabilization with 4K/8K export capabilities and batch processing for professional-grade results.
Part 2: How does CapCut Stabilize video on Mobile?
The CapCut mobile editor, available for both Android and iOS, is a powerful multimedia app equipped with an effective video stabilization tool.
Step 1: Start a New Project
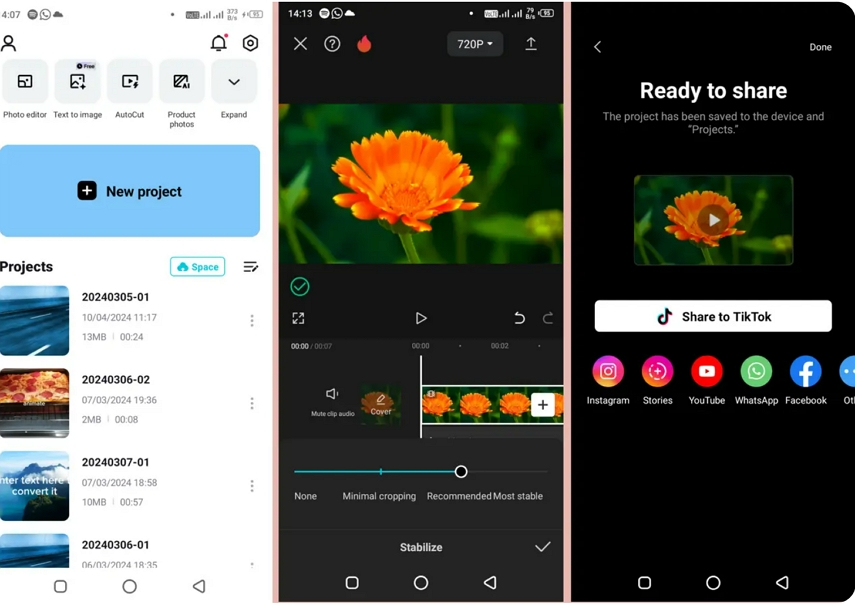
Open the app on your device and tap “New Project.” Choose a video from your device’s gallery, CapCut Cloud, or the app’s internal video library. After selecting your clip, tap “Add” to open it in the editing workspace.
Step 2: Apply the Stabilization Effect
Tap your video clip on the editing timeline, then scroll through the tools until you find “Stabilize.” Select “Stabilize” and adjust the stabilization level using the slider — you can choose between Minimal Cropping, Recommended, or Most Stable, depending on your needs. Once done, tap the checkmark at the bottom right to confirm your choice.
Step 3: Export and Share Your Video
Before exporting, tap the settings icon next to the Export button to customize your output. You can increase the resolution up to 1080p, set your preferred bitrate, and choose a frame rate up to 60fps. When you’re ready, tap the Export icon at the top right corner. CapCut will automatically save your stabilized video to your device’s gallery.
Part 3: How to Use CapCut Stabilizer on PC & Mac (Desktop)
Beyond mobile usage, CapCut Video Stabilizer is also widely used on PC and Mac, here are detailed guides on how to stabilize video with CapCut on your computer.
Step 1: Import Your Video into CapCut
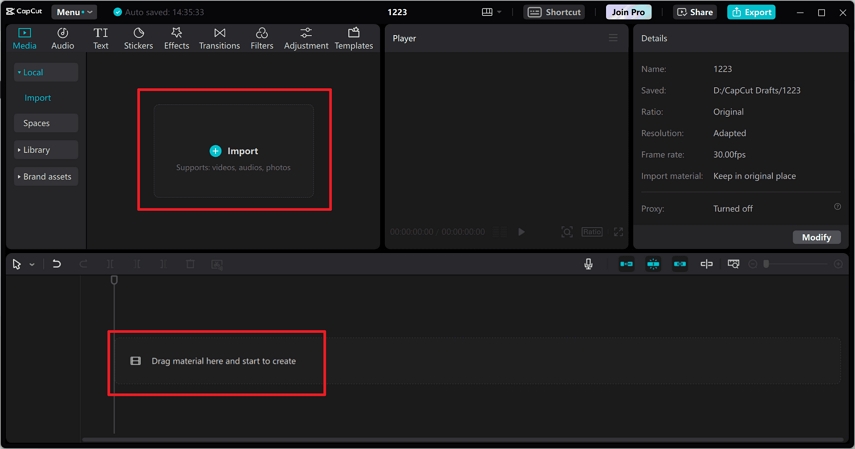
Start by installing and launching the CapCut desktop video editor on your computer. On the home screen, click “New Project” to open the editing interface. You can drag and drop your video file directly into the timeline or click “Import” to locate and upload your footage using the file explorer. Alternatively, navigate to the Library under the Media tab to access CapCut’s built-in stock video library — a great option if you need additional media to enhance your project.
Step 2: Stabilize Video in CapCut
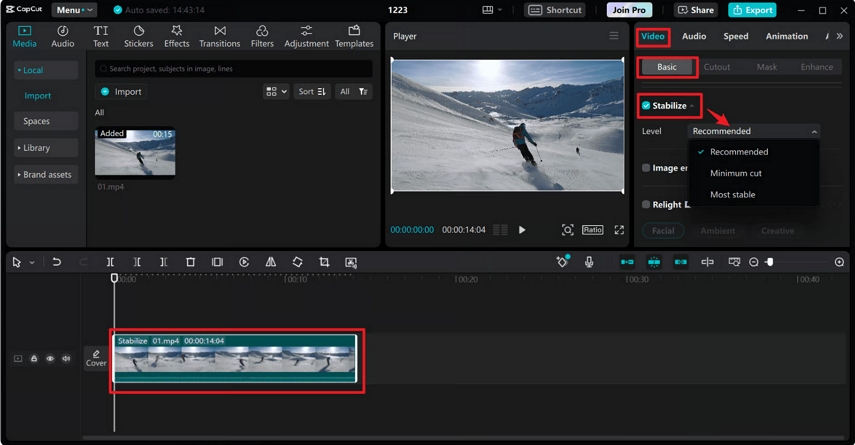
Once your video is imported, click on it in the timeline, then go to the right-hand panel and open Video > Basic. Scroll down until you find the “Stabilize” option and check the box beside it to activate the feature. From the Level dropdown menu, choose your preferred stabilization intensity — options include Recommended, Minimum Cut, or Most Stable, depending on how shaky your footage is.
Step 3: Export and Share Your Stabilized Video
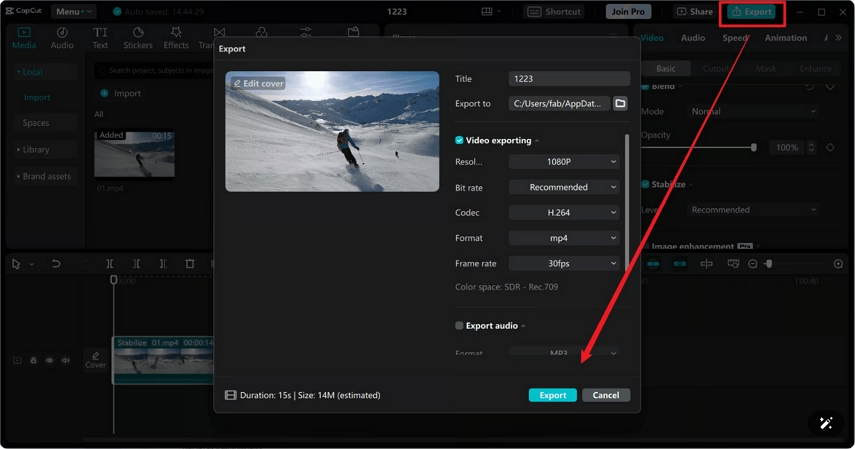
When your editing is complete, click “Export” in the top-right corner of the screen. Customize your file name and output settings, including resolution (up to 4K), bit rate, codec, format (MP4 or MOV), and frame rate (up to 60fps). Once your settings are configured, click “Export” again to start rendering. After export, CapCut allows you to upload directly to TikTok or YouTube from within the software — no need to open another app.
Part 4: How to Stabilize Video in CapCut Online?
If you prefer not to install any software on your device, the CapCut Online Video Editor is a great alternative. It’s a free, browser-based editing tool that works smoothly on Chrome, Safari, Edge, and Firefox.
Step 1: Upload Your Video to CapCut Online
Open your preferred browser and visit the CapCut Online Editor website. Click “New Video” to start a new project and open the editing workspace.
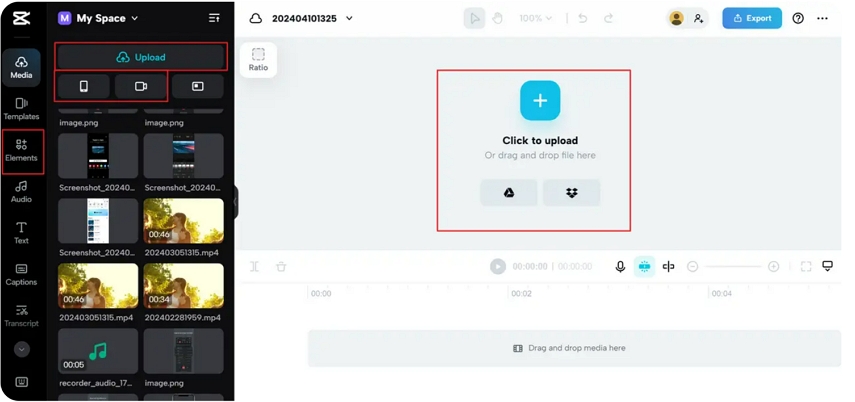
Step 2: Apply the Stabilization Feature
Once your clip is uploaded, click to select it on the timeline, then open the Basic tab in the right-hand editing panel.Scroll down until you find the “Stabilize” option, then toggle it on to activate video stabilization.
Next, choose your desired stabilization intensity from the Level dropdown menu:
- Recommended: Balanced stabilization with minimal cropping.
- Minimum Cut: Keeps more of the frame with lighter stabilization.
- Most Stable: Provides the smoothest result with stronger cropping.
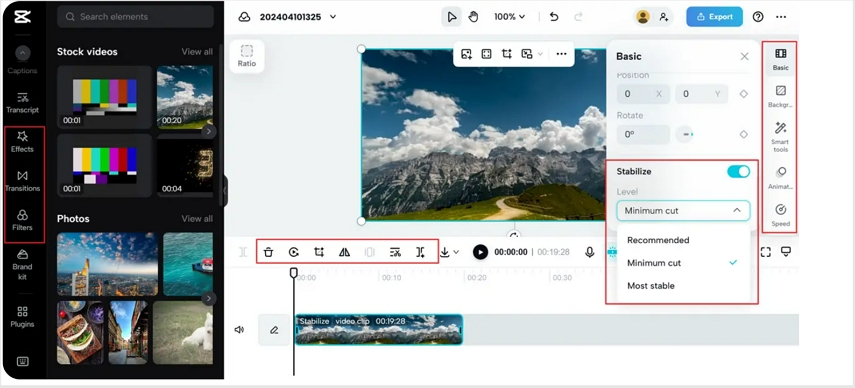
CapCut Online will automatically analyze and smooth your video, removing jitters and shakes. After stabilizing, you can further enhance your footage by adding background music, text, filters, transitions, or special effects. You can also crop, adjust speed, replace backgrounds, or use AI-powered retouching to beautify and refine your video.
Step 3: Export and Share Your Stabilized Video
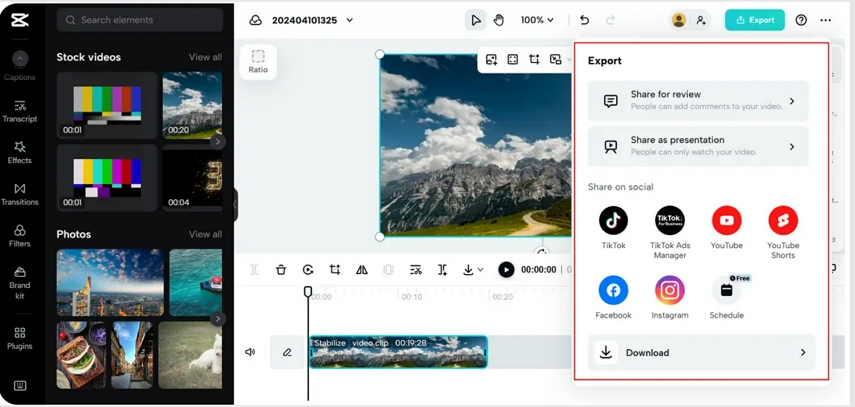
When your video looks perfect, click “Export” in the upper-right corner. Choose “Download” to save your stabilized video directly to your device, and customize your output settings — including name, resolution (up to 4K), quality, format (MP4 or MOV), and frame rate (up to 60fps).
Tips: If you need, you can still explore CapCut upscale about other functions.
Part 5: Pro-Tip: Best CapCut Stabilizer Alternative - HitPaw VikPea
If you regularly edit professional footage, need better preservation of framing and detail, or want AI-driven enhancement (stabilization + clarity improvements), consider HitPaw VikPea. It’s a desktop solution focused on intelligent, high-quality stabilization and enhancement using modern AI algorithms.
Features of the Best Alternative to CapCut Upscaler
- AI Video Stabilizer: Advanced motion estimation for less aggressive cropping and more natural motion compensation.
- AI Video Enhancer: Upscales, denoises, and sharpens while keeping stabilized frames crisp.
- Batch Processing: Stabilize multiple clips at once to save time.
- High-Resolution Support: 4K and even 8K workflows for filmmakers.
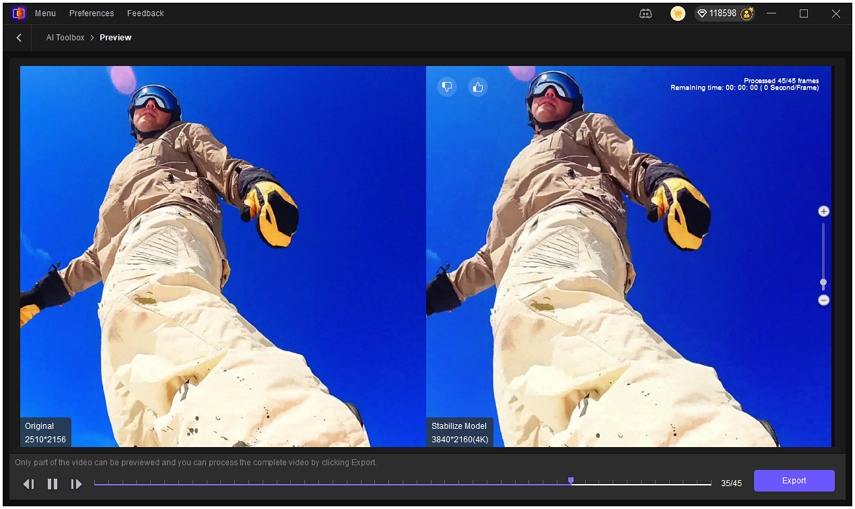
- Preview & Compare: Side-by-side before/after preview to inspect details.
- Fine control: More options to balance crop, smoothing, and artifact reduction.
Steps to Stabilize Videos in HitPaw VikPea
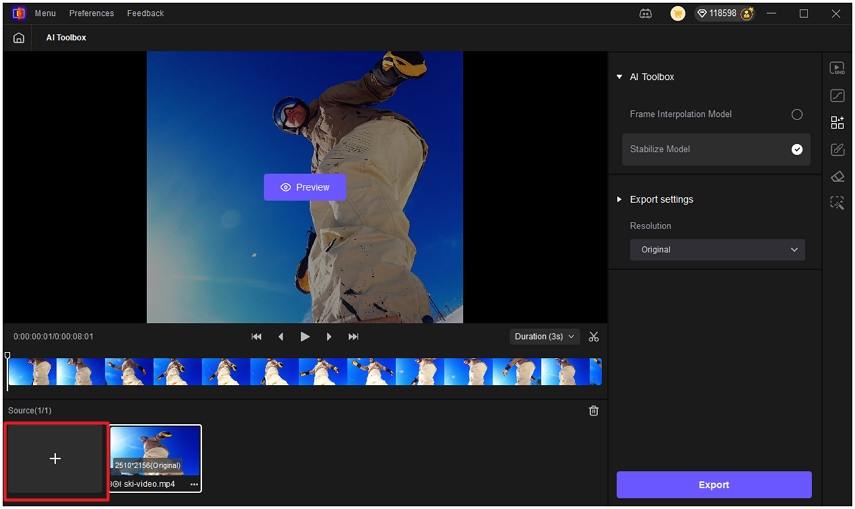
Step 1: Before you use HitPaw VikPea's feature library, you need to install it on your computer.
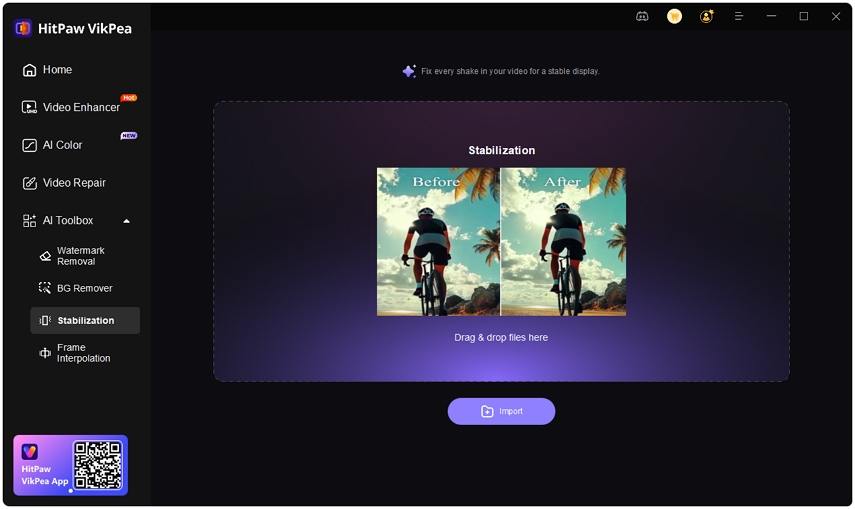
Step 2: Choose AI Toolbox from the left sidebar, and then find the Stabilization feature. Add your video file by dragging and dropping it.
Step 3:From the right panel, choose the Stabilize Model to get the best video expression.
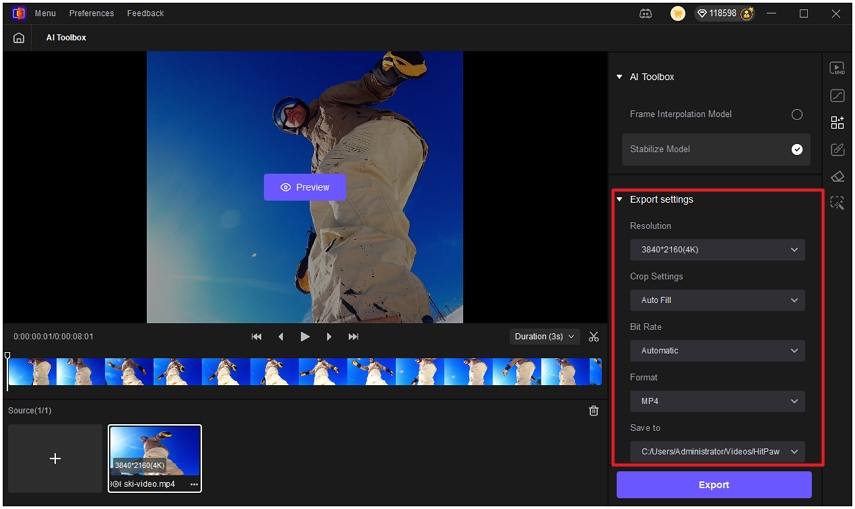
Step 4: Before preview and export, you can custom the expore settings including upscaling the quality in Resolution, bitrate and frame rate.
Step 5:After making your selection, hit 'Preview' to see a side-by-side befoore-and-after comparison. Once satisfied, 'Export' the masterpiece you made.
Note: Additionally, HitPaw VikPea is also the best alternative to After Effects to denoise video.
Part 6: FAQs of Stabilizer Video CapCut
Q1. How can I stabilize image online?
A1. Sure, you can use online tools like Deshake to stabilize your images. Simply upload your image, let the tool process it, and then download the stabilized result. And you can stabilize video in Premiere Pro.
Q2. What is code rate in CapCut?
A2. Code rate in CapCut refers to the video’s bitrate, which affects quality and file size. Higher code rate means better quality but a larger file; lower means smaller size but reduced clarity.
Q3. How to make video smooth in CapCut?
A3. Use CapCut's stabilizer: Import video, select clip, enable stabilization under "Video" settings, choose intensity level (recommend "Most Stable"), preview, and export. Optimal for moderate shakes under 2-minute clips.
Q4. What is the best video stabilization software?
A4. HitPaw VikPea outperforms with AI motion analysis, 4K/8K stabilization without cropping, and batch processing. Ideal for action videos and long footage where CapCut struggles with quality loss.
Q5. How to make video clearer in CapCut?
A5. Combine stabilization with sharpness adjustment (+15-20) and 4K export. For severe blur, first enhance clarity via HitPaw VikPea's AI denoiser before importing to CapCut for final edits.
BOTTOM LINE
In this guide, we deeply discover the overview of CapCut Stabilizer and how to increase quality of video in CapCut. From mobile usage to PC utilization, we list detailed operations. Hope that you have a well-known understanding of CapCut video stabilizer and smoothly take use of it to enhance your video quality.
And as an alternative to CapCut Stabilizer, HitPaw VikPea is the best choice with its AI stabilization. You can not only use it to automatically get rid of your video jitters but also explore more useful functions which will make your video more outstanding.


 HitPaw Univd (Video Converter)
  HitPaw FotorPea
 HitPaw VoicePea


Share this article:
Select the product rating:
Daniel Walker
Editor-in-Chief
This post was written by Editor Daniel Walker whose passion lies in bridging the gap between cutting-edge technology and everyday creativity. The content he created inspires audience to embrace digital tools confidently.
View all ArticlesLeave a Comment
Create your review for HitPaw articles