Best Video Stabilization Software in 2026
"What is the best software to do video stabilizing/de-shaking?"
Shaky videos can ruin even the most memorable moments. Whether you're recording with a handheld camera, drone, or smartphone, unwanted motion often makes footage look unprofessional. That's where video stabilization software comes in.
In this guide, we'll review the best video stabilization software for Windows, Mac, online platforms, and mobile apps. We'll compare their key features, pros and cons, and help you choose the best software to stabilize video based on your needs.
Part 1. What Is Video Stabilization Software?
Video stabilization software is designed to remove unwanted camera shake and create smooth playback. By analyzing motion between frames, a video image stabilization software can correct jitters, rolling shutter issues, and shaky panning.
There are three main types of stabilizers:
- Desktop software - Advanced tools for Windows and Mac, ideal for professional editing.
- Online stabilizers - Browser-based programs for quick fixes without installation.
- Mobile apps - Handy apps that stabilize video directly on your phone.
Whether you're looking for a free video stabilizer, professional desktop solution, or an app that stabilizes video, the options below cover all use cases.
Comparison Table of the Best Video Stabilizers
| Software/App | Platform | Free/Paid | Stabilization Location | Best For | Pros | Cons |
|---|---|---|---|---|---|---|
| VikPea | Win/Mac | Paid | Enhancement Panel → Stabilize | Best Overall | AI-powered, multi-feature tool | Paid license required |
| PowerDirector | Windows/Mac/ Android/iOS | Free/Paid | Edit → Enhance → Video Stabilizer | Beginners and Intermediate Users | AI-powered, frequently update, user-friendly | Premium features required subscription |
| Adobe Premiere Pro | Win/Mac | Paid | Effects → Distort → Warp Stabilizer | Professionals | Industry-standard, customizable | Expensive, steep learning |
| Final Cut Pro | Mac | Paid | Inspector → Video → Stabilization | Mac Editors | Optimized for Mac, one-time fee | Mac only, costly |
| DaVinci Resolve | Win/Mac/Linux | Free/Paid | Color Page → Stabilizer | Free Pro Editing | Advanced modes, professional | Needs strong hardware |
| iMovie | Mac/iOS | Free | Video Inspector → Stabilization | Beginners | Free, easy to use | Limited control |
| VirtualDub + Deshaker | Windows | Free | Video → Filters → Add → Deshaker | Lightweight Freeware | Free, effective basic tool | Outdated UI |
| Kapwing | Online | Free/Paid | Editing Tools → Adjust → Stabilize | Social Sharing | Multi-functional, easy | Watermarks in free plan |
| Google Photos | Android/iOS | Free | Edit → Adjust → Stabilize | Mobile Beginners | Free, simple, accessible | Very basic |
Part 2. Best Video Stabilization Software for Windows & Mac
When it comes to professional editing, desktop software remains the most reliable option. Both Windows video stabilization and video stabilization software Mac offer advanced features, high-quality output, and support for larger files. Unlike online tools or mobile apps, desktop programs usually provide more control over stabilization settings and work seamlessly with professional editing workflows.
1. HitPaw VikPea
VikPea is s a powerful AI video enhancer and stabilizer that improves overall video quality, repairs corrupted footage, and stabilizes shaky clips with cutting-edge algorithms. Built with artificial intelligence, it makes video editing easy for both beginners and professionals.
Unlike traditional video stabilizer programs that only reduce shakes, VikPea combines multiple enhancement features, such as upscaling low-resolution videos, restoring old footage, colorizing black-and-white clips, and even removing backgrounds. Its AI-powered stabilization feature ensures smoother results than standard tools, making it the best software to stabilize video in 2026.
Key Features
- AI Video Stabilization: Automatically detects and removes shakes from handheld, drone, and action-camera footage with precision.
- Video Repair: Fixes corrupted or damaged video files to restore smooth playback.
- Upscale Video: Enhance resolution from SD to HD, 4K, or even 8K.
- AI Colorization: Turn black-and-white videos into color with realistic tones.
- Background Removal: Easily remove or replace backgrounds without a green screen.
- Cross-Platform Support: Works on both Windows and Mac.
How to Stabilize Video with VikPea
Stabilizing video with VikPea is simple thanks to its AI automation. Here's how to do it:
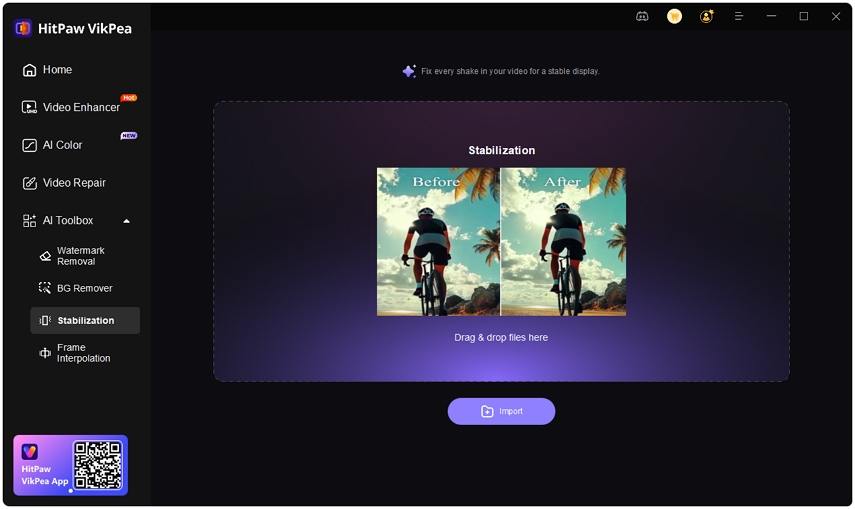
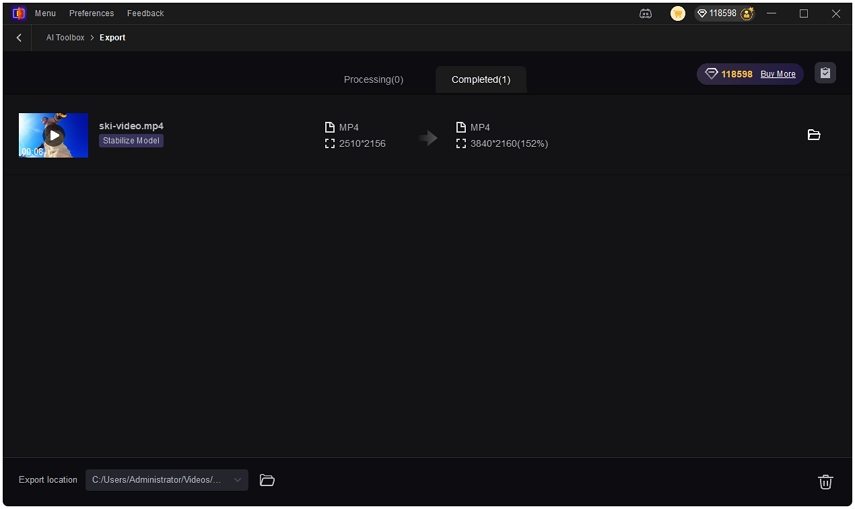
Step 1.Download & install VikPea on your Windows or Mac computer. Launch the program and choose Stabilization from the side menu.

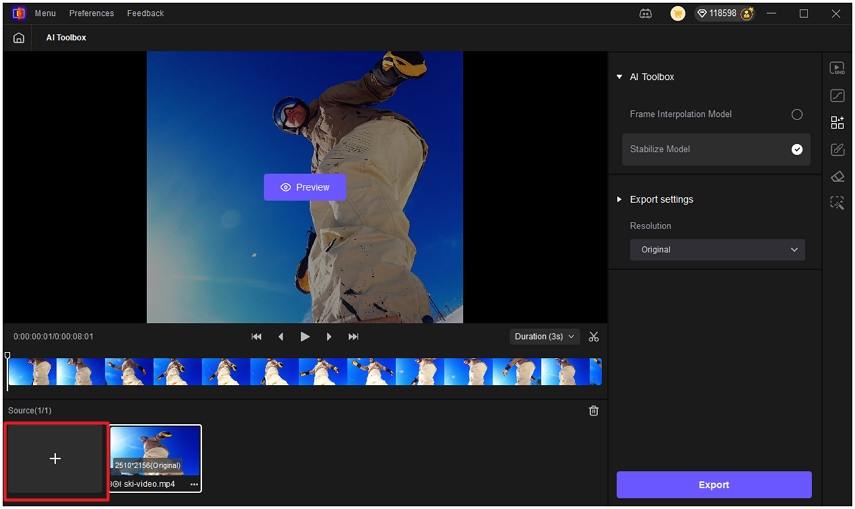
Step 2.Import the shaking video footage to the panel. You can import multiple videos to do batch stabilization.

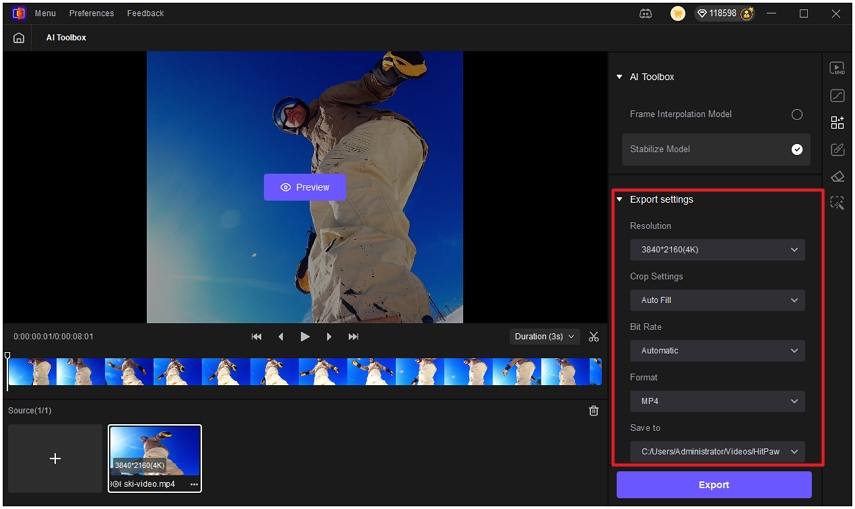
Step 3.In the Export Settings, you can set up the resolution, crop settings, bit rate and output format.

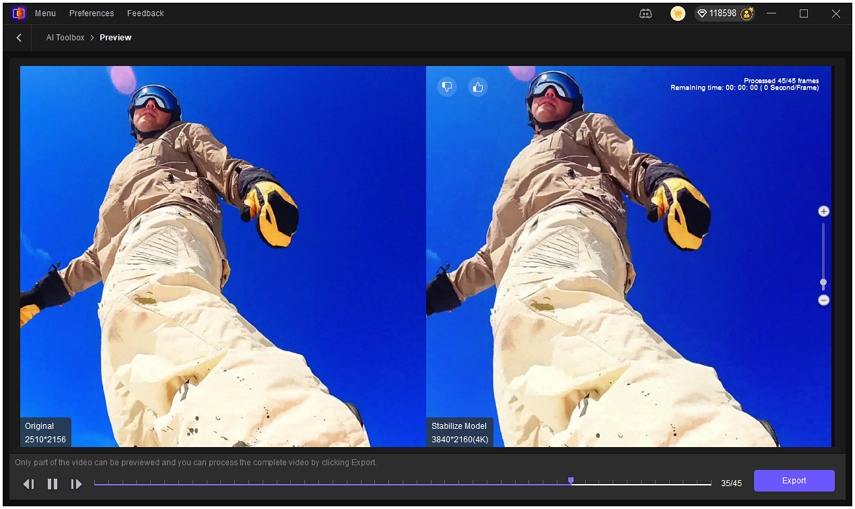
Step 4.Click "Preview" to check the AI-stabilized version before final export.

Step 5.Click Export button to save the stabilized video in your desired format (MP4, MOV, etc.) with original or enhanced resolution.

With just a few clicks, your shaky footage will be transformed into smooth, professional-looking video.
Pros
- AI-Powered Precision: Produces smoother stabilization results than traditional tools.
- Comprehensive Features: Not only stabilize video, but also upscale, colorize, repair, and remove background.
- Beginner-Friendly: One-click stabilization with an intuitive interface.
- Cross-Platform: Available on both Windows and Mac
- Professional Quality: Supports HD, 4K, and 8K output.
Cons
- Paid software (free trial available, but full features require subscription).
2. PowerDirector (User-friendly & AI-powered)
PowerDirector (available on Mac, Windows, iOS, and Android) is the perfect fit for people who are serious about their videos and want to do more with them without needing extensive film education. Not only do beginners find its intuitive interface easy to use, but even professionals may discover that it offers everything they need.
PowerDirector also includes a built-in video stabilizer that can correct even the most unsteady footage in a way that looks seamless and realistic. As the first Windows editing software to support 360-degree VR footage, PowerDirector remains a premier tool for video editors of all levels.
Key Features:
- Fix action cam footage with video stabilization and lens corrections.
- Enhance colors with the Split Toning tool for a dramatic look.
- Automatically correct the color of your video to enhance its quality.
- Use frame interpolation to make your video smoother.
- Multi-track editing allows you to create complex video projects.
Pros:
- Filled with advanced features for professionals.
- Intuitive interface that is easy to learn for beginners.
- Various one-click AI functions.
- Update frequently to bring the latest technology.
Cons:
- Some tools are premium.
3. Adobe Premiere Pro (Professional Choice)
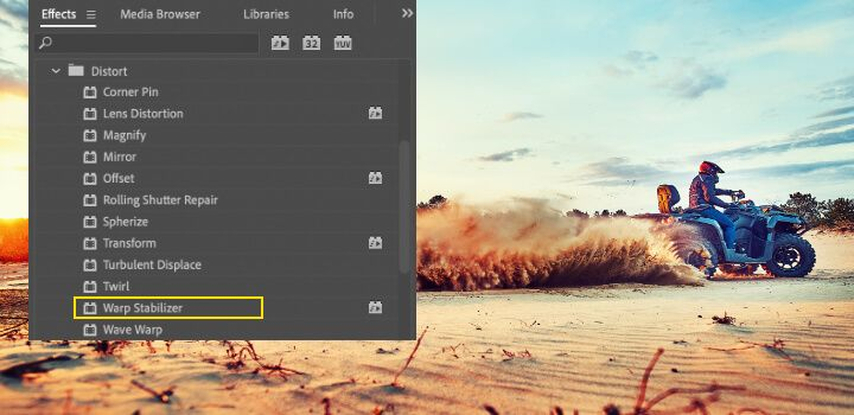
Adobe Premiere Pro is one of the most popular video image stabilization software among professional editors. Its stabilization function is located under the "Warp Stabilizer" effect, which can be found in the Effects panel. By simply dragging and dropping the Warp Stabilizer onto a shaky clip, the software analyzes motion and automatically smooths the footage.
Key Features:
- Warp Stabilizer for automatic shake reduction.
- Supports stabilization for high-resolution footage (HD, 4K, 8K).
- Customizable settings: smoothness level, crop vs. no-crop stabilization.
- Integration with After Effects for advanced control.
Read more: How to Stabilize Video in Premiere Pro
Pros:
- Industry-standard results.
- Highly customizable stabilization parameters.
- Works for both Windows and Mac.
Cons:
- Expensive subscription.
- Steeper learning curve for new users.
4. Final Cut Pro (Best for Mac Users)
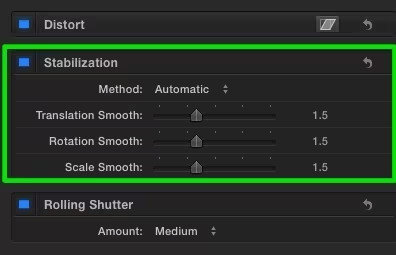
Final Cut Pro is Apple's professional video stabilization software for Mac. The stabilization feature is located under the Inspector panel > Video > Stabilization. Users can select options like "Automatic" or manually adjust the smoothness for handheld and drone footage.
Key Features:
- SmoothCam stabilization technology.
- Optimized for macOS and Apple Silicon chips.
- Offers both automatic and manual stabilization.
- Integrated into a full professional editing suite.
Pros:
- Professional-grade stabilization.
- Optimized performance on Mac hardware.
- One-time purchase instead of subscription.
Cons:
- Available only for Mac.
- High upfront cost.
Part 3. Free Video Stabilizer
Not everyone needs professional-grade tools. If you're a beginner or simply looking for a free video stabilizer, there are great video stabilizer freeware options available. These tools may lack advanced customization but are perfect for quick stabilization without cost.
5. DaVinci Resolve (Free with Pro Features)
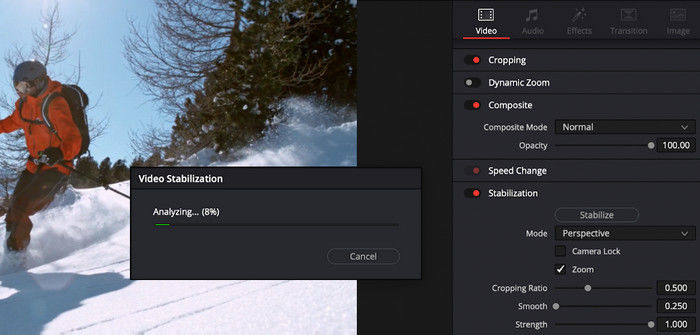
DaVinci Resolve is a professional editing program that doubles as a free video stabilizer. Stabilization can be found in the Color Page > Stabilizer Panel, where users can choose between Perspective, Similarity, or Translation stabilization modes.
Key Features:
- Multiple stabilization modes.
- Works with HD, 4K, and higher resolutions.
- Integrated color correction and video editing.
- Free version offers professional-quality stabilization.
Pros:
- Free yet professional.
- Advanced stabilization with adjustable parameters.
- Cross-platform: Windows, Mac, Linux.
Cons:
- Requires powerful hardware.
- Learning curve for new users.
6. iMovie (Beginner-Friendly Freeware for Mac)
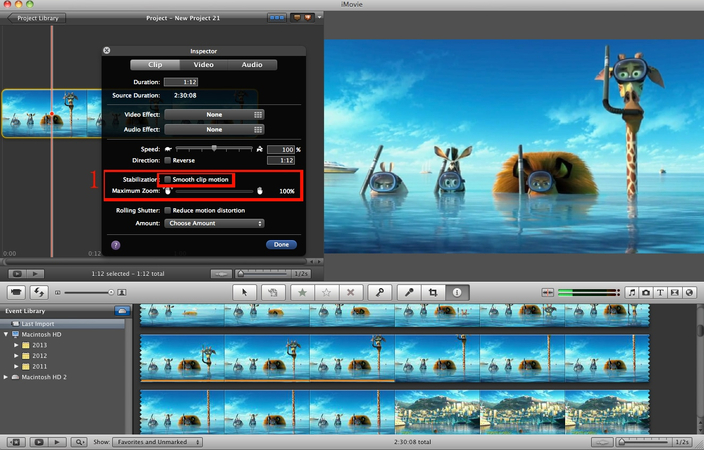
iMovie offers a simple stabilization feature for Mac users. Found under Video Inspector > Stabilization, you can check the "Stabilize Shaky Video" box and adjust the slider for smoothness.
Read more: Complete Guide to Stabilize Video in iMovie
Key Features:
- Stabilize shaky clips with a simple slider.
- 4K video support.
- Free for all macOS and iOS users.
Pros:
- 100% free.
- User-friendly, beginner-focused.
- Integrates with Apple ecosystem.
Cons:
- Limited stabilization customization.
- Only available for Mac/iOS.
7. VirtualDub + Deshaker Plugin (Classic Freeware for Windows)
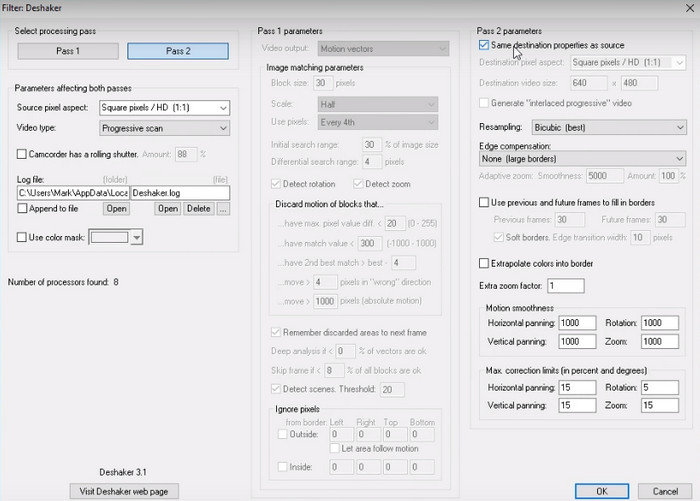
VirtualDub is a lightweight video editor for Windows, and with the Deshaker plugin, it becomes a capable video stabilizer freeware. Stabilization is activated by loading Deshaker under the Video > Filters < Add < Deshaker menu.
Key Features:
- Deshaker plugin removes jitters and rolling shutter.
- Lightweight and efficient.
- Free for Windows users.
Pros:
- 100% free.
- Low system requirements.
- Effective basic stabilization.
Cons:
- Outdated interface.
- Limited editing functions compared to modern tools.
Part 3. Online Video Stabilization Tools
For users who don't want to download software, online video stabilization software is the quickest option. These browser-based tools are convenient for small files and casual fixes, though they often come with limitations like file size caps or internet dependency.
8. Kapwing Video Stabilizer
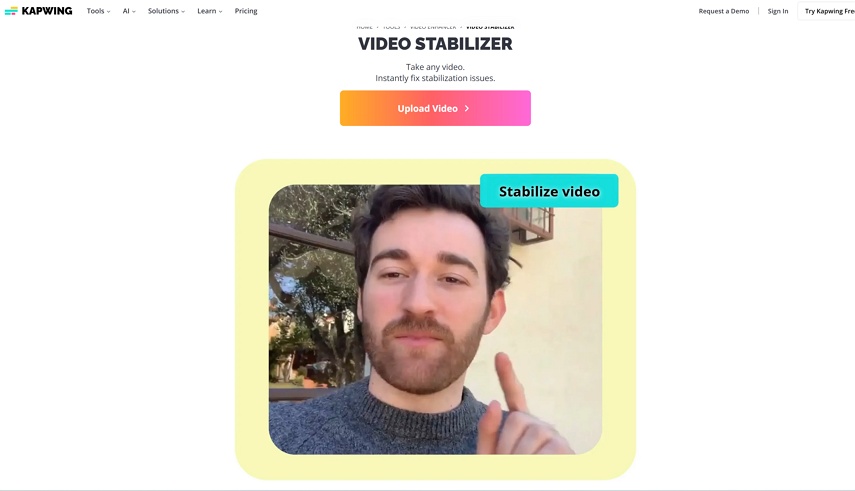
Kapwing provides stabilization through its online video editor. After uploading a video, users can access stabilization under the Editing Tools > Adjust > Stabilize. It's especially popular among social media creators.
Key Features:
- Stabilization plus trimming, filters, and subtitles.
- Cloud-based editing.
- Works on any device with internet.
Pros:
- Multi-functional editing.
- Easy to use for beginners.
- Collaboration-friendly.
Cons:
- Free plan adds watermark.
- Limited advanced control.
Part 5. Best Mobile Apps That Stabilize Video
For creators on the go, an app that stabilizes video is the most practical choice. Mobile stabilizers are ideal for vlogging, TikTok, Instagram, and casual recording. While not as advanced as desktop software, they are fast and convenient.
9. Google Photos
Google Photos includes a built-in stabilization tool. When editing a clip, tap Edit → Adjust → Stabilize to reduce shakiness. It works on both Android and iOS.
Read more: How to Use Google Photos Stabilize Video
Key Features:
- One-tap stabilization.
- Free with Google account.
- Integrated with photo/video storage.
Pros:
- Simple, beginner-friendly.
- Free and widely available.
- Works on most devices.
Cons:
- Very basic stabilization.
- Requires Google account.
Conclusion
Finding the best video stabilization software depends on your editing needs, budget, and platform preference. If you want a powerful all-in-one solution, AI-driven programs like VikPea stand out with their ability to stabilize shaky footage, upscale videos, colorize old clips, and even remove backgrounds-all in one tool. For professional editors, options like Adobe Premiere Pro and Final Cut Pro provide highly customizable stabilization, while free video stabilizers and mobile apps are ideal for quick fixes.
Whether you are editing on Windows, Mac, online, or mobile, the tools listed above cover every workflow. With the right video stabilizer program, you can turn shaky recordings into smooth, professional-quality videos effortlessly.
Leave a Comment
Create your review for HitPaw articles


