


Davinci Resolve Upscale: Master Super Scale for Sharp 4K Video
DaVinci Resolve upscale allows users to increase video resolution by changing timeline settings or using the AI-powered Super Scale feature in the Studio version. While timeline scaling offers fast, basic upscaling, Super Scale delivers higher-quality results by reconstructing detail, making Resolve suitable for both quick edits and professional 4K restoration workflows.
This guide explains how to upscale video in DaVinci Resolve from simple timeline resolution changes to the advanced Davinci Resolve Super Scale. Whether you need a quick 720p to 1080p bump or a high-quality 4K restoration, these methods help you get predictable, broadcast-ready results.
![]() Tips
Tips
For an easier alternative to DaVinci Resolve, HitPaw VikPea (formerly HitPaw Video Enhancer) offers fast, AI-powered upscaling with minimal effort, perfect for users seeking quick results without complexity.


Part 1. What is Davinci Resolve Video Upscaler?
Davinci Resolve video upscaler refers to the tools and workflows inside Resolve that increase a clip’s resolution while attempting to retain or enhance perceived detail. Upscaling in Resolve can be as simple as changing timeline settings or as advanced as using AI-driven Super Scale for better detail recovery.
1. Super Scale in DaVinci Resolve Studio
Super Scale is an AI-enhanced enlargement feature available in the Studio edition. It analyzes frames and reconstructs missing detail using intelligent interpolation and sharpening, making it one of the best AI super scale in Davinci Resolve options for creators who need higher-quality enlargements without resorting to third-party software. Super Scale is designed to reduce common upscaling artifacts and improve edge definition, especially useful when mixing older clips into 4K or 8K projects.

What Super Scale Can Do:
- Improve the appearance of lower-resolution footage so it fits better with 4K or 8K projects.
- Add sharpness and detail, helping old or stock library clips blend more naturally into your modern timeline.
What Super Scale Cannot Do:
- Turn extremely poor-quality footage into a stunning piece.
- Fix severe issues like heavy compression artifacts or out-of-focus video.
- Perform miracles where original detail simply does not exist.
2. Change Timeline Resolution in DaVinci Resolve (Free Version)
For users of the free version, changing the timeline resolution is the primary upscaling route. Adjusting the timeline to a higher resolution lets Resolve scale clips at render time. This method is fast, widely compatible, and requires no Studio license, but it relies on standard scaling rather than AI-based reconstruction, so results will vary depending on source quality.
Pros and Cons of Davinci Resolve AI Upscaling
Pros
- Integrated workflow with color, effects, and export tools.
- Super Scale gives superior results when available.
- Advanced DaVinci resolve AI upscaling
- Precise control over scaling and sharpening in the Color page.
- Integration with other Blackmagic Design tools
Cons
- Steep learning curve for beginners
- Requires a powerful system for smooth operation
- Super Scale requires the Studio version for the best results.
- Extreme upscaling from very low resolutions can still look soft or noisy.
- Heavy noise or compression artifacts often need external repair tools.
Part 2. How To Upscale Video in Davinci Resolve?
Upscaling videos in Davinci Resolve enhances the resolution, making your content sharper and more detailed. Whether you want to convert 720p to 1080p, 1080p to 4K, or even restore low-resolution footage, Resolve gives creators a clean workflow for boosting clarity while preserving detail.
Method 1: Change Timeline Resolution in Project Settings
- 1. Create or open your project
Launch DaVinci Resolve and open your existing timeline or start a new one. 2. Change the Timeline Resolution
In the 'Master Settings' tab, adjust the timeline resolution to your desired upscale resolution, such as 1080P or 4K.
- 3. Add Video to Timeline
Drag and drop your video onto the timeline. - 4. Enable "Scale full frame with crop"
In the Inspector, set Scaling to: Scale full frame with crop. This prevents black borders and ensures proper upscale behavior. - 5. Export your upscaled video
Go to Deliver, choose your output resolution, and render.
By following these steps, you can easily use Davinci Resolve improve video quality and achieve a higher resolution output.
![]() Tips
Tips
If the Davinci Resolve enhance video quality workflow feels overwhelming, you can try AI-based alternatives like HitPaw VikPea for a one-click video upscaling process.
Method 2: Upscale Using DaVinci Resolve's Super Scale (Best Quality)
DaVinci’s Super Scale is an AI-enhanced enlargement tool that delivers noticeably sharper results than normal scaling.
- Step 1. Import your low-resolution footage
Drag and drop your clip to add it to the Media Pool. Step 2. Setting Up Your Timeline
Create a new timeline. Let's call it "Super Scale." Right-click the timeline settings and change the timeline resolution to 3840 x 2160 (the dimensions of a 4K clip). For 8K, double these dimensions.
- Step 3. Place the clip on the timeline
Drag your clip from the Media Pool directly onto the newly created 4K timeline. Step 4. Open Clip Attributes
Right-click on the clip in the timeline and select Clip Attributes from the dropdown menu.
Step 5. Applying the Super Scale to Your Clip
Right-click the video and choose Clip Attributes. Under Super Scale, set Factor from 2x, 4x, or 6x. To go from 1080p to 4K, choose 4x in the Super Scale dropdown.
- Step 6. Adjust Sharpness and Noise Reduction
The Sharpness and Noise Reduction each have High/Medium/Low levels. High makes images sharper and cleaner but may look slightly "digital"; Medium is more natural. - Step 7. Export in a matching high resolution
Render in the Deliver tab as 1080p, 4K, or your chosen resolution.
Part 3. Best Alternative to Davinci Resolve Video Enhancer
When it comes to enhancing video quality, HitPaw VikPea stands out as a top-tier alternative to DaVinci resolve upscale video. It is a dedicated AI video upscaler designed to upscale and restore videos effortlessly. VikPea uses advanced algorithms to improve clarity, resolution, and overall quality, perfect for users who want professional results without complex steps.
Outstanding Features of HitPaw VikPea Video Enhancer
- Restore old or low-quality videos by removing noise and sharpening blurry frames.
- Upscale video to 8K using advanced AI models tailored for general videos, faces, and animations.
- AI intelligent recognition, no need for complex operation skills.
- Delivers crisp, detailed results that rival or surpass DaVinci Resolve's AI capabilities.
- Batch processing lets you enhance multiple videos at once, saving you time and effort.
- Available on both Windows and macOS, making it a flexible tool for content creators across different systems.
Learn More on HitPaw VikPea Video Quality Upscaler
Steps to Use HitPaw VikPea to Upscale Video Quality
Step 1: Download and Install
You can get started by first going to their website and installing the software.Step 2: Upload the Original Video
Next, you need to add the video you need to edit. You can upload or just drag drop it in any format ranging from MKV to MP4.
Step 3: Select an AI Model
Choose from the available AI models based on the type of video you have. For instance, use the Animation Model for animation videos or the Portrait Model for videos focusing on human faces.
Step 4: Upscale the Video
After the enhancing is done, check your work and if satisfied, save it.
Step 5: Preview the Effect
Click Preview to review results, then press Export to save the enhanced video.
Part 4.DaVinci Resolve vs. HitPaw VikPea AI: Which One to Choose?
Feature
DaVinci Resolve
HitPaw VikPea
Ease of Use
Complex, requires expertise
Simple, AI-driven one-click upscaling
AI Technology
Manual settings with some AI integration
Fully automated AI upscaling
Processing Speed
Time-consuming
Fast output with AI handling
Customization
High level of control
Pre-set AI models for specific video types
Watermarks
None in paid version
No watermarks or ads
Pricing
Free version, $295 for Studio
Free trial, paid version available
Best For
Professionals needing full control
Beginners and fast, automated enhancement
This comparison highlights that HitPaw VikPea is better suited for users looking for a quick and easy solution, while DaVinci Resolve Video Enhancer caters more to professionals who require full control over the editing and upscaling process.
FAQs Of Upscale Video Davinci Resolve
Q1. Can DaVinci Resolve upscale videos?
A1. Yes, DaVinci Resolve can upscale videos by changing the timeline resolution or using the Super Scale feature in the Studio version. Timeline scaling applies standard interpolation, while Super Scale uses AI to reconstruct detail and produce sharper high-resolution output.
Q2. What is the maximum resolution of DaVinci Resolve free?
A2. The free version of DaVinci Resolve supports exporting up to 3840 × 2160 (4K) in most cases. However, advanced features like Super Scale, advanced noise reduction, and some GPU optimizations are limited to the paid Studio edition.
Q3. Is DaVinci Resolve upscaling free?
A3. Basic upscaling in DaVinci Resolve is free when you adjust timeline resolution. AI-based Super Scale, which provides better detail reconstruction and cleaner results, is only available in DaVinci Resolve Studio.
Q4. How do I upscale 480p to 1080p in DaVinci Resolve?
A4. To upscale 480p to 1080p, set the timeline resolution to 1920 × 1080 in Project Settings, then place the clip on the timeline and export at 1080p. For higher quality, apply Super Scale in the Studio version.
Bottom Line
Davinci Resolve upscaling offers flexible options for most creators. For quick results, change the timeline resolution. For the best in-app quality use Davinci Resolve Super Scale in Studio. Alternatives like HitPaw VikPea. Armed with AI-driven upscaling and an interface that's a breeze to navigate, it's a worthy contender. Understanding when to use each method ensures cleaner upscales and more natural-looking results.

 HitPaw Edimakor
 HitPaw Univd (Video Converter)
  HitPaw VikPea (Video Enhancer)
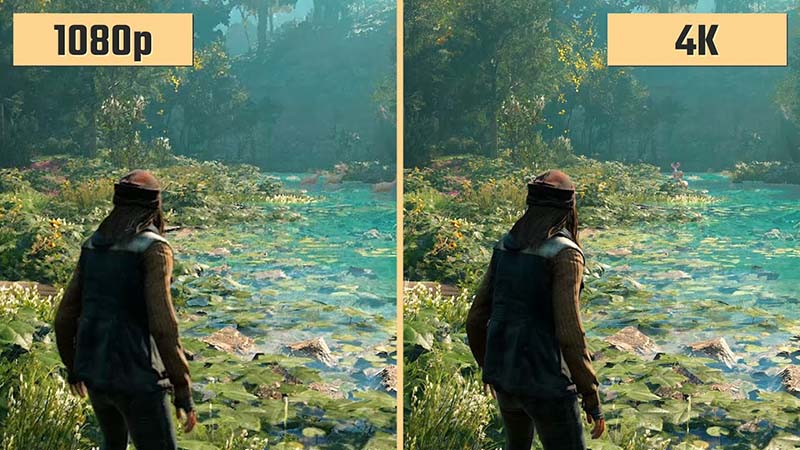

Share this article:
Select the product rating:
Daniel Walker
Editor-in-Chief
This post was written by Editor Daniel Walker whose passion lies in bridging the gap between cutting-edge technology and everyday creativity. The content he created inspires audience to embrace digital tools confidently.
View all ArticlesLeave a Comment
Create your review for HitPaw articles