


[100% Working!] How to Use Luminar Neo Background Removal Tutorial
Are you looking for a reliable and efficient way to remove the backgroundfrom your images? Luminar Neo is a cutting-edge photo editing software that offers an advanced AI-powered tool to remove background in Luminar Neo.
With its user-friendly interface and powerful features, remove background Luminar Ai is an ideal feature for photographers, designers, and anyone who wants to enhance the quality of their images.
Part 1. How to Use Luminar Neo Remove Background?
Step 1. Open your image in Luminar Neo and navigate to the EDIT section.
Step 2. At the top of the screen, click on Layer Properties to reveal a dropdown menu.
Step 3. Select Masking from the dropdown menu to access the first set of options for background removal Luminar Neo.
Step 4. 4.From the available options, choose 'Background Removal AI' to initiate the neural network analysis of your image.

Step 5. The AI will detect the subject(s) you want to keep and prompt you to select additional choices to improve the mask.
Step 6. 6.After making your selections, click the 'Remove' button and let Luminar Neo perform the background removal for you.
Step 7. Once the background has been removed, you can continue editing your image as desired.
Part 2. How to Use Luminar ai Remove Background From a Portrait?
Here is a step-by-step process to use Luminar Neo portrait background removal for your portrait images:
Step 1. To get started, import the photo you want to edit by selecting the 'Add photos' button at the top left of the screen. Choose the photo you want to edit and click 'Open'.
Step 2. If this is your first time using the Luminar Ai background removal extension, you'll need to download it from the extensions tab at the top right of your screen.
Step 3. Double-click your photo and click on the "Edit" button to start editing.
Step 4. From the edit bar located at the right of your screen, select 'Layer Properties', then 'Masking', and finally, "Background Removal AI." This will allow you to select the subject for which you want Luminar Neo replace background.
Step 5. Once you've selected the 'Background Removal AI' option, your subject should be highlighted in red. If it's not highlighted, try adjusting the settings or making a more precise selection.
Step 6. 6.If your subject is highlighted correctly, click the 'Remove' button and let the AI do its work. The background should now be removed from your image.
Step 7. 7.If there are any areas that the AI missed or you want to refine, use the refinements brush to clean up the image. You can also use the Luminar Neo change background feature to change the background of the image.
Part 3. Best Photo Object Remover than Luminar Neo— HitPaw Photo Object Remover
While Luminar Neo may be a popular photo editing software, it does have its drawbacks when it comes to object removal. The Luminar Neo background removal tutorial is not easy to understand for everyone.
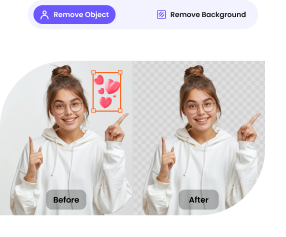
If you're looking for an alternative that's easy to use and efficient, HitPaw Photo Object Remover is a great option. With its AI-powered technology, you can quickly remove unwanted people, clutter, shadows, and more with just a few clicks.


- Easy-to-use interface that makes removing objects from your photos with ease
- Edit people out of picture with AI model
- Ability to retouch photos by removing humans, clutter, and even shadows
- Get free effect preview after processing
- Ability to remove facial blemishes, wrinkles, freckles, and other defects from portrait photos.
Features:
- Step 1. Download HitPaw Photo Object Remover
- Step 2. Import Photo
- Step 3. Locate the Box Selection Tool or Brush Tool
- Step 4. Paint the object out or frame it
- Step 5. Modify Your Selection
- Step 6. Preview and Export the Photo
On your Windows computer, download HitPaw Photo Object Remover.
To add the picture you want to remove things from, click the picture box in the center. Alternatively, you could just put the picture into the edit box.
The program's bottom has the Brush or Box Selection tool.
The object that needs to be removed from your photo can be painted out or framed.
After choosing a frame, the chosen area will be highlighted. The remove area, add, and reduce selection can be changed as needed. By using the "Undo" button, you can reselect the object if you're not happy with the current selection zoom.
Additionally, by moving the size bar, you can change the Brush Size.
To remove an object from the photo, click "Preview". The last photo(s) will then be saved to your computer once you click "Export All" and browse the route for saving.
Part 4. FAQs of Tools in Luminar Neo Portrait Background Removal
Since you know that Luminar Neo background removal Ai feature for portrait images, there are some tools that you can use to further refine your image — refinements brush and the background brush.
1. Refinements Brush
The Refinements Brush tool is a highly useful feature that lets you brush in additional areas of your photo. You can access this brush easily by clicking on it in the software's toolbar.
After selecting the Refinements Brush, three areas of your photo will appear. Blue represents the background, orange represents the object you want to remove, and the transparent area shows the transition between the two.
The brush size is customizable, which makes it easier to add or remove from the mask with greater accuracy while editing your photo.
2. The Background Brush
The Background Brush is a helpful tool that can be used to remove parts of an image that may not have been detected by the AI.
The brush allows you to manually paint over areas of the background that need to be removed, and since it is a manual process, it gives you greater control over the final result.
Conclusion
While Luminar remove background is a popular photo editing feature in the Luminar latest software, its object removal feature may not always be effective in removing unwanted objects or people from your photos.
If you are looking for an alternative that is easy to use and efficient, HitPaw Photo Object Remover is an excellent choice. With its AI-powered technology, HitPaw can locate and remove unwanted objects and people in your photos in a blink.
 HitPaw Video Object Remover
 HitPaw Univd (Video Converter)
  HitPaw VikPea (Video Enhancer)
![[Detailed Steps] 5 Online Ways to Make Your Passport Size Photo Background Change](https://images.hitpaw.com/topics/photo-tips/passport-size-photo-background-change-cover.jpg?w=1920&h=1280)

Share this article:
Select the product rating:
Daniel Walker
Editor-in-Chief
This post was written by Editor Daniel Walker whose passion lies in bridging the gap between cutting-edge technology and everyday creativity. The content he created inspires audience to embrace digital tools confidently.
View all ArticlesLeave a Comment
Create your review for HitPaw articles