How to Compress Images on Mac [Solved!]
“My Mac ran out of storage, and the thing is that all the photos stored on the Mac PC are important. Can you help me to know how to compress photos Mac?”
The photo editing technology has evolved immensely, and knowing how to compress a picture on Mac has become simpler than you think. The tools we're going to mention below won't affect the image while compressing the images on the Mac. Dive into this guide to learn how to compress an image on Mac.
Part 1. What is Image Compression?
Before answering the question “how do I compress photos on a Mac” knowing about the image compression term is equally important. Image compression implies that you're reducing the size of images, and sometimes, doing so will mess up the image quality. There are two types of image compression, including lossy compression and lossless compression.
1. Lossless CompressionAs you can suggest by its name, when you apply lossless compression on your photos, you can reduce the size of the images without affecting the image quality. This way, the original quality of the photos will remain intact.
2. Lossy compressionUnfortunately, lossy compression of the images will prompt the image quality, making the photos look blurred. Opting for lossy compression isn't recommended, as it could make the images look meaningless.
Part 2. Best Way to Compress Images on Mac
Knowing how to compress an image Mac isn't enough to serve your purpose as while compressing the images, many software end up affecting the image quality. Fortunately, HitPaw Univd (HitPaw Video Converter) is an exceptional software that offers image compression without affecting the image quality.
There are various things to like about the HitPaw Univd as apart from supporting the multiple image, it enables you to compress multiple photos simultaneously.
Features- Offers multiple image formats
- It doesn't mess up the image quality
- Comes up with the wonderful free trial version
- Offers an effortless user interface
- It helps you to compress multiple images simultaneously
Here's the detailed guide below to learn how to compress images in Mac through the HitPaw Univd.
Step 1:Navigate to the official webpage of the HitPaw Univd and install the software afterward.
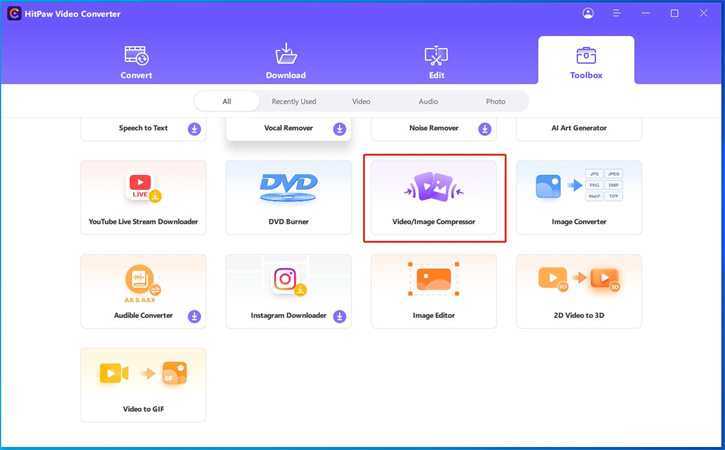
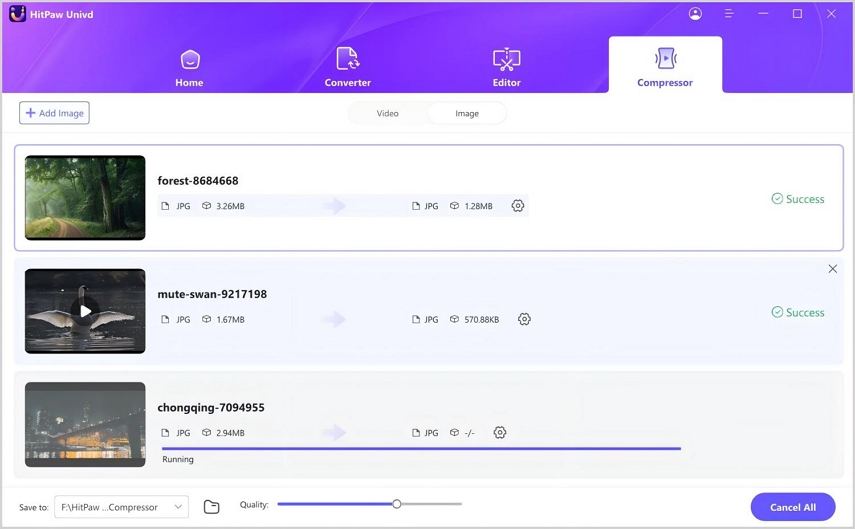
Step 2:Next, you'll need to select the Video/Image Compressor after hitting the Toolbox button.

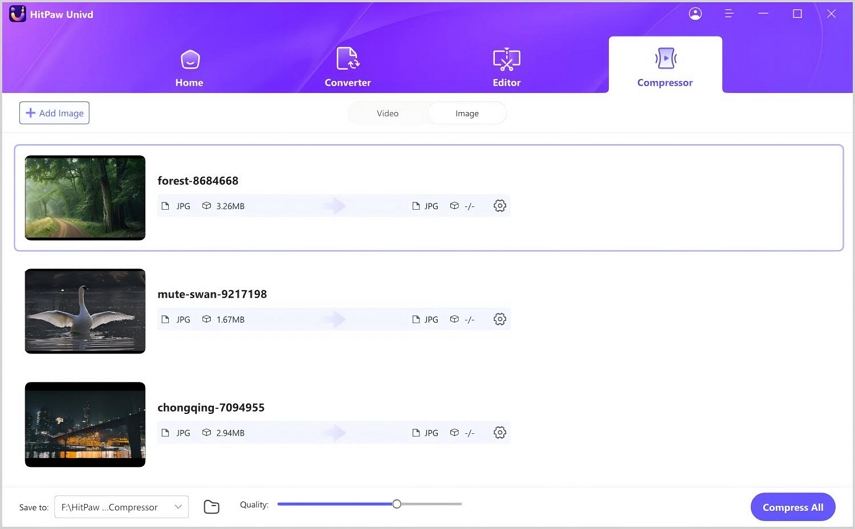
Step 3:After jumping into the image tab, you'll need to select the ''Add Image'' button to import the photos into the timeline of the HitPaw Univd.

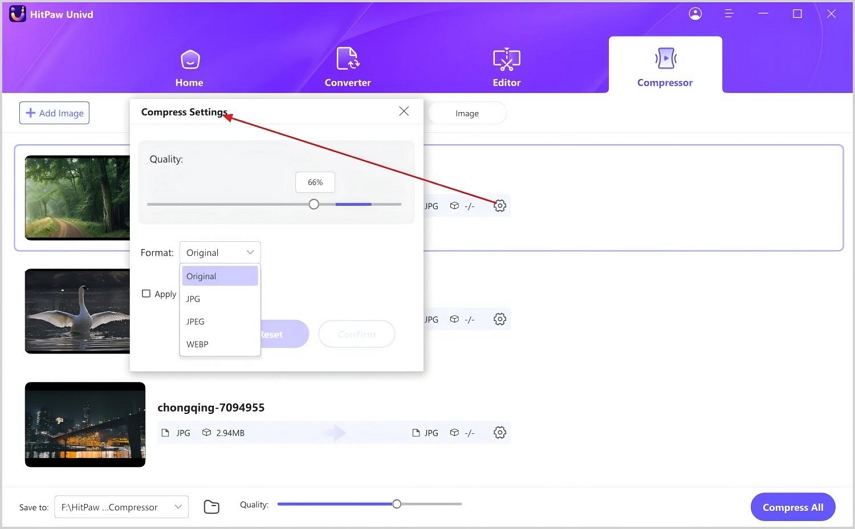
Step 4:Upon pressing the gear icon, you can select the appropriate compression quality or level for your file. The format list comes up with the WEBP, JPEG, JPG, and original options. Click on the ''Apply all to list'' button to compress all the images simultaneously. You can save the settings by hitting the Confirm button.

Step 5:The most recommended compression level is the medium option, and this way, you can reduce the size of images without any issues.

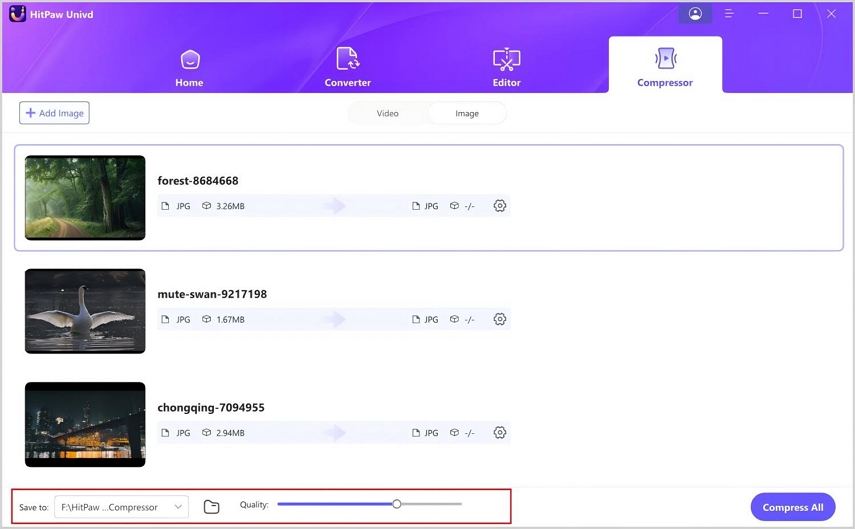
Step 6:Press the Compress All icon to begin the compression process. After compressing the photos, you can access them in the output folder.

Part 3. Other Two Ways to Compress Photos on a Mac
1. How to Compress An Album Using the iPhoto App
iPhoto App makes it fairly simple to help you learn how to reduce image file size on Mac. It is the built-in app of Mac that helps you to customize the resolution of images without putting in any extra effort.
Pros
- Offers a simple user interface
- Compress the images in a few moments
- Free
Cons
- Might mess up with the image quality
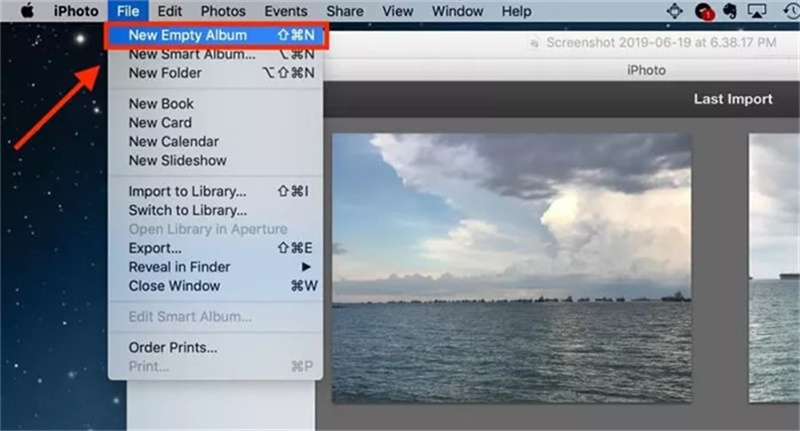
Step 1:Create the album in the iPhoto and start the iPhoto App afterward. Press the File button after navigating to the taskbar. After going into the drop-down list, you'll need to choose the ''New Empty Album'' button.

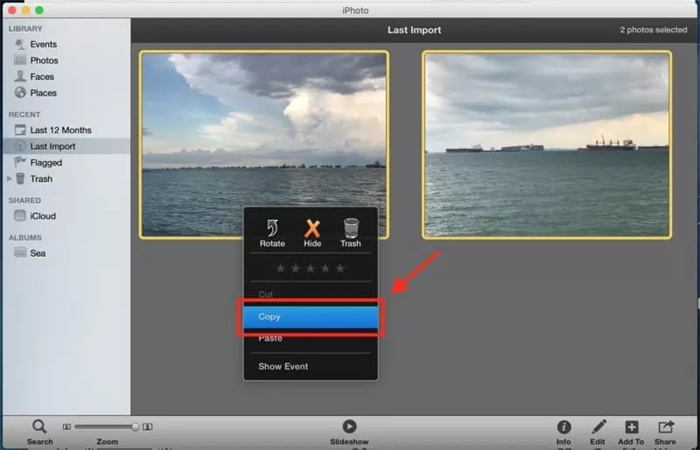
Step 2:Choose the photos you'd like to add to the new album. Right click the box and press the Copy icon afterwards.

Step 3:After visiting the new album you've created, right click on it and select the Paste button.
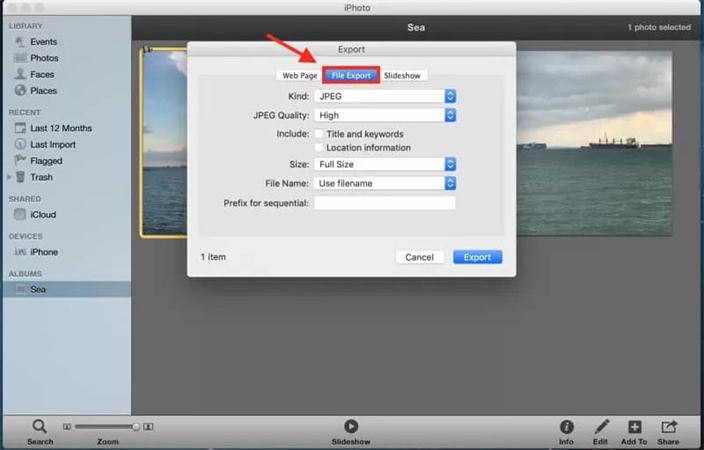
Step 4:Click on the Export button after selecting the File icon.

Step 5:Press on the File Export button and now you can reduce the image size of the album.
2. How to Compress An Image Using Mac Preview App
Many people ask us about learning how to decrease image file size Mac, and putting things together is fairly simple. All you need to do here is to look at the Preview app to know how to decrease image file size Mac.
Pros
- Easy compression
- Supports multiple image formats
- No image quality
Cons
- It might take extra time to compress the images
Here's the detailed guide below to know how to decrease picture file size on Mac via Preview.
1.Navigate to the picture you'd like to compress. Right-click on the image to launch it with the ''Preview''.
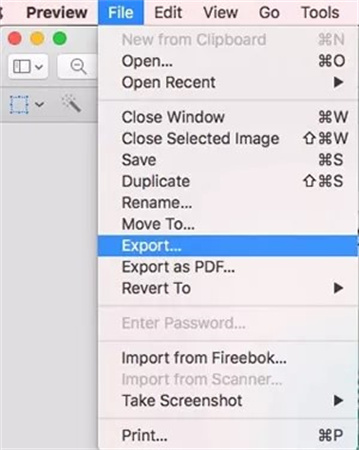
2.Tap on the File button after visiting the ''Preview '' and choose the Export button.

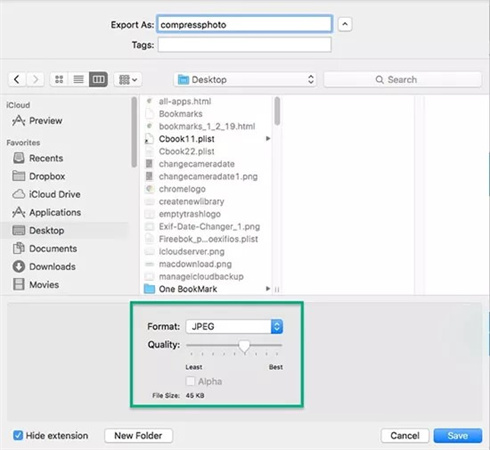
3.After visiting the Format button, you'll need to select the JPEG icon. Push the Quality slider to decrease the image size. Click on the ''Save'' button to download the images after saving all the changes.

FAQs about How to Compress Images on Mac
Q1. How do I reduce file size on Mac?
A1. Reducing the file size on Mac is fairly simple. To do it, you need to download and install HitPaw Univd. Then select "image compressor" to adjust your files. In this way, you'll be able to reduce the file size on Mac.
Q2. How do I reduce the MB size of a photo on a Mac?
A2. Reducing the image size of a photo on Mac only takes a few moments. You can visit the Preview app and select the image you'd like to change the size of. Click on the Tools button before hitting the ''Adjust Size'' icon. Press the ''Resample Image'' icon and visit the Resolution field to enter the small value there.
Conclusion
You can take notes from this guide to learn how to compress photos Mac. We have highlighted the three sensational methods to reduce the size of the images, and all the options are breathtaking. HitPaw Univd comes out as the best way to help you learn how to compress image in Mac. It doesn't mess up with the image quality while compressing the image size.



 HitPaw Watermark Remover
  HitPaw VikPea (Video Enhancer)


Share this article:
Select the product rating:
Daniel Walker
Editor-in-Chief
My passion lies in bridging the gap between cutting-edge technology and everyday creativity. With years of hands-on experience, I create content that not only informs but inspires our audience to embrace digital tools confidently.
View all ArticlesLeave a Comment
Create your review for HitPaw articles