How to Print Reference Images for Drawing, Painting, or Design Work
A high-quality print reference image is bound to impact the creative process significantly, irrespective of your experience as an artist or designer. Although working from a screen is typical, printing your reference image might offer greater control, comfort, and clarity.
Everything you need to know about correctly publishing a reference image will be covered in this article, including choosing the best tool to improve your image before printing and choosing the correct size, quality, and format.
Part 1. What Is a Print Reference Image?
A print reference image is a hard copy of a picture or graphic that you employ as a visual aid for your creative endeavor. This is useful in several fields:
- Drawing and sketching
- Painting digitally
- 3D modeling and sculpture
- Conventional painting
- Mockups of graphic designs
- Design of tattoos
- Product design and architecture
For instance, a sculptor could want a printed side view of an object to help with dimensions, while a character artist might print a portrait shot to examine facial features. For placement testing, a tattoo artist could print a design to scale.
Why go with printed instead of just digital?
- Avoid being distracted by screens while working.
- Less difficult to view from various perspectives without screen glare
- On the paper, you can annotate, grid, or trace.
- More comfortable for the eyes during extended sessions
- You don't have to be concerned about screen power or brightness.
- The ability to physically modify an image is something that digital screens cannot truly provide.
Part 2. How to Prepare Your Print Reference Image
Make sure your image is prepared before pressing the print button. This is a helpful checklist to adhere to:
1. Change the image's dimensions or resize it
You must ensure that the image is the correct size by using editing software like online editors, Canva, GIMP, and Adobe Photoshop. Moreover, you must verify whether the image fits the paper size, including the letter size or A4, that you plan to print.
2. Frame and Crop the Image
Get rid of any extraneous background or distractions. Pay attention to the area of the picture that you will use the most. For better clarity, you must zoom and crop only the head and shoulders while drawing a face, for instance.
3. Modify the Sharpness, Contrast, and Brightness
Make little adjustments to make sure details are seen. The print shouldn't be very flat, washed out, or dark. When needed, sharpen the subject and increase contrast to define edges.
4. Use filters if necessary
For drawing or grayscale conversion, certain filters can highlight contrast or detail. If value and shading are your main concerns, black and white filters are useful.
5. Include Labels or Grids (Optional)
Before printing, apply a grid overlay if you plan to transfer photos using the grid approach. Angles, important spots, and proportions can also be labeled. Utilize translucent grid layers in programs such as Photoshop or FotorPea.
6. Save in a format that is print-friendly.
You must use a high-quality JPG, PNG, or PDF for perfect results.
Part 3. Best Tool to Enhance Images Before Printing with HitPaw FotorPea
Before you hit "Print," ensure your image is sharp, bright, and well-balanced. This is where HitPaw FotorPea comes in. This user-friendly, AI-powered image enhancer lets you quickly and efficiently improve your reference photographs, whether sketching a portrait, painting from a photo, or creating something new. It's especially beneficial when working with low-quality or outdated pictures that require a refresh.
HitPaw FotorPea employs superior AI technology and provides nine distinct enhancement models, each adapted to individual creative demands. Whether you are improving facial characteristics, recovering scanned artwork, colorizing sketches, or preparing clean linework for design references, there is a model that fits. The tool does more than improve image clarity; it also helps you see the details you need to work more effectively. It's like having a smart assistant who improves your images while you concentrate on the creative aspects.
Features
- Includes nine powerful AI enhancement models: Face Model, General Upscale, Colorize, Animation, and Scratch Repair.
- Artificial intelligence technology is used to improve sharpness, correct fuzzy photos, restore color, and enhance fine details.
- Maintains image quality throughout enhancement, with no pixilation or strange alterations.
- Supports batch improvement, which allows you to improve numerous photographs at once.
- Functions as an AI picture generator and photo editor with additional creative features.
Here's how to use HitPaw FotorPea to enhance your image before printing:
-
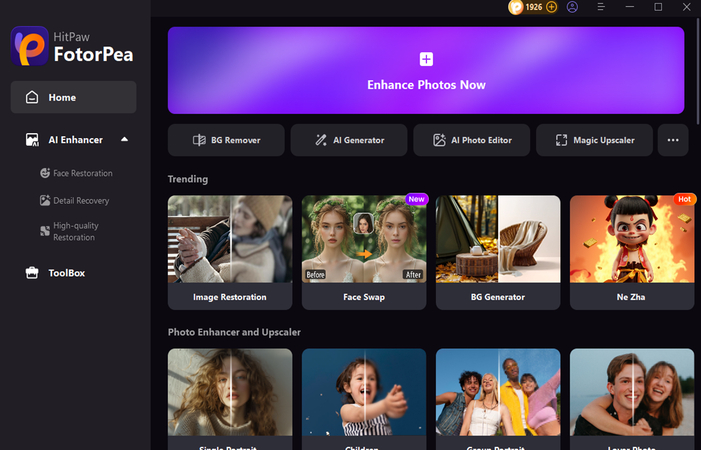
Download and install HitPaw FotorPea for your computer. Open the tool and select the "AI Enhancer" tab. Then, choose "Enhance Photos Now." You will be requested to import your reference image. If you're working on a sequence of photographs, you can also import them in bulk for processing.

-
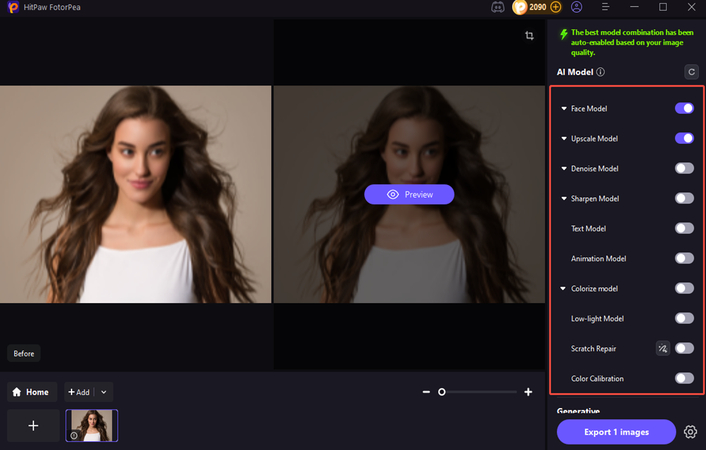
Once the image is loaded, select from 9 possible AI models based on your demands. Face Model (for portraits or facial studies), General Upscale (for improving sharpness and resolution), Colorize (for black and white images), Animation Model (for cartoon-style references), Scratch Repair (for restoring old or damaged scans), Color Calibration, Noise Reduction, Background Removal, and Low-light Model are also available depending on the image.

-
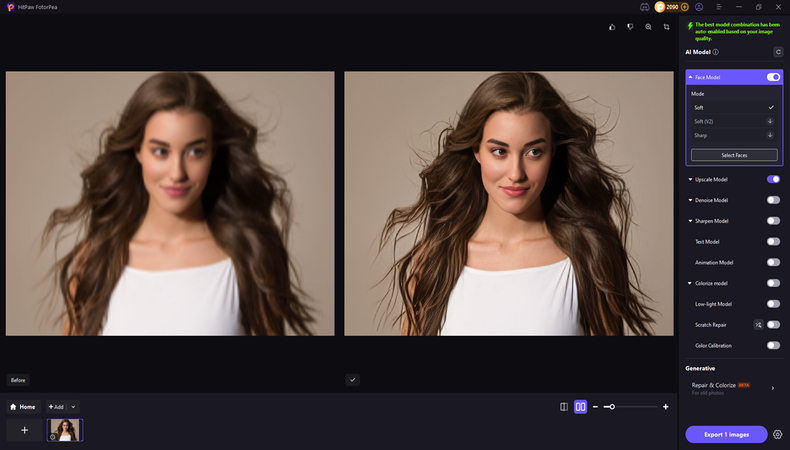
To see an enhanced version of your photograph, click "Preview". If you are satisfied with the results, click the "Export" option to save your finished image on your computer.

Part 4. FAQs of Print Reference Image
Q1. What is the best size to print a reference image?
A1. Your project and workspace will influence this. The standard size for an in-depth study is 8.5"x 11" (A4). For larger artworks, you may pick A3 or tabloid print sizes.
Q2. What's the best type of paper to use for reference printing?
A2. Choose matte picture paper or high-quality printer paper to reduce glare and reveal clear detail. Glossy paper may reflect light and cause eye strain. For tracing, lightweight paper or tracing sheets are very beneficial.
Q3. What DPI should I use when printing a photo reference?
A3. 300 DPI produces sharp and clear prints, as anything below 150 DPI might appear pixelated or hazy. Most editing applications allow you to verify or alter the DPI before printing.
In Summary
Printing a reference image helps your creative work become more focused and exact. From changing brightness to cropping and adding grids, properly prepping an image makes a significant impact.
You should use formats like PDF or PNG for better quality. You must also verify the DPI before printing, and avoiding the typical issues like bad paper selection, improper cropping, and pixelation is most recommended. With HitPaw FotorPea, you can easily enhance the images before printing as it provides 9 AI models, and all the operations are done automatically, so manual efforts are unnecessary.
Leave a Comment
Create your review for HitPaw articles


