CMOS Sensor Noise: Understanding Dynamics & How To Remove It?
Capturing the perfect shot in the world of digital photography often feels like a blend of science and creativity. No matter how good a picture looks, there is an invisible challenge called the CMOS sensor noise. While you might think of it as a human error, this grain is a visual of light interacting with silicon-based image sensors.
If your images have this noise, it will appear as grains, colors, or blur in low light or high ISO settings. Although this can be a real problem for the photographer, there are many effective techniques to make this grain go away. The article below looks into the causes of this noise and how to get rid of it.
Part 1. Types of CMOS Image Sensor Noise
If you want to learn the concept of this noise, you will have to explore its types and their causes. The table below looks into the types of CMOS image sensor noise and discusses all the relevant information:
| Noise Type | Category | Cause | Characteristics | Impact on the Image |
|---|---|---|---|---|
| Random Noise | Temporal/Stochastic | Natural randomness in photon arrival | Changes from frame to frame | Grainy or speckled appearance |
| Fixed Pattern Noise | Spatial | Pixel-to-pixel variations in sensitivity or dark current | Appears consistently in the same pattern under identical conditions | Visible as vertical and horizontal banding or grid-like patterns |
| Thermal Noise | Random | Electron activity due to heat rather than light | Increases with temperature and exposure time | Bright spots or foggy patches in dark areas |
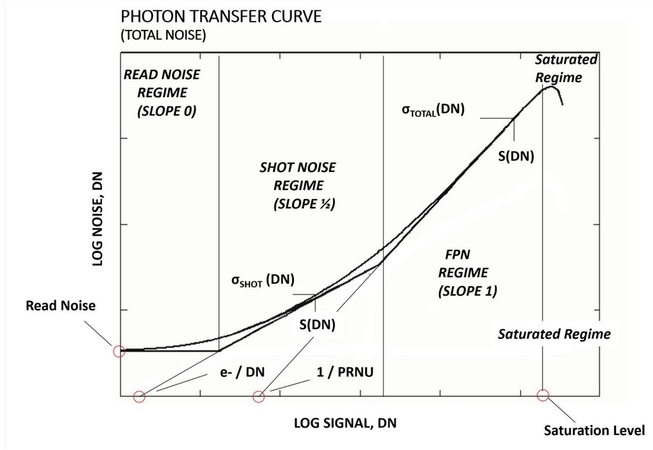
| Readout Noise | Systematic | Noise from amplifiers, ADCs, and other electronics during signal readout | Affects signal integrity during conversion from analog to digital | Blurred details or general degradation of dynamic range |
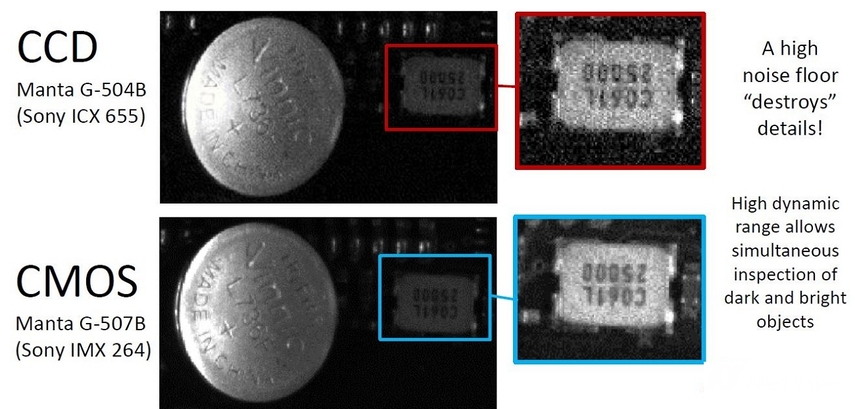
Photographers often confuse CMOS with CCD noise, which may hinder the noise reduction process. Check out the following points to easily differentiate between the two:
1. Readout Method and Noise Distribution: In CMOS, each pixel has its own amplifier and readout circuitry, whereas the read noise varies across pixels. However, in CCD, pixels transfer charge to a single output amplifier with more uniform read noise but slower readout.
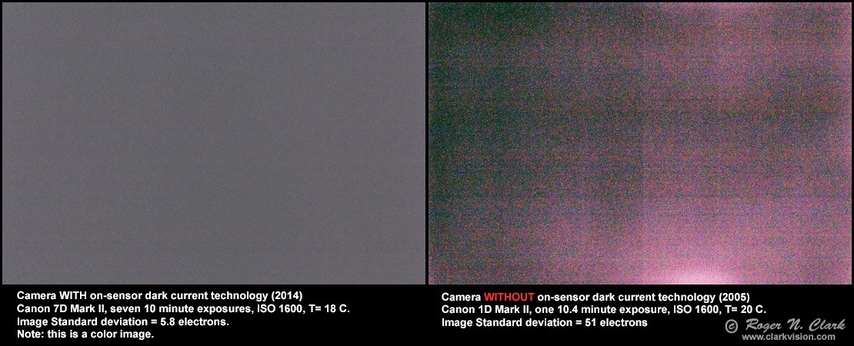
2. Read Noise Level: Although modern CMOS sensors have significantly improved, the previous ones had higher read noise. In contrast, CCDs are ideal for scientific and low-light applications because of their low read noise.
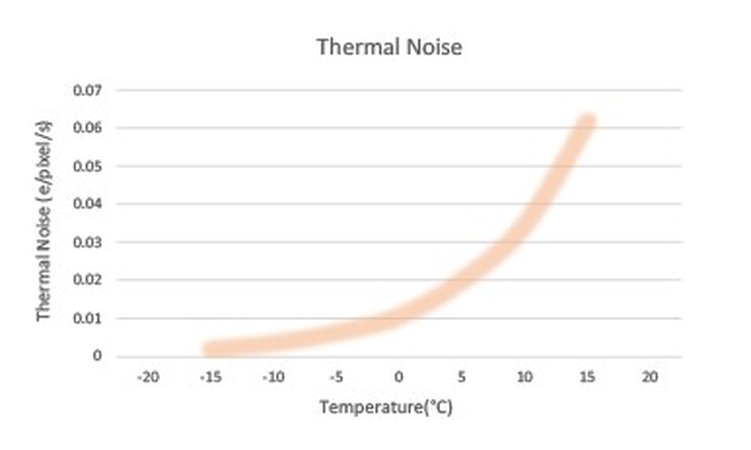
3. Thermal Noise: The noise in CMOS sensors is prone to thermal noise in long exposures. In comparison, the other type of noise is also impacted but controlled due to more uniform charge handling.
Part 2. CMOS vs CCD Noise Comparison
Although the above section comprehensively discusses the comparison between the two types of artifacts, explore the table below for a brief look:
| Aspect | CMOS Sensor | CCD Sensor |
|---|---|---|
| Structural Design | Each pixel has its own amplifier and readout circuitry | Charges from all pixels are shifted to a single readout node |
| Operation Style | Integrates processing on-chip with low power consumption | External processing with higher power |
| Noise Sources | Higher fixed pattern noise | Lower read noise |
| Astrophotography | Modern CMOS with cooling is viable, but is unsuitable due to noise | Preferred for low-light imaging due to low noise |
| Surveillance Imaging | Preferred for HDR, low-light IR modes | Less suited due to slower readout and higher power consumption |
| Trends in Technology | Advanced BSI, stacked sensors, global shutters closing gap | Limited evolution and mostly used in niche or scientific applications |
Part 3. CMOS Sensor Low-Light Performance
Now that we have a clear differentiation between the two types of noise, let’s dig deeper into the concept of CMOS and the CMOS sensor low-light performance:
1. CMOS Sensor and its Performance in Low-Light Conditions
In low-light conditions, CMOS sensors increase the noise visibility due to their struggle to collect photons. Cameras often increase the ISO setting as a compensation, which amplifies both the signal and the noise. This leads to grains as random and thermal noise become more prominent.
2. Role of Pixel Architecture and Back-Side Illumination
The structure of each pixel plays an important role in how well it captures light. Traditional front-side illuminated sensors suffer from reduced efficiency due to metal wiring blocking some of the incoming light. Back-side illumination technology flips the structure so light hits the photodiode directly to increase sensitivity.
3. Managing CMOS Sensor Noise in Nighttime
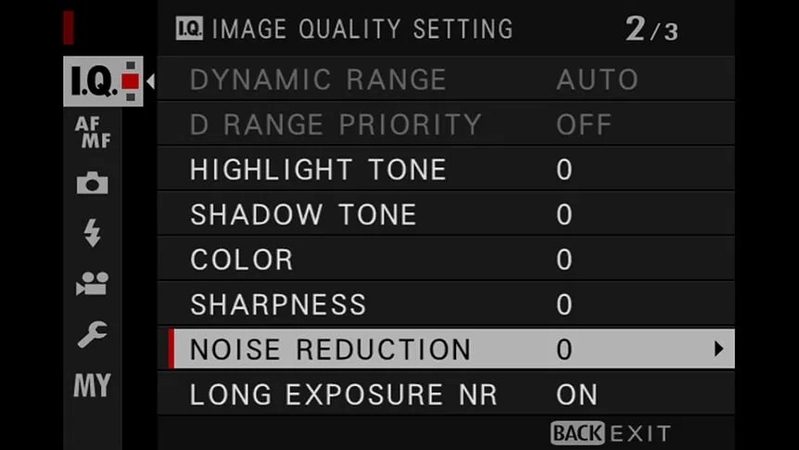
To reduce noise in night scenes, CMOS sensor noise uses both hardware and software techniques. You can use long exposure noise reduction and dark frame subtraction to minimize the grain. If your camera does not have in-camera noise filtering options, benefit from third-party noise reduction tools.
Part 4. CMOS Sensor Noise Reduction Techniques
To refine your image quality, you must understand the intricacies of CMOS sensor noise correction. Look into the following section and gain clarity on the two techniques of noise reduction:
Hardware-Based Noise Reduction
These techniques are built directly into the sensor or the camera hardware to minimize noise at the source. The following points will explain the hardware-based noise reduction techniques in a better way:
1. To subtract out consistent noise, the Correlated Double Sampling captures the before and after light exposure signals.
2. The Analog Gain Control carefully adjusts the amplification of the signal to avoid boosting noise along with the image data.
3. Enlarging the pixels is a good idea, as bigger sizes can collect more light to improve the signal-to-noise ratio in low light.
4. Design enhancements like electrical shielding minimize interference between pixels and circuits.
Software-Based Noise Reduction
Either in-camera or during editing, these techniques are applied after the image is captured to clean up visible noise. You can explore the explanation below and learn the details on this CMOS image sensor noise reduction technique:
1. Use the in-camera noise reduction techniques to smooth out the areas with high noise while preserving the details of the image.
2. With Multi-Frame Stacking, you can capture multiple exposures and merge them to average out random noise.
3. Luminance vs Chrominance Filtering separates brightness noise from color noise and treats them differently to avoid detail loss.
4. If the above-mentioned techniques do not work, you can always invest in a CMOS sensor noise reduction software.
Part 5. Post-Processing CMOS Sensor Noise Reduction From Images: FotorPea
Despite all the efforts made for the perfect photo, imagine sharing a grainy image for your photography thesis. Besides resulting in bad grades, this picture will kill your opportunities as a photographer. If we told you that this artifact can go away by using a robust image enhancer, none of the above situations will happen. With HitPaw FotorPea, you can upgrade your image quality through effective CMOS sensor noise correction.
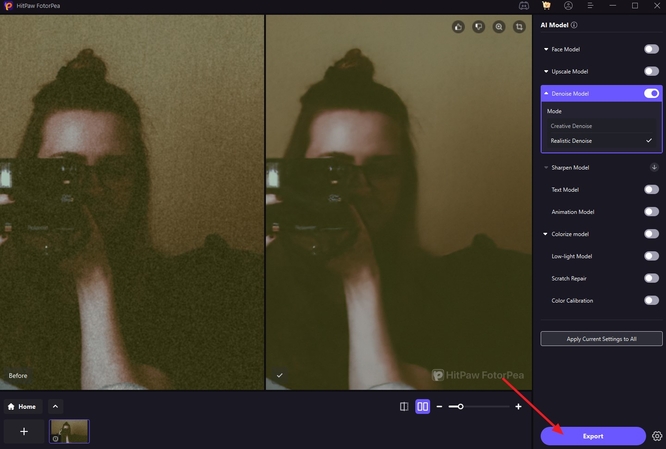
Besides its conventional noise reduction model, the newly introduced Realistic Denoise model helps you with image enhancement by offering extensive noise removal. This model retains the image details while retaining the original textures. If your image is a combination of blur and noise, the Creative Denoise model will detect the flaws in your picture and fix them with a single click.
Key Features of HitPaw FotorPea
1. Batch Processing: If you have multiple images with CMOS image sensor noise, use the batch enhancement feature to improve their quality.
2. Export Settings: Before you save the enhanced image, you can select the desired image quality and format to get personally tailored outcomes.
3. Preview Results: To be sure of the quality of noise reduction, preview the before and after enhancement results.
A Quick Overview of Using FotorPea to Remove CMOS Sensor Noise
As mentioned above, the picture enhancement process at HitPaw FotorPea is simple and relies just on a single click. The following guide covers a complete guide on using this tool for CMOS sensor noise reduction:
Step 1. Select HitPaw FotorPea to Start EnhancementTo begin with, open the HitPaw FotorPea’s main interface and use the “Enhance Photos Now” button to head to a new screen.

Step 2. Import the Images With CMOS Sensor Noise for Enhancement
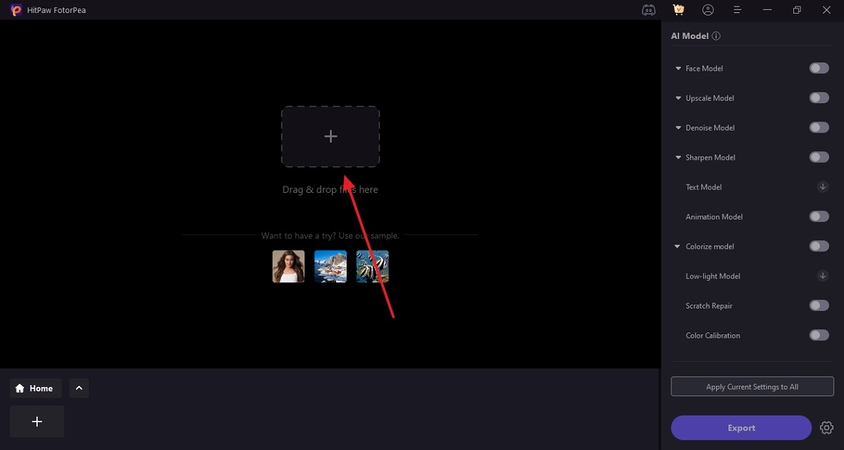
Using the next screen, select the “+” button at the center and choose the noisy images from your device for quality upgrade.
Step 3. See the Enhanced Results After Selecting an AI Model
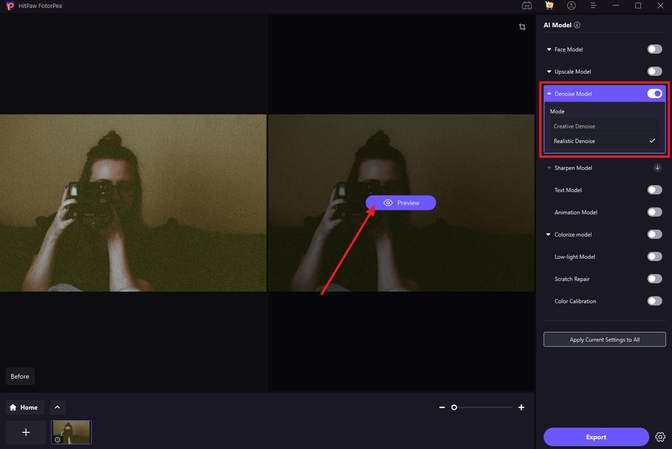
Once the imported image appears on the screen, select the “Realistic Denoise” model from the “Denoise Model” section. Now, click the “Preview” button and wait for the enhanced picture to be unveiled.
Step 4. Save the Upgraded-Quality Image to Your Device
If the enhanced image satisfies you, select the “Export” button at the bottom right to save the picture to your PC.
Conclusion
In summary, this article covered all the details you might need to know about the CMOS sensor noise. While we discussed various techniques to prevent and reduce this artifact, we came across HitPaw FotorPea. This platform is a robust image enhancer that offers numerous noise reduction models to enhance your photography.


 HitPaw Edimakor
 HitPaw VikPea (Video Enhancer)
 HitPaw Univd (Video Converter)


Share this article:
Select the product rating:
Daniel Walker
Editor-in-Chief
This post was written by Editor Daniel Walker whose passion lies in bridging the gap between cutting-edge technology and everyday creativity. The content he created inspires the audience to embrace digital tools confidently.
View all ArticlesLeave a Comment
Create your review for HitPaw articles