iMovie Color Grading: A Complete Guide to Editing Colors Like a Pro
Color grading is one of the most powerful ways to transform the mood, tone, and overall appearance of a video. Whether you are producing a short film, vlog, or presentation, the right colors can elevate your footage to a professional level. For Mac users, iMovie provides a simple but effective set of tools for adjusting brightness, contrast, saturation, and temperature. This guide will take you through everything you need to know about iMovie color grading, including its built-in features, how to use auto correction, manual adjustments, limitations, and even a professional AI-powered alternative for more advanced needs.
Part 1. Color Grading Tools in iMovie
When it comes to color grading iMovie, the software offers multiple features that help you correct and enhance your video. Although they are not as advanced as professional editors, they are more than enough for beginners and casual creators. Below are the essential tools for colour grading in iMovie.
1. Color Correction
This tool lets you adjust exposure, brightness, and color balance. It is ideal for fixing overexposed or underexposed clips and giving your video a more natural look.
2. Color Wheels
The color wheels allow you to control shadows, midtones, and highlights separately. This gives you finer control over your footage and helps create a professional cinematic style.
3. White Balance
White balance correction ensures that your video colors look realistic. With iMovie, you can quickly fix any warm or cool tones and make your footage more visually appealing.
4. Presets
For those who want quick edits, iMovie offers built-in presets that instantly apply specific looks or moods. This is a simple way to experiment with different styles.
5. Saturation and Exposure
By adjusting saturation and exposure levels, you can make your clips either more vivid or softer. This is especially useful when you want to highlight certain details or create a subtle atmosphere.
Part 2. How to Use Auto Color Correction in iMovie?
One of the easiest ways to enhance your video is by using the auto color correction tool. This feature automatically balances the colors of your footage, making it appear cleaner and more professional without requiring manual adjustments. Auto correction is especially useful for beginners who want quick improvements.
Step 1.In the iMovie app on your Mac, select a clip or range in the browser or the timeline.
Step 2.To show the color balance controls, click the Color Balance button.

Step 3.Click the Auto button.

Step 4.The clip's color values are automatically adjusted, removing any color casts and maximizing contrast. The Color Balance and Auto buttons will be highlighted when you select the clip.
Part 3. How to Manually Adjust Color in iMovie?
If you want more control over the look of your video, manual adjustments are the way to go. Manual colour grading in iMovie allows you to fine-tune brightness, shadows, contrast, and more to achieve your desired cinematic style.
Step 1: Select Your Clip and Open Color Correction Controls
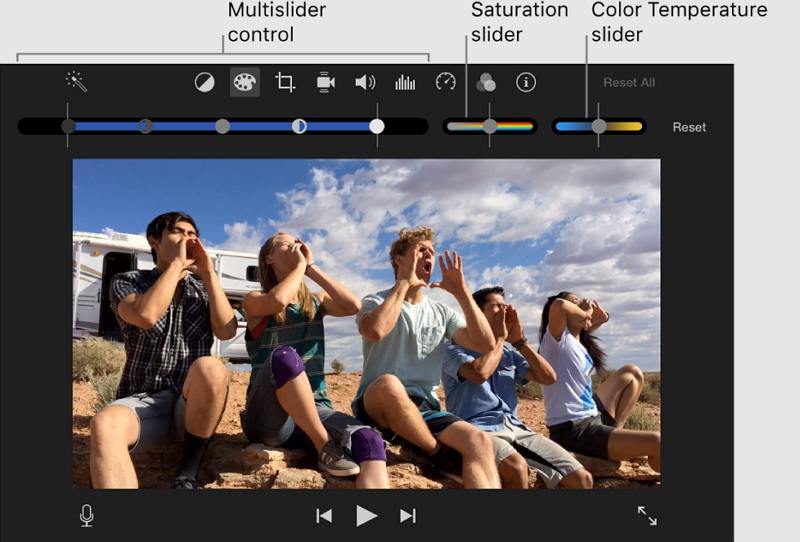
Select a clip or a segment of your video again. Then, click on the manual Color Correction button (the color palette icon) to reveal the adjustment options.

Step 2: Adjust Color Settings
Shadows: Move the black slider within the multislider control to adjust shadow details.
Brightness: Use the gray slider in the multislider control to modify the overall brightness.
Contrast: Adjust the contrast by moving either of the half-moon sliders in the multislider control.
Highlights: Change the highlights by dragging the white slider in the multislider control.
Color Saturation: Increase or decrease the color saturation with the Saturation slider.
Color Temperature: Modify the color temperature using the Color Temperature slider.

Part 4. Limitations and Possible Issues of Using iMovie Color Grading
While iMovie is useful for basic video editing, it does have limitations when it comes to professional color grading. Here are a few issues you may encounter:
Limited tools compared to advanced video editing software.
- No advanced color scopes like waveform or vectorscope.
- Presets may not match professional cinematic looks.
- Manual controls lack precision for detailed corrections.
- Rendering time can be slower for long or high-resolution clips.
- Limited export options if you need professional post-production formats.
Part 5. Best iMovie Alternative for Consistent Color Correction
For creators who want to go beyond iMovie colour grading, HitPaw VikPea is a powerful AI-driven solution. It offers professional-grade color enhancement models that deliver more consistent, accurate, and visually stunning results. Unlike iMovie, which relies on manual sliders and presets, HitPaw VikPea uses artificial intelligence to analyze your footage and apply intelligent adjustments automatically. This makes it perfect for filmmakers, YouTubers, and anyone looking for advanced editing without complexity.
Top Features of HitPaw VikPea for Color Enhancement
- AI-driven color enhancement improves vibrancy and tonal balance intelligently
- Colorize black-and-white videos with natural, realistic tones automatically
- Transform SDR footage into HDR-like visuals with improved depth and brightness
- Enhance low-light footage by correcting tints and restoring hidden details
- Preserve natural tones while improving saturation, contrast, and luminance
- Preview changes in real time before exporting your color-enhanced video
Steps to Use HitPaw VikPea for Color Enhancement
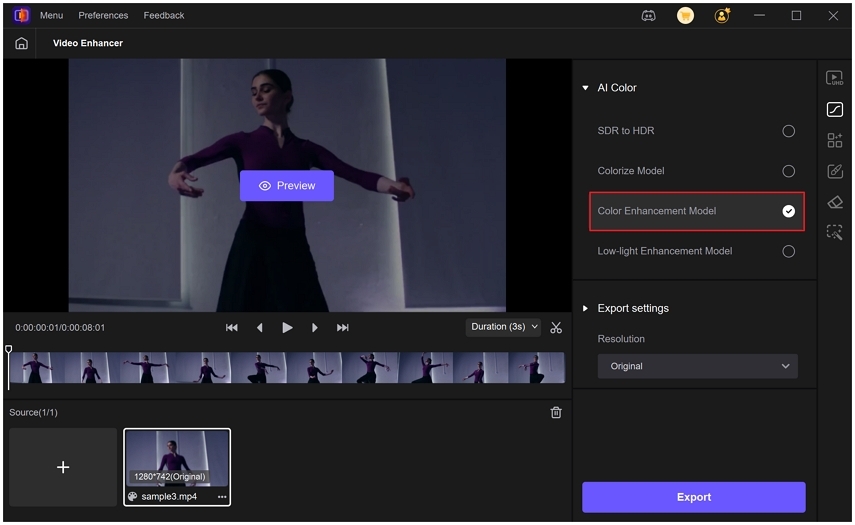
Step 1.Download and install HitPaw VikPea on your computer. Run VikPea, click on AI Color, then choose B & W Colorization, SDR to HDR Model, Color Enhancement Model, or Low-light Enhancement Model depending on your needs.

Step 2.Import the file you want to correct. Select the best-fitting AI model, such as Color Enhancement, to boost color vibrancy.

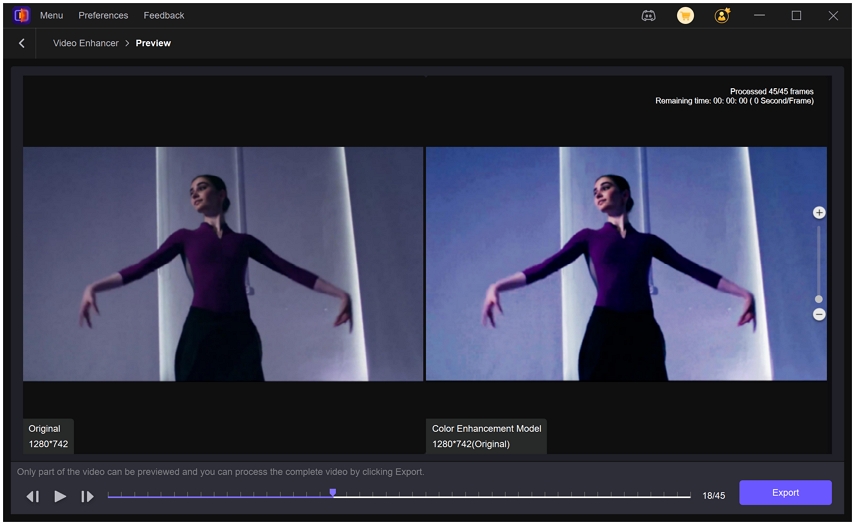
Step 3.Preview the changes to see how your improved colors look in your video. Once satisfied, click Export to save your color-balanced video to your computer.

Frequently Asked Questions About Color Grading in iMovie
Yes, iMovie allows you to perform basic color grading using tools such as color correction, white balance, and saturation adjustments. While not as advanced as professional editors, it is perfect for beginners.
The best tool depends on your needs. iMovie is great for simple adjustments, but if you need advanced controls or AI-powered enhancements, HitPaw VikPea is the stronger choice.
You can copy color corrections in iMovie by selecting the clip with the adjustments, using the Edit menu, and applying the correction to another clip. This ensures consistency across multiple clips.
Conclusion
iMovie color grading gives Mac users an easy way to enhance their videos with simple yet effective tools. From automatic corrections to manual adjustments, you can improve brightness, saturation, and overall color balance. However, if you are aiming for professional-level results, AI-powered tools like VikPea AI Colorize Video provide far more advanced and consistent features. Whether you are a beginner or an experienced creator, the right tool will make your videos look polished and cinematic.
Leave a Comment
Create your review for HitPaw articles


