What Is Color Banding in Video and How to Fix It
Color banding is a common video artifact that appears as visible stripes or blocks across smooth gradients such as skies, shadows, and soft color transitions. Instead of seeing a continuous color blend, viewers notice abrupt steps between tones. This issue can make otherwise high-quality footage look cheap, low bit depth, or poorly processed. In this guide we explain what banding looks like, why it happens, practical fixes in Adobe Premiere Pro, and a recommended AI-driven tool to automatically reduce banding and improve overall color fidelity.
Part 1. What Is Color Banding in Video?
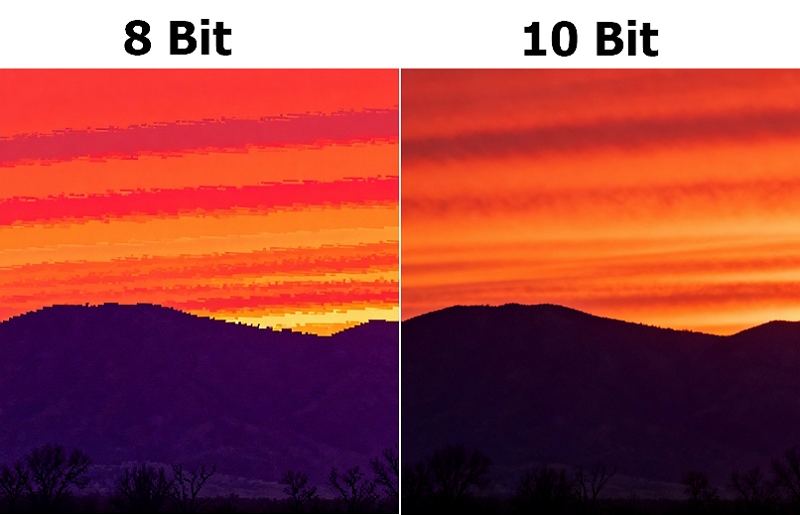
Color banding occurs when a smooth gradient is represented by too few color values, causing visible steps between similar tones instead of a continuous transition. This artifact is most obvious in low bit depth footage, heavy compression, or after aggressive color grading. Banding reduces perceived image quality because the human eye expects smooth tonal shifts; when those shifts are quantized into discrete levels, the result is distracting stripes or patches. Banding can appear in skies, skin tones, cinematic fades, and any area with subtle luminance or chroma changes.
How to Recognize Color Banding in Video?
- Solid stripes across gradients where smooth color change should appear.
- Posterized areas with sudden jumps in tone or saturation.
- Blocky bands in skies, shadows, or soft vignettes.
- Noticeable on monitors with limited color reproduction or low dynamic range.
- Becomes worse after heavy compression or aggressive color grading.
- More visible on large screens or when viewing in dark rooms.
Part 2. What Causes Color Banding in Video?
Color banding stems from limitations in how color and luminance are stored, processed, or displayed. When there are not enough distinct color values to represent a smooth transition, the gradient is quantized into visible steps. Other causes include aggressive compression algorithms that discard color precision, using the wrong color space or bit depth during editing, poor export settings, and subpar camera settings. Understanding the root causes helps editors choose fixes that restore smooth gradients and preserve image quality.
- Low bit depth capture such as 8-bit color per channel.
- Heavy lossy compression that reduces color precision.
- Extreme color grading that stretches limited tonal values.
- Incorrect color space conversions between SDR and HDR.
- Insufficient dithering or lack of noise to break up steps.
- Display limitations like low dynamic range or poor panel calibration.
Part 3. How to Reduce Video Banding in Adobe Premiere Pro?
Reducing banding in Premiere Pro involves increasing color precision, applying tools that break up visible steps, and avoiding workflows that reduce tonal information. Start by preserving the highest color bit depth you can during editing, then use effects designed to smooth gradients. When exporting, choose settings that maintain color fidelity. Below are practical methods to reduce banding inside Premiere Pro.
1. Rendering at a Higher Bit Depth
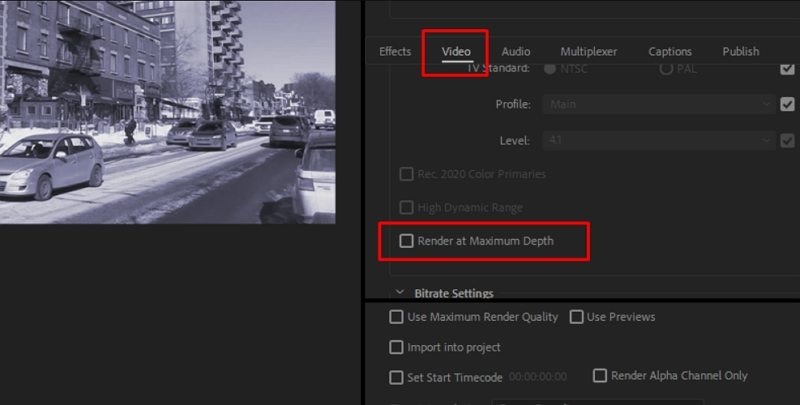
When you're ready to export your video, go to Video File > Export > Media. In the Export settings window, go to the Video tab to check Render at Maximum Depth. Use this only if you're working with 16-bit or 32-bit color depth in your timeline, and be ready for longer encoding times.
2. Deband Effect
Boris FX Sapphire and Continuum have a Deband effect ready to use in Premiere Pro.
- Select your video clips in the timeline.
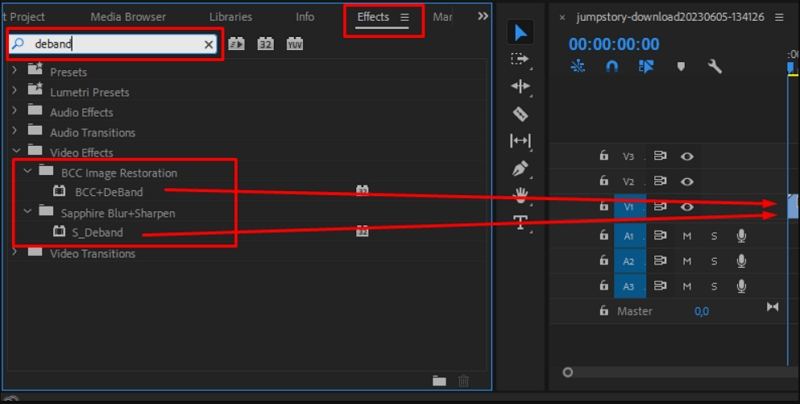
Go to your Effects library and search for "Deband." You can use S\_Deband or BCC+DeBand.

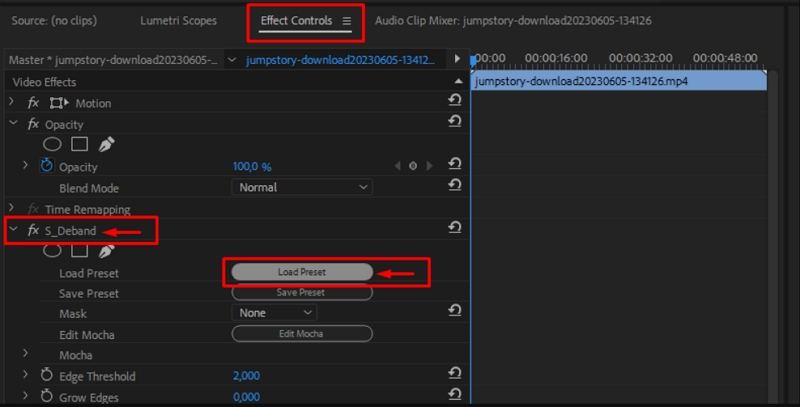
Drag the effect to your clip and adjust parameters in your Effects Control panel or launch the FX Browser to select a preset.

3. Adding Noise/Grain
Another efficient way to fix banding is by adding noise or film grain.
- Select your video clips in the timeline.
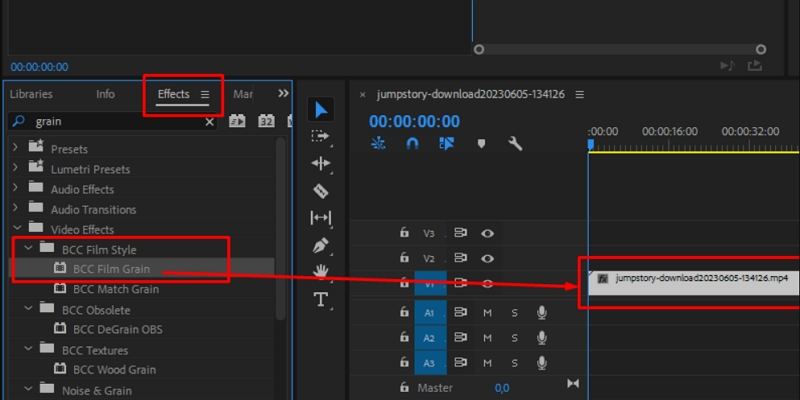
Search your Effects library for a noise or grain filter such as Sapphire's S\_Grain or BCC Film Grain.

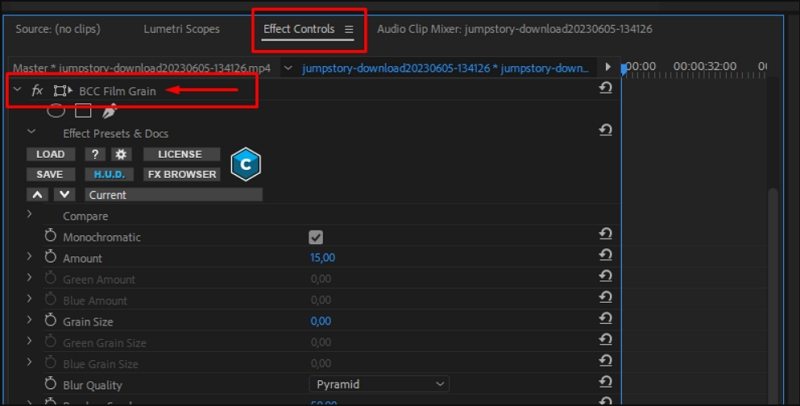
Drag it to your clip and adjust the parameters in your Effects Control panel. Find a balance to avoid noisy footage but enough to help reduce banding.

- You can launch the FX Browser to select presets from Boris FX Continuum. Select and preview the effect.
- Click Apply and close the window to continue editing your video in Premiere Pro.
Part 4. Best Way to Automatically Fix Banding In Video with AI
AI video enhancers can automatically analyze gradients and apply denoising, HDR conversion, and matting techniques to smooth out banding with minimal manual work. HitPaw VikPea uses machine learning to detect gradient tracks and intelligently reduce unwanted banding while preserving detail. It uses AI and matting technology to quickly reduce gradient tracks and unwanted background color banding. AI-powered denoising and HDR conversion help smooth gradients and enhance overall color quality without hassle. It also helps you manage complex scenes, blurred edges, and banding in videos.
For editors who need a fast, automated solution that works on large batches and supports upscaling, an AI enhancer can save time and produce consistent results across clips and scenes.
AI-driven gradient smoothing to remove visible bands without losing detail.
- Automatic HDR conversion to expand dynamic range and reduce quantization artifacts.
- Intelligent denoising that preserves edges while removing color steps.
- Matting technology to isolate backgrounds and treat gradients separately.
- Batch processing for converting multiple clips with consistent settings.
- Up to 4K and 8K upscaling while minimizing color artifacts and banding.
- Side-by-side preview to compare before and after results quickly.
- Adjustable exposure and tone mapping to refine final color balance.
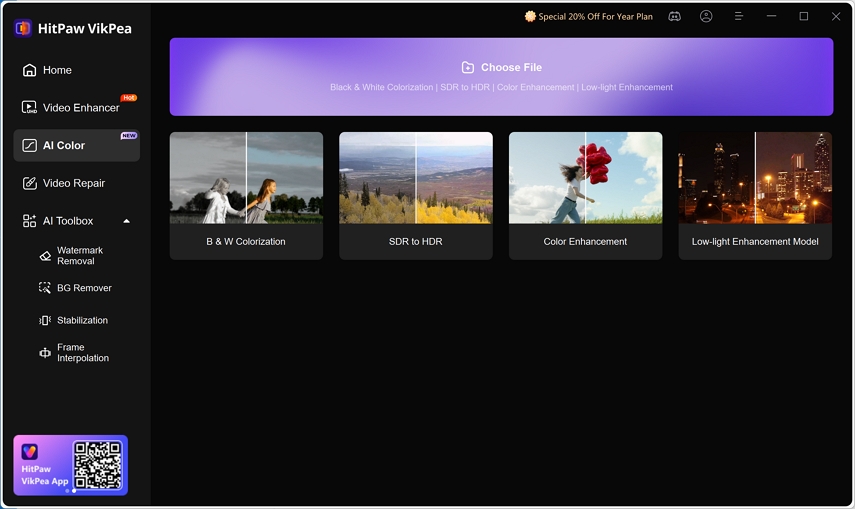
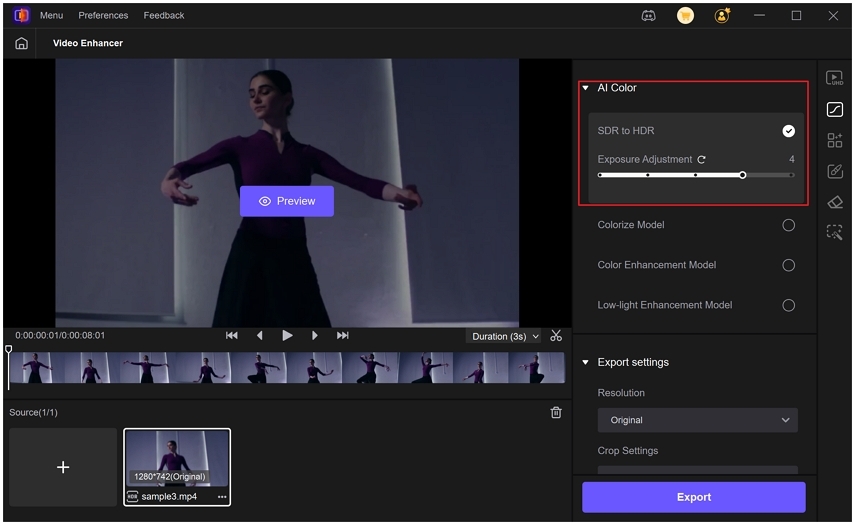
Step 1.Download and install HitPaw VikPea on your computer. Run VikPea after installing, click on AI Color and then click on SDR to HDR Model. Import the low-res videos you want to convert to HDR.

Step 2.Drag the slider to adjust the exposure level. The Exposure Adjustment slider in the SDR to HDR model lets you fine-tune the brightness level of your video after the dynamic range has been enhanced.

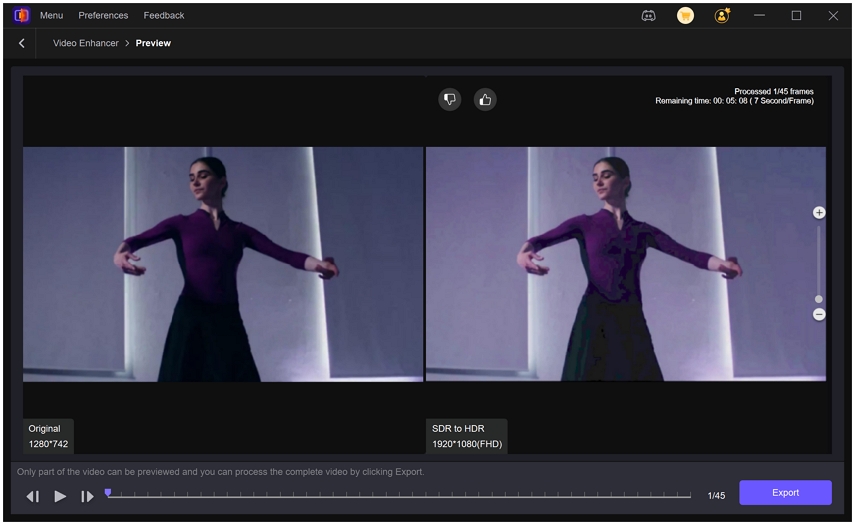
Step 3.Under Export Settings, choose your desired resolution. VikPea supports upscaling up to 4K or 8K. Preview the changes to see a side-by-side before-and-after comparison. Click on "Export" to transfer your color-balanced video to your computer.

Part 5. Frequently Asked Questions on Color Banding
Capture and edit in higher bit depth where possible, avoid extreme grading, use dithering or subtle grain, and export with settings that preserve color precision.
Not necessarily. Banding indicates limited color precision or processing issues, but other image aspects can still be high quality like resolution and sharpness.
Color banding appears as stepped stripes or patches across smooth gradients, where color shifts suddenly rather than blending smoothly.
8 bit stores 256 values per channel and shows banding more easily; 10 bit stores 1024 values per channel, giving much smoother gradients with fewer visible bands.
Banding is the artifact of insufficient color values. Dithering adds controlled noise to mask steps, creating the appearance of smoother gradients.
Conclusion
Color banding is a preventable and fixable artifact when you understand its causes and follow careful capture, editing, and export practices. Preserve higher bit depth, avoid extreme compression, and use techniques such as dithering, adding subtle grain, or specialized deband effects in Adobe Premiere Pro. For automated, fast, and consistent results, AI tools like HitPaw VikPea can intelligently smooth gradients, perform HDR conversion, and reduce banding across large projects. By combining best practices with the right tools, you can deliver videos with smooth, professional color transitions and improved viewer experience.
Leave a Comment
Create your review for HitPaw articles


