How to Blur Background of Photo: iPhone, Android, Photoshop
Blurring the background of a photo is a powerful technique that draws attention and enhances the overall aesthetic. Whether you want to achieve this effect on a mobile or with editing software, each method offers various features. Understanding how to blur the background of a photo can help make your images stand out across various social platforms. In this article, we have provided detailed guides to easily and efficiently remove image backgrounds.
Part 1. What Is Background Blur and Why Does It Enhance Photos
Background Blur is a creative technique that intentionally renders the background out of focus, leaving the subject sharp. It is created by controlling camera settings to get a shallow depth of field in the image. Before you dive into how to blur the background of a photo, let's explore what benefits it provides:
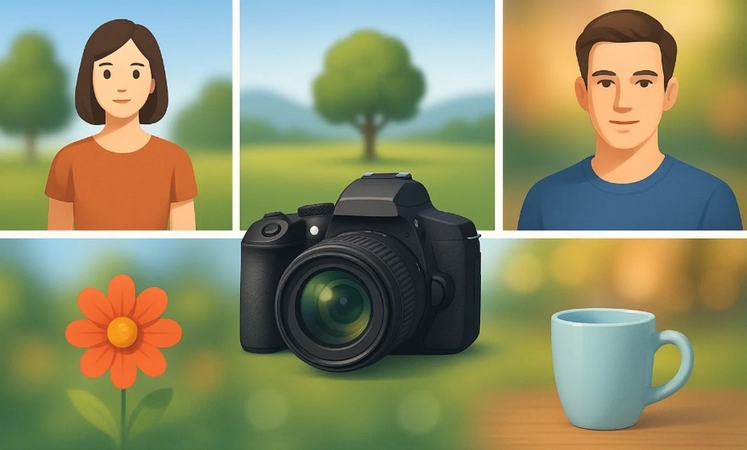
- 1. Draws Viewer's Attention:The blur effect removes distracting backgrounds, keeping the viewer's focus on the main object.
- 2. Add Depth and Dimension:Separating the subject from the background creates a sense of 3-D, making photos more visually compelling.
- 3. Enhance Professional Look:Images with a blurred background often appear more polished and sophisticated, mimicking the styles commonly seen in high-quality work.
- 4. Creative Storytelling:Using blur lets photographers present visual stories by highlighting key elements and conveying emotion properly.
- 5. Increase Versatility:Mastering background blur gives photographers the power to handle a variety of scenes, including product shots.
Part 2. How To Blur the Background with an iPhone
While exploring how to blur the background of a photo, know that you can do this on your iPhone easily. This method lets you blur the background while taking a picture or during post-processing. With the advancements it provides, portrait mode lets you instantly create professional-looking social media posts. So, let's explore a detailed guide to understand the procedures for both methods.
How to Blur the Background of a Photo Using iPhone Portrait Mode
Instructions. Open the Camera app on your iPhone and tap the "Portrait" mode. After this, tap the "F stop" icon at the top-right of the screen and adjust the slider to blur the image background.
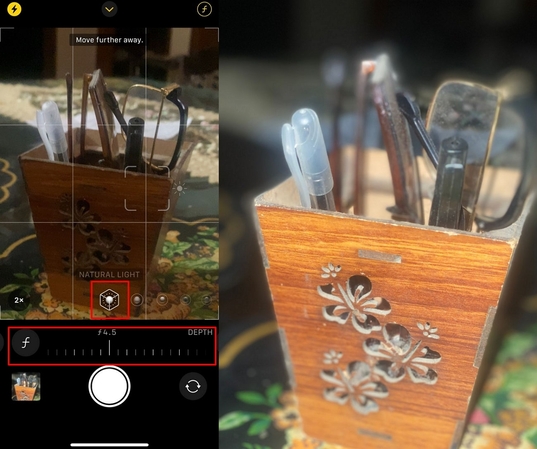
How To Blur the Photo Background After Taking a Picture
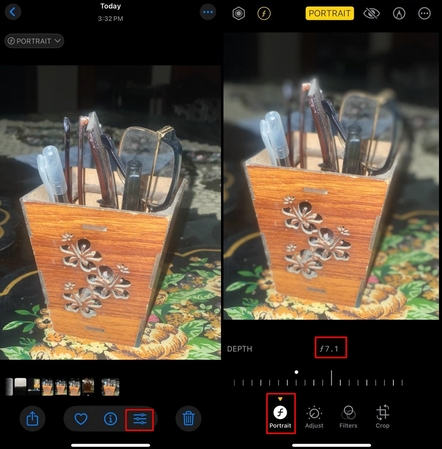
Instructions. Access the desired image within the "Photos" app and click on the 3 lines icon. Afterwards, tap on the "F portrait" icon to adjust the slider to get the desired blurriness level.
Part 3. How To Blur the Background on A Photo on Android Devices
With the advancement in technology, now you can also blur your image backgrounds with your Android phone. Without downloading an extra third-party app, you can even edit it using its built-in editing tool in the gallery. Furthermore, you can blur images in the Google Photos app to make them more visually appealing. Have a look at the following guides to know how to blur a background on a photo:
How To Blur the Background of a Photo on Android Without Apps
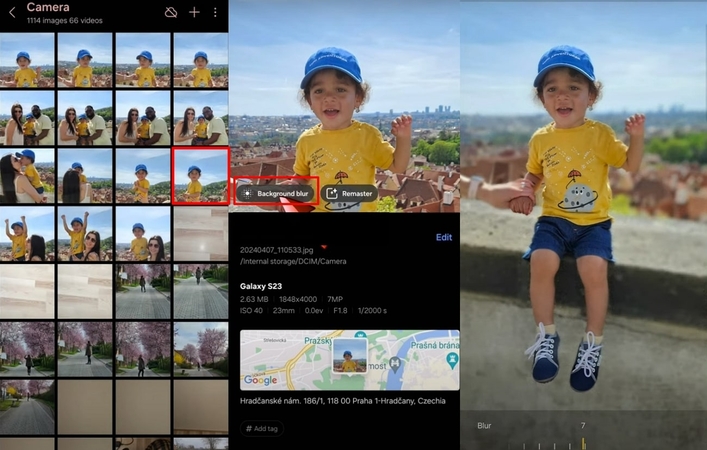
Instructions. Open the desired image in the Gallery app and swipe it upward. Here, tap the "Background Blur" option and move the slider to 7 to create a perfect blurry background.
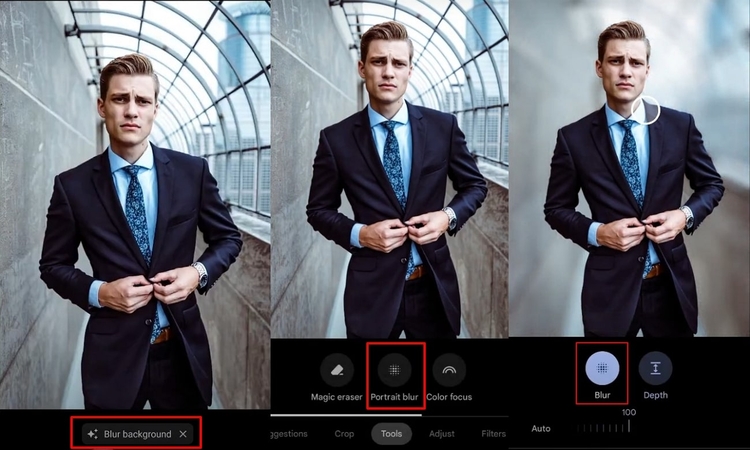
How to Blur Photo Background on Android Using Google Photos
Instructions. Upon opening the "Google Photos" app, tap the "Blur Background" option. Now, select "Portrait Blur" and choose the "Blur" option, and hit the "OK" button to save it.
Part 4. How Do You Blur the Background in Photoshop
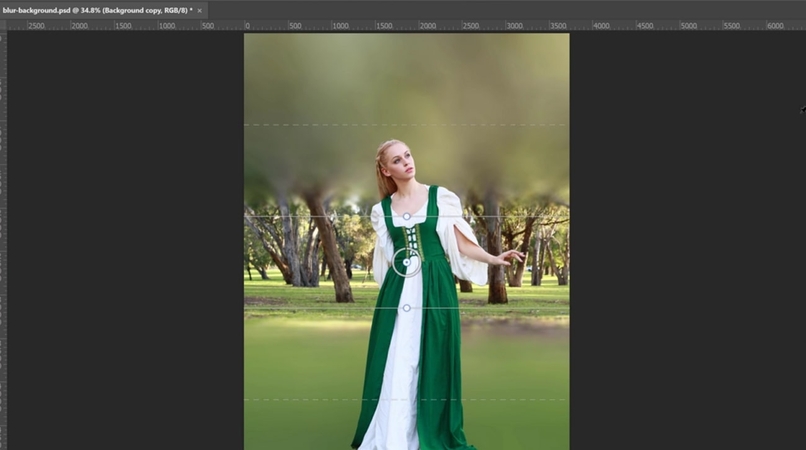
If you want an advanced solution for editing professional images, then you can opt for the built-in Blur Gallery feature in Photoshop. Users can use its precision tool first to demonstrate the subject from the background for a professional look. Furthermore, while blurring the image backdrop, you can also access its other features to enhance overall visuals. Upon hearing its features, let's explore how to blur out part of a photo on Photoshop:
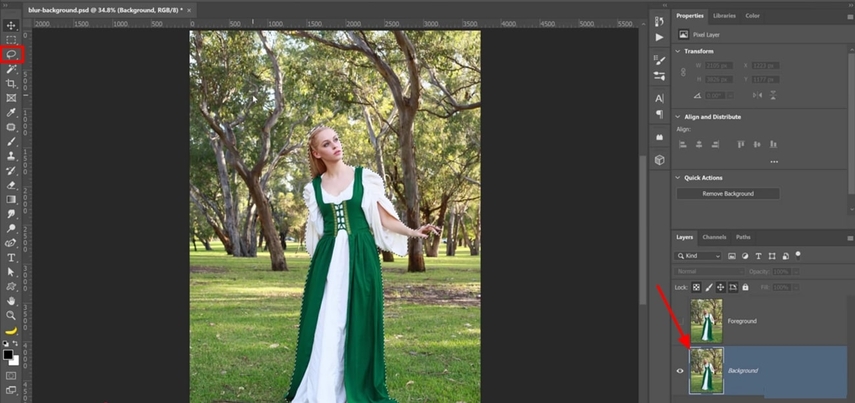
Step 1.Initiate by opening the image in Photoshop and creating a copy layer for safer editing. Afterwards, choose the "Selection" tool to select the main object.

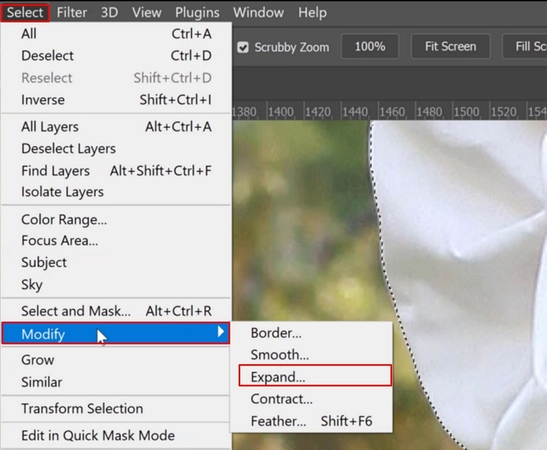
Step 2.Tap on the "Select" menu, choose the "Modify" option to further hit the "Expand" option in the pop-up menu.

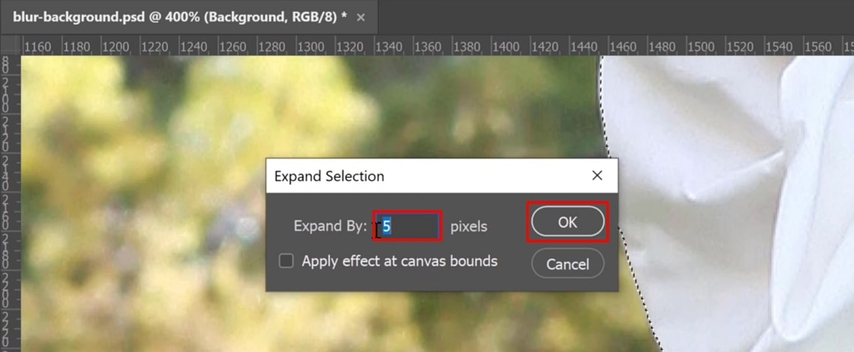
Step 3.Here, choose the pixels to 5 and hit the "OK" button to save the updated settings.

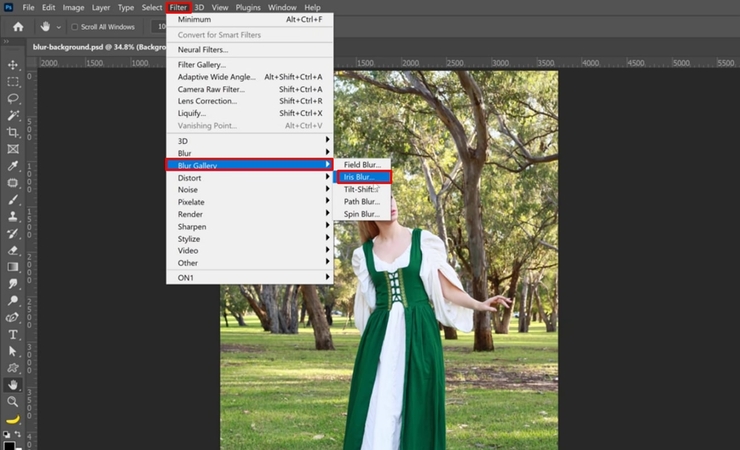
Step 4.Afterwards, choose the "Filter" menu, hit the "Blur Gallery" option, and choose the "Iris" Blur option.

Step 5.Here, it shows the blurred part with a line border, which you can expand to make the whole image's backdrop blurry. Afterwards, hit the "Save" button to export the edited image to the device.

Part 5. How To Blur the Background of An Image On Lightroom
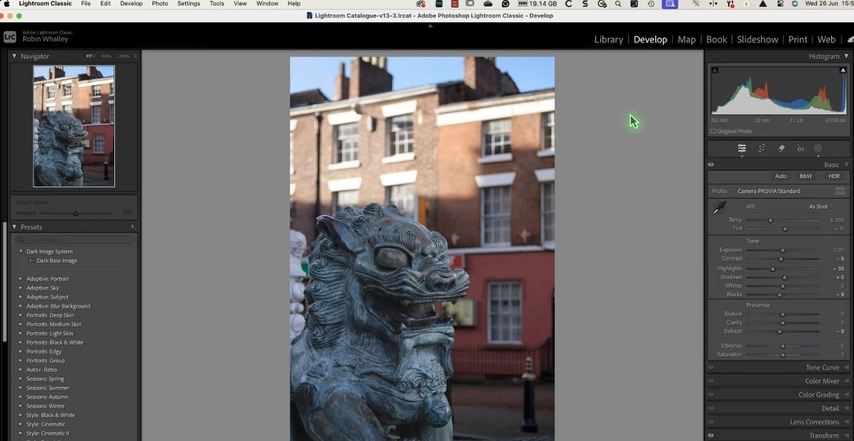
Besides Photoshop, you can also use Lightroom to get professional results with more straightforward steps. Within this method, you simply select the Lens blur tool, and it automatically blurs the backdrop. Whether you want to enhance portraits or product shoots, it is an ideal option for both beginners and professionals. So, if you are also exploring ways to blur the light background, then go ahead with this guide:
Step 1.Access Lightroom and open the desired image you want to edit.

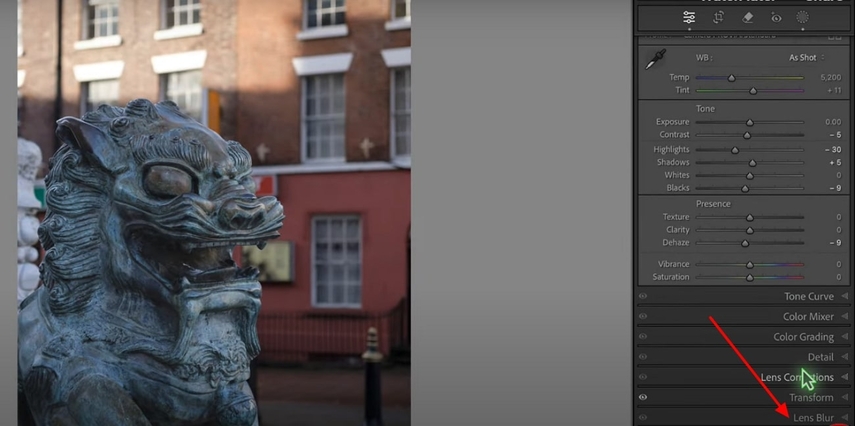
Step 2.Scroll down the settings bar and hit the "Lens Blur" feature option.

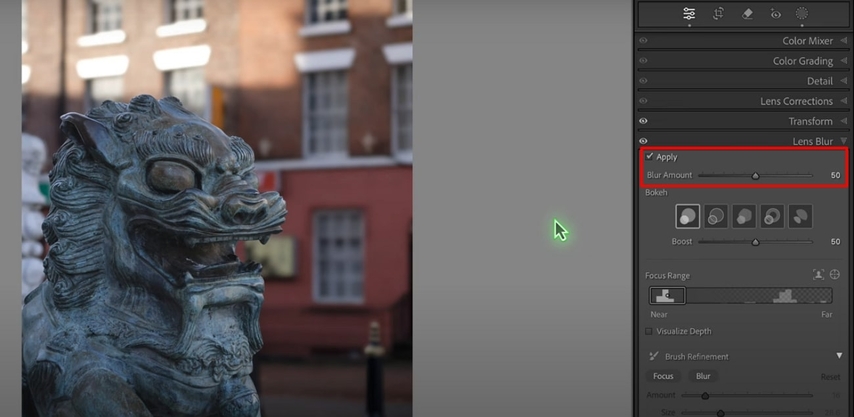
Step 3.Now, enable the "Apply" option, and adjust the "Blur Amount" bar settings. Afterwards, save the file to the desired folder on the device.

Part 6. From Blurring Backgrounds to Creating New Scenes with HitPaw FotorPea
Suppose you are editing a photo from a family gathering, and the background is so messy. However, you used other tools, but they are tricky, so we recommend using HitPaw FotorPea (formerly HitPaw Photo Enhancer). This tool provides a photo editor to let you replace and customize the backgrounds of images. It offers you a vast variety of background solid colors to choose from for your image.
Key Features
- 1.Allows you to choose the desired background, including Abstract and Art.
- 2.Lets you even remove the background to let you edit on other platforms.
- 3.Offers a Replace Element feature to replace the desired element in the image.
- 4.Provides the Image Restoration tool to enhance the old image's visuals.
- 5.Gives a new Halloween feature to generate Halloween-themed images.
How To Change the Background of a Photo Quickly With HitPaw FotorPea
After exploring HitPaw FotorPea features, if you want to know how to get HD background blur, then follow the given guide:
Step 1. Choose an AI Photo Editor to Edit the Desired Image
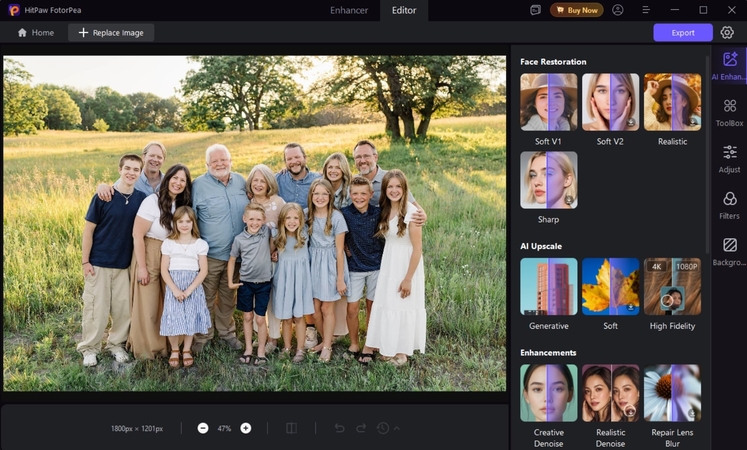
Upon entering the HitPaw FotorPea tool, click on the "AI Photo Editor" to insert the desired family portrait.

Step 2. Choose Background Feature
Here, select the "Background" feature available in the right tab to access its editing interface.
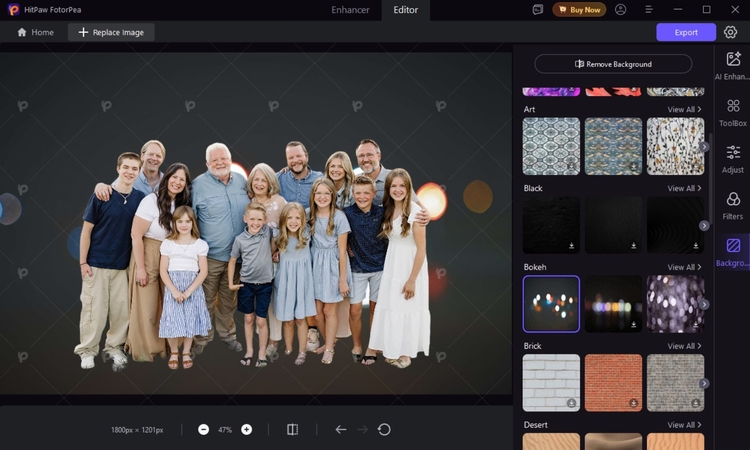
Step 3. Select Blurring Background Template and Export
After clicking "Remove Background," choose the desired blur background template for your image and hit the "Export" button to save it.
FAQs on How to Blur the Background of Pictures
To blur a part of a photo, you can opt for an editing tool like Photoshop, Canva, or HitPaw FotorPea. When choosing a specific tool, go for a tool that aligns with your requirements.
While uploading the wallpaper, click on the Add button and then "Customize Home Screen." Afterwards, hit the Blur button to get the wallpaper saved as a blur image.
You can easily blur the background of an image by using the built-in method of your mobile phone. Furthermore, if you want a professional tool, then opt for a tool like HitPaw FotorPea to make the images visually appealing.
Conclusion
Summing up, now anyone can easily make their image backdrops blurry to give the images a cleaner look. In this article, we have provided several methods to explore how to blur the background of a photo with step-by-step guides. Among these tools, we recommend HitPaw FotorPea, which lets you remove and replace the wallpaper to give it a more professional look.
Leave a Comment
Create your review for HitPaw articles


