How to Create 8 Bit Art: 4 Easy Ways
8-bit art is a style of pixel-based digital artwork that uses small, blocky graphics made from limited color palettes. This art is often seen in classic video games like Super Mario Bros. or Pac-Man. Its nostalgic charm and simplicity have fueled a modern revival among retro gaming fans, NFT creators, and indie artists who appreciate its timeless appeal.
This guide will walk you through how to create 8-bit art using Adobe Illustrator, beginner-friendly online tools, and customizable templates to help you easily capture that classic video game vibe.
Part 1. What You Need to Know Before You Create 8 Bit Art
Creating 8-bit art may seem like a simple process, but you need to know some basics. The following section covers the stuff you need to know before creating this art:
Basic Principles
- Pixel Grid: An 8-bit artwork is built on a grid where each square or pixel represents one color block. Setting up a clear grid helps maintain symmetry and crisp, retro visuals.
- Palette Limits: Classic 8-bit art uses a small set of colors, often 8-32 shades only. Limiting your palette ensures authentic retro aesthetics and makes shading easier to manage.
- Square Canvas Setup: Start with a square canvas, like 32x32 or 64x64 pixels, for balanced proportions. This format keeps your characters and icons consistent across different games or art assets.
Tools Used
- 1. Adobe Photoshop:It lets you create 8-bit character template using a pixel grid and the Pencil tool for precise block detailing. Layer and color controls enhance retro-style artwork.
- 2. Adobe Illustrator:Adobe Illustrator enables scalable 8-bit designs through vector grids and snapping features. It is perfect for clean, structured pixel art that maintains quality when resized.
- 3. Pixilart:This is a free online tool with built-in grids, palettes, and community sharing. This tool is ideal for beginners making quick pixel characters or sprites.
- 4. Piskel:It is a simple web-based app focused on pixel animation and sprite design. This comes with live previews, layers, and easy exports for digital or game use.
Part 2. How to Create 8 Bit Art with HitPaw FotorPea
If creating an 8-bit character template is complicated for you, you can use a platform that converts your existing images into this style. With HitPaw FotorPea (formerly HitPaw Photo Enhancer), you can input a regular image and transform it into a pixelated piece. Users can enter a text prompt that defines the transformation and get a pixelated 8-bit masterpiece through the Image-to-Image feature.
Key Features
- 1.Lets you create an 8-bit image from scratch using the Text-to-Image model.
- 2.Offers various templates and lets you apply them to your own image.
- 3.Enables users to reuse a template to simplify image generation.
- 4.Accepts a prompt, besides allowing you to add an 8-bit picture for compliant results.
- 5.Provides you with an image enhancement feature that can be applied after generating the photo.
A Walkthrough Guide to Using HitPaw FotorPea for Generating 8-Bit Art Images
HitPaw FotorPea uses the ready-to-use templates for making a pixelated image. The following steps are a guide on how to make an 8 bit character using this tool:
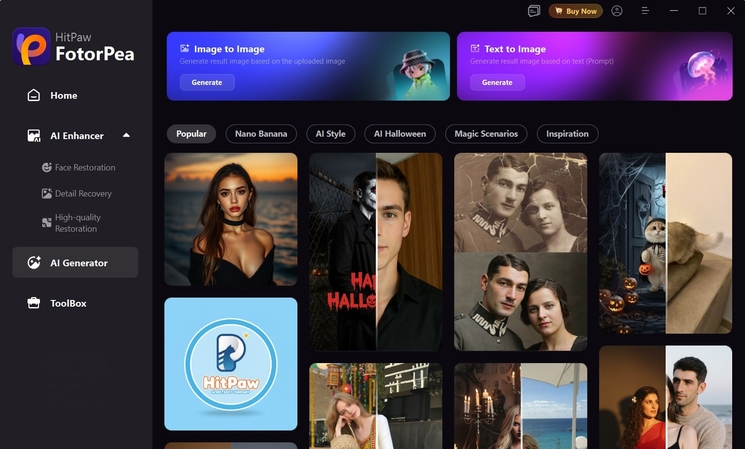
Step 1. Enter the AI Generator Mode
To start the process, enter the "AI Generator" mode to enter the next interface.
Step 2. Enter the Template Section
Using the right panel, enter the "Template" tab and select the "More Templates" option to access all templates.
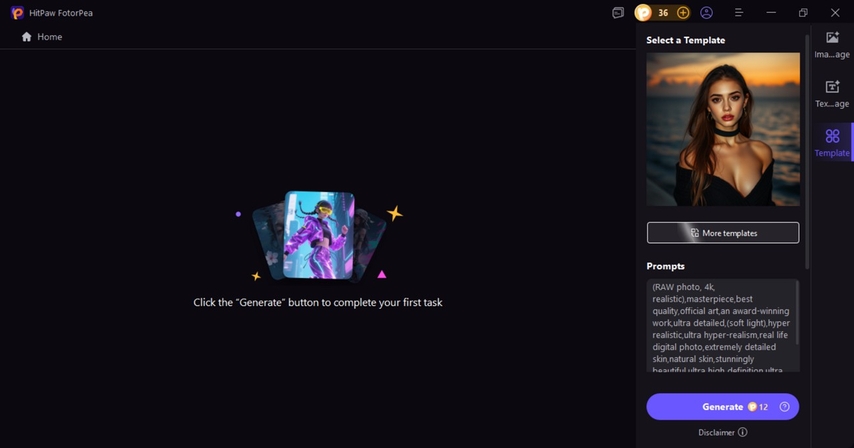
Step 3. Import an Image to Transform it into the Template's Style
When you are directed to the main interface, import an original image and click the "Generate" button to get the results.
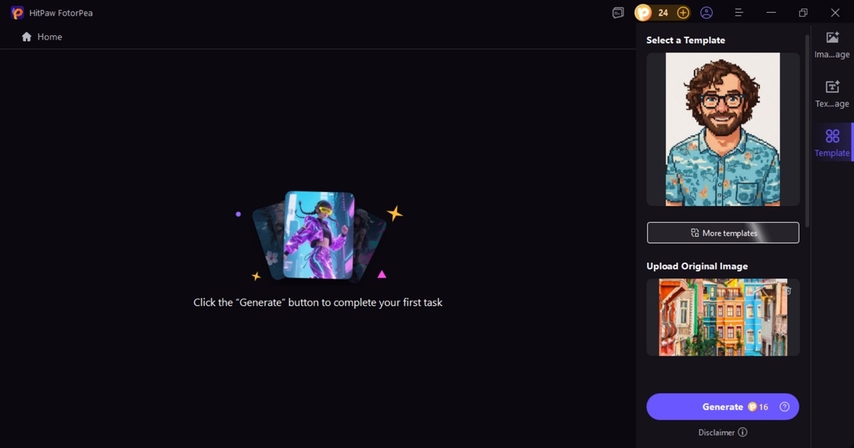
Step 4. Decide What Happens Next with the Image
As soon as the image is generated, click on it to open it. Once the image opens, see if you want to download it or enhance it.
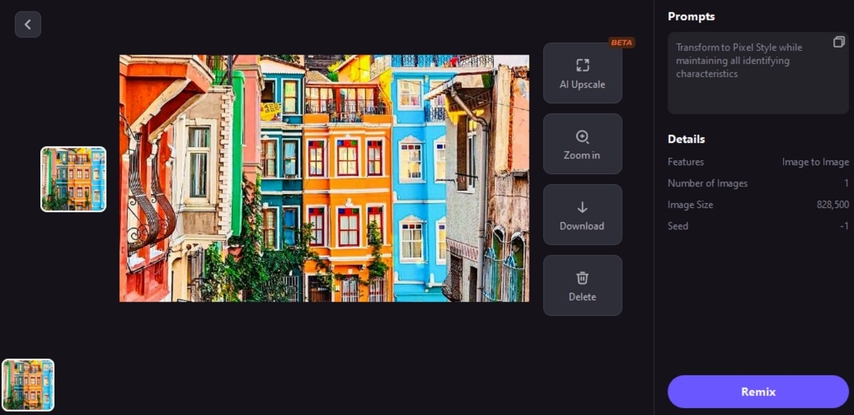
Part 3. How to Make an 8-Bit Character with Clip Studio
If you are looking for something different, use Clip Studio to generate such images. Clip Studio Paint supports 8-bit image creation through its precise pixel brush, customizable grids, and palette tools. Artists can manually design retro sprites, tiles, or characters with excellent color control, layer blending, and export options suited for game or NFT use. The following steps explain how to make 8 bit pixel art:
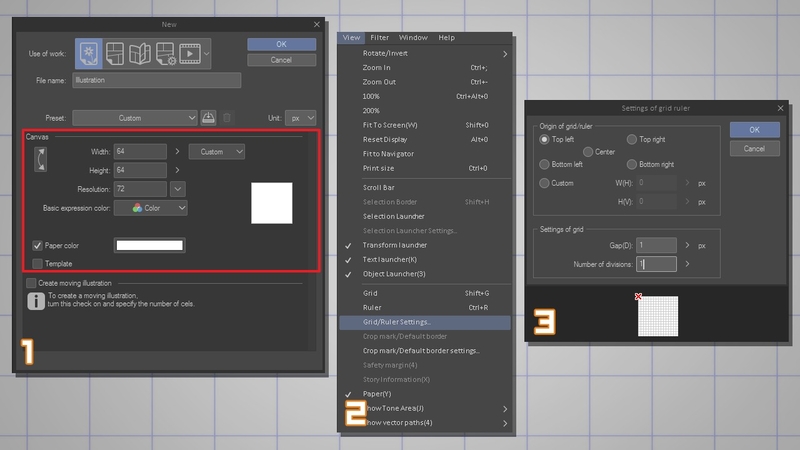
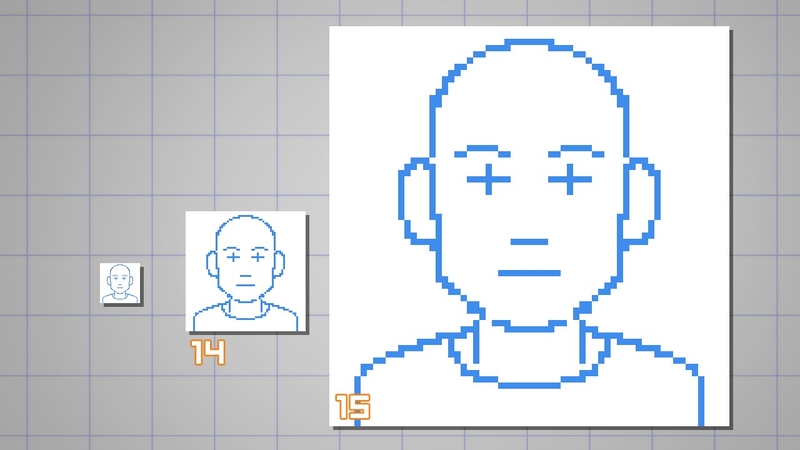
Step 1.Create a new file around 64×64 pixels, then adjust grid settings in the "Canvas" section so each pixel appears clearly. You can toggle the grid visibility anytime using Shift + G for easier alignment.

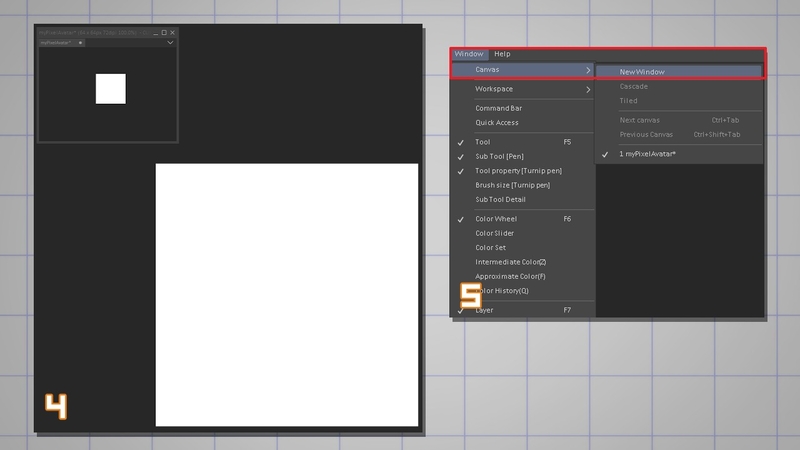
Step 2.To make a new canvas, enter the "Window" menu and hover the mouse over the "Canvas" option. Using the extended menu, pick the "New Window" feature. Once the canvas is made, set its size to 100%.

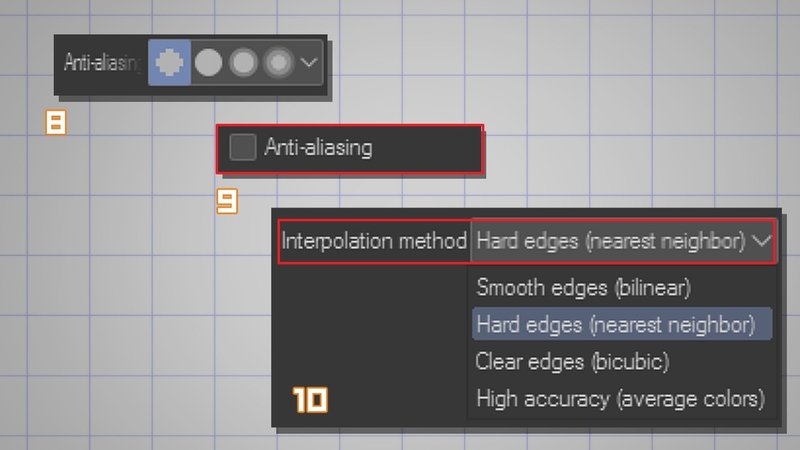
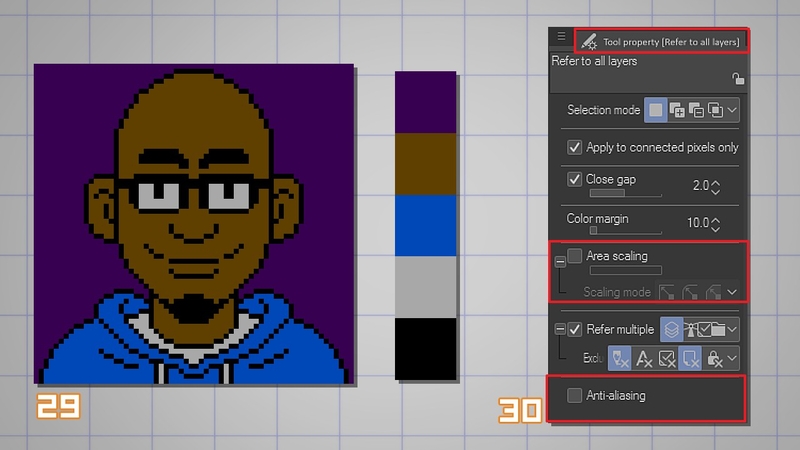
Step 3.Turn off the anti-aliasing option in the Brush Tool Property panel. Use the "Anti-Aliasing" checkbox to disable it for tools like Selection, Fill, and Text. When using Edit > Transform, set the "Interpolation Method" to "Hard Edges" to preserve crisp pixel boundaries. Use Clip Studio's Dot Pen, a 1-pixel brush designed for clean, authentic pixel strokes.

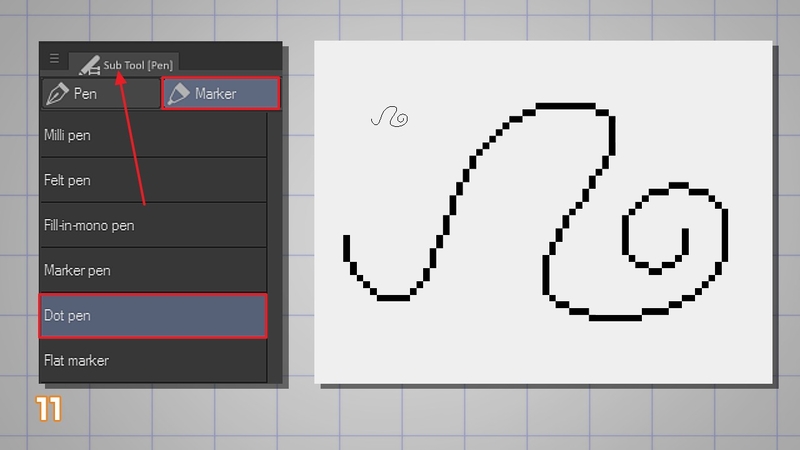
Step 4.In the "Sub Tool(Pen)" section, enter the "Marker" panel to pick "Dot Pen" from the list. Now, draw on the canvas using this dot pen.

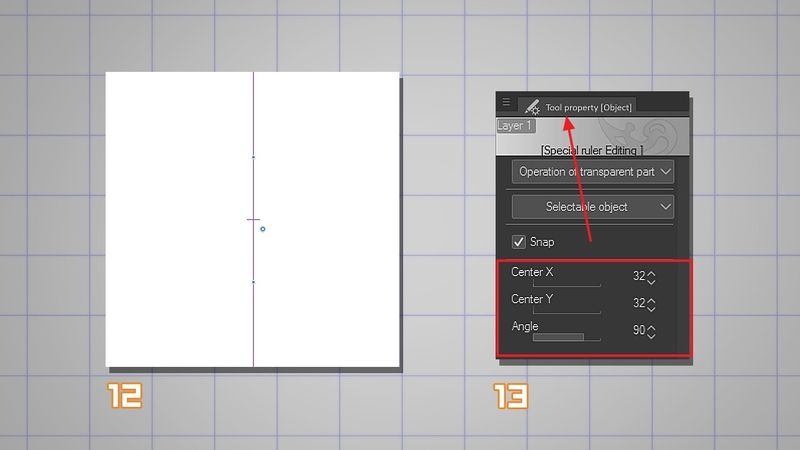
Step 5.Place a "Symmetrical Ruler" at the exact center of your 64×64 canvas by setting "Center X and Y" to 32 in the "Tool Property" panel for balanced front-facing drawing.

Step 6.Now, select the dot pen again and draw the desired object on the canvas.

Step 7.To add color to your image, open the "Tool Property" window and unselect the "Area Scaling" and "Anti-Aliasing" options. Enter your Auto Select and Fill settings to achieve the desired outlook.

Part 4. How to Make 8-Bit Pixel Art with Canva
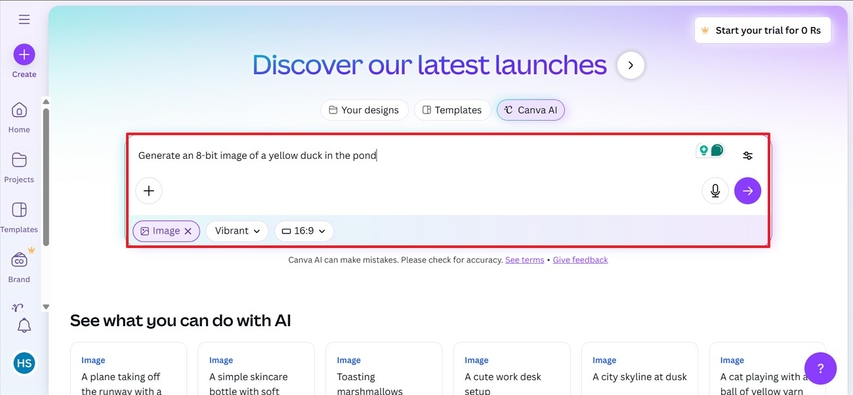
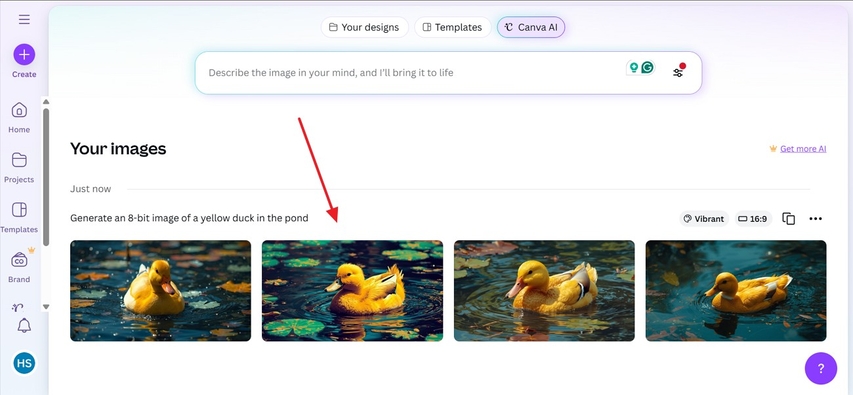
When looking for a comprehensive image editing solution, Canva is a good choice. With its generation feature, it lets you choose a style to transform your ideas into visuals. You can choose the image aspect ratio to be generated and fit it for any image-sharing platform. Follow these instructions to learn how to create 8-bit art:
Step 1.In the Image Generation page of Canva, enter the prompt. Now enter a "Style" from the designated menu and hit the "Generate" icon to process.

Step 2.Once the images are generated, pick the desired variant.

Part 5. How to Create 8 Bit Art in Illustrator
Adobe Illustrator is an advanced platform for creating vector art. Creating 8-bit art in Adobe Illustrator involves setting up a pixel grid and using the Rectangle Tool to place each pixel manually. Illustrator's snapping, alignment, and color palette features help design clean, scalable pixel characters or retro-style icons with precision. Following are the methods on how to create 8-bit art in Illustrator:
Method 1: Using the Object Mosaic feature
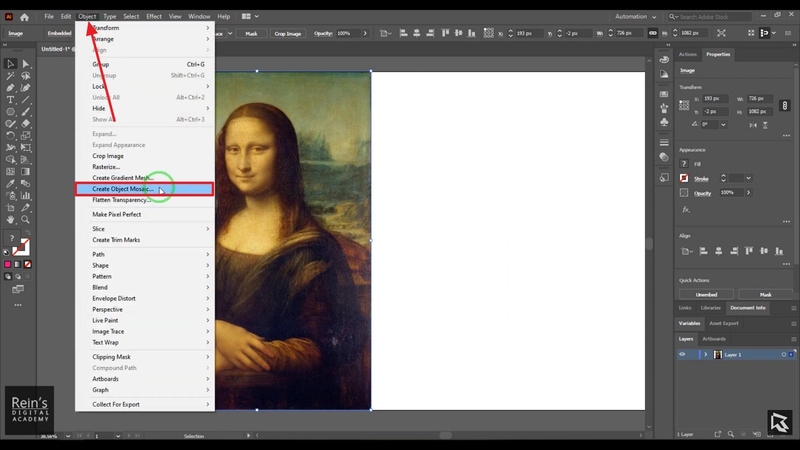
Follow these instructions to learn how to use the Object Mosaic feature to make 8-bit art on Adobe Illustrator:
Step 1.To start, enter the "Object" menu and select "Create Object Mosaic".

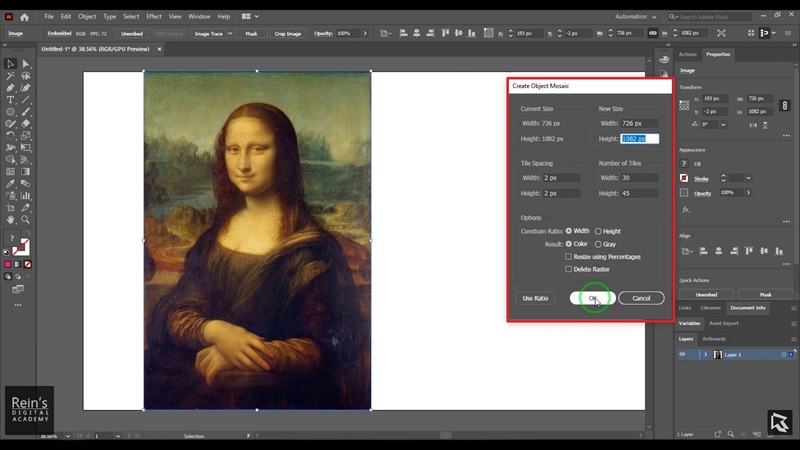
Step 2.Using the next window, adjust the values as needed and pick the "Use Ratio" option to align the width and height of the tiles. Now, you will see a pixelated image on the canvas.

Method 2: Building Pixel-by-Pixel with a Custom Grid
Follow these steps to learn how to make a pixel-by-pixel illustration on Adobe Illustrator:
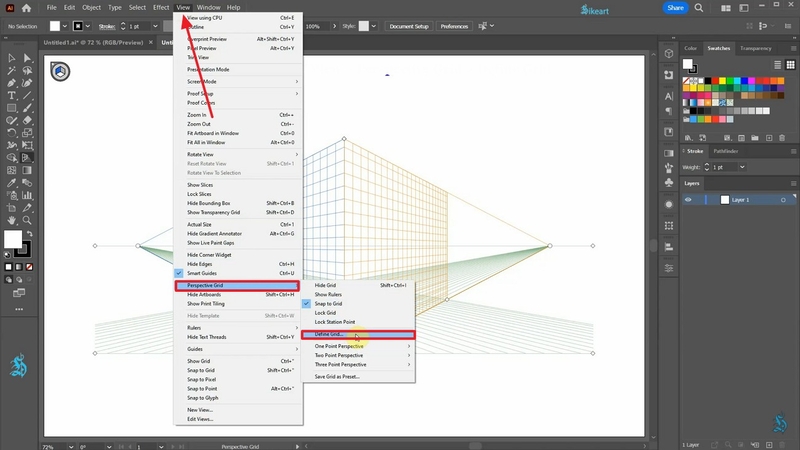
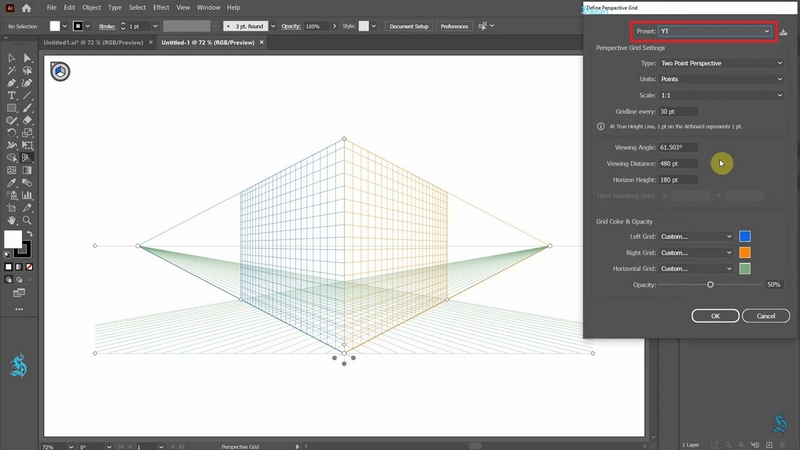
Step 1.First, create a new project and use "Shift+P" keys to get a default grid. Enter the "View" menu to select the "Define Grid" option in the "Perspective Grid" option.

Step 2.In the following window, select the "YT Preset" and other grid size specifications.

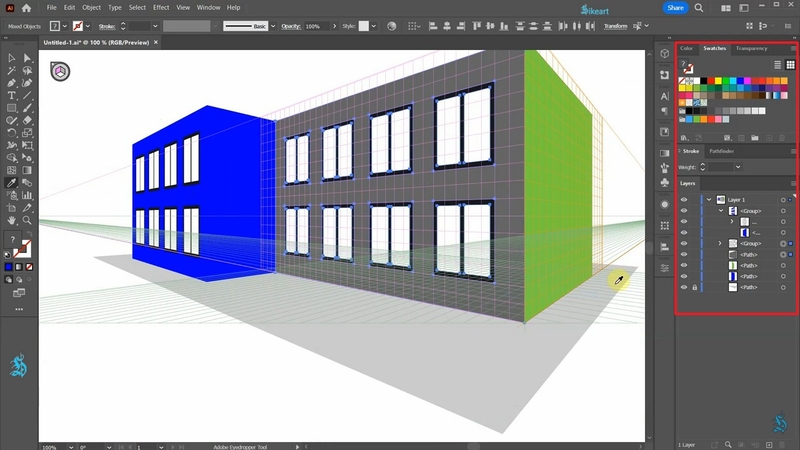
Step 3.Now, uncheck the "Stroke" option and draw the illustration. Once you are done, use the right panel to fill in the colors, and you will be done.

Conclusion
In essence, this article was all about how to create 8-bit art to revive the old game nostalgia. We learned how to create this art on Canva, Adobe Illustrator, and Clip Studio. However, HitPaw FotorPea is the most practical option, as it offers a one-click application of pixelated AI image templates.
Leave a Comment
Create your review for HitPaw articles


