How to Use Generative Fill in Photoshop: Overview, Guide & Alternative
Generative Fill in Photoshop is one of the most powerful tools to be introduced in recent years, which enables users to create, remove, or seamlessly extend content with just a few clicks. Whether you want to expand a photo's background, remove unwanted objects, or create an imaginative storyboard, this Adobe-powered feature is for you.
However, not everyone knows about this option and how to use Generative Fill in Photoshop. In this article, we will provide an overview of everything, covering from its definition to a detailed step-by-step guide.
Part 1. What is Generative Fill in Photoshop?
Before you learn how to use Photoshop generative fill, you should be aware of its basic use cases, which is discussed below:
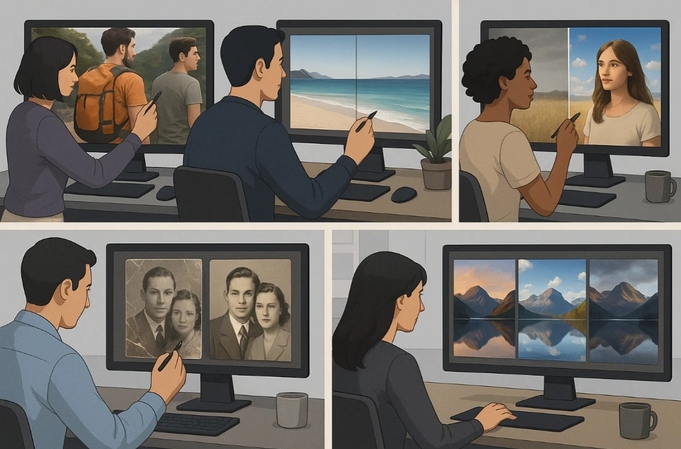
- 1. Object Removal:It removes the objects that people do not want in a picture, including people and distracting text, so that AI can rebuild the picture easily.
- 2. Background Expansion:You can expand the edges of an image to fit new aspect ratios, which is perfect for expanding photos to social media posts or banners.
- 3. Creative Additions:One can easily add new things, like a beautiful sky, to his/her pictures, making them look attractive.
- 4. Photo Restoration:Photos that are damaged or old can also be repaired, restoring missing parts or reconstructing missing details, using generative AI.
- 5. Producing Variations:This enables the production of a number of creative variations of an image to give a lot of options in developing the concept.

Part 2. How to Use Generative Fill in Photoshop - Step-by-Step Guide
After learning about its basics, if you are eager to explore how to use Generative Fill in Adobe Photoshop, the following stepwise guide is for you:
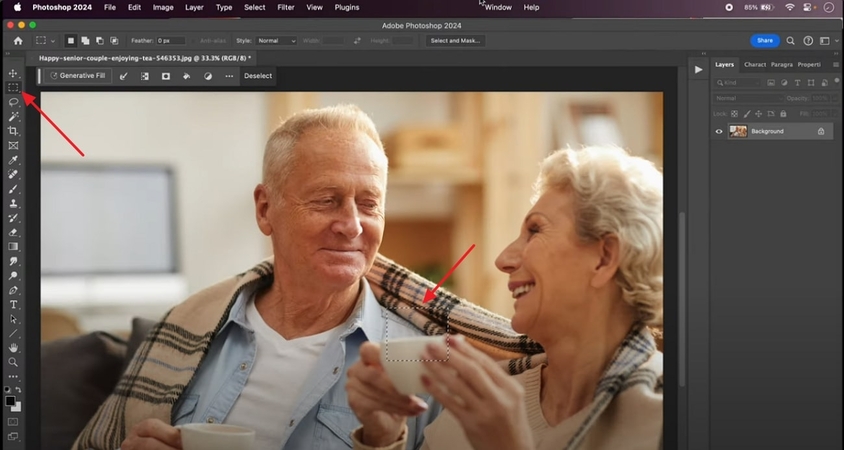
Step 1. Open Your Image in Photoshop and Select the Area to Edit
Upon entering the Photoshop app, select the "File" menu to import your image. Now, click on the "Rectangle" tool available in the left panel, and select the desired area you want to edit further.
Step 2. Access the Generative Fill Option
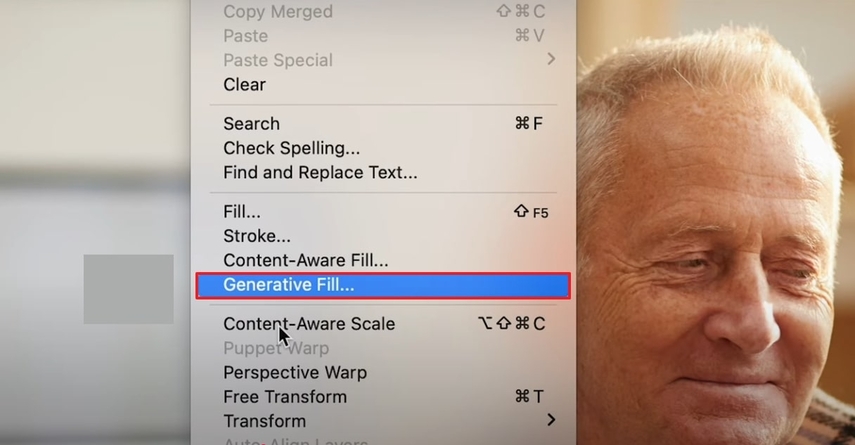
Here, right-click the nearby selected area and choose the "Generative Fill" tool from the given options.
Step 3. Enter a Prompt (Optional)
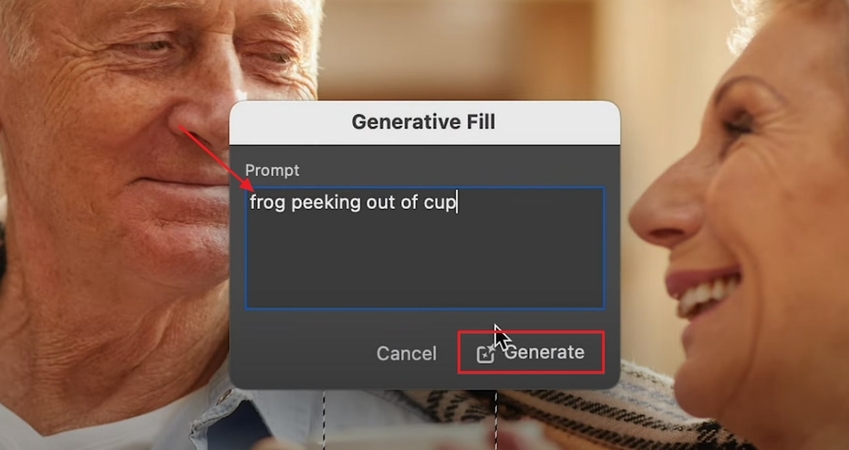
As the Generative Fill pop-up appears, you can add a detailed prompt of all the elements you want to add or remove and click the "Generate" button. Here, you can also keep the prompt box empty to let Photoshop do its own magic to fill the space.
Step 4. Review & Choose Variations
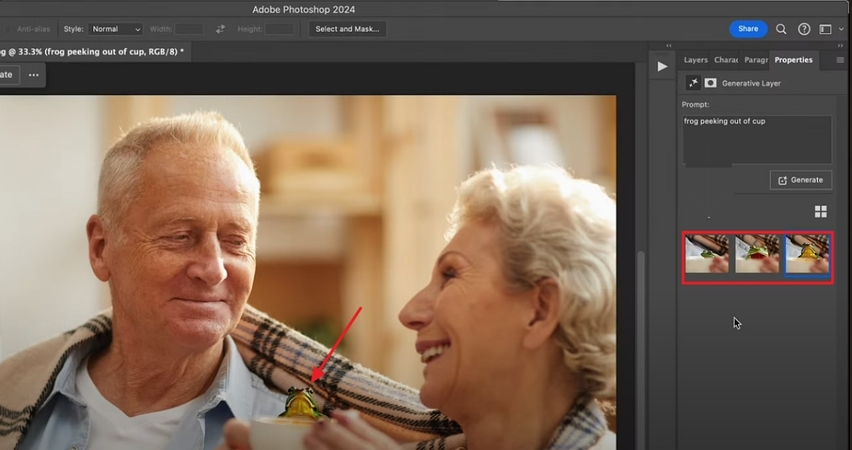
After clicking the "Generate" button, it will take a few seconds to generate the desired outcome. Here, if you don't like the generated results, you can choose from the other samples it has provided in your right panel.
Step 5. Refine with Additional Edits
Finally, your AI-generated part is now created, and you can refine the image further by choosing other tools available in Photoshop's toolbar.
Part 3. Try Easier Alternative to Photoshop Generative Fill - FotorPea Local Retouching
Suppose you learned how to use Photoshop AI Generative Fill and are now considering to make similar edits. However, you have found Adobe Photoshop to be a complex and pricey option for such tasks. To counter such low efficiency, you prefer going for other options but fail to find one. This is where we recommend using HitPaw FotorPea (formerly HitPaw Photo Enhancer), which allows you to fill your image with its inpainting ability.
Features of HitPaw FotorPea
- 1.Conveniently adds new elements to the characters or fixes the flaws present in different AI-generated images.
- 2.Allows removing objects and surrounding pixels through its intelligent inpainting operations.
- 3.Removes blemishes and fills in the missing areas of old photos to make them look new.
- 4.Easily enhances the imported images with its dedicated Upscale Model.
- 5.Gives an AI Generator to create visually appealing images by providing a text prompt.
Quick Guide to Fix Photos with Effective Partial Repaint in FotorPea
Now, if you want to explore this tool after learning about Generative Fill in Photoshop, then follow the provided detailed guide:
Step 1. Launch FotorPea to Select the AI Photo Editor
Enter the HitPaw FotorPea Tool and then select the "AI Photo Editor".

Step 2. Select AI Replace
Import your image then click ToolBOX and choose AI Replace.

Step 3. Enter Prompt Text to Edit Image
Edit the image by entering text prompts, whether it is removing objects, changing color or adding objects. If you are satisfied with the image, click Generate to export it.

FAQs on How to Use Photoshop Generative Fill
Yes, you need to access the latest version of Photoshop, which is 25.0 or newer. Older versions, including Photoshop 2023 and version 24.x, don't support Generative fill.
While exploring how to use Photoshop AI generative fill, note that it is not a free tool. You need to get a paid membership to Adobe Creative Cloud, or a trial period is required.
There is no potential shorter route to utilizing the Generative Fill option in Photoshop. While the feature is a one-click solution, the user needs to have other editing knowledge to make the image look flawless.
Generative Fill supports all image formats, including JPEG, PNG, BMP, and PSD (Photoshop Document) files. However, it doesn't support RAW camera files, so you need to convert them to a compatible format first.
Conclusion
Concluding this, with the evolution of AI, Photoshop has introduced a new feature, Generative Fill, which allows you to add elements by providing a prompt. In this article, we offer a detailed, step-by-step guide on how to use Generative Fill in Photoshop. Moreover, if you don't like its outcome, we recommend using HitPaw FotorPea, which provides an advanced inpainting option along with other advanced features.
Leave a Comment
Create your review for HitPaw articles


