How to Face Swap in Photoshop with Simple Steps
Many people want to know how to create interesting photos, memes and creative edits using the face exchange function in Photoshop. It looks difficult at first glance, but it becomes easier if you follow the correct procedure. Photoshop allows you to control the entire process so you can fit your face properly. It is also possible to blend colors, adjust lighting, adjust details to make them look real. This guide will tell you how to face swap in Photoshop in a simple and easy way. Even if you are new, you can follow these steps and make great face swap photos without any stress.
Part 1: What Is Face Swapping and Why Use It?
Face exchange refers to taking one face out of the photo and sticking it to the face of another person. This technique is frequently used to create interesting photos and memes and to edit the face of posters and videos. Various people want to know how to face swap in Photoshop to make their photos look funny or attractive. It is also used in art or movie mockups. Some people use AI tools, but Photoshop lets you control everything and make the result look more real if done properly.
Memes and Funny Edits
Many people use Photoshop's face exchange function to create interesting photos for social media. They synthesize their faces and friends' faces into celebrity faces and interesting scenes. These edits are fun to share and make others laugh online.
Creative Projects and Posters
Photoshop face swaps are also used in creative work like posters or fan art. People enjoy putting themselves into movie scenes or changing characters in photos. It's a fun way to imagine yourself in famous moments or create cool, fake movie covers.
Manual Editing vs AI Face Swap
If you manually change face with Photoshop, you can complete control, but time and technology are required. AI tools are quicker and easier to use, but you may not be able to fix small issues. Each method has advantages and disadvantages.
Part 2: What You Need Before Starting Face Swap in Photoshop
Before you start learning how to face swap in Photoshop, you should get a few things ready. When you are prepared, the work becomes easier and the photo looks better. First, pick two clear photos where both faces are easy to see. Try to pick images with the same lighting and angle. You also need Adobe Photoshop installed on your computer. If you know some basic tools in Photoshop, that will also help. With these things ready, you can learn how to swap faces in Photoshop step by step without any problem.
Two Clear Face Photos
Choose two face photos that look alike in light and angle. This makes the face swap look better and more real. If the lighting or angle is very different, the result may look fake or need a lot of fixing.
Adobe Photoshop Software
You need Adobe Photoshop on your computer to do face swapping. Any new version is okay. Just make sure it lets you use layers and tools. Photoshop is a paid software, so check that it's installed and ready before you start.
Some Photoshop Knowledge
It is helpful to know how to use basic tools in Photoshop. For example, move tools, layer masks, selection tools, etc. But do not worry. Even beginners will guide you step-by-step with simple and easy-to-understand steps.
Part 3: How to Face Swap in Photoshop - Step-by-Step
Face swapping in Photoshop is easy if you follow a few simple steps. With the right tools and clear photos, you can switch faces smoothly and make the final image look natural and real.
1. Open Your Photos in Photoshop
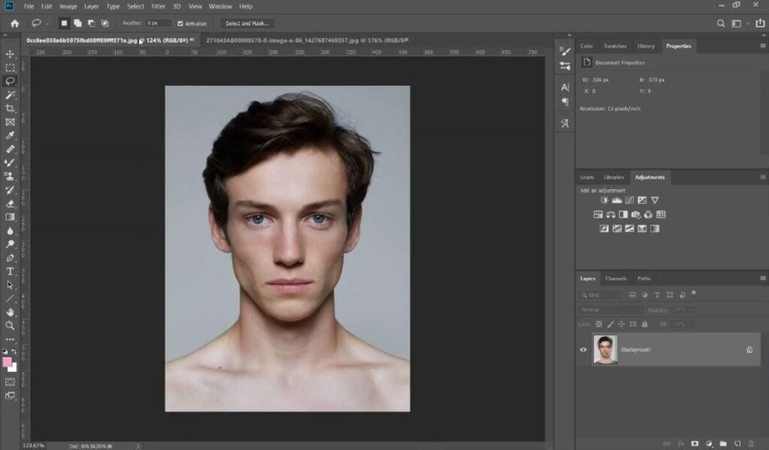
Start by opening both images in Photoshop one with the face you want to keep (the main photo), and the other with the face you want to add. Try to use clear, high-quality photos taken from a similar angle for best results.
2. Select the Face You Want to Use
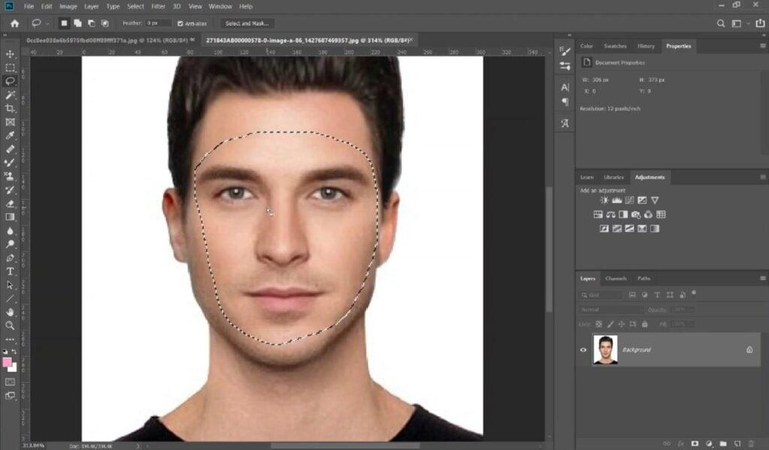
Use the Lasso Tool (or any selection tool you like) to carefully draw around the face you want to copy. Try to include the eyes, nose, and mouth, but leave out parts like the hair, neck, or ears.
3. Copy and Paste the New Face
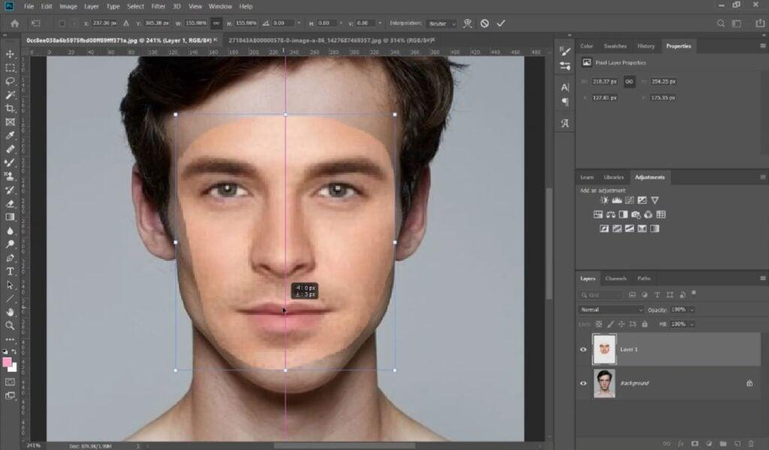
After selecting the face, press Ctrl + C (or Cmd + C on Mac) to copy it. Then go to the main image and press Ctrl + V (or Cmd + V) to paste it. Move the new face roughly over the old one.
4. Resize the New Face

To make the face fit, lower its opacity to about 50%. This lets you see both faces at once and helps you line them up better. Use Free Transform (Ctrl + T / Cmd + T) to resize and position it until it matches.
Pro Tip: If the background layer is locked (you see a padlock), just click the padlock to unlock it. You can also right-click and turn the layer into a Smart Object to keep it safe from changes.
5. Make the Face Slightly Overlap the Body
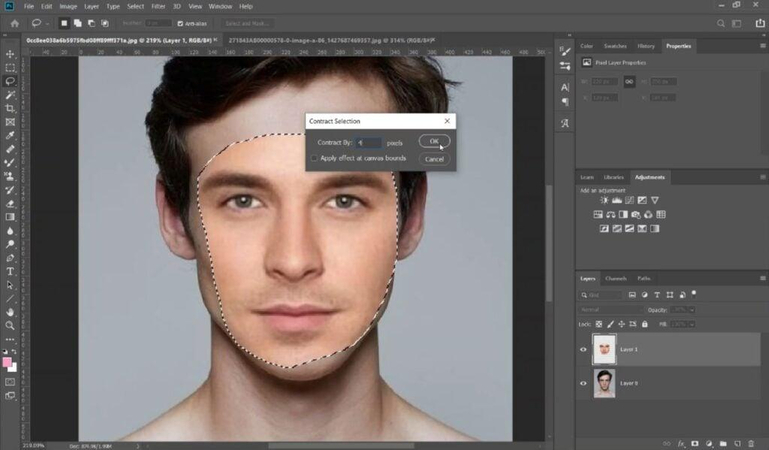
Select the new face layer again, then go to Select > Modify > Contract and shrink the selection by a few pixels. This helps the face blend better into the body.
6. Select That Area on the Body Layer
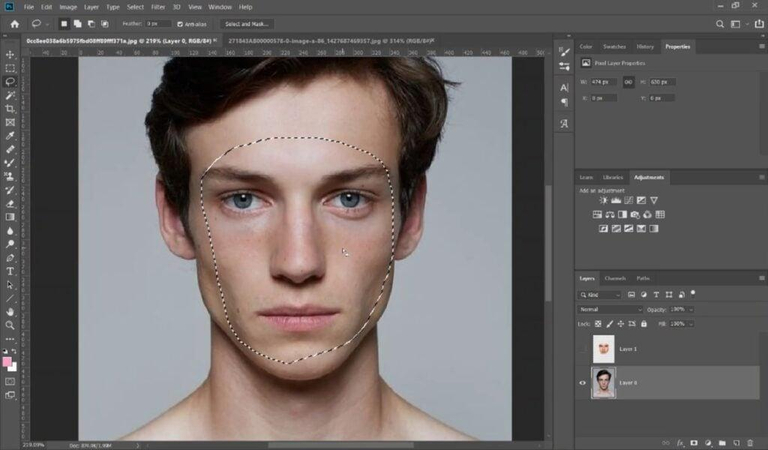
Now, hold Ctrl (or Cmd on Mac) and click on the new face's thumbnail. This will select its shape. Then go to the body layer (the original photo) and make sure the selection shows up there too.
7. Delete the Old Face
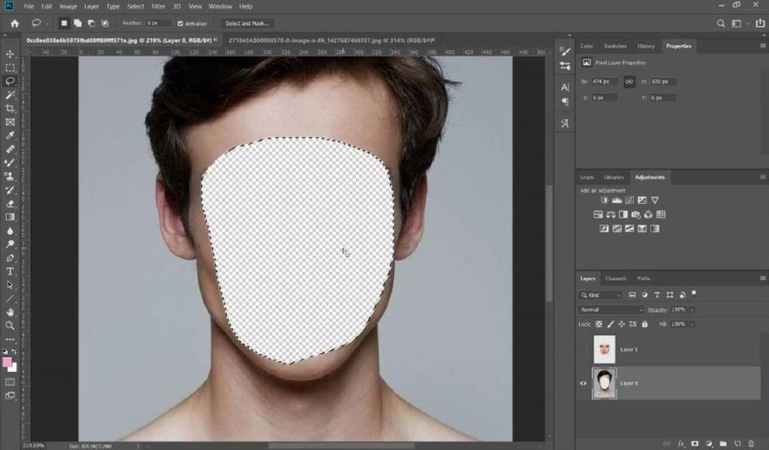
With that selection still active, press Delete on your keyboard. This will remove the old face and make space for the new one.
8. Blend the Two Faces Together

Select both the new face layer and the body layer (hold Shift and click both layers). Then go to Edit > Auto-Blend Layers. In the pop-up, choose Panorama and check both boxes, then click OK. Photoshop will do its best to mix the layers.
9. Do a Final Touch-Up
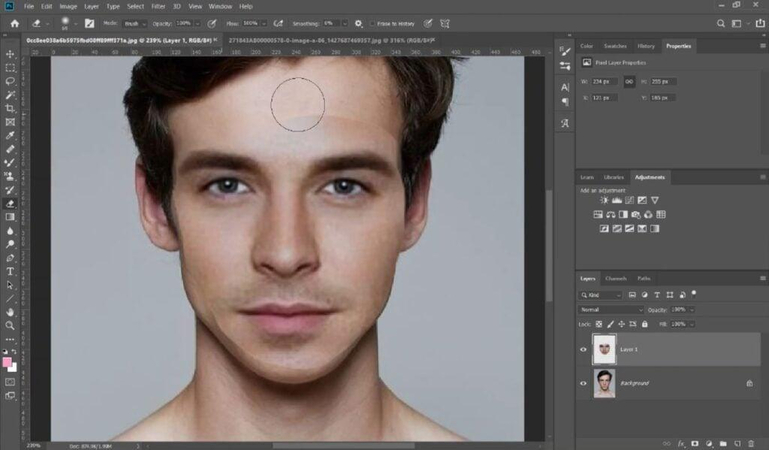
If things still do not look perfect, do not worry! Use the Eraser tool to gently clean any rough edges. You can also use the Blur tool to soften the edges and make everything look smoother and more natural.
Part 4: Limitations of Photoshop for Face Swap
Face exchange in Photoshop is fun, but not always easy. Many people who need to know how to face swap in Photoshop find it hard to make it look real. If the two faces have different angles, lighting, or sizes, the final photo may look strange. Matching skin tone and blending edges can also be tricky. Small things like glasses, hair, or face lines make it harder. It takes time, patience, and some editing skills to get good results that look clean and natural.
Here are some common problems with face swapping in Photoshop:
- It takes a lot of time to make it look natural.
- You need editing skills to do it properly.
- Different light, face angle, or size can cause bad results.
- It's easy to make mistakes when joining the faces.
- Small things like glasses or beard are hard to match.
Part 5: Best AI Face Swap Alternative - HitPaw FotorPea
If you find Photoshop difficult or do not want to learn editing, HitPaw FotorPea is a great choice. It is an easy face swap tool that uses AI. You only need to upload two photos, and it will do everything for you. There is no need to cut, blend, or use layers. The results are fast and look clean. Many people use it for fun edits, memes, or profile photos. If you are searching how to face swap in Photoshop but want a faster way, then FotorPea gives you a simple and stress-free option to try face swapping.
Key Features of HitPaw FotorPea:
- Use AI tools to improve face clarity and color before swapping.
- Resize and crop faces easily to match Photoshop face swap size needs.
- Create realistic face swaps with advanced AI portrait editing.
- Remove unwanted parts from the photo for a cleaner face swap result.
Steps to Swap Face with HitPaw FotorPea
Step 1: Upload the Two Faces for Swapping
Go to the Face Swap option from the main menu. Upload your Original image (the face to be replaced) and the Target image (the face you want to apply). Ensure both images are clear for best accuracy.

Step 2: Start the Face Swap Process
Click the Swap button to begin. For optimal results, it's recommended to use photos with a full, front-facing view of the face.
Step 3: Preview and Export the Result
Once the face swap is complete, preview the result. If satisfied, click the Export icon to download the final image.

FAQs about Face Swap on Photoshop
Q1. Can I face swap in Photoshop on mobile?
A1. Photoshop on mobile does not have all the tools you need for face swap. It is better to use the desktop version of Photoshop. The desktop version gives you more options and control to make the face swap look better and cleaner.
Q2. Is it legal to use face swaps for commercial content?
A2. If you are learning how to face swap in Photoshop, when using someone else's face, be sure to obtain permission in advance. In particular, using someone else's face without permission may cause legal problems if it is intended for sale or sharing. Always make safety a top priority.
Q3. What file types work best for Photoshop face swaps?
A3. Use high quality JPG or PNG files to get the best results in Photoshop. Clear and high-resolution photos help to smoothly and cleanly replace the face. Blurred photos and small images may not work well and the final image may become unnatural or fake.
Conclusion
Learning how to face swap in Photoshop helps you control every part of the photo. You can blend faces, adjust colors, and make it look real. But it needs time and some editing skills. If you don't want to do all the steps, you can use an easier option. HitPaw FotorPea is perfect for quick face swaps. It does the work in one click and gives good results. So, whether you like doing it yourself or want a fast tool, you have both choices. For quick edits, try HitPaw FotorPea and save time.
(*Final Reminder: This guide is for informational purposes only and does not constitute legal advice. Before using the relevant features, please make sure to:
① Consult a qualified legal professional in your jurisdiction to evaluate any legal risks that may apply;
② Carefully read and fully understand the HitPaw Term of Service and HitPaw Privacy Policy;
③ Ensure that all generated content complies with applicable local, state, and federal laws and regulations, particularly those related to synthetic media.)




 HitPaw Univd (Video Converter)
 HitPaw VoicePea
  HitPaw VikPea (Video Enhancer)


Share this article:
Select the product rating:
Daniel Walker
Editor-in-Chief
This post was written by Editor Daniel Walker whose passion lies in bridging the gap between cutting-edge technology and everyday creativity. The content he created inspires the audience to embrace digital tools confidently.
View all ArticlesLeave a Comment
Create your review for HitPaw articles