How to Sell Photos on Shutterstock as a Contributor [Simple Guide]
While doing photography as your passion, you must have thought of making it a side hustle at times. Getting started online is the best bet in this growing digital age. Platforms like Shutterstock provide an opportunity, but navigating the platform and figuring out the sign-up and upload process can become quite confusing. We will explore in this article how to sell photos on Shutterstock while we cover every minute detail of the process.
Part 1. Sell Images to Shutterstock: Is It Worth It?
One of the largest royalty-free content marketplaces, it can be a viable way to generate a side income from your photography. Shutterstock hosts over 200 million media files, connecting photographers and content creators with businesses worldwide. The answer to the question of whether Shutterstock contributor is the best place to sell images depends on many factors, including the expectations for earnings and the kind of content that is generated.

How the Shutterstock Earnings Work
1. Royalty-based Earnings: Each download earns you a royalty, though the payout amount varies by the buyer’s subscription type and your contribution level.
2. Multiple Earning Levels: This platform has a tiered earnings system with different levels from 1 to 6 assigned to contributors.
3. Annual Resets: The contributor level resets at the start of every year to keep it challenging for you and keep your uploads consistent.
4. Non-Exclusive: Shutterstock gives a non-exclusive opportunity, meaning you hold the full ownership of your content, which you can upload to other platforms as well.
5. Volume Over Single Sales: It works best with a high volume of uploaded images that generate consistent small royalties over time.
Is it worth it?
Shutterstock is great to use when you want to earn passive income by monetizing photos or want to build a broad digital portfolio. If you want an immediate payout without regular posting, it might not be the best choice for you.
Part 2. Preparations Necessary to Create a Shutterstock Contributor Account
Before we jump to sell on Shutterstock, let's talk about the preparations that you need to consider to increase your chances of earning faster:
1. Understand Basic Requirements: You must be familiar with the age restrictions and the content rights agreements before you sign up for selling photos. Learn about the property release forms, which are required if your work involves private property.
2. Research the Platform and Customers: Browse from a buyer’s point of view to understand customer needs and analyze keywords and image styles. You should also study the market metrics to customize your submissions to in-demand trends.
3. Curate an Initial Submission: The first uploads set the tone for your audience's perception of your profile, and those should reflect quality and commercial value. Generic subjects employing over-editing must be avoided to increase the chances of approval in the curated submission.
4. Set up Payment and Profile: To get paid through PayPal and Payoneer, you’ll need to sign up for these programs and fill out the required information. Take your time to make an impactful portfolio description that builds trust and visibility.
5. Make a Plan for Uploads and Portfolio: You must plan out a schedule for uploads to focus on building a diverse portfolio. Maintaining consistency will define your success as a contributor with some trending or evergreen themes.
Part 3. How to Make Money on Shutterstock: Full Step-by-Step Process?
Once you have taken care of all the requirements, let's learn how to earn on Shutterstock through these simple steps:
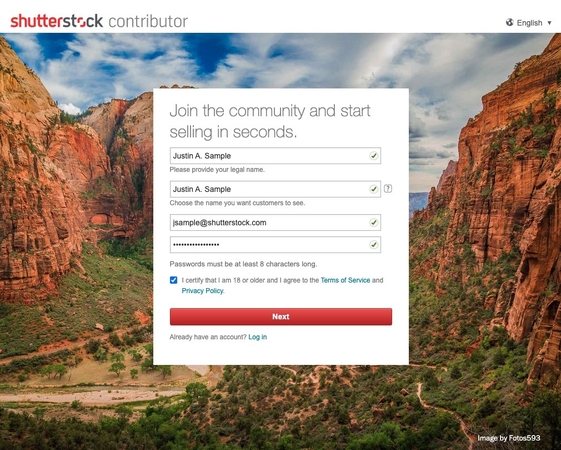
Step 1. Shutterstock Contributor Sign Up and Email Verification
Go to the registration site and fill in the information in the “Create Your Free Account” box. Click on the “Get Started” button and verify your email by clicking on the Shutterstock site link in the Email. Now, log in with your credentials and hit the “Next” button to fill in the required information and select the “Go to the Dashboard” button.

Step 2. Upload Your Best Images to Shutterstock
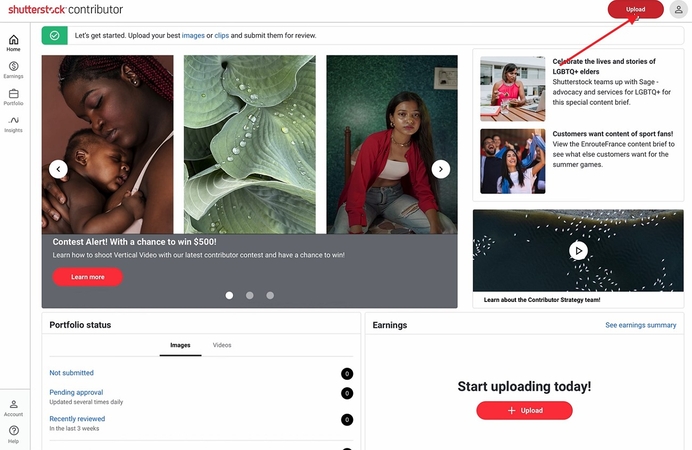
Once your account is created and you are on the dashboard, click on the “Upload” button in the top right corner to drag your high-quality images.
Step 3. Add Metadata and Select the Right License
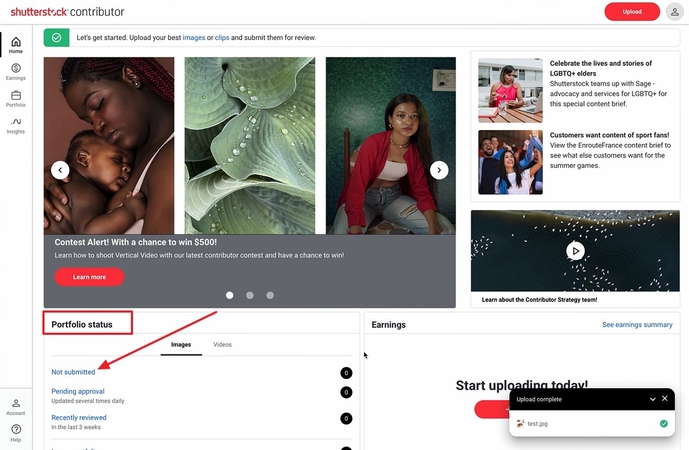
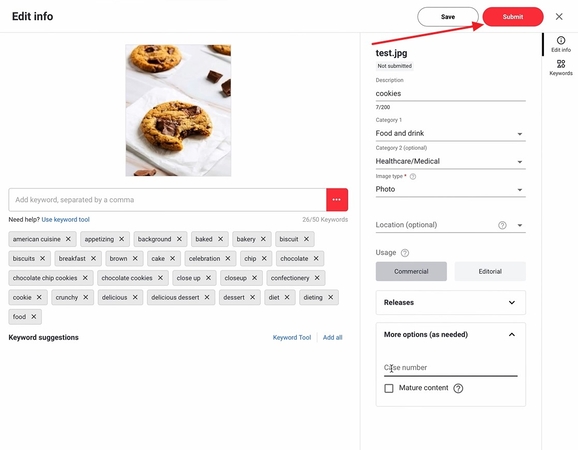
After you have uploaded the image, hit the “Not Submitted” option in the “Image” tab under the “Portfolio Status” section.
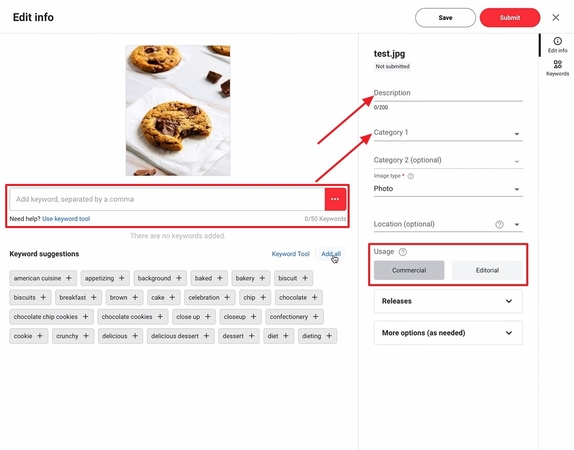
Choose your image and add relevant keywords from suggestions or research in the “Add Keyword” bar. Add 5 words or more describing the image in the “Description” section and select the category for it in the “Category 1” section. Choose the license from the “Commercial” and “Editorial” options.
Step 4. Submit for Review and Wait for Feedback
When you have added the required information, hit the “Submit” button to submit your image for review. As a Shutterstock contributor, you will have to wait while the Shutterstock review team reviews your submissions for errors and missing information.
Step 5. Track Earnings and Manage Your Portfolio
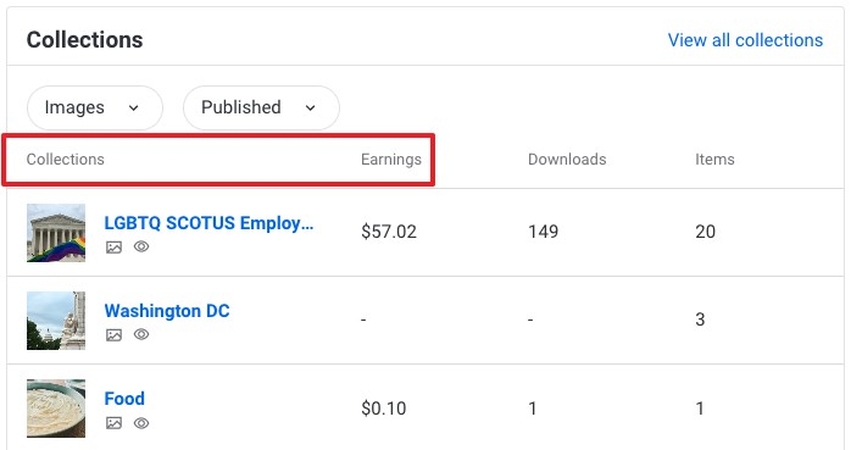
Once your images have been approved, track the downloads and earnings in the “Latest Downloads”, “Earnings,” and “Collections” tabs. You can also manage your Shutterstock portfolio with the provided tools by analyzing content and customer needs.
Part 4. Boost Your Shutterstock Sales with HitPaw FotorPea Photo Enhancer
When your Shutterstock photo is approved, you may not see many downloads for your content. Although it meets all the guidelines, it may be lacking the commercial touch to attract users. In such a case, a manual edit might not be enough, and you could use a professional-grade tool like HitPaw FotorPea for the professional touch. This tool allows you to enhance photos by upscaling the resolution and reducing noise in them.
Key Features
1. Removes noise and compression artifacts to restore clarity, especially in low-light images.
2. Fixes lens blur and motion blur, helping sharpen images taken in shaky environments.
3. Upgrades image resolution without detail loss to make images crisp for Shutterstock.
4. Lets you select custom output sizes to meet the platform’s requirements.
5. Includes a prompt option to guide the enhancement goals regarding color, clarity, and other parameters.
Guide to Enhancing Photos for Shutterstock Using HitPaw FotorPea
When you have decided to use this tool for enhancing “Shutterstock uploaded images,” follow this simple guide:
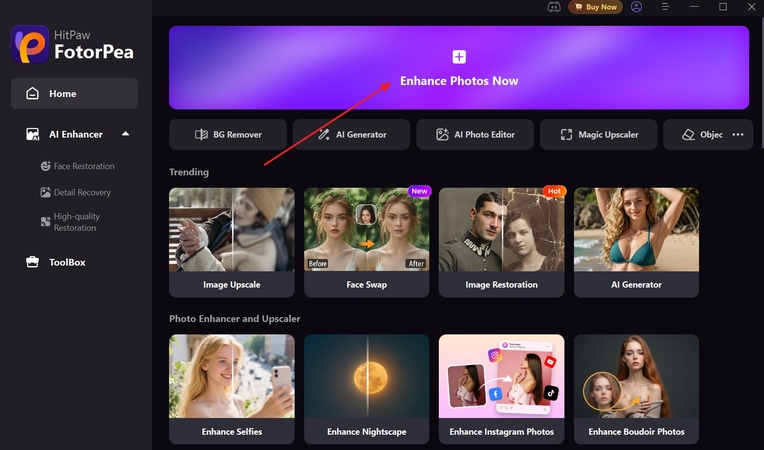
Step 1. Access the Tool and Add Shutterstock ImageOn the tool homepage, click on the “Enhance Photos Now” button to add the image to the tool library.
Step 2. Toggle the Required Model and Hit Preview
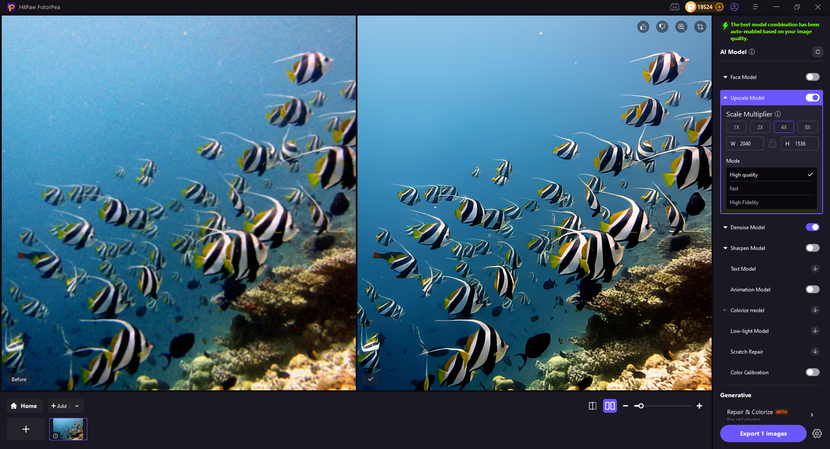
FotorPea will automatically enable the “Upscale Model” to enhance the quality of your Shutterstock picture. You can further apply other AI models before clicking on the “Preview” button to start the process.

Step 3. Save the AI-Enhanced Image to Your Device
After this, press the “Export” button to save it to your device in the desired quality.
Part 5. FAQs on How to Earn Money on Shutterstock
Q1. How do I sell photos on Shutterstock?
A1. Whether you are a beginner or a professional, anyone can sell on Shutterstock. Users simply log in and create a contributor’s account to upload their images for sale.
Q2. How much can I earn per photo?
A2. Shutterstock contributors typically earn between $0.10 $2 if you have a standard account. If you have an extended license that gets you paid around $50 to $100.
Q3. Where is the Shutterstock contributor login?
A3. To log in to Shutterstock as a contributor, go to its official Shutterstock Contributor website. At this interface, you can upload your taken images and can easily earn money by selling them.
Q4. Can I sell pictures taken on my phone?
A4. Yes, you can easily sell your pictures by uploading photographs taken from your phone. However, ensure that the images you upload have high quality and transparent pixels.
Conclusion
To sum up, selling photos on Shutterstock is a rewarding way to turn your passion into passive income. In this article, we provide a detailed, step-by-step guide on how to sell photos on Shutterstock. To enhance your chances of approval and boost downloads, we recommend using HitPaw FotorPea, which upgrades and refines the pictures.


 HitPaw VoicePea
  HitPaw VikPea (Video Enhancer)
 HitPaw Univd (Video Converter)


Share this article:
Select the product rating:
Daniel Walker
Editor-in-Chief
This post was written by Editor Daniel Walker whose passion lies in bridging the gap between cutting-edge technology and everyday creativity. The content he created inspires the audience to embrace digital tools confidently.
View all ArticlesLeave a Comment
Create your review for HitPaw articles